NestJS 프로젝트를 진행하면서 FCM에서 삽질을 참 많이 했는데,
FCM 토큰을 가져오는 부분에서 계속 막힌 상태였다.
근데 알고보니 Node 환경에서는 FCM 토큰을 가져올 수 없던 것..
브라우저 환경에서 접근해야 FCM 토큰을 가져올 수 있었다.
그래서 팀원들이 진행중인 React코드에 필요한 코드를 추가해서
클라이언트의 FCM 토큰을 발급받고 콘솔로 확인하는 작업을 진행했다.
그 과정을 작성하려 한다.
firebase.js
토큰을 가져오는 코드이다. 그러기위해선 firebaseConfig 내용과 vapidKey가 필요하다.
추가로 메세지를 받아 콘솔로 출력하는 코드도 작성해주었다.
src 폴더 안에 생성하고 작성해주자.
import {initializeApp} from 'firebase/app'
import { getMessaging, getToken, onMessage } from "firebase/messaging";
import 'firebase/messaging';

const firebaseConfig = {
  	// 각 내용 기입
    apiKey: "apiKey",
    authDomain: "authDomain",
    projectId: "projectId",
    storageBucket: "storageBucket",
    messagingSenderId: "messagingSenderId",
    appId: "appId"
  };

initializeApp(firebaseConfig);

const messaging = getMessaging();

export const requestForToken = () => {
  return getToken(messaging, {vapidKey: 'vapidKey'}) // vapidKey 기입
  .then((currentToken) => {
    if (currentToken) {
      console.log(currentToken);
    } else {
      // Show permission request UI
      console.log('No registration token available. Request permission to generate one.');
      // ...
    }
  })
  .catch(err => {
    console.log('Error', err);
  })
}

export const onMessageListener = () => {
  return new Promise((resolve) => {
    onMessage(messaging, (payload) => {
      console.log('OnMessage Payload', payload);

      resolve(payload);
    })
  })
}
Notification.js
이 부분에 대한 설명을 완전히 할 순 없기에 설명은 생략하려 한다.
firebase.js에 접근해서 
토큰을 가져오는 함수를 불러주고, 알림 메세지를 받았을 때 React에서 실제로 동작해주는 역할로 보인다.
components 폴더 안에 생성하고 작성해주자.
import React, { useEffect, useState } from 'react';
import toast, {Toaster} from 'react-hot-toast'
import { requestForToken, onMessageListener } from '../firebase';

const Notification = () => {
    const {notification, setNotification} = useState({title: '', body: ''});

    const notify = () => toast(<ToastDisplay />);

    const ToastDisplay = () => {
        return (
            <div>
                <p><b>{notification?.title}</b></p>
                <p>{notification?.body}</p>;
            </div>
        )
    }

    useEffect(() => {
        if(notification?.title) {
            notify();
        }
    })

    requestForToken();

    onMessageListener()
    .then((payload) => {
        setNotification({ title: payload?.notification.title, body: payload?.notification.body,})
    })
    .catch(err => console.log('onMessageListener- Notification', err));

    return <Toaster/>
}

export default Notification;
firebase-messaging-sw.js
메세징 서비스 워커이다.
firebase 공식 문서에도 나와있는데, 작성해주어야 한다.
경로는 root경로에 만들어주면 되는데, react로 했을 때 public 폴더 안에 작성해주면 된다.
// Scripts for firebase and firebase messaging
// eslint-disable-next-line no-undef
importScripts("https://www.gstatic.com/firebasejs/10.11.0/firebase-app-compat.js");
// eslint-disable-next-line no-undef
importScripts("https://www.gstatic.com/firebasejs/10.11.0/firebase-messaging-compat.js");

const firebaseConfig = {
    apiKey: "AIzaSyAg6CyHRHm96FQo6b60omi56Zzi6izwxlw",
    authDomain: "youpt-605fa.firebaseapp.com",
    projectId: "youpt-605fa",
    storageBucket: "youpt-605fa.appspot.com",
    messagingSenderId: "337137767170",
    appId: "1:337137767170:web:6b3ad8d202786951a1a81b"
};
if (!firebase.apps.length) {
    firebase.initializeApp(firebaseConfig);
}
const messaging = firebase.messaging();

messaging.onBackgroundMessage(function (payload) {
    console.log("Received background message ", payload);

    const notificationTitle = payload.notification.title;
    const notificationOptions = {
        body: payload?.notification?.body,
    };

    // eslint-disable-next-line no-restricted-globals
    self.registration.showNotification(
        notificationTitle,
        notificationOptions,
    );
});
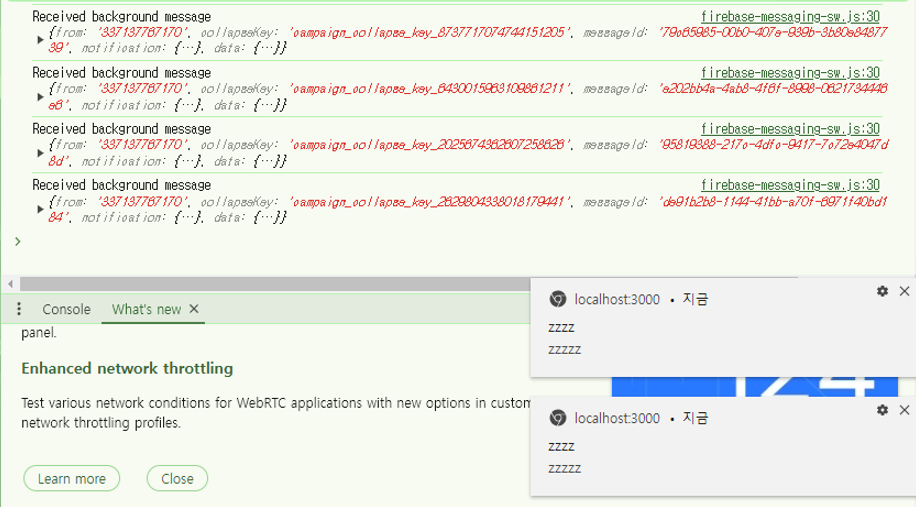
굉장히 오랜 삽질을 했는데 결국 프론트에서 토큰을 받아야 하는 것으로 해결하였다..
토큰을 받아 firebase console에서 테스트 메세지를 보내니 아래처럼 잘 작동했다.
이제 해야할 일은 프론트에서 발급받은 토큰을 백엔드로 보내주고,
받은 토큰과 알림을 주어야 하는 날짜와 시간은 DB에 저장한 뒤,
해당 날짜와 시간에 알림 메세지를 뿌려주는 작업을 해주면 된다.
엉엉...