Prologue
스프링부트에서 유효성 검사(사용자의 정보)를 하는 방법
validation이 쓰이는 부분에 대해서만 코드를 제공하고 하도록 할려고 한다.
build.gradle
valid와 not blank, null 등의 어노테이션을 사용하기 위해 validation 추가하기
dependencies {
	implementation 'org.springframework.boot:spring-boot-starter-validation'
}
UserController
execSignup 함수에 매개변수 UserDto 앞에 @Valid를 추가한다.
import com.example.exproject.Dto.UserDto;
import com.example.exproject.Service.UserService;
import jakarta.validation.Valid;
import lombok.AllArgsConstructor;
import lombok.extern.slf4j.Slf4j;
import org.springframework.stereotype.Controller;
import org.springframework.ui.Model;
import org.springframework.validation.Errors;
import org.springframework.web.bind.annotation.GetMapping;
import org.springframework.web.bind.annotation.PostMapping;
import java.util.HashMap;
import java.util.Map;

  @PostMapping("/signup")
    public String execSignup(@Valid UserDto userDto, Errors errors, Model model) {
        Map<String, String> response = new HashMap<>();
        if (errors.hasErrors()) {
            // 회원가입 실패시, 입력 데이터를 유지
            model.addAttribute("userDto", userDto);

            // 유효성 통과 못한 필드와 메시지를 핸들링
            Map<String, String> validatorResult = userService.validateHandling(errors);
            for (String key : validatorResult.keySet())
            {
                model.addAttribute(key, validatorResult.get(key));
            }
            return "/SignUp/SignUp"; // 회원가입 페이지 유지
        }

        userService.create(userDto);
        return "redirect:/login"; //로그인 페이지 이동
    }
UserDto
Not Blank 어노테이션을 사용하여 메시지 창을 띄우게 한다.
Not Blank는 null과 공백 값을 방지하는 역할을 한다.
import jakarta.validation.constraints.NotBlank;
import jakarta.validation.constraints.Pattern;

public class UserDto {
    @NotBlank(message = "아이디를 입력해주세요.")
    private String id;

    @NotBlank(message = "비밀번호를 입력해주세요.")
    @Pattern(regexp = "(?=.*[0-9])(?=.*[a-zA-Z])(?=.*\\W)(?=\\S+$).{8,16}", message = "비밀번호는 8~16자 영문 대 소문자, 숫자, 특수문자를 사용하세요.")
    private String pw;

    @NotBlank(message = "닉네임을 입력해주세요.")
    private String nickname;

}
UserService
import com.example.exproject.Dto.UserDto;
import com.example.exproject.Entity.UserEntity;
import com.example.exproject.Repository.UserRepository;
import jakarta.transaction.Transactional;
import org.springframework.validation.Errors;
import org.springframework.validation.FieldError;

import java.util.HashMap;
import java.util.Map;
import java.util.Optional;

@Service
@Slf4j
public class UserService {
    private UserRepository userRepository;
    public UserService(UserRepository userRepository) {
        this.userRepository = userRepository;
    }

    // 유효성 검사 valid ( id, pw, nickname )
    @Transactional
    public Map<String, String> validateHandling(Errors errors) {
        Map<String, String> validatorResult = new HashMap<>();

        for (FieldError error : errors.getFieldErrors()) {
            String validKeyName = String.format("valid_%s", error.getField());
            validatorResult.put(validKeyName, error.getDefaultMessage());
        }

        return validatorResult;
    }
모든 준비는 끝났다. 이제 뷰 페이지에 보여줄 검증 메시지를 띄우기 위해 musthace 파일을 수정을 하면 된다 !
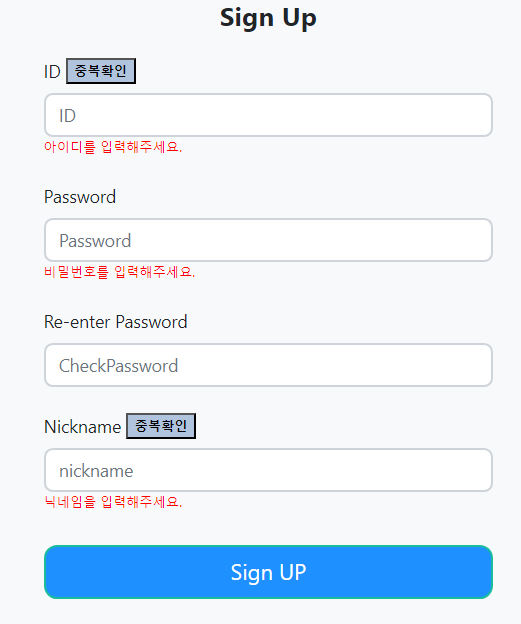
SignUp.mustahce
<body>
<section class="bg-light">
    <div class="container py-4">
        <div class="row align-items-center justify-content-between">
            <a class="navbar-brand hi text-center" href="/signup">
                <span class="text-dark h4"> Sign Up  </span>
            </a>
        </div>
<form id="signupForm" action="/signup" method="post">
        <div>
            <!-- 아이디 입력 -->
            <div class="form-group">
                <label for="exampleInputEmail1" class="form-label mt-4"> ID </label>
                <div>
                <input type="text" id="id" name="id" value="{{#userDto}}{{userDto.id}}{{/userDto}}" oninput="hideidMessage()" class="form-control" placeholder="ID"/>

                    <button  type="button" id="checkidButton" style="  background :  lightsteelblue; float:right; left:-325px; position: relative; top:-72px;
                        width:64px; height:24px; font-size: 12px; font-weight: bolder">
                        중복확인
                    </button>
                </div>
                    {{#valid_id}} <span id="valid_id" style="font-size: 12px; color:red;">{{valid_id}}</span> {{/valid_id}}
                <div><span id="checkId"></span></div>


            </div>

            <div class="form-group has-success">
                <!-- 비밀번호 입력 -->
                <label class="form-label mt-4" for="inputValid"> Password </label>
                <input type="password" id="pw" name="pw" value="{{#userDto}}{{userDto.pw}}{{/userDto}}" oninput="hidepwMessage()" class="form-control" placeholder="Password"/>
                {{#valid_pw}} <span id="valid_pw" style="font-size: 12px; color:red; ">{{valid_pw}}</span> {{/valid_pw}}


                <div class="valid-feedback"></div>
            </div>
        </div>
        <div class="form-group has-danger">

            <!-- 비밀번호 재확인 입력 -->
            <label class="form-label mt-4" for="inputInvalid"> Re-enter Password </label>
            <input type="password" class="form-control invalid" id="newRe-enterPW" placeholder="CheckPassword">
            <div><span id="checkPw"></span></div>
        </div>
    <div class="form-group-nickname">
        <div>
        <label class="form-label mt-4" for="newNickName">Nickname</label>

        <button  type="button" id="checknicknameButton" style="  background : lightsteelblue; float:right; left:-270px; position: relative; top:24px;
            width:64px; height:24px; font-size: 12px; font-weight: bolder ">
            중복확인
        </button>
        </div>
        <div class="input-group">
            <input type="nickname" name="nickname" id="nickname" value="{{#userDto}}{{userDto.nickname}}{{/userDto}}" oninput="hidenicknameMessage()" class="form-control" placeholder="nickname" />
        </div>
        {{#valid_nickname}} <span id="valid_nickname" style="font-size: 12px; color:red;">{{valid_nickname}}</span> {{/valid_nickname}}
        <div><span id="checknickname"></span></div>
        <!-- 닉네임 중복확인 버튼 -->
    </div>

    <div class="d-grid gap-2">
            <!-- 회원 가입 버튼 -->
            <button class="btn btn-primary btn-lg" type="submit" id="signUpButton" style="background: dodgerblue"> Sign UP</button>
        </div>
    </div>
    </form>
</section>

</body>
동적인 템플릿을 생성하는 플레이스 홀더 {{ }} 를 사용하여 valid의 값을 가져와서 검증 메시지를 띄우게 할 수 있다. 추가로 요구 사항에 따라 js 혹은 jsp를 이용하여 수정할 수 있다.
결과
버튼 클릭 전

버튼 클릭 후

노력하는 개미