Android의 TextInputLayout은 EditText와 함께 사용해 텍스트 입력을 위한 UI 요소를 제공하는 View이다.
힌트 텍스트, 오류 메시지 등의 기능을 포함하므로 사용자 친화적으로 개발할 수 있다.
TextInputLayout을 사용하지 않고 EditText만을 단독으로 사용할 수도 있지만, 다음과 같은 몇 가지 차이점이 존재해 TextInputLayout을 사용하는 것이 좀 더 나은 사용자 경험을 제공한다.
1. 레이블 및 힌트 표시: TextInputLayout은 EditText 위에 레이블 또는 힌트 텍스트를 표시할 수 있다.
반면에 EditText를 단독으로 사용할 때에는 별도로 힌트를 표시해야 하며, 힌트 텍스트가 입력된 내용과 겹치는 등 가독성 문제가 발생할 수 있다.2. 입력 유효성 검사: TextInputLayout은 입력 내용의 유효성을 검사하고 오류 메시지를 표시하는 기능을 제공한다.
사용자가 올바른 형식으로 입력하지 않을 경우, setError() 메서드를 통해 오류 메시지를 표시하여 사용자에게 알릴 수 있다.
단독으로 사용되는 EditText에서는 이러한 기능을 직접 구현해야 한다.3. 도움말 텍스트: TextInputLayout은 setHelperText() 메서드를 사용하여 입력 내용에 대한 도움말을 제공할 수 있다.
이를 통해 입력하는 내용에 대한 추가 정보를 제공할 수 있습니다.4. 스타일링: TextInputLayout은 EditText와 함께 사용되는 데, 둘 다 Material Design 스타일을 따르도록 디자인되다.
따라서 TextInputLayout과 EditText를 함께 사용하면 일관된 UI 디자인을 유지할 수 있습니다.5. 접근성: TextInputLayout은 접근성을 높일 수 있는 추가 기능을 제공할 수 있다.
예를 들어, 레이블이 확대/축소될 때 사용자에게 더 나은 경험을 제공할 수 있다.6. 강제 지정: 일부 경우에는 앱의 디자인 요구 사항에 따라 TextInputLayout을 사용하도록 강제할 수 있습니다.
TextInputLayout을 포함한 xml 코드
<?xml version="1.0" encoding="utf-8"?>
<LinearLayout xmlns:android="http://schemas.android.com/apk/res/android"
xmlns:app="http://schemas.android.com/apk/res-auto"
xmlns:tools="http://schemas.android.com/tools"
android:layout_width="match_parent"
android:layout_height="match_parent"
android:orientation="vertical"
tools:context=".MainActivity" >
<com.google.android.material.textfield.TextInputLayout
android:id="@+id/textInputLayout"
android:layout_width="match_parent"
android:layout_height="wrap_content"
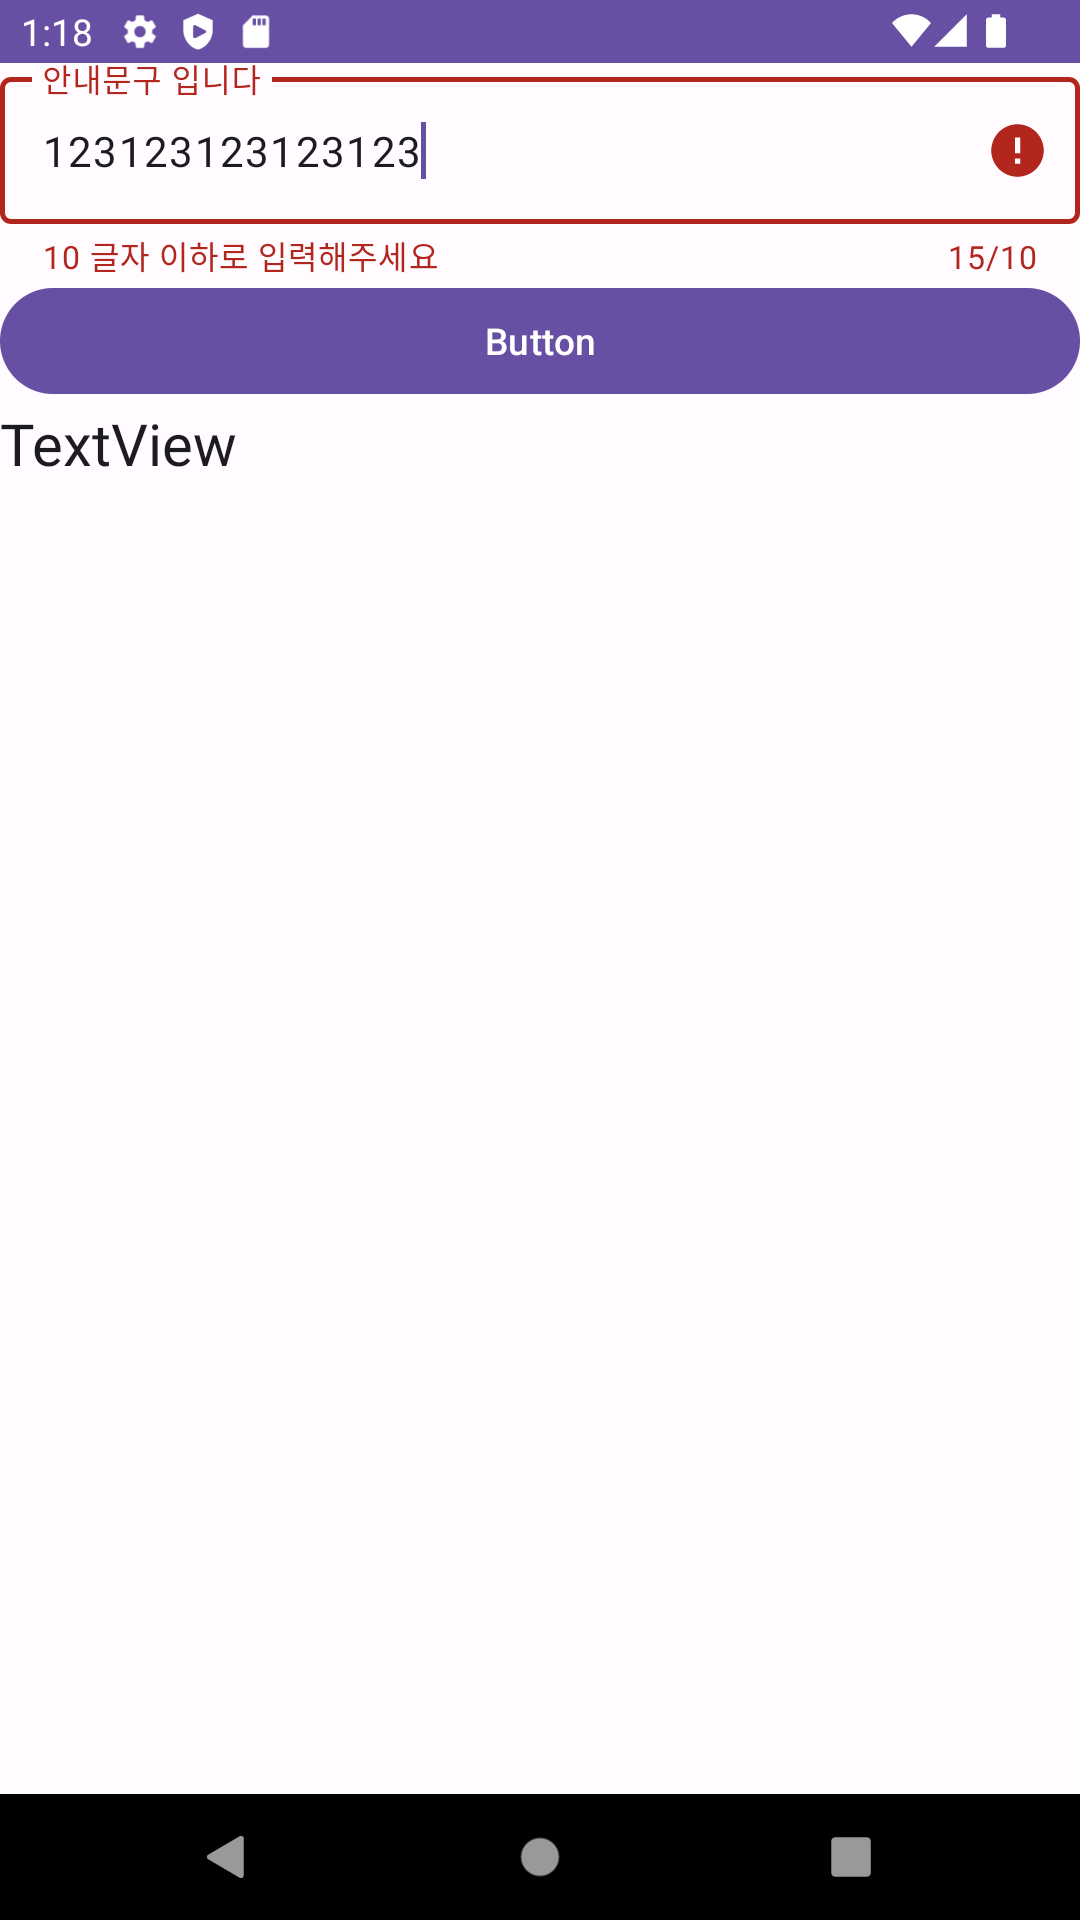
android:hint="안내문구 입니다"
app:counterEnabled="true"
app:counterMaxLength="10">
<com.google.android.material.textfield.TextInputEditText
android:id="@+id/textInputEditText"
android:layout_width="match_parent"
android:layout_height="wrap_content" />
</com.google.android.material.textfield.TextInputLayout>
<Button
android:id="@+id/button"
android:layout_width="match_parent"
android:layout_height="wrap_content"
android:text="Button" />
<TextView
android:id="@+id/textView"
android:layout_width="match_parent"
android:layout_height="wrap_content"
android:text="TextView"
android:textAppearance="@style/TextAppearance.AppCompat.Large" />
</LinearLayout>MainActivity 코드
class MainActivity : AppCompatActivity() {

    lateinit var activityMainBinding: ActivityMainBinding

    override fun onCreate(savedInstanceState: Bundle?) {
        super.onCreate(savedInstanceState)

        activityMainBinding = ActivityMainBinding.inflate(layoutInflater)
        setContentView(activityMainBinding.root)

        activityMainBinding.run{

            textInputLayout.run{
                editText?.run{
                    addTextChangedListener {
                        if(it!!.length > 10){
                            // error = "10 글자 이하로 입력해주세요"
                            textInputLayout.error = "10 글자 이하로 입력해주세요"
                        } else {
                            // error = null
                            textInputLayout.error = null
                        }
                    }
                }
            }

            button.run{
                setOnClickListener {
                    // 입력한 내용을 가져온다.
                    // val str1 = textInputEditText.text.toString()
                    // textView.text = str1

                    // TextInputLayout으로 부터 EditText를 추출하낟.
                    if(textInputLayout.editText != null) {
                        val str1 = textInputLayout.editText!!.text.toString()
                        textView.text = str1
                    }
                }
            }
        }
    }
}
실행 화면