
2 장은 스프링 context 와 bean 을 소개하며 이들이 왜 중요한지, 그리고 어떻게 사용할 수 있는지 설명한다.
스프링 Context 와 Bean
개발자가 코드로 집적 개체를 생성, 통제하는 행위는 종종 버그를 일으킬 수 있다.
또한 이는 boilerplate 코드가 많아지고, 개발 비용이 높아지는 상황까지 이를 수 있다.
스프링은 이를 제어의 역전 (IoC, Inversion of Control) 을 통해 해결한다. 프레임웍이 개체를 통제함으로서 개발자의 의무를 줄이고, 많은 boilerplate 코드를 줄일 수 있다.
하지만 스프링이 주도권을 갖기 위해선 필수적인 요소가 존재하는데, 바로 Context 와 Bean 이다.
스프링 context 를 쉽게 말해 구동되는 앱 메모리에 존재한 어느 공간으로, 스프링이 관리할 개체들이 존재하는 공간이다.
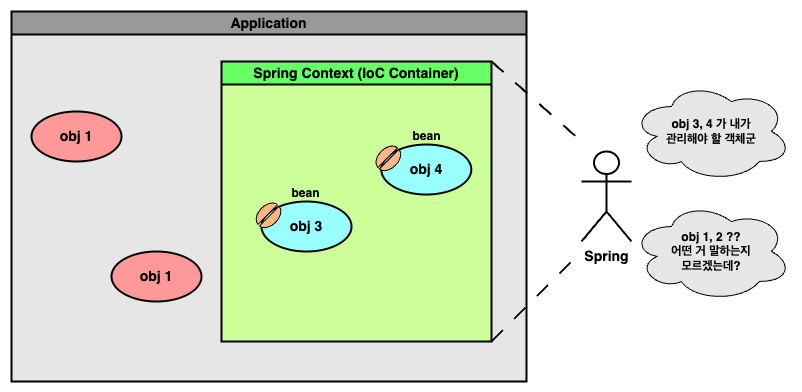
스프링에는 다양한 context 들이 존재한다. 하지만 스프링 context 라 하면 대개 Application Context 를 뜻하고, 이는 IoC Container 라 불리기도
한다.
기본적으로 스프링은 우리 앱에 존재하는 개체들을 인식할 수 없다. 하지만 인식할 수 있도록 context 에 넣어주고, 그 개체들의 제어를 스프링에게 위윔하는 것이다.
또한 이 때 스프링 context 에 등록된 개체를 bean 이라 부른다.
Context 에 Bean 을 등록하는 2 가지 방법
결국 스프링은 context 에 등록된 개체를 사용하며 프레임웍의 다양한 기능들을 제공한다.
하지만 이는 context 에 개체를 등록시켜야만 가능하다.
context 에 bean 을 등록하는 방법은 크게 2 가지 방법이 있는데, @Bean 어노테이션을 이용하는 방법과, 스테레오타입 (Stereotype) 어노테이션을 이용하는 방법이다.
I. @Bean 어노테이션 이용하기
@Bean 어노테이션을 이용하기 위해선 @Configuration 이 붙은 '스프링 설정 클래스' 가 필요하다.
import org.springframework.context.annotation.Configuration;

/*
Indicates that a class declares one or more @Bean methods
and may be processed by the Spring container to generate bean definitions
and service requests for those beans at runtime,
*/
@Configuration
public class Config {
}
@Configuration 은 org.springframework.context.annotation 패키지에 존재하며, 주석의 말대로 @Bean 이 붙은 메서드를 구현하여 context 에 등록할 bean 정의 (bean definition) 를 생성할 수 있다.
import org.springframework.context.annotation.Bean;
@Configuration
public class Config {
/*
Indicates that a method produces a bean to be managed
by the Spring container.
*/
@Bean
Parrot parrot() {
Parrot p = new Parrot();
p.setName("I am a Parrot!!!");
return p;
}
@Bean
String str() {
return "I am Str!!!";
}
@Bean(name = "12345")
Integer integer() {
return 12345;
}
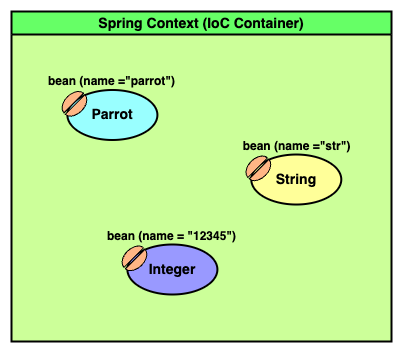
}위 설정 클래스를 보면 Parrot, String, Integer 타입의 bean 을 선언한 것을 볼 수 있다.
따라서 결국 context 에 위 3 bean 들이 등록되는데, 이 때 bean 들의 이름은 명시적으로 설정하지 않는 이상 메서드의 이름이 붙는다.
잠시 @Bean 어노테이션을 더 자세히 들여다보면, 아래처럼 name, value 가 동일한 값임을 알 수 있다.
import org.springframework.core.annotation.AliasFor;

@Target({ElementType.METHOD, ElementType.ANNOTATION_TYPE})
@Retention(RetentionPolicy.RUNTIME)
@Documented
public @interface Bean {

	@AliasFor("name")
	String[] value() default {};

	@AliasFor("value")
	String[] name() default {};

	boolean autowireCandidate() default true;

	String initMethod() default "";

	String destroyMethod() default AbstractBeanDefinition.INFER_METHOD;

}
또한 이들 모두 String[] 로, 하나의 bean 이 여러개의 이름을 가질 수 있다.
결국 우리는 스프링 설정 클래스 Config 에 어떤 개체가 bean 이 되어야 하는지 명시하였다. 이제 이 Config 클래스를 이용해 context 에 bean 을 적재할 수 있다.
var context
        /*
        Create a new AnnotationConfigApplicationContext,
        deriving bean definitions from the given component classes
        and automatically refreshing the context.
         */
        = new AnnotationConfigApplicationContext(Config.class);

/*
Return the bean instance that uniquely matches the given object type, if any.
*/
Parrot p = context.getBean(Parrot.class);
String str = (String) context.getBean("str");
Integer i = context.getBean("12345", Integer.class);

for (Object bean : Arrays.asList(p, str, i))
        System.out.println(bean.getClass().getSimpleName() + "\t: " + bean);
Parrot : I am Parrot!!!
String : I am Str!!!
Integer : 12345위 예시처럼 등록된 bean 의 타입 (Parrot.class, Integer.class), bean 의 이름 ("str"), 혹은 이들 모두를 이용 ("12345", Integer.class) 해 context 에서 bean 을 제공받을 수 있다.
하지만 만약 context 에 찾는 bean 이 없거나 찾은 bean 이 여러개라면 에러가 발생한다.
@Configuration
public class Config {
    @Bean
    Parrot parrot1()    {
        Parrot p = new Parrot();
        p.setName("I am First Parrot!!!");
        return p;
    }

    @Bean
    Parrot parrot2()    {
        Parrot p = new Parrot();
        p.setName("I am Second Parrot!!!");
        return p;
    }
}
Parrot p = context.getBean(Parrot.class);
// org.springframework.beans.factory.NoUniqueBeanDefinitionException
// No qualifying bean of type 'practice.using_beans.Parrot' available:
// expected single matching bean but found 2: parrot1,parrot2
String str = context.getBean(String.class);
// org.springframework.beans.factory.NoSuchBeanDefinitionException
// No qualifying bean of type 'java.lang.String' available
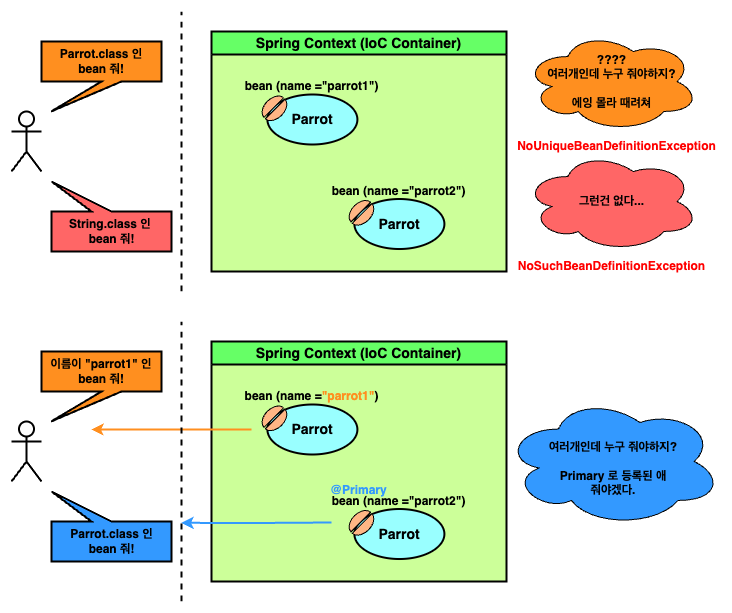
이러한 상황은 bean 이름 혹은 @Qualifer 어노테이션을 사용해, 어느 bean 인지 명확하게 지칭해 해결할 수 있다.
혹은 @Primary 어노테이션으로 애매한 bean 중 어느것을 우선시할지 지칭해 해결할 수도 있다.
II. 스테레오타입 어노테이션 이용하기
위처럼 @Configuration 이 붙은 Config 클래스에 직접 @Bean 으로 개체를 지정할 수 있지만, 스프링에 존재하는 스테레오타입 (stereotype) 어노테이션을 이용해 지칭할 수도 있다.
스테레오를 직역하면 "일방향적인", "단방향의" 란 뜻이다.
이러한 수식어가 붙은 이유는 @Bean 처럼 메서드를 선언해 개체를 지정시키지 않고, 지정시키고 싶은 개체 선언에 단지 어노테이션을 붙여 "개체 자신은 모르게, 일방적으" bean 으로 등록되기 때문이다.
스프링에는 다양한 스테레오타입 어노테이션이 존재한다. 그 중 가장 대표적인 어노테이션은 @Component 이며 org.springframework.stereotype 패키지에 존재한다.
스테레오타입 어노테이션은 앞서 말했듯, bean 으로 등록하고자 하는 개체의 선언부에 사용한다.
import org.springframework.stereotype.Component;

@Component
public class Parrot {
    private String name;

    public String getName() {
        return name;
    }

    public void setName(String name) {
        this.name = name;
    }

    @Override
    public String toString() {
        return name;
    }
}
이후 @Component 들을 스캔하는 스프링 설정 클래스를 선언한다.
@Configuration
@ComponentScan(basePackages = "practice.using_stereotype")
public class Config {
    @Bean
    String hello()    {
        return "Hello World";
    }
}
앞서 @Bean 을 사용하는 방법과 동일하게 @Configuration 이 붙지만, 추가로 @ComponentScan 으로 @Component 들을 스캔할 방식을 지정한다.
물론 이 때 @Bean 방법을 같이 적용할 수 있다.
스프링 설정 클래스를 완성하였으므로, 이전 @Bean 에서처럼 동일하게 Config 클래스로 context 에 bean 을 적재시킬 수 있다.
var context
        = new AnnotationConfigApplicationContext(Config.class);

Parrot p = context.getBean(Parrot.class);
String hello = context.getBean(String.class);

System.out.println(p.getClass().getSimpleName() + " : " + p);
System.out.println(hello);
Parrot : null
Hello World위 출력을 보면 Parrot 의 name 이 null 로 표기되는데, (아주 당연하지만) name 이 초기돠되지 않았기 때문이다.
앞서 @Bean 방식은 등록될 bean 의 속성을 유연하게 조절 가능하였다. 하지만 @Component 자체는 그럴 수 없다.
다만 이를 보완하기 위한 기능이 존재하는데, 바로 @PostConstruct 어노테이션이다.
스프링은 @Component 방식에 유연성을 더하기 위해 Java EE 의 @PostConstruct 를 가져왔다. 이를 통해 bean 적재 직후의 행동을 지시할 수 있다.
@Component
public class Parrot {
    private String name;

    public String getName() {
        return name;
    }

    public void setName(String name) {
        this.name = name;
    }

    @Override
    public String toString() {
        return name;
    }

    @PostConstruct
    public void init() {
        System.out.println("post constructing parrot...");
        name = "I am post-constructed Parrot!!!";
    }
}
var context
= new AnnotationConfigApplicationContext(Config.class);
Parrot p = context.getBean(Parrot.class);
System.out.println(p.getClass().getSimpleName() + " : " + p);post constructing parrot...
Parrot : I am post-constructed Parrot!!!
@PostConstruct를 사용하기 위해선javax.annotation-api라이브러리가 필요하다.
이처럼 context 가 초기화 되고 bean 이 적재된 직후, Parrot 의 init() 메서드가 실행된 것을 볼 수 있다.
@Bean vs @Component
앞서 context 에 bean 을 등록하는 두가지 방식을 보았다.
언뜻 보면 @Component 방식이 짧고 간결해 더 우위에 선 것처럼 보인다.
하지만 사실 두 방식 모두 없어지면 안될 만큼 필요하다. 우리가 직접 만든 개체는 @Component 를 사용할 수 있지만 외부 라이브러리 개체는 그럴 수 없기 때문이다.
@Configuration
@ComponentScan(basePackages = "practice.using_stereotype")
public class Config {
    @Bean
    List<?> list()  {
        return new ArrayList<>();
    }
}
우리가 구현한 개체는 쉽게 @Component 를 붙여 사용할 수 있다. 하지만 List<?> 의 경우 쉽지 않다.
만약 List<?> 에 @Component 를 사용하자 한다면, java.util.List 를 수정해 직접 @Component 를 붙여야 한다.
이는 오히려 @Component 방식이 복잡해지고 난해한 결과를 이끈다. 그리고 무엇보다 아주 위험하다!
때문에 외부 라이브러리 개체를 bean 으로 선정할 때는 @Bean 방식을, 직접 구현한 개체는 @Component 방식을 주로 이용한다.
Summary
- 스프링 context 란 프레임웍이 관리하고자 하는 개가 존재하는 어느 공간이다.
- 스프링 context 에 적재되, 프레임웍의 관리 하에 존재하는 개체를 Bean 이라 부른다.
- 스프링 context 에 bean 을 등록하는 방법은 크게 다음과 같다.
@Bean어노테이션을 사용하는 방법@Component와 같은 스테레오타입 (stereotype) 어노테이션을 사용하는 방법
@Bean방식은 스테레오타입 보다 유연하게 bean 속성을 조절할 수 있다.- 스테레오타입 방식은
@Bean보다 좀 더 간편하다. - 두 방식 모두 장단점이 존재한다. 때문에 직접 구현한 개체는 주로 스테레오타입 방식, 외부 라이브러리 개체는
@Bean방식을 주로 이용한다.
> Github 에서 보기