
이번 챕터에서는 bean 간의 관계를 설정하는 법에 대해 알아본다.
저번 챕터에서 우리는 context 에 bean 을 등록시키고, getBean() 메서드를 이용해 이를 제공받았다. 그런데 Java 같은 객체지향적 언어에서 종종 개체간 종속적인 관계가 필요할 때가 있다.
class A {}

class B {       // B has instance of an A
    A instance;
}
위 같은 상황에서 오직 getBean 메서드만 이용한다면 다음처럼 이용해야 한다.
A a = context.getBean(A.class);
B b = context.getBean(B.class);

b.setInstance(a);
하지만 위 방식은 우리가 직접 b 에 a 를 주입하는 것이기에, 버그가 많이 발생할 수 있고, 유지보수가 낮은 boilerplate 코드를 생성할 수 있다.
그럼 이를 어떻게 해결할 수 있을까? 애초에 위 과정을 프레임웍이 대신 해주면 안되나?
스프링은 "bean 연결짓기" (Wiring beans) 를 통해 이를 해결한다.
우리가 bean 간의 관계를 명시하고 이를 context 에 적재하면, 스프링은 그 의존관계를 파악해 자동으로 주입시키는 기능을 가지고 있다.
이를 통해 우리는 (다시한번) 스프링에게 제어권을 위임하고 더 안전한 코드를 생성할 수 있다.
@Bean 어노테이션으로 연결짓기
@Bean 어노테이션으로 연결짓는 방법은 크게 2 가지 방법이 존재한다.
@Bean이 붙은 메서드를 직접 호출하는 방식- 매개변수로 bean 을 제공하는 방식
I. @Bean 이 붙은 메서드를 직접 호출하는 방식
@Bean 어노테이션을 이용해 bean 을 선언하려면 스프링 설정 클래스가 필요하다.
@Configuration
public class UnWiredConfig {
  @Bean
  Parrot parrot() {
    Parrot parrot = new Parrot();
    parrot.setName("un-wired parrot");
    return parrot;
  }

  @Bean
  Person person() {
    Person person = new Person();
    person.setName("un-wired person");
    return person;
  }
}
var context
= new AnnotationConfigApplicationContext(
UnWiredConfig.class
);
Parrot parrot = context.getBean(Parrot.class);
Person person = context.getBean(Person.class);
System.out.println(parrot);
System.out.println(person);Parrot : un-wired parrot
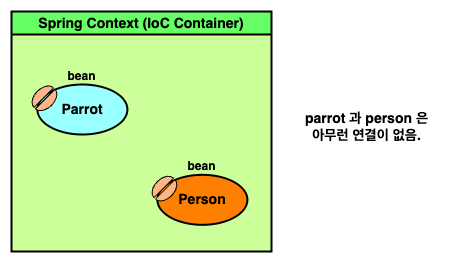
Person : un-wired person, null위 예시의 UnWiredConfig 의 parrot 과 person 은 아무런 연결점이 없다. 때문에 person 의 parrot 또한 null 로 출력되는 것을 볼 수 있다.
하지만 아래 예시처럼 사용해 이 둘의 의존성을 만들 수 있다.
@Configuration
public class WiredConfig {
    @Bean
    Parrot parrot() {
        Parrot parrot = new Parrot();
        parrot.setName("wired parrot");
        return parrot;
    }

    @Bean
    Person person() {
        Person person = new Person();
        person.setName("wired person");

        // wire bean via direct method call
        person.setParrot(parrot());
        return person;
    }
}
var context
= new AnnotationConfigApplicationContext(
UnWiredConfig.class
);
Parrot parrot = context.getBean(Parrot.class);
Person person = context.getBean(Person.class);
System.out.println(parrot);
System.out.println(person);Parrot : wired parrot
Person : wired person, Parrot : wired parrot
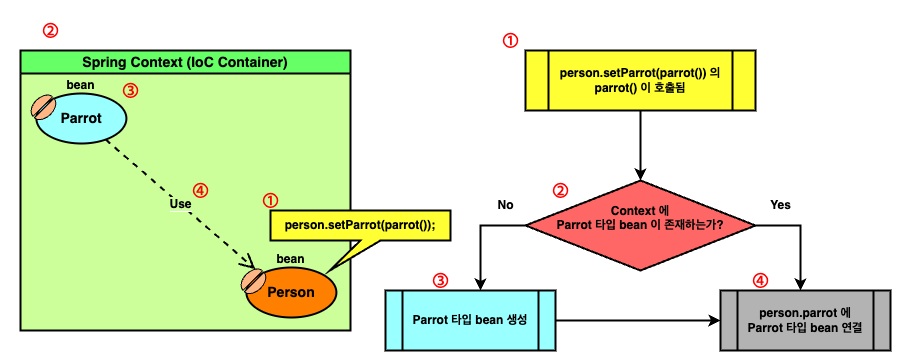
위 다이어그램은 일반적으로 스프링이 bean 을 연결시키는 과정을 서술한다.
이는 일반적으로 스프링이 bean 관계를 연결지을 때도 적용되는데, 정리하자면 아래와 같다.
- bean 간의 연결관계를 파악한다.
- 연결지을 bean 이 존재하는지 확인 한다.
- 연결지을 bean 이 존재하지 않으면 해당 bean 을 생성한다.
- 생성 혹은 존재하는 bean 을 연결짓는다.
이를 위 예시에 적용하면,
personbean 생성 시person.setParrot(parrot())의parrot()이 호출된다.- 스프링은 context 내
parrot()과 동일한 bean 이 있는지 탐색한다. - 존재하지 않는다면
parrot()에 해당하는 bean 을 생성한다. - 생성 혹은 context 에 존재하던 bean 을
person.setParrot(...)에 제공한다.
와 같이 정리할 수 있다.
II. 매개변수로 bean 을 제공하는 방식
매개변수로 bean 을 제공해 연결짓는 방식은 사실 따져보면 앞의 과정과 동일하다.
@Configuration
public class Config {
    @Bean
    Parrot parrot() {
        Parrot parrot = new Parrot();
        parrot.setName("Param Parrot");
        return parrot;
    }

    @Bean
    Person person(Parrot p) {
        Person person = new Person();
        person.setName("Param Person");
        person.setParrot(p);
        return person;
    }
}
var context
= new AnnotationConfigApplicationContext(
Config.class
);
Parrot parrot = context.getBean(Parrot.class);
Person person = context.getBean(Person.class);
System.out.println(parrot);
System.out.println(person);Parrot : Param Parrot
Person : Param Person, Parrot : Param Parrot매개변수로 제공되는 방식은 @Bean 이 붙은 person 메서드에 Parrot p 인자가 존재한다.
앞서 direct method call 방식과 동일하게, 위 person bean 이 생성될 때, 스프링은 context 에 Parrot 타입의 bean 이 존재하는지 확인한다.
이 때 만약 존재하지 않으면 생성해 메서드 인자로 제공한다.
때문에 사실 direct method call 방식과 method parameter 방식은 우리의 사용 방법이 다를 뿐, 스프링 입장에서는 모두 동등한 방식이다.
@Autowired 어노테이션으로 연결짓기
앞서 @Bean 어노테이션을 사용해 연결짓는 방식을 보았다.
하지만 bean 이 @Bean 으로 선언되지 않고 @Component 같은 스테레오타입 방식으로 선언되었을 수도 있다.
이러한 경우 @Autowired 어노테이션을 이용해 스테레오타입 방식의 bean 을 연결지을 수 있다.
해당 방식은 @Autowired 를 어디에 사용하는지에 따라 크게 3 가지 방식으로 나뉜다.
- 클래스 필드에 사용하는 방식
- 생성자에 사용하는 방식
- Setter 에 사용하는 방식
이들의 사용법은 정말 방식 이름 그대로 사용하면 된다.
이들 각각의 예시를 보이면 다음과 같다.
클래스 필드에 사용하는 방식
import org.springframework.beans.factory.annotation.Autowired;

@Component
public class Person {
    private String name = "field person";

    @Autowired // inject dependency on field
    private Parrot parrot;

    public String getName() {
        return name;
    }

    public void setName(String name) {
        this.name = name;
    }

    public Parrot getParrot() {
        return parrot;
    }

    public void setParrot(Parrot parrot) {
        this.parrot = parrot;
    }

    @Override
    public String toString() {
        return "Person : " + name + ", " + parrot;
    }
}
var context
= new AnnotationConfigApplicationContext(
Config.class
);
Parrot parrot = context.getBean(Parrot.class);
Person person = context.getBean(Person.class);
System.out.println(parrot);
System.out.println(person);Parrot : field parrot
Person : field person, Parrot : field parrotimport org.springframework.beans.factory.annotation.Autowired;
@Component
public class Person {
private String name = "const person";
// parrot can be final with constructor injection
private final Parrot parrot;
@Autowired // inject dependency on constructor
public Person(Parrot parrot) {
this.parrot = parrot;
}
public String getName() {
return name;
}
public void setName(String name) {
this.name = name;
}
public Parrot getParrot() {
return parrot;
}
@Override
public String toString() {
return "Person : " + name + ", " + parrot;
}
}var context
= new AnnotationConfigApplicationContext(
Config.class
);
Parrot parrot = context.getBean(Parrot.class);
Person person = context.getBean(Person.class);
System.out.println(parrot);
System.out.println(person);Parrot : const parrot
Person : const person, Parrot : const parrotimport org.springframework.beans.factory.annotation.Autowired;
@Component
public class Person {
private String name = "setter person";
private Parrot parrot;
public String getName() {
return name;
}
public void setName(String name) {
this.name = name;
}
public Parrot getParrot() {
return parrot;
}
@Autowired // inject dependency on setter
public void setParrot(Parrot parrot) {
this.parrot = parrot;
}
@Override
public String toString() {
return "Person : " + name + ", " + parrot;
}
}var context
= new AnnotationConfigApplicationContext(
Config.class
);
Parrot parrot = context.getBean(Parrot.class);
Person person = context.getBean(Person.class);
System.out.println(parrot);
System.out.println(person);Parrot : setter parrot
Person : setter person, Parrot : setter parrot교재는 이 중 생성자에 사용하는 방식을 권장한다. 생성자에 @Autowired 를 이용하면 주입되는 bean 을 final 로 설정할 수 있기 때문이다.
@Component
public class Person {
    // parrot can be final with constructor injection
    private final Parrot parrot;

    @Autowired  // inject dependency on constructor
    public Person(Parrot parrot) {
        this.parrot = parrot;
    }

    /* ... */
}그런데 스프링이 bean 을 연결시키는 과정이 살짝 의아할 수 있다.
스프링이 bean 간 관계를 연결시켜주는 건 알겠는데, 이것이 스프링에 어떻게 구현되었으며, 어떻게 가능하냐는 것이다.
사실 이는 스프링의 강력한 기능 중 하나인 "관점" (Aspect) 을 이용한 것으로, 스프링은 자신이 관리하는 개체의 메서드 호출에 관여할 수 있기 때문에 가능하다.
더 자세히 말하자면 우리가 스프링에게 제공받는 개체는 정확히 해당 개채가 아니라 아주 비슷한 모방품 (Proxy) 이며, 이로 인해 메서드 호출에 관여할 수 있다.
// a real entity we implemented
class RealEntity    {
    void methodA()  {}
}

// spring gives ProxyEntity instead of RealEntity
class ProxyEntity   {
    RealEntity entity;

    void methodA()  {
        /* ... */
        entity.methodA();
        /* ... */
    }
}
우리는 bean 으로 등록할 개체 RealEntity 를 정의하고, 스프링은 이를 인지해 RealEntity 와 유사한 ProxyEntity 를 bean 으로서 제공한다.
그래서 우리가 bean 을 제공받고 entity.methodA() 를 호출해도, 사실 ProxyEntity.methodA 가 호출되는 것이고, 이로 인해 스프링은 메서드 호출을 가로채는 것이다.
bean 연결 시 주의사항
앞서 @Bean, @Autowired 를 이용해 bean 을 연결짓는 방법을 확인하였다.
하지만 bean 들을 연결할 때 유의해야 할 사항들이 존재한다.
I. bean 의 scope
해당 내용은 사실 5 장 : Bean scope and life cycle 에 자세한 설명이 존재한다.
Bean 의 scope 는 쉽게 말해 bean 을 제공할 방식 이라 말할 수 있다.
스프링은 개발자의 의도에 따라, context 에서 bean 을 요구할 때 매번 같은 개체 (Singleton) 또는 매번 새로운 개체 (Prototype) 를 제공할 수 있다.
@Configuration
public class Config {

    @Bean
    Parrot parrot() {
        Parrot parrot = new Parrot();
        parrot.setName("I am parrot");
        return parrot;
    }

    @Bean
    Person person1(Parrot p)    {
        Person person = new Person();
        person.setParrot(p);
        person.setName("First person");
        return person;
    }

    @Bean
    Person person2(Parrot p)    {
        Person person = new Person();
        person.setParrot(p);
        person.setName("Second person");
        return person;
    }
}
void showProperties(Object... objs) {
Arrays.stream(objs)
.map(o -> String.format("[%s] \t: 0x%8x",
o.getClass().getSimpleName(),
System.identityHashCode(o)))
.forEach(System.out::println);
}
var context
= new AnnotationConfigApplicationContext(
Config.class
);
Parrot beanParrot = context.getBean(Parrot.class);
Person person1 = context.getBean("person1", Person.class);
Person person2 = context.getBean("person2", Person.class);
System.out.println(beanParrot);
System.out.println(person1);
System.out.println(person2);
System.out.println();
showProperties(person1, person2);
System.out.println();
showProperties(beanParrot, person1.getParrot(), person2.getParrot());Parrot : I am parrot
Person : First person, Parrot : I am parrot
Person : Second person, Parrot : I am parrot
[Person] : 0x2a4fb17b
[Person] : 0x7c7b252e
[Parrot] : 0x4d5d943d
[Parrot] : 0x4d5d943d
[Parrot] : 0x4d5d943d위처럼 System.identityHashcode 를 이용해 각 bean 의 JVM 구별용 hashCode 를 확인해보면 놀라운 사실을 알 수 있다.
person1 과 person2 가 분명히 다른 객체임에도 불구하고, 각각의 .parrot 이 beanParrot 개체인 것을 확인할 수 있다.
이처럼 나타나는 이유는 스프링 bean 의 기본 scope 는 singleton 이기 때문이다.
Bean scope 가 singleton 으로 설정되면 스프링은 매 bean 제공마다 동일한 개체를 제공한다.
때문에 Config 의 Person person1(...), Person person2(...) 메서드의 Parrot p 는 모두 동일한 개체가 제공되어 위와 같은 결과가 나타나는 것이다.
하지만 만약 아래처럼 scope 를 prototype 으로 설정하면 각각 다른 개체인 것을 확인할 수 있다.
import org.springframework.beans.factory.config.BeanDefinition;

@Configuration
public class Config {
    @Bean
    @Scope(BeanDefinition.SCOPE_PROTOTYPE)
    Parrot parrot() {
        Parrot parrot = new Parrot();
        parrot.setName("I am parrot");
        return parrot;
    }

    /* ... */
}
Parrot : I am parrot
Person : First person, Parrot : I am parrot
Person : Second person, Parrot : I am parrot
[Person] : 0x 7b2bbc3
[Person] : 0x3270d194
[Parrot] : 0x235834f2
[Parrot] : 0x5656be13
[Parrot] : 0x4218d6a3II. 순환 의존관계
우리가 bean 으로 정의하는 개체간 순환 의존관계가 존재할 시, 다음처럼 에러가 발생할 수 있다.
@Component
public class Parrot {
    private String name;
    private Person person;

    @Autowired
    public Parrot(Person person) {
        this.person = person;
    }

    /* ... */
}
@Component
public class Person {
private String name;
private Parrot parrot;
@Autowired
public Person(Parrot parrot) {
this.parrot = parrot;
}
/* ... */
}var context
= new AnnotationConfigApplicationContext(
Config.class
);Exception in thread "main" org.springframework.beans.factory.UnsatisfiedDependencyException:
... Requested bean is currently in creation: Is there an unresolvable circular reference?위 코드를 보면 Parrot 은 Person 을, Person 을 Parrot 을 필요하는 순환 의존관계임을 볼 수 있다.
이를 해결하는 방법은 다양하자민 교재는 애초에 순환 관계를 갖지 않도록 재설계하는 것을 권장하고 있다.
III. @Qualifier 와 @Primary
앱을 개발하다보면 종종 같은 타입이지만 다른 속성을 가진 여러 개체가 필요할 수 있다.
교재는 이 때 @Qualifer 또는 @Primary 를 이용해 여러 bean 을 구별하거나 주 bean 을 설정하길 권장한다.
사실 이에 대한 내용은 이미 2 장에 정리하였으므로 이를 참고하면 될 듯 하다.
Summary
- 앱을 개발하며 종종 한 개체가 다른 개체를 참조해야하는 상황이 발생한다. 이 때 bean 간의 관계를 지어주는 bean wiring 으로 스프링에게 작업을 넘길 수 있다.
- Bean wiring 은 크게
@Bean어노테이션을 이용하는 방법과@Autowired어노테이션을 이용하는 방법이 있다. 특히@Autowired는 스테레오타입 어노테이션을 이용할 때 유용하다. @Bean어노테이션을 이용하는 bean wiring 은 다음 2 가지 방법이 있다.@Bean이 붙은 메서드를 직접 호출하는 방식 (Direct method call)- 매개변수로 bean 을 제공하는 방식 (Supply bean via method parameter)
@Autowired어노테이션을 이용하는 bean wiring 은 다음 3 가지 방법이 있다.- 필드에 주입하는 방식
- 생성자에 주입하는 방식
- Setter 에 주입하는 방식
@Autowired방식 중 생성자에 주입하는 방식 은final키워드를 사용할 수 있어 선호된다.- Bean wiring 시 다음 3 가지 사항을 유의해야 한다.
- Bean scope 에 따른 singleton, prototype bean
- 순환 의존관계 (Circular dependency)
@Qualifier,@Primary를 이용해 bean 구별 및 선정하기
- 스프링이 bean 을 연결지을 때, 기본적으로 현재 context 에 동일시 될 수 있는 bean 을 찾아 연결한다.
- Bean wiring 은 관점 (Aspect) 기술을 바탕으로 이뤄진다. 때문에 우리가 제공받는 bean 은 모종품 (Proxy) 이다.
> Github 에서 보기