[Spring Starts Here] - Chapter 4 : The Spring context : Using abstractions
Spring Starts Here

이번 챕터에서는 추상화 (Abstraction) 된 bean 을 이용하는 예시를 구체적으로 설명한다.
추상화란 "어느 시스템의 기반을 담당하는 과정 등을 일반화하고 뭉뚱그려, 더 효율적으로 수행하기 위한 방법론" 으로 Java 는 추상 클래스, interface 등의 문법으로 추상화 기능을 제공한다.
추상화를 통해 우리는 여러 기능을 목적에 따라 묶고 상황에 따라 알맞게 구현할 수 있으며, 이를 통해 유지보수성이 높은 코드를 작성할 수 있다.
때문에 개발자는 추상화를 빈번히 이용하는데, 스프링 bean 또한 추상화가 이뤄질 수 있다.
문제 상황 제시
교재는 다음과 같은 문제 상황을 제시한다.
- 당신은 팀 작업을 관리하기 위해 사용하는 앱을 개발하고 있다.
- 앱의 주 기능 중 하나는 사용자가 작업에 대한 의견 (댓글) 을 남기는 기능이다.
- 사용자가 댓글을 남기면 이를 DB 등 어딘가에 저장하고, 앱은 작업을 게시한 사용자에게 이메일 등의 알림을 보낸다.
정리하면 어느 게시글에 댓글이 작성되면 게시글 작성자에게 (이메일 등의) 알림을 보내는 기능을 구현하는 상황이다.
문제 설계
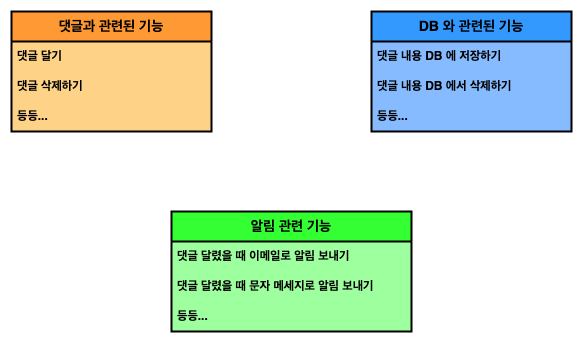
문제를 해결하기 전, 문제에 필요한 기능들과 요구 기능에 따른 책임들 (responsibilities) 를 구별해 보자.
우선 게시글에 댓글을 다는 기능이 필요하다. 또한 댓글을 달았을 때 해당 정보를 저장하는 기능, 그리고 게시글 작성자에게 이메일을 보내는 기능이 필요할 것이다.
이들을 보면 각 기능들을 다음처럼 분류할 수 있다.
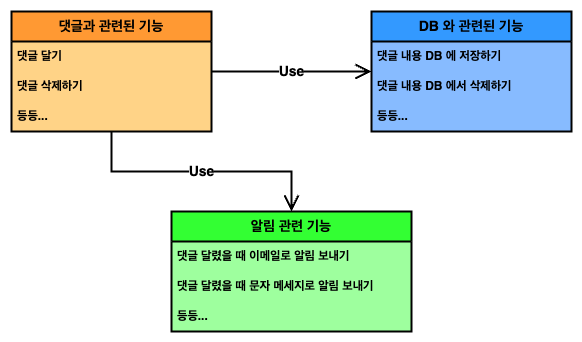
또한 생각해보면 우리는 "댓글이 달렸을 때 DB 에 내용을 저장하고, 사용자에게 알림을 주고 싶으므로" 아래와 같은 의존관계를 생각할 수 있다.
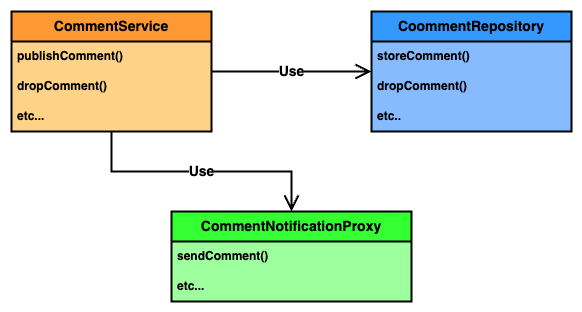
그런데 현업 개발에서는 종종 어떤 기능의 필수 부가결한 코드, 논리 등 을 비즈니스 로직 (Business Logic) 이라 칭하고, 비즈니스 로직 등을 포함하여 사용자의 요구를 만족시키는 개체 를 서비스 (Service) 라고 부른다.
또한 실제 앱과 DB 사이에 존재하며, 앱의 데이터 CRUD 작업을 DB 에 전달할 수 있는 개체를 Repository 또는 DAO (Data Access Object), 앱 외부와 통신하는 역할을 가진 개체를 Proxies 라 부른다.
때문에 이를 활용해 다이어그램을 현실에 가깝게 만들면 다음처럼 보일 수 있다.
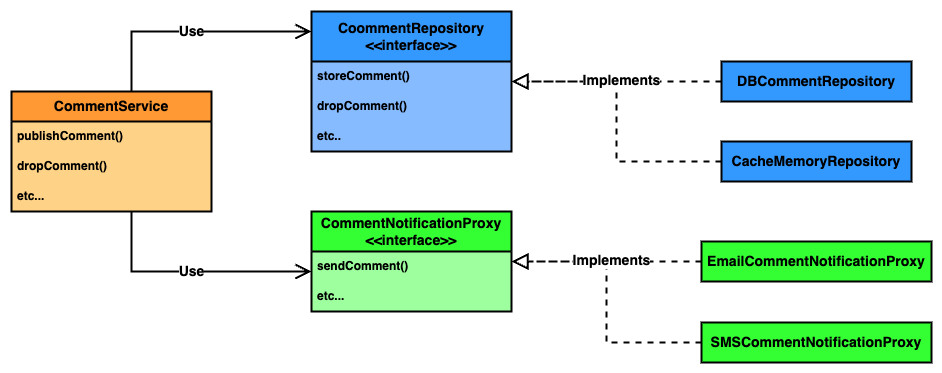
여기서 한번 생각해보자.
CommentRepository 는 앱과 DB 사이에 존재해 필요한 기능을 CommentService 에 제공한다. 하지만 만약 우리가 사용하는 DB 가 바뀔 수 있고 심지어 DB 를 사용하지 않는다면 어떨까?
또한 문제 상황에서는 게시글 작성자에게 이메일 알림을 보내기로 했지만 문자 메시지, 혹은 다른 알림을 보낸다면 어떨까?
만약 우리가 위 다이어그램 그대로 구현을 마쳤다면, 각 요구상황에 맞춰 또다른 개체를 설계, 구현 해야 한다.
때문에 우리는 추후 유지보수와 개발성을 생각해 CommentRepository, CommentNotificationProxy 의 책임을 한단계 추상화 한다.
위 과정으로 우리는 기능 구현에 필요한 설계를 마쳤다. 마지막으로 하나 언급하지 않은 내용이 있는데, 바로 댓글 그 자체이다.
우리가 댓글을 작성할 때, CommentService 는 그 댓글의 내용이 담긴 어떤 개체를 Repository, Proxy 로 보내주어야 한다.
현업에서 이처럼 각 부품에게 정보를 제공하기 위한 개체 를 Model 또는 DTO (Data Transfer Object) 라 칭한다.
우리의 댓글 은 그 자체가 사용자의 로직에 관여하거나 하지 않고, 단지 CommentService 에서 CommentRepository 혹은 CommentNotificationProxy 로 전달될 뿐이므로 Model 로 분류할 수 있다.
이제 이에 따라서 모든 추상체와 구현체를 작성하면 아래와 같다.
without_spring
├── models
│   └── Comment.java
├── proxies
│   ├── CommentNotificationProxy.java
│   └── EmailCommentNotificationProxy.java
├── repositories
│   ├── CommentRepository.java
│   └── DBCommentRepository.java
├── services
│   └── CommentService.java
└── Main.javamodels/Comment.java
package practice.without_spring.models;

public class Comment {
    private String author;
    private String text;

    public String getAuthor() {
        return author;
    }

    public void setAuthor(String author) {
        this.author = author;
    }

    public String getText() {
        return text;
    }

    public void setText(String text) {
        this.text = text;
    }
}
proxies
-
CommentNotificationProxy.javapackage practice.without_spring.proxies; import practice.without_spring.models.Comment; public interface CommentNotificationProxy { void sendComment(Comment comment); } -
EmailCommentNotificationProxy.javapackage practice.without_spring.proxies; import practice.without_spring.models.Comment; public class EmailCommentNotificationProxy implements CommentNotificationProxy { @Override public void sendComment(Comment comment) { System.out.println("Sending notification for comment : " + comment.getText()); } }
repositories
-
CommentRepository
package practice.without_spring.repositories; import practice.without_spring.models.Comment; public interface CommentRepository { void storeComment(Comment comment); } -
DBCommentRepository
package practice.without_spring.repositories;

import practice.without_spring.models.Comment;

public class DBCommentRepository implements CommentRepository {
    @Override
    public void storeComment(Comment comment) {
        System.out.println("Storing comment : " + comment.getText());
    }
}
services/CommentService.java
package practice.without_spring.services;

import practice.without_spring.models.Comment;
import practice.without_spring.proxies.CommentNotificationProxy;
import practice.without_spring.repositories.CommentRepository;

public class CommentService {
    private final CommentRepository repo;
    private final CommentNotificationProxy notificationProxy;

    public CommentService(CommentRepository repo, CommentNotificationProxy notificationProxy) {
        this.repo              = repo;
        this.notificationProxy = notificationProxy;
    }

    public void publishComment(Comment comment) {
        repo.storeComment(comment);
        notificationProxy.sendComment(comment);
    }
}
세부 구현한 내용을 간단히 말하자면 각 작업이 수행될 때마다 콘솔 (System.out) 에 이를 출력하도록 만들었다.
그래서 아래처럼 실행하면 실행된 작업이 출력됨을 볼 수 있다.
CommentRepository repo
        = new DBCommentRepository();
CommentNotificationProxy notificationProxy
        = new EmailCommentNotificationProxy();

CommentService service
        = new CommentService(repo, notificationProxy);

Comment comment = new Comment();
comment.setAuthor("Anonymous");
comment.setText("My First Comment!");

service.publishComment(comment);
Storing comment : My First Comment!
Sending notification for comment : My First Comment!Spring 을 얹어보자
앞서 CommentService 를 인스턴스화 하는 부분을 다시 보자.
CommentRepository repo
        = new DBCommentRepository();
CommentNotificationProxy notificationProxy
        = new EmailCommentNotificationProxy();

CommentService service
        = new CommentService(repo, notificationProxy);
스프링을 이용하지 않으면 위처럼 우리가 직접 repo 와 notificationProxy 를 CommentService 의 생성자에 제공해야 한다.
이를 스프링을 이용해 바꿔보자.
편의를 위해 스테레오타입 어노테이션을 이용하자.
@Component
public class DBCommentRepository
        implements CommentRepository {
    /* ... */
}
@Component
public class EmailCommentNotificationProxy
implements CommentNotificationProxy {
/* ... */
}@Component
public class CommentService {
private final CommentRepository repo;
private final CommentNotificationProxy notificationProxy;
@Autowired
public CommentService(
CommentRepository repo,
CommentNotificationProxy notificationProxy
) {
this.repo = repo;
this.notificationProxy = notificationProxy;
}
/* ... */
}@Configuration
@ComponentScan
// If specific packages are not defined,
// scanning will occur recursively
// beginning with the package of the class
// that declares this annotation.
public class Config {}위 코드를 보면 한가지 눈에띄는 사항이 존재한다.
분명 우리는 @Component 어노테이션을 DBCommentRepository, EmailCommentNotificationProxy 구현체에 붙였다.
하지만 CommentService 에는 CommentRepository, CommentNotificationProxy 를 이용해 @Autowired 가 사용됨을 볼 수 있다.
이처럼 사용해도 에러가 나지 않는 이유는 스프링이 bean wiring 을 진행할 때, 필요한 bean 의 타입을 추론하기 때문이다.
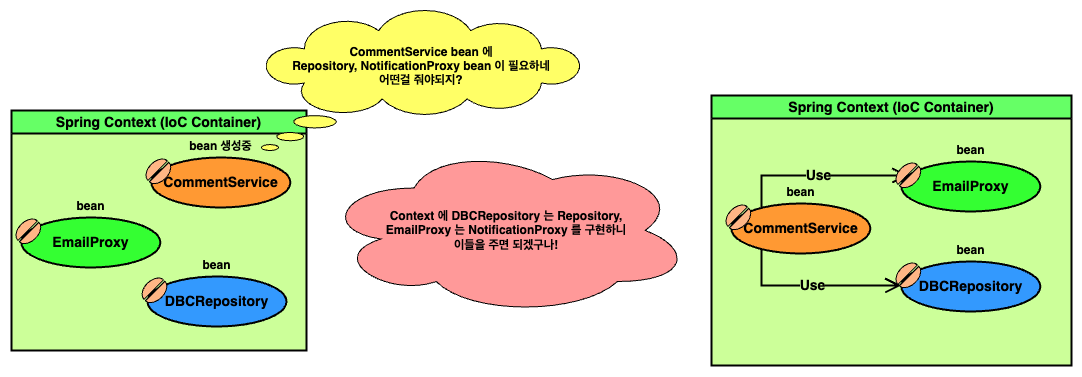
즉, 우리가 평소 스프링이 없던것 처럼 개발해도 스프링은 똑똑하게 잘 알아들을 수 있다는 것이다.
때문에 위처럼 어노테이션을 붙인 후, 아래처럼 실행할 수 있다.
var context
        = new AnnotationConfigApplicationContext(Config.class);

CommentService service
        = context.getBean(CommentService.class);

Comment comment = new Comment();
comment.setAuthor("Anonymous");
comment.setText("Comment with Spring!");

service.publishComment(comment);
Storing comment : Comment with Spring!
Sending PUSH notification for comment : Comment with Spring!물론 스프링 bean wiring 을 이용하는 것이기에, 만약 context 에 CommentRepository 등을 구현한 개체가 다수 존재하면 @Primary, @Qualifier 등을 이용해 명확히 지시해야 한다.
@Service, @Repository 어노테이션
우리는 앞서 '게시글에 댓글을 다는 기능', '댓글의 정보를 저장하는 기능' 등을 성격에 따라 Service, Repository 로 분류했다.
하지만 정작 우리가 스프링을 이용할 때는 @Component 어노테이션만 이용하였고, 이는 개발자의 의도가 감춰지는 결과로 이어질 수 있다.
스프링은 이를 위해 @Service, @Repository 등의 어노테이션을 제공한다.
이들은 모두 @Component 와 동일하게 스테레오타입 어노테이션들이고, 기본적으로 @Component 와 동일한 역할을 수행한다.
때문에 교재는 이들을 이용해 자신의 의도를 더 명확히 하는 것을 권장한다.
Summary
- 추상화를 통해 기능을 구분짓는건 설계에 있어서 중요한 요소 중 하나이다.
- 스프링은 똑똑해서 추상화 된 bean 을 wiring 할 때, 적절히 추론하여 연결시켜 준다.
- 이전 bean wiring 에서와 동일하게, context 에 bean 이 많아질수록
@Qualifier,@Primary를 잘 활용하자. - 자신의 의도를 잘 나타낼 수 있도록
@Service,@Repository어노테이션을 잘 활용하자.
> Github 에서 보기