
“Android 로봇은 Google에서 제작하여 공유한 저작물을 복제하거나 수정한 것으로 Creative Commons 3.0 저작자 표시 라이선스의 약관에 따라 사용되었습니다.”
OpenGraph?
OpenGraph란
sns 혹은 앱에서 웹페이지를 공유하면 링크가 썸네일(미리보기)처럼 표시되는 경우를 종종 볼 수 있다.
웹페이지의 metadata에 해당 페이지의 간략한 정보(제목이나 이미지 등)들로 구성 되어있는 태그로 페이스북에서 만든 Protocol이다.
아래는 공식 문서에서 발췌한 것으로 지원되는 metadata들이다.
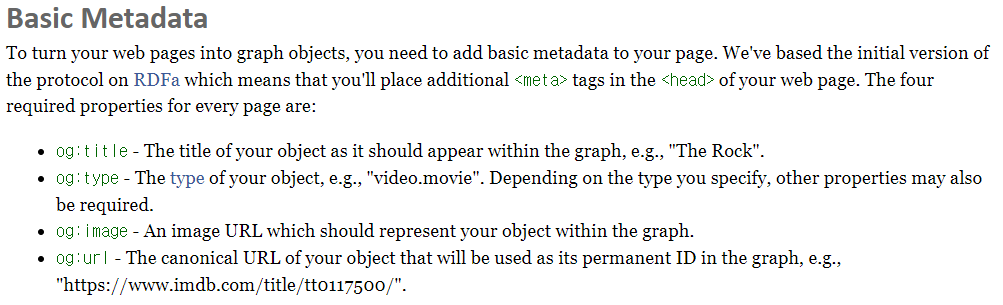
이 외에도 여러가지 데이터들이 있으니 공식 문서를 참고하면 좋겠다.
예시
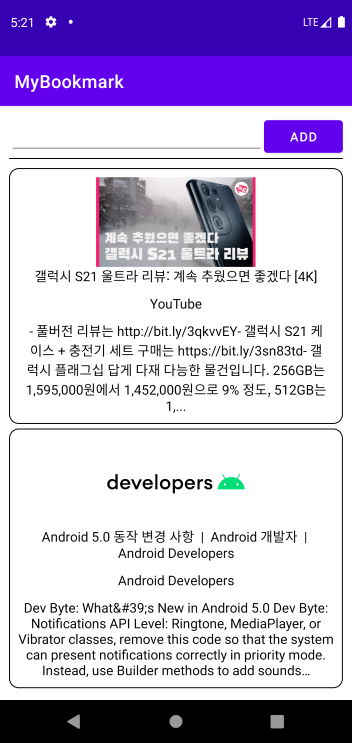
아래는 필자의 카톡에 보낸 유튜브 링크인데 카드 형식으로
이미지와 타이틀 등이 보여지는 것을 볼 수 있다.
이 또한 OpenGraph 덕분인데 구조를 살펴보자면

<meta property="og:site_name" content="YouTube">
<meta property="og:url" content="https://www.youtube.com/watch?v=TaPngpgMx5g">
<meta property="og:title" content="“통화 내용 들었어요!” 유재석, 전소민이 증언한 애처가 썰(?) 《Running Man》런닝맨 EP547">
<meta property="og:image" content="https://i.ytimg.com/vi/TaPngpgMx5g/maxresdefault.jpg">
<meta property="og:description" content="Running Man 런닝맨 EP547 20180826 SBS전소민은 촬영 전 유재석이 아내 나경은과 통화하는 내용을 직접 들었다며 애처가임을 증언했지만 이에 하하가 반박하게 된다.Running Man is a Korean variety show forming part of SBS...">
위 태그에서 대화창에 보여지는 데이터들이 담겨있는 것을 확인할 수 있다.
만들어보자
Activity
먼저 Sample로 만들어볼 앱은 URL을 받아서
og 태그들을 추출한 뒤 Room에 저장하여 RecyclerView로 보여줄 계획이다.
image, title, siteName, description으로 구성했으며
image는 Glide를 이용해서 가져오도록 했다.
우선 html 파싱을 통해 og 태그들을 가져오도록 하자
필자는 Jsoup를 사용했다.
아마 대부분 Jsoup를 사용하겠지만..
                CoroutineScope(Dispatchers.IO).launch {
                    val document = Jsoup.connect(url).get()
                    val elements = document.select("meta[property^=og:]")
                    elements?.let {
                        it.forEach { el ->
                            when(el.attr("property")) {
                                "og:url" -> {
                                    el.attr("content")?.let { content ->
                                        ogMap.put("url", content)
                                    }
                                }
                                "og:site_name" -> {
                                    el.attr("content")?.let { content ->
                                        ogMap.put("siteName", content)
                                    }
                                }
                                "og:title" -> {
                                    el.attr("content")?.let { content ->
                                        ogMap.put("title", content)
                                    }
                                }
                                "og:description" -> {
                                    el.attr("content")?.let { content ->
                                        ogMap.put("description", content)
                                    }
                                }
                                "og:image" -> { ogMap.put("image", el.attr("content")) }
                            }
                        }

                        var entity: OgEntity? = null
                        try {
                            entity = OgEntity(
                                0,
                                ogMap.get("url")!!,
                                ogMap.get("siteName")!!,
                                ogMap.get("title")!!,
                                ogMap.get("description")!!,
                                ogMap.get("image")!!
                            )
                        } catch (e: NullPointerException) {
                            e.printStackTrace()
                            Toast.makeText(this@MainActivity, "OpenGraph를 지원하지 않거나 잘못된 URL입니다.", Toast.LENGTH_SHORT).show()
                            return@launch
                        }
                        MyRoomDatabase.getInstance(this@MainActivity).getOgDAO()
                            .insertOg(entity)
                    }
                    ogList.postValue(
                        MyRoomDatabase.getInstance(this@MainActivity).getOgDAO().getOg()
                    )
}document.select()에 meta[property^=og:] 표현식을 통해
property 속성에 og: 라는 내용을 포함하는 meta 태그들을 가져온다.
가져온 뒤 attr() 메소드를 통해
각 content attribute에 담긴 내용들을 map에 넣어준다.
그리고 나서 Room에 저장을 하기 위해
map을 entity로 만들어주고 Room에 insert를 해준다.
insert를 한 뒤에는 LiveData로 선언된 list에 저장된 entity들을 가져온 뒤
아래 코드와 같이 갱신이 이루어질 때마다 RecyclerView를 초기화해준다.
            ogList.observe(this@MainActivity, Observer {
                rvLinkList.adapter = OgListAdapter(it)
            })
RecyclerView
먼저 item들을 담아줄 layout을 만들어주자
<?xml version="1.0" encoding="utf-8"?>
<LinearLayout xmlns:android="http://schemas.android.com/apk/res/android"
    xmlns:tools="http://schemas.android.com/tools"
    android:orientation="vertical" android:layout_width="match_parent"
    android:layout_height="wrap_content"
    android:background="@drawable/border"
    android:padding="10dp"
    android:layout_marginBottom="5dp"
    android:id="@+id/ll_group">
    <ImageView
        android:id="@+id/iv_og_image"
        android:layout_width="match_parent"
        android:layout_height="100dp"
        android:contentDescription="@string/todo" />
    <TextView
        android:id="@+id/tv_og_title"
        android:layout_width="match_parent"
        android:layout_height="wrap_content"
        android:text=""
        tools:text="title"
        android:textSize="15dp"
        android:textColor="@color/black"
        android:textAlignment="center"
        android:layout_marginBottom="10dp"/>
    <TextView
        android:id="@+id/tv_og_site_name"
        android:layout_width="match_parent"
        android:layout_height="wrap_content"
        android:text=""
        tools:text="title"
        android:textSize="15dp"
        android:textColor="@color/black"
        android:textAlignment="center"
        android:layout_marginBottom="10dp"/>
    <TextView
        android:id="@+id/tv_og_description"
        android:layout_width="match_parent"
        android:layout_height="wrap_content"
        android:text=""
        tools:text="title"
        android:textSize="15dp"
        android:textColor="@color/black"
        android:textAlignment="center"/>
</LinearLayout>
그리고 RecyclerView의 코드는 아래와 같다.
class OgListAdapter(private val _ogList: List<OgEntity>) : RecyclerView.Adapter<OgListAdapter.OgListHolder>() {
    private val ogList = _ogList.toMutableList()
    class OgListHolder(view: View) : RecyclerView.ViewHolder(view) {
        val tvTitle: TextView = view.findViewById(R.id.tv_og_title)
        val tvSiteName: TextView = view.findViewById(R.id.tv_og_site_name)
        val tvDescription: TextView = view.findViewById(R.id.tv_og_description)
        val ivImage: ImageView = view.findViewById(R.id.iv_og_image)
        val llGroup: LinearLayout = view.findViewById(R.id.ll_group)
    }

    override fun onCreateViewHolder(parent: ViewGroup, viewType: Int): OgListHolder {
        val view = LayoutInflater.from(parent.context).inflate(R.layout.item_recycler, parent, false)
        return OgListHolder(view)
    }

    override fun onBindViewHolder(holder: OgListHolder, position: Int) {
        holder.apply {
            tvTitle.text = ogList[position].title
            tvSiteName.text = ogList[position].siteName
            tvDescription.text = ogList[position].description

            Glide.with(itemView.context)
                .load(ogList[position].image)
                .error(R.drawable.ic_launcher_foreground)
                .thumbnail(0.2f)
                .into(ivImage)

            llGroup.apply {
                setOnClickListener {
                    if(ogList[position].url == "")
                        return@setOnClickListener
                    val intent = Intent(itemView.context, WebActivity::class.java).apply {
                        putExtra("url", ogList[position].url)
                    }
                    itemView.context.startActivity(intent)
                }
                setOnLongClickListener {
                    AlertDialog.Builder(itemView.context)
                            .setMessage("삭제하시겠습니까?")
                            .setPositiveButton("삭제") { _, _ ->
                                CoroutineScope(Dispatchers.IO).launch {
                                    MyRoomDatabase.getInstance(itemView.context).getOgDAO()
                                            .deleteOg(ogList[position])
                                    ogList.removeAt(position)
                                }
                                notifyDataSetChanged()
                            }
                            .setNegativeButton("취소", null)
                            .show()

                    true
                }
            }
        }
    }

    override fun getItemCount(): Int {
        return ogList.size
    }
}
RecyclerView는 어렵지 않다.
인자로 넘어온 list를 각 TextView에 이쁘게 담아주기만 하면 된다.
이미지는 위에도 언급했듯이 url로 되어있기 때문에
Glide나 피카소 같은 API를 사용해서 가져오면 된다.
추가적인 기능이 있다면
LinearLayout에 clickListener와 longClickListener를 정의해서
각 각 웹뷰로 띄워주거나 삭제하는 기능 정도를 추가했다.
URL의 OpenGraph 여부
타겟 URL이 OpenGraph를 사용하여 어느 데이터들을 넣었는지 보기 위해
URL에 접속해서 원본 소스를 뒤져가며 일일이 찾곤 했는데
이런 수고를 덜어주는 사이트가 있다.
페이스북에서 제공하는 것으로 보고싶은 URL을 넣어주면 된다.

보통 이런 빨간 박스를 띄우면서 겁을 주는데 아무 상관없으니
새 정보 가져오기를 눌러주면 된다.
쫄지말자
새 정보 가져오기를 눌러주면 2 ~ 3초 뒤에 결과가 아래와 같이 뜬다.
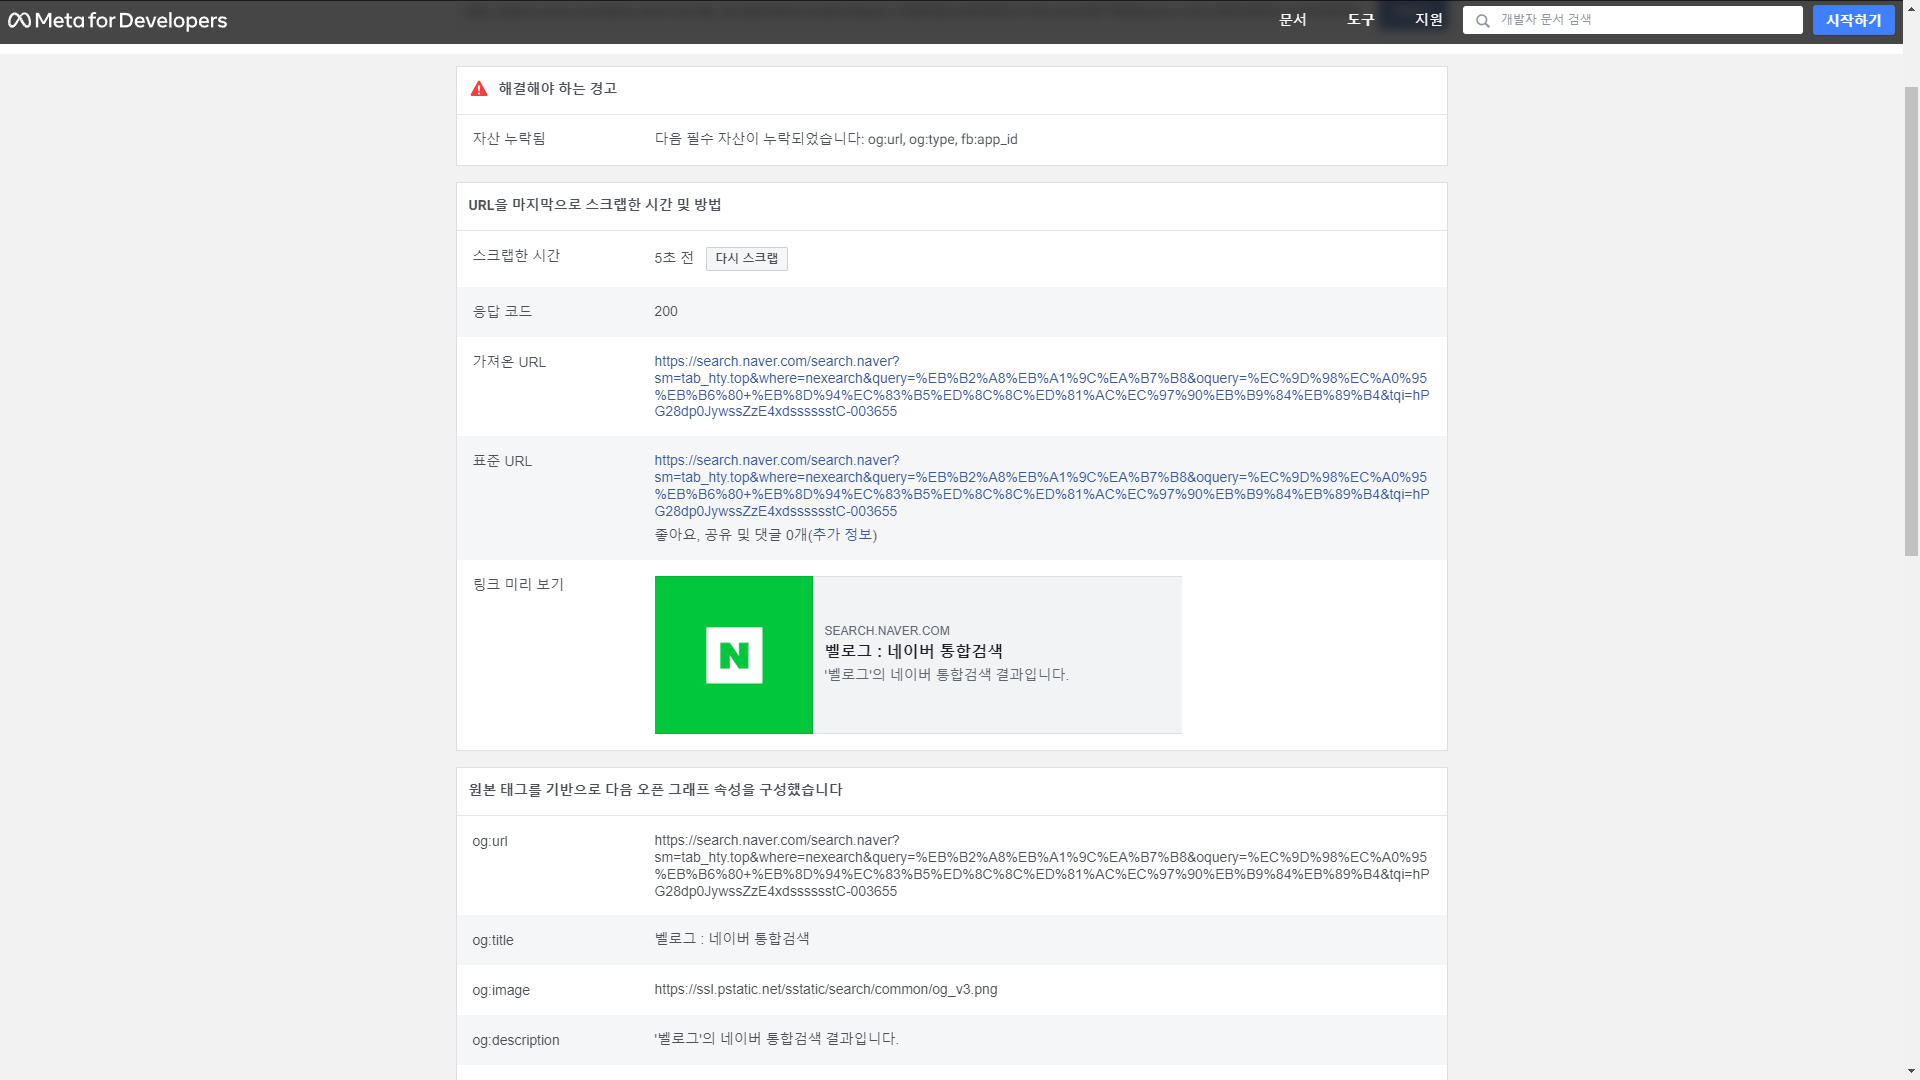
누락된 og속성부터 미리보기, 사용된 속성들을 모두 보여준다.
정리
만들어뒀던 Sample 앱으로 글을 쓰다보니 글이 조금 길어진 거 같지만
사실 og 메타태그를 파싱해서 원하는 값만 뽑아서 UI로 가공하면 되기에
사용하기는 굉장히 쉬웠다.
이쁘게 담는게 문제지
Sample 앱의 코드는 이 곳에서 확인할 수 있다.
개인적으로 공부했던 것을 바탕으로 작성하다보니
잘못된 정보가 있을수도 있습니다.
인지하게 되면 추후 수정하겠습니다.
피드백은 언제나 환영합니다.
읽어주셔서 감사합니다.

혹시 유튜브 영상 링크를 타고 들어갔을 경우 썸네일 이미지는 어떻게 추출하는지 아실까요?
예를들어 https://www.youtube.com/watch?v=PjhlUzp_cU0 의
og:image 는 그냥 유튜브 로고거든요 ㅠ