
Socket이란
- Socket은 상태 유지 프로토톨로, 실시간 애플리케이션(RTA)을 구현하는 데 도움을 주는 기능입니다. 이는 클라이언트와 서버 간의 지속적인 연결을 통해 양방향 통신을 가능하게 합니다.
- Socket은 HTTP와는 다르게 한 번 연결이 이루어지면 클라이언트와 서버 간의 데이터 교환이 자유롭게 이루어질 수 있어, 실시간 데이터 전송이 필요한 애플리케이션에 적합합니다.
- 소켓은 다음과 같은 경우에 유용하게 사용됩니다.
- 실시간 채팅 애플리케이션
- 온라인 게임
- 실시간 데이터 피드
- 협업 도구
- 소켓의 실행 흐름은 다음과 같습니다.
- 생성(Create)
- 클라이언트가 서버와의 연결을 위해 소켓을 생성합니다.
- 연결(Connect)
- 생성된 소켓을 통해 서버에 연결 요청을 보냅니다. 서버가 이를 수락하면 연결이 확립됩니다.
- 송수신(Send/Receive)
- 연결이 유지되는 동안 클라이언트와 서버는 자유롭게 데이터를 주고받을 수 있습니다. 이 과정은 상태를 유지하며, 양방향으로 비동기적인 통신이 가능합니다.
- 닫기(Close)
- 통신이 끝나면 소켓을 닫아 연결을 종료합니다. 이는 자원을 해제하고, 불필요한 연결을 유지하지 않도록 합니다.
채팅 앱 만들기 전 사전 작업
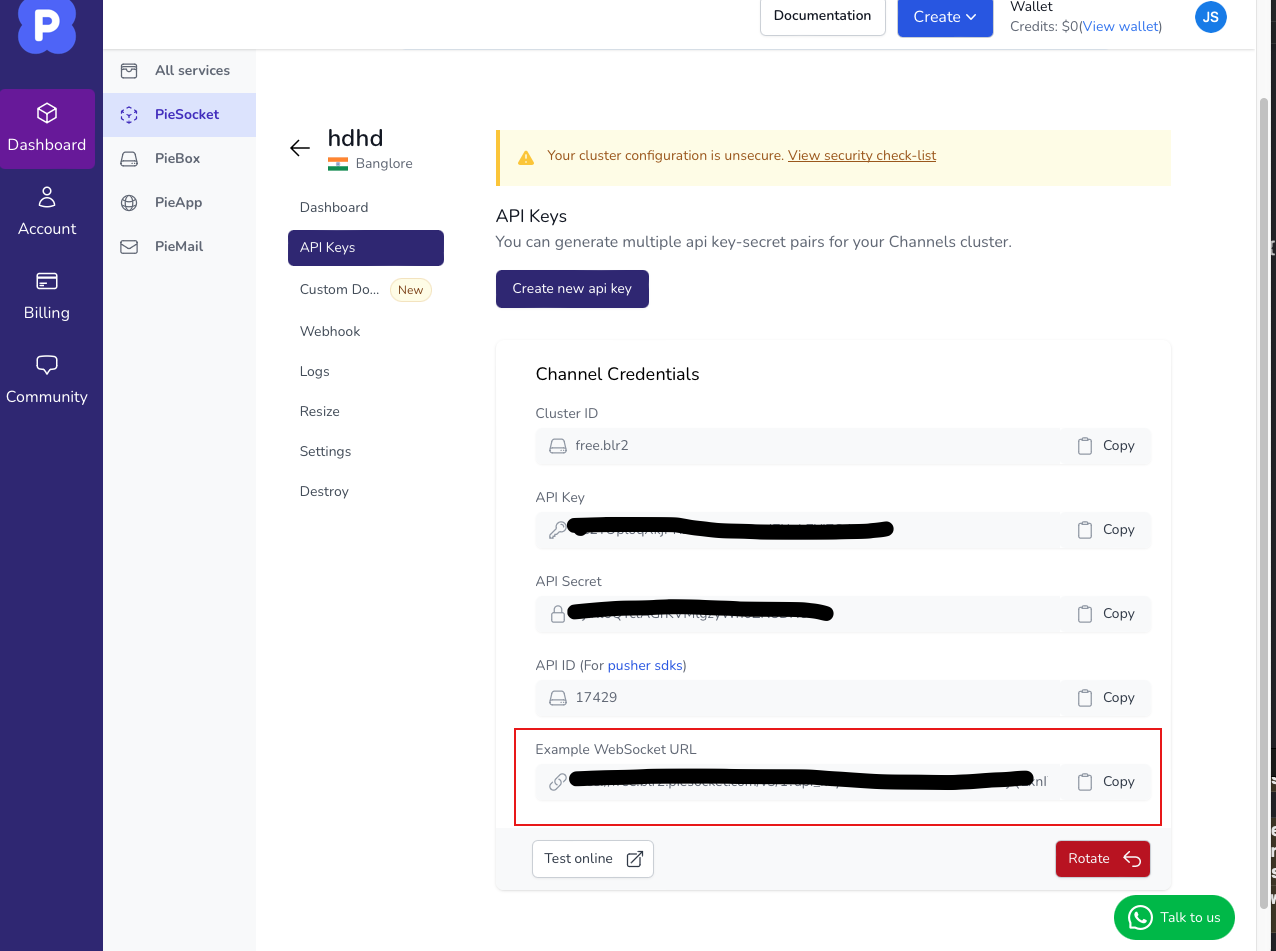
- 채팅 앱을 만들기 전, 데모 API를 https://piehost.com/websocket-tester 여기서 받아옵니다.
- 해당 홈페이지에서 계정을 생성 후, 무료 API를 발급받아 해당 example websocket URL을 복사해서 사용합니다.
Socket Manager 만들기
- 이제 채팅 앱을 만들기 위한 중요한 단계 중 하나인 Socket Manager를 구현해보겠습니다. Socket Manager는 WebSocket 연결을 관리하고, 메시지를 송수신하며, 연결을 유지하거나 종료하는 역할을 합니다.
Socket Manager의 기본 구성
import Foundation

final class SocketManager {
	// WebSocket 통신을 위한 URLSessionWebSocketTask 인스턴스 입니다.
	private var webSocketTask: URLSessionWebSocketTask?
	// URLSession 인스턴스 입니다.
	private let urlSession = URLSession(configuration: .default)

	// 1. WebSocket 연결을 시작하는 함수
	func connect(to url: URL) {
		// ...
	}

	// 2. 메시지를 수신하는 함수
	func receiveMessage(completion: @escaping (Result<String, Error>) -> Void) {
		// ...
	}

	// 3. 메시지를 송신하는 함수
	func sendMessage(text: String, completion: @escaping (Result<String, Error>) -> Void) {
		// ...
	}

	// 4. WebSocket 연결을 종료하는 힘수
	func disConnect() {
		// ...
	}
}
WebSocket 연결 하기
func connect(to url: URL) {
	webSocketTask = urlSession.webSocketTask(with: url)
	webSocketTask?.resume()
}- 주어진 URL값을 이용해서
WebSocketTask를 생성하고 연결을 시작합니다. - 여기서 URL값은 HTTP 프로토콜을 사용하지않고 대신에 'WSS' 로 시작합니다. 이는
websocket secure라는 의미를 갖고 있습니다.
메시지 수신하기
URLSessionWebSocketTask클래스는receive()메서드를 활용해서 메시지를 수신할 수 있습니다.receive메서드는 클로저를 매개변수로 받습니다. 이 클로저는 메시지를 수신할 때 호출되며,Result<URLSessionWebSocketTask.Message, Error>타입의 결과를 전달합니다. 이는 메시지 수신의 성공과 실패를 나타내는 열거형 입니다.URLSessionWebSocketTask.Message는.data(Data)또는.string(String)의 두가지 형태로 나타날 수 있습니다.- 이제 구현해 보겠습니다.
func receiveMessage(completion: @escaping (Result<String, Error>) -> Void) {
	webSocketTask?.receive { [weak self] result in
		switch result {
		case .success(let message):
			switch message {
			case .data(let data):
				// 예제 API는 String값으로 socket을 다루기 때문에 data를 디코딩하지 않습니다.
				print("Data received: \(data)")
			case .string(let strData):
				print("STR Message received: \(strData)")
				completion(.success(strData))
			default:
				break
			}
		case .failure(let error):
			completion(.failure(error))
		}

		self?.receiveMessage(completion: completion)
	}
}URLSessionWebSocketTask클래스의receive메서드를 활용해서 데이터를 받고 해당 결과를 클로저 매개변수의 결과로 전달합니다.Receive메서드가 한 번 호출되고나서 종료가 되는것이 아니라, 지속적으로 데이터를 받을 수 있는 상태를 유지해야 합니다. 이를 위해receive메서드가 종료되기 전에receiveMessage메서드를 재귀적으로 호출하여 지속적으로 메시지를 수신할 수 있도록 합니다.- 이 방식으로 WebSocket 연결이 유지되는 동안 실시간으로 데이터를 받을 수 있습니다.
메시지 송신하기
URLSessionWebSocketTask클래스는send()메서드를 활용해서 메시지를 송신할 수 있습니다.send메서드는 클로저를 매개변수로 받아, 메시지를 송신한 후의 결과를 처리합니다.send메서드는 메시지를 성공적으로 송신했는지 또는 오류가 발생했는지 여부를 클로저를 통해 전달합니다.- 이제 구현해 보겠습니다.
func sendMessage(text: String, completion: @escaping (Result<String, Error>) -> Void) {
	let message = URLSessionWebSocketTask.Message.string(text)

	webSocketTask?.send(message) { error in
		if let error = error {
			completion(.failure(error))
		} else {
			completion(.success(text))
		}
	}
}URLSessionWebSocketTask클래스의send메서드를 활용해서 데이터를 송신하고, 해당 결과를 클로저 매개변수의 결과로 전달합니다.send메서드는 메시지를 송신한 후, 클로저를 호출하여 송신 성공 여부를 전달합니다. 성공적으로 송신된 경우completion핸들러를 통해 송신된 메시지를 전달하고, 오류가 발생한 경우에는 오류 정보를 전달합니다.
WebSocket 연결을 종료하기
- WebSocket 연결을 종료하려면
URLSessionWebSocketTask클래스의cancel(with:reason:)메서드를 사용합니다. cancel(with:reason:)메서드는 연결을 종료하는 이유를 포함하여 WebSocket 연결을 닫습니다.- 이제 구현해 보겠습니다.
func disConnect() {
	webSocketTask?.cancel(with: .goingAway, reason: nil)
}URLSessionWebSocketTask클래스의cancel(with:reason:)메서드를 활용해서 WebSocket 연결을 종료합니다.cancel메서드는 두 개의 매개변수를 받습니다:with: 종료 상태 코드를 나타냅니다. 여기서는.goingAway를 사용하여 정상적인 종료를 나타냅니다.
reason: 연결 종료의 이유를 설명하는 데이터입니다. 여기서는nil로 설정하여 별도의 이유를 제공하지 않습니다.
UI 설계하기
- 사전 영상과 같이 간단한 채팅 기능을 구현하기 위해 텍스트를 보여줄 TableView, 텍스트를 입력할 textField, 입력한 텍스트를 전송할 전송 Button으로 구성되어 있습니다.
ViewController 구현하기
import UIKit

final class ViewController: UIViewController {
	private var chatModel: [Chat] = []

    private let chatTableView: UITableView = {
        let tableView = UITableView()

        tableView.register(
            ChatCell.self,
            forCellReuseIdentifier: ChatCell.identifier
        )
        tableView.estimatedRowHeight = 300
        tableView.rowHeight = UITableView.automaticDimension

        return tableView
    }()

    private let textField: UITextField = {
        let textField = UITextField()

        textField.borderStyle = .roundedRect
        textField.textColor = .black

        return textField
    }()

    private let sendButton: UIButton = {
        let btn = UIButton()

        btn.setTitle("전송", for: .normal)
        btn.setTitleColor(.black, for: .normal)
        btn.backgroundColor = .lightGray
        btn.layer.cornerRadius = 6

        return btn
    }()

    override func viewDidLoad() {
	    super.viewDidLoad()

	    setupLayout()
	    setupAttribute()
    }

    private func setupLayout() {
        [
            chatTableView,
            textField,
            sendButton
        ].forEach {
            $0.translatesAutoresizingMaskIntoConstraints = false
            self.view.addSubview($0)
        }

        NSLayoutConstraint.activate([
            chatTableView.topAnchor.constraint(equalTo: self.view.safeAreaLayoutGuide.topAnchor, constant: 26),
            chatTableView.leadingAnchor.constraint(equalTo: self.view.leadingAnchor),
            chatTableView.trailingAnchor.constraint(equalTo: self.view.trailingAnchor),
            chatTableView.bottomAnchor.constraint(equalTo: textField.topAnchor),

            textField.bottomAnchor.constraint(equalTo: self.view.safeAreaLayoutGuide.bottomAnchor),
            textField.leadingAnchor.constraint(equalTo: self.view.leadingAnchor, constant: 16),
            textField.trailingAnchor.constraint(equalTo: sendButton.leadingAnchor, constant: -6),
            textField.heightAnchor.constraint(equalTo: sendButton.heightAnchor),

            sendButton.bottomAnchor.constraint(equalTo: textField.bottomAnchor),
            sendButton.trailingAnchor.constraint(equalTo: self.view.trailingAnchor, constant: -16),
            sendButton.widthAnchor.constraint(equalToConstant: 55),
            sendButton.heightAnchor.constraint(equalToConstant: 35)
        ])
    }

    private func setupAttribute() {
        self.view.backgroundColor = .white

        chatTableView.dataSource = self
        chatTableView.separatorStyle = .none

        sendButton.addTarget(
	        self,
	        action: #selector(sendText(_:)),
	        for: .touchUpInside
	    )
    }

	@objc func sendText(_ sender: UIButton) {
        if let text = textField.text {
            textField.text = ""
            textField.endEditing(true)
        }
    }
}

extension ViewController: UITableViewDataSource {
    func tableView(
        _ tableView: UITableView,
        numberOfRowsInSection section: Int
    ) -> Int {
        chatModel.count
    }

    func tableView(
        _ tableView: UITableView,
        cellForRowAt indexPath: IndexPath
    ) -> UITableViewCell {

        let cell = tableView.dequeueReusableCell(
            withIdentifier: ChatCell.identifier,
            for: indexPath
        ) as? ChatCell

        cell?.bind(to: chatModel[indexPath.row])

        return cell ?? UITableViewCell()
    }
}
ChatCell 구현하기
enum Sender {
    case me
    case other
}

struct Chat {
    let text: String
    let type: Sender
}Sender- 메시지의 발신자를 구분하기 위한 열거형입니다.
me와other두 가지 케이스가 있습니다.
Chat- 메시지 데이터를 나타내는 구조체입니다.
text는 메시지 내용,type은 발신자를 나타냅니다.
final class ChatCell: UITableViewCell {
    static let identifier = String(describing: ChatCell.self)

    private lazy var chatView = ChatView()

    private var chatLabelLeadingConstraint: NSLayoutConstraint?
private var chatLabelTrailingConstraint: NSLayoutConstraint?identifier- 셀의 재사용 식별자입니다.
chatView- 메시지를 표시하는 커스텀 뷰입니다.
chatLabelLeadingConstraint및chatLabelTrailingConstraint- 메시지의 정렬을 위한 제약 조건입니다.
Sender값이me일 경우chatLabelTrailingConstraint를 활성화하고other일 경우chatLabelLeadingConstraint를 활성화 해서 메시지의 위치를 조정합니다.
	override init(style: UITableViewCell.CellStyle, reuseIdentifier: String?) {
	    super.init(style: style, reuseIdentifier: reuseIdentifier)

	    setupLayout()
	    setupAttribute()
	}

	required init?(coder: NSCoder) {
	    fatalError("init(coder:) has not been implemented")
	}

	override func prepareForReuse() {
	    chatView.clearTextField()

	    chatLabelLeadingConstraint?.isActive = false
	    chatLabelTrailingConstraint?.isActive = false

	    chatLabelLeadingConstraint = nil
	    chatLabelTrailingConstraint = nil
	}

	private func setupLayout() {
	    [
	        chatView
	    ].forEach {
	        $0.translatesAutoresizingMaskIntoConstraints = false
	        self.contentView.addSubview($0)
	    }

	    NSLayoutConstraint.activate([
	        chatView.topAnchor.constraint(equalTo: self.contentView.topAnchor),
	        chatView.bottomAnchor.constraint(equalTo: self.contentView.bottomAnchor, constant: -6),
	        chatView.widthAnchor.constraint(lessThanOrEqualTo: self.contentView.widthAnchor, multiplier: 0.8)
	    ])
	}

	private func setupAttribute() {
	    self.backgroundColor = .white
	    self.selectionStyle = .none
}chatView의 너비는 콘텐츠 뷰 너비의 최대 80%로 제한합니다.
	func bind(to model: Chat) {
	    chatView.bind(to: model)

	    switch model.type {
	    case .me:
	        myTextLabel()
	    case .other:
	        otherTextLabel()
	    }
	}

	private func myTextLabel() {
	    chatLabelLeadingConstraint?.isActive = false
	    chatLabelLeadingConstraint = nil

	    chatLabelTrailingConstraint = chatView.trailingAnchor.constraint(equalTo: self.contentView.trailingAnchor, constant: -6)

	    chatLabelTrailingConstraint?.isActive = true
	}

	private func otherTextLabel() {
	    chatLabelTrailingConstraint?.isActive = false
	    chatLabelTrailingConstraint = nil

	    chatLabelLeadingConstraint = chatView.leadingAnchor.constraint(equalTo: self.contentView.leadingAnchor, constant: 6)

	    chatLabelLeadingConstraint?.isActive = true
	}
}myTextLabel()chatLabelLeadingConstraint를 비활성화하고,chatLabelTrailingConstraint를 활성화하여chatView를 콘텐츠 뷰의 우측에 배치합니다.
otherTextLabel()chatLabelTrailingConstraint를 비활성화하고,chatLabelLeadingConstraint를 활성화하여chatView를 콘텐츠 뷰의 좌측에 배치합니다.
- 이와 같이
ChatCell클래스는 사용자의 메시지와 다른 사람의 메시지를 구분하여 좌우 정렬하는 기능을 제공합니다. - 각 메시지를
chatView에 바인딩하고, 메시지 유형에 따라 레이아웃 제약 조건을 동적으로 설정합니다.
ChatView 구현하기
import UIKit

final class ChatView: UIView {
    private lazy var chatLabel: UILabel = {
        let lbl = UILabel()

        lbl.numberOfLines = 0
        lbl.textColor = .black
        lbl.font = .systemFont(ofSize: 16, weight: .regular)
        lbl.backgroundColor = .clear

        return lbl
    }()

    override init(frame: CGRect) {
        super.init(frame: frame)

        setupLayout()
        setupAttribute()
    }

    required init?(coder: NSCoder) {
        fatalError("init(coder:) has not been implemented")
    }

    private func setupLayout() {
        [
            chatLabel
        ].forEach {
            $0.translatesAutoresizingMaskIntoConstraints = false
            self.addSubview($0)
        }

        NSLayoutConstraint.activate([
            chatLabel.leadingAnchor.constraint(equalTo: self.leadingAnchor, constant: 12),
            chatLabel.trailingAnchor.constraint(equalTo: self.trailingAnchor, constant: -12),
            chatLabel.topAnchor.constraint(equalTo: self.topAnchor, constant: 12),
            chatLabel.bottomAnchor.constraint(equalTo: self.bottomAnchor, constant: -12)
        ])
    }

    private func setupAttribute() {
        self.layer.cornerRadius = 8
        self.clipsToBounds = true
    }

    func bind(to model: Chat) {
        chatLabel.text = model.text

        switch model.type {
        case .me:
            myTextLabel()
        case .other:
            otherTextLabel()
        }
    }

    private func myTextLabel() {
        chatLabel.textAlignment = .right
        self.backgroundColor = .lightGray
    }

    private func otherTextLabel() {
        chatLabel.textAlignment = .left
        self.backgroundColor = .systemGray6
    }

    func clearTextField() {
        chatLabel.text = ""
    }
}chatLabel을ChatView에 추가하고 오토레이아웃 제약 조건을 설정해서 여백을 둡니다.myTextLabel()- 사용자의 메시지를 우측 정렬하고, 배경색을 연한 회색(
.lightGray)으로 설정합니다. - 텍스트를 오른쪽 정렬합니다.
- 배경색을 연한 회색으로 설정합니다.
- 사용자의 메시지를 우측 정렬하고, 배경색을 연한 회색(
otherTextLabel()- 다른 사람의 메시지를 좌측 정렬하고, 배경색을 시스템 회색(
.systemGray6)으로 설정합니다. - 텍스트를 왼쪽 정렬합니다.
- 배경색을 시스템 회색으로 설정합니다.
- 다른 사람의 메시지를 좌측 정렬하고, 배경색을 시스템 회색(
기능 추가하기
- WebSocket을 통해 메시지를 송수신하고, 수신한 메시지를 테이블 뷰에 업데이트하는 기능을 추가합니다.
WebSocket 연결하기 & 메시지 수신하기
import UIKit

final class ViewController: UIViewController {
	private let socketManager = SocketManager()
	// ...

	private func setupAttribute() {
		// ...

		connectWebSocket()
	}

   private func connectWebSocket() {
        /// notify_self 삭제
        /// notify_self 파라미터가 적용되어 있으면 성공적으로 데이터를 전송할 때 내가 보낸 데이터를 receive하게 됨
        let url = URL(string: "발급 받은 URL")!

        socketManager.connect(to: url)

        socketManager.receiveMessage { [weak self] result in
            DispatchQueue.main.async {
                switch result {
                case .success(let message):
                    let chat = Chat(text: message, type: .other)

                    self?.updateTableView(chat: chat)

                case .failure(let error):
                    print(error.localizedDescription)
                }
            }
        }
}connectWebSocket()메서드에서 WebSocket URL을 통해 서버에 연결합니다.- 연결이 성공하면 메시지를 수신 대기합니다.
socketManager.receiveMessage메서드를 통해 서버로부터 수신된 메시지를 처리합니다.
메시지 송신하기
    @objc func sendText(_ sender: UIButton) {
        if let text = textField.text {
            sendMessage(with: text)
        }
    }

    private func sendMessage(with text: String) {
        socketManager.sendMessage(text: text) { [weak self] result in
            DispatchQueue.main.async {
                switch result {
                case .success(let message):
                    let chat = Chat(text: message, type: .me)

                    self?.updateTableView(chat: chat)

                    self?.textField.text = ""
                    self?.textField.endEditing(true)
                case .failure(let error):
                    print(error.localizedDescription)
                }

            }
        }
}sendText(_:)메서드는 사용자가 입력한 텍스트를 WebSocket 서버로 송신합니다.- 텍스트가 송신된 후 텍스트 필드를 비웁니다.
테이블 업데이트하기
	private func updateTableView(chat: Chat) {
        chatModel.append(chat)

        let indexPath = IndexPath(row: chatModel.count - 1, section: 0)

        chatTableView.beginUpdates()
        chatTableView.insertRows(
            at: [indexPath],
            with: chat.type == .me ? .right : .left
        )
        chatTableView.endUpdates()

        chatTableView.scrollToRow(at: indexPath, at: .bottom, animated: true)
    }
}updateTableView(chat:)메서드는 새로운 메시지가 수신될 때마다 테이블 뷰를 업데이트합니다.- 메시지가 테이블 뷰에 추가될 때 스크롤을 최하단으로 이동시킵니다.
결론
- 이 기능을 통해 사용자는 WebSocket을 통해 실시간으로 메시지를 주고받을 수 있으며, 수신된 메시지가 테이블 뷰에 즉시 반영됩니다.
출처(참고문헌)
- https://piehost.com
- https://developer.apple.com/documentation/foundation/urlsessionwebsockettask
- https://developer.apple.com/documentation/foundation/urlsessionwebsockettask/3281789-receive
- https://developer.apple.com/documentation/foundation/urlsessionwebsockettask/3281790-send
원본코드
제가 학습한 내용을 요약하여 정리한 것입니다. 내용에 오류가 있을 수 있으며, 어떠한 피드백도 감사히 받겠습니다.
감사합니다.
