Lesson 1.
1.1. Self-Driving-Car Engineering team
- 운영팀: 차량 프로토타입 운전
- 하드웨어팀: SDC 시스템에 센서 관리 및 칩 배포
- R&D팀: 새로운 차선 감지 알고리즘 개발
- 데이터팀: 차량에서 클라우드로 데이터 파이프라인 작성
- UI/UX팀: 차량의 대시보드 디스플레이 개선
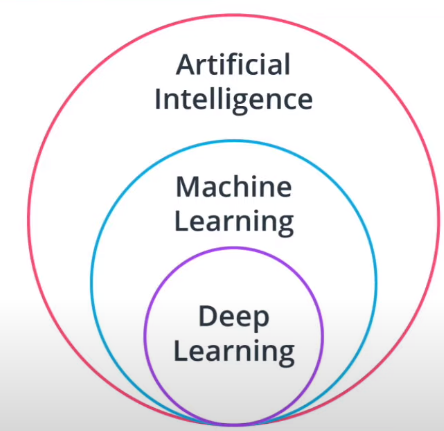
1.2. 인공지능&머신러닝&딥러닝
-
인공지능: 의사 결정을 하기 위해 그 환경에서 정보를 활용하는 시스템
-
머신러닝: 인공지능의 한 분야로, 누적된 경험을 통해 컴퓨터가 스스로 학습할 수 있게 하는 알고리즘
- 지도학습과 비지도학습이 존재
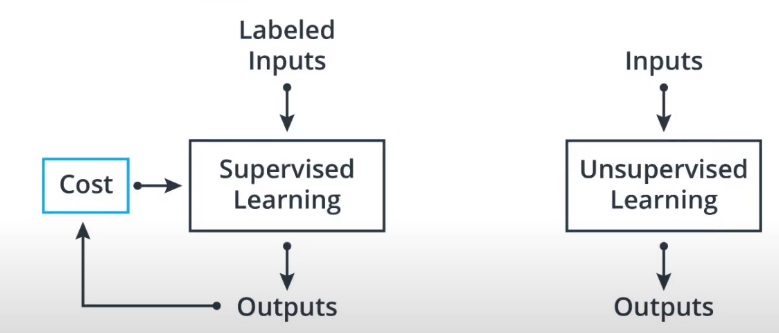
- 지도학습과 비지도학습이 존재
-
딥러닝: 딥러닝은 머신러닝과 마찬가지로 인공지능의 하위 개념이며, 인공신경망에서 발전한 형태
1.3. 딥러닝의 역사
- ImageNet:
- AlexNet: GPU를 사용하여 획기적인 성능향상을 했다.
1.3. 딥러닝을 실습하기 위한 도구 tensorflow
Lesson2. 머신러닝 workflow
2.1. 문제 프레이밍
- 머신러닝이 필요한 문제인가?
- 누가 관심이 있으며 제약조건과 목표는 무엇인가?
- 학습데이터는 어떤 것을 쓰고 데이터 병목현상이 어디에 나타날 수 있는가?
- 평가지표는 어떤것을 사용할 것인가?
2.2. 평가지표(confusion matrix)
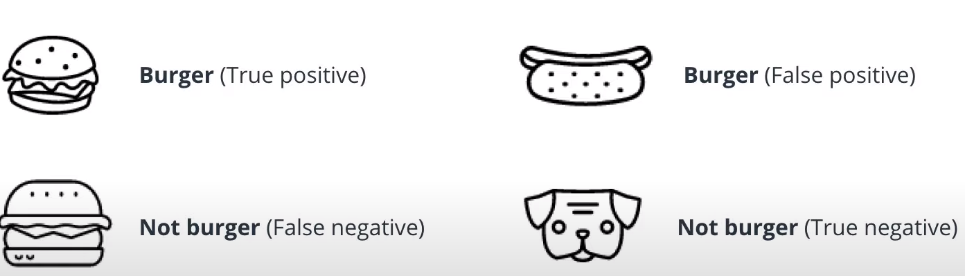
- intersection 계산 시 +1 해줘야하나?
intersection = max(0, xmax - xmin + 1) * max(0, ymax - ymin + 1)- 객체검출에서 Precision과 Recall 계산은?
Lesson3. 카메라 캘리브레이션
3.1 카메라 센서의 장단점
- 장점
- 고해상도 센서
- 색, 밝기 인지
- 저비용
- 스테레오 카메라를 이용한 Depth reconstruction
- 단점
- 기상, 밝기변화에 민감
- 제공되는 데이터를 추출하고 가공해야함
- 깊이추정에 최적이지는 않음
3.2. 카메라 왜곡보정
-
방사성 왜곡
- 곡면 렌즈의 영향으로 이미지의 모서리로 갈수록 휘어지는 왜곡
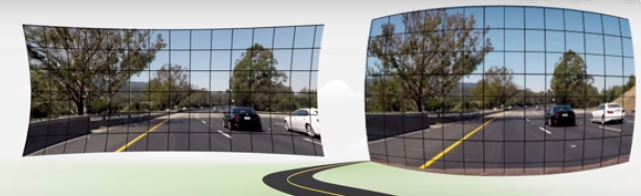
- 곡면 렌즈의 영향으로 이미지의 모서리로 갈수록 휘어지는 왜곡
-
접선 왜곡
- 카메라 필름이나 센서가 이미지 평면과 완벽히 평행으로 정렬되어 있지 않을때 발생
- 이미지를 기울게 만들어 일부 물체가 실제보다 더 멀거나 가깝게 보이도록 함
-
왜곡을 보정하는 상관계수: [k1, k2, p1, p2,k3]
- k: 방사성 왜곡 보정계수
- p: 접선왜곡 보정계수
- OpenCV를 이용한 왜곡보정
import numpy as np
import cv2
import glob
import matplotlib.pyplot as plt
%matplotlib qt

# prepare object points, like (0,0,0), (1,0,0), (2,0,0) ....,(6,5,0)
objp = np.zeros((6*8,3), np.float32)
objp[:,:2] = np.mgrid[0:8, 0:6].T.reshape(-1,2)

# Arrays to store object points and image points from all the images.
objpoints = [] # 3d points in real world space
imgpoints = [] # 2d points in image plane.

# Make a list of calibration images
images = glob.glob('calibration_wide/GO*.jpg')

# Step through the list and search for chessboard corners
for idx, fname in enumerate(images):
    img = cv2.imread(fname)
    gray = cv2.cvtColor(img, cv2.COLOR_BGR2GRAY)

    # Find the chessboard corners
    ret, corners = cv2.findChessboardCorners(gray, (8,6), None)

    # If found, add object points, image points
    if ret == True:
        objpoints.append(objp)
        imgpoints.append(corners)

        # Draw and display the corners
        cv2.drawChessboardCorners(img, (8,6), corners, ret)
        #write_name = 'corners_found'+str(idx)+'.jpg'
        #cv2.imwrite(write_name, img)
        cv2.imshow('img', img)
        cv2.waitKey(500)

cv2.destroyAllWindows()
import pickle
%matplotlib inline
# Test undistortion on an image
img = cv2.imread('calibration_wide/test_image.jpg')
img_size = (img.shape[1], img.shape[0])
# Do camera calibration given object points and image points
ret, mtx, dist, rvecs, tvecs = cv2.calibrateCamera(objpoints, imgpoints, img_size,None,None)
dst = cv2.undistort(img, mtx, dist, None, mtx)
cv2.imwrite('calibration_wide/test_undist.jpg',dst)
# Save the camera calibration result for later use (we won't worry about rvecs / tvecs)
dist_pickle = {}
dist_pickle["mtx"] = mtx
dist_pickle["dist"] = dist
pickle.dump( dist_pickle, open( "calibration_wide/wide_dist_pickle.p", "wb" ) )
#dst = cv2.cvtColor(dst, cv2.COLOR_BGR2RGB)
# Visualize undistortion
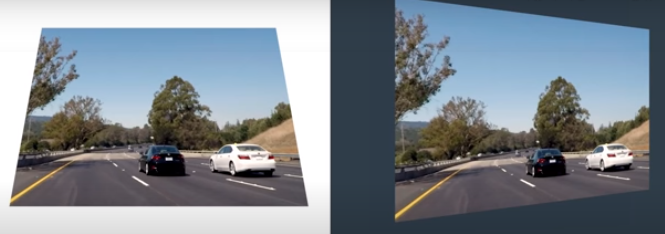
f, (ax1, ax2) = plt.subplots(1, 2, figsize=(20,10))
ax1.imshow(img)
ax1.set_title('Original Image', fontsize=30)
ax2.imshow(dst)
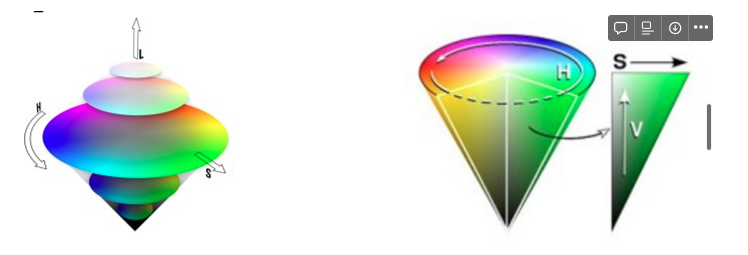
ax2.set_title('Undistorted Image', fontsize=30)3.3. 색공간
-
RGB
- 빨노초 세가지 채널을 사용
- 한 채널 당 8-bits(256가지) (256, 256, 256)
-
GRAY
- 빛의 intensity만 전달하는 단일채널(8bits)
-
HLS/HSV
- H: Hue(각도)
- L: Lightness(밝기)
- S: Saturation(채도)
- V: Value