
블로그에서 보기 : https://lit-blog.vercel.app/post/lit-tutorial-2
이전 포스팅에서 lit-project를 설치하여 lit-element를 사용하여 커스텀 엘리먼트가 만들어 지는 것을 보았습니다. 이번포스팅 에서는 엘리먼트의 property를 사용하여 템플릿을 업데이트하며 property의 옵션들을 살펴보도록 하겠습니다.
properties
lit-element에서 템플릿을 정의할때 property를 템플릿에 바인딩 할 수 있으며, 속성이 변경 될 때 마다 템플릿 이 변경 됩니다.
pages/lit-tomato.ts
class Tomato extends LitElement {
    static get properties() {
      return {
        name,
      };
    }


  render() {
    return html`
      <style></style>
      <h1>Hello ${this.name}</h1>
    `;
  }
}
static get properties()를 사용하여 엘리먼트의 property를 선언 할 수 있습니다. name이라는 property를 선언하였고 name property를 html 템플릿에 바인딩 하였습니다. 후에 name이 변경된다면 html 템플릿도 변경 되게 됩니다.
property 초기화
선언된 property를 초기화 하는 방법에 대해 알아보도록 하겠습니다.
앞에서 선언한 name에 초기값을 주도록 하겠습니다.
constructor
property의 초기값을 주기 위해 constructor()를 사용 할 수 있습니다.
class Tomato extends LitElement {
  static get properties() {
    return {
      name,
    };
  }

  constructor() {
    super();
    this.name = "tomato1";
  }
  render() {
    return html`
      <style></style>
      <h1>Hello ${this.name}</h1>
    `;
  }
}
constructor()를 사용하여 name property에 'tomato1'값으로 초기화 해주었습니다.
'Hello tomato1'이 브라우저에 출력 되는 것을 확인 할 수 있습니닫. 하지만 vsCode에서는 타입에러가 있다는 에러가 발생합니다.
Property 'name' does not exist on type 'Tomato'.ts(2339)
@property
타입스크립트를 사용한다면 @property 데코레이터를 사용하여 property 선언과 초기화를 할 수 있습니다.
import { LitElement, html, customElement, property } from "lit-element";

@customElement("lit-tomato")
class Tomato extends LitElement {
  @property() name = "tomato1";

  render() {
    return html`
      <style></style>
      <h1>Hello ${this.name}</h1>
    `;
  }
}
constructor를 사용 할 때와 동인한 결과가 나타납니다. 앞의 constructor를 사용할때와 같은 기능을 한다는 것을 확인 할 수 있습니다.
@property의 인자로 다양한 옵션들을 설정해 사용할 수 있습니다. 후에 하나씩 살펴보도록 하겠습니다.
change property
property에 변화를 주어 리렌더가 되는것을 해보려고 합니다. setTimeOut을 이용하여 2초후에 이름이 바뀌게 해보도록 하겠습니다.
@customElement("lit-tomato")
class Tomato extends LitElement {
  @property() name = "tomato1";

  connectedCallback() {
    super.connectedCallback();

    setTimeout(() => {
      this.name = "tomato2";
    }, 2000);
  }
실행을 해보면 2초후에 'tomato1'이 'tomato2'로 변경되는 것을 볼 수 있습니다.
connectedCallback() : 웹 컴포넌트의 생명주기 중 하나로 문서의 DOM에 컴포넌트가 추가 될 때 호출됩니다. 리액트에서 componentDidMount라고 생각하면 쉽게 다가올 것입니다. 모든 생명주기 메서드는 'super.connectedCallback()' 와 같이 super 메서드를 호출해야합니다.
this.name="tomato2";앞의 코드처럼 property를 변경 할 수 있습니다. property 변경은 비동기 업데이트주기를 트리거하여 구성 요소가 템플릿을 다시 렌더링하도록 할 수 있습니다. lit-element의 생명주기는 다음 포스팅에서 알아보기로 하겠습니다.
attribute
이번에는 다른 방법을 이용하여 property를 변경시켜보도록 하겠습니다.
this.setAttribute()를 사용하여 property를 변경 해보도록 하려고 합니다.
  @property() name = "tomato1";

  connectedCallback() {
    super.connectedCallback();

    setTimeout(() => {
      this.setAttribute("name", "tomato3");
      this.requestUpdate();
    }, 2000);
  }
2초후에 'Hello tomato3'으로 변경이 되었습니다.
setAttribute는 attribute를 변경하는 함수인데 어째서 property가 변경 되었을까요?
lit-element에서 선언된 모든 property는 observed attribute가 만들어 지게 됩니다.
property에 대한 attribute는 lowercased 문자열로 생성이 됩니다. 예로 myProp이라는 property는 "myprop"이라는 attribute를 가지게 됩니다.
앞에 property를 선언할때 옵션을 줄 수 있다고 하였는데 옵션중 attribute는 이와 관련된 설정을 하게 됩니다.
  @property({ attribute: true }) myProp1 = "myProp1";
  @property({ attribute: false }) myProp2 = "myProp2";
  @property({ attribute: "my-custom-prop3" }) myProp3 = "myProp3";
attribute를 설정해주지 않는다면 attribute의 기본값인 true가 설정 됩니다.
값이 true일 때 myProps1(property)는 "myprop1" attribute를 가지게 됩니다.
값이 true일 때 myProps2(property)는 attribute를 가지지 않습니다.
값이 "my-custom-prop3" 일 때 myProp3(property)는 "my-custom-prop3"이라는 attribute를 가지게 됩니다.
setAttribute()를 사용하면 첫번째 인자로 전달해준 attribute명의 property 값을 두번째 인자로 전달해준 값으로 변경하게 됩니다. 앞에서 'name'이 변경 된 것은 name property가 'name' attribute값을 가지게 되었고,
this.setAttribute("name", "tomato3")를 통해 'name' attribute를 가진 property의 값을 'tomato3'으로 변경하게 되었기 때문입니다.
각자 다른 attribute 값을 가진 프로퍼티에 setAttribute()를 이용하여 property 값이 변경되는지 확인해보도록 하겠습니다.
@customElement("lit-tomato")
class Tomato extends LitElement {
  @property() name = "tomato1";
  @property({ attribute: true }) myProp1 = "myProp1";
  @property({ attribute: false }) myProp2 = "myProp2";
  @property({ attribute: "my-custom-prop3" }) myProp3 = "myProp3";

  connectedCallback() {
    super.connectedCallback();
    setTimeout(() => {
      this.setAttribute("name", "changed-name");
      this.setAttribute("myprop1", "changed-myProp1");
      this.setAttribute("myprop2", "changed-myProp2");
      this.setAttribute("my-custom-prop3", "changed-myProp3");

      this.requestUpdate();
    }, 2000);
  }

  render() {
    return html`
      <style></style>
      <h1>Hello ${this.name}</h1>
      <h1>Hello ${this.myProp1}</h1>
      <h1>Hello ${this.myProp2}</h1>
      <h1>Hello ${this.myProp3}</h1>
    `;
  }
}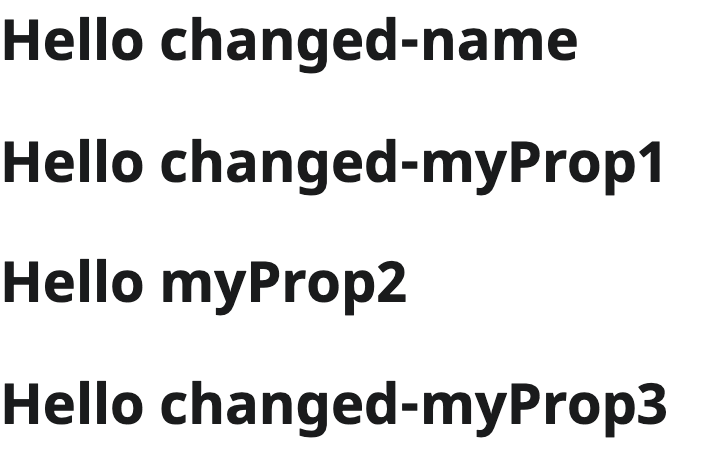
myProp2를 제외한 property의 값이 변경 되었습니다. myProp2는 왜 변경되지 않았을까요?
@property({ attribute: false }) myProp2 = "myProp2";
attribute 값을 false로 하여attribute가 생성되지 않아 setAttribute("myprop2","")에서 "myprop2"를 찾을 수 없었기 때문입니다. attribute가 변경 되는 것을 좀더 직접적으로 확인해 보도록 하겠습니다.
   attributeChangedCallback(attributeName: string, oldVal: any, newVal: any) {
    super.attributeChangedCallback(attributeName, oldVal, newVal);
    console.log(
      "attribute ",
      attributeName,
      "은 ",
      oldVal,
      "에서 ",
      newVal,
      "로 변경되었습니다."
    );
  }
콘솔에 다음과 같이 출력 되었습니다.

attributeChangedCallback(): 웹 컴포넌트의 생명주기 중 하나로 컴포넌트 attribute값이 변경 될 때 호출됩니다. 첫번째 인자로 변경된 attribute의 문자열을, 두번째 인자로 변견 전의 값을, 세번째 인자로 변경 된 값을 받게 됩니다. 마찬자기로 생명주기 메서드는 super를 사용해야 합니다.
그렇다면 이전에 하였던 property를 직접 변경하는 방법을 사용하면 어떻게 될까요?
버튼을 만들어 setAttribute() 대신 직접 property를 변경하는 함수를 버튼의 클릭 이벤트로 전달해 주도록 하겠습니다.
@customElement("lit-tomato")
class Tomato extends LitElement {
  @property() name = "tomato1";
  @property({ attribute: true }) myProp1 = "myProp1";
  @property({ attribute: false }) myProp2 = "myProp2";
  @property({ attribute: "my-custom-prop3" }) myProp3 = "myProp3";

  changeProperties() {
    this.name = "changed-name";
    this.myProp1 = "changed-myProp1";
    this.myProp2 = "changed-myProp2";
    this.myProp3 = "changed-myProp3";
  }

  render() {
    return html`
      <style></style>
      <h1>Hello ${this.name}</h1>
      <h1>Hello ${this.myProp1}</h1>
      <h1>Hello ${this.myProp2}</h1>
      <h1>Hello ${this.myProp3}</h1>
      <button @click="${this.changeProperties}">changeProperties</button>
    `;
  }
}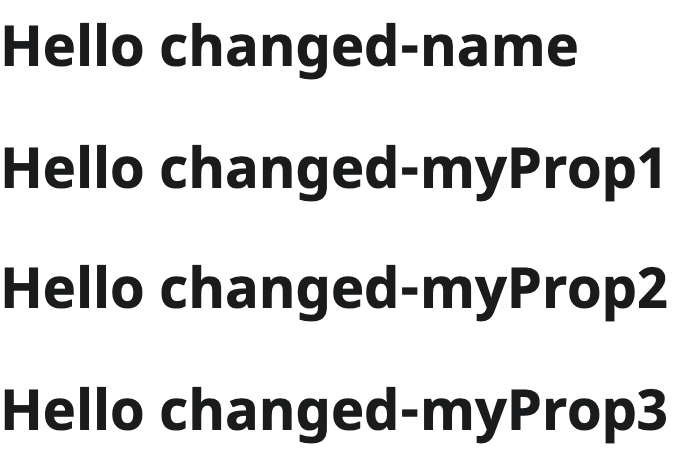
버튼을 클릭하자 값이 전부 변경 되었습니다. 이 방식은 property의 attribute을 변경 한 것이아닌 property의 자동으로 생성 된 setter를 실행하여 변경하였기 때문입니다.
accessors
property를 선언하였을때 다음과 같이 getter와 setter가 생성 됩니다.
static get properties() { return { myProp: { type: String } }; }

set myProp(value) {
  // Implement setter logic here...
  // retrieve the old property value and store the new one
  this.requestUpdate('myProp', oldValue);
}
get myProp() { ... }

...

// Later, set the property
this.myProp = 'hi'; // Invokes your setter
getter와 setter 쌍을 property accessors라고 부릅니다. property를 선언할때에 accessors를 자동으로 만들지 않고 getter와 setter를 직접 만들어 줄 수 있습니다. 'name' property를 다음과 같이 변경하도록 하겠습니다.
  private _name: string = "tomato1";

  @property({ noAccessor: true })
  get name() {
    return this._name;
  }

  set name(val) {
    let oldVal = this._name;
    this._name = val + "-custom";
    this.requestUpdate("prop", oldVal);
  }
setter에 변경될 값에 "-custom"이라는 글자가 추가되도록 하였습니다.

커스텀 setter가 실행되어 그림과 같이 출력이 되는 것을 볼 수 있습니다.
앞에서 attribute를 변경하는 것과 accessors를 이용하여 property를 변경하는 것을 해보았습니다.
그렇다면 이번에는 반대로 property의 업데이트를 방지하는 것은 어떻게 해야할까요?
hasChanged
property의 hascChanged옵션을 사용한다면 이전 값과, 새로운 값을 이용하여 property의 업데이트를 결정 할 수 있습니다.
class Tomato extends LitElement {
  @property({
    hasChanged: (newVal, oldVal) => {
      return false;
    },
  })
  name = "original-name";

  changeProperties() {
    this.name = "changed-name";
  }
  render() {
    return html`
      <style></style>
      <h1>Hello ${this.name}</h1>
      <button @click="${this.changeProperties}">changeProperties</button>
    `;
  }
}
버튼을 클릭해도 업데이트가 발생하지 않는 것을 볼 수 있습니다.
(버그인지 다른 값이 업데이트 되면 hasChanged가 false여도 업데이트가 되버리네요... 그래서 Issue를 만들엇습니다.https://github.com/Polymer/lit-element/issues/1098)
여기까지 property의 옵션 중attribute, noAccessor, hasChanged 값에대해 다뤄 보았습니다.
property는 이외에도 type, reflect, converter 옵션을 가지고 있습니다. 이는 property의 값을 변환해주는 용도로 사용할 수 있습니다. 더 자세한 정보는 properties 공식문서 를 참고 하시기 바랍니다.
다음 장에서는 lit-element의 생명주기를 살펴보면서 업데이트가 발생하는 순서를 살펴보도록 하겠습니다.
조항연 좋아녕 아주 조조항연