블로그에서 보기 : https://lit-blog.vercel.app/post/lit-tutorial-3
LitElement의 라이프사이클에 대해 다뤄보도록 하겠습니다. 모든 라이프사이클 메서드에서는 super를 사용하여야 하는것을 유의하여야 합니다.
lit-element는 웹 컴포넌트의 기본 라이프사이클을 상속하게 됩니다.
> 웹 컴포넌트 라이프사이클
웹 컴포넌트 라이프 사이클
웹 컴포넌트의 기본 라이프사이클은 다음과 같습니다.
connectedCallback: 커스텀 엘리먼트가 문서의 DOM에 처음 연결될 때 호출됩니다.
disconnectedCallback: 커스텀 엘리먼트가 문서의 DOM에서 연결 해제 될 때 호출됩니다.
conntectedCallback을 사용하여 리액트에서 componentDidMount처럼 이벤트를 추가하거나 데이터를 불러올 수 있습니다.
connectedCallback() {
  super.connectedCallback();
  window.addEventListener('resize', this._handleResize);
}
disconnectedCallback() {
  window.removeEventListener('resize', this._handleResize);
  super.disconnectedCallback();
}
adoptedCallback: 커스텀 엘리먼트가 새 문서로 이동 될 때 호출됩니다.
attributeChangedCallback: 커스텀 엘리먼트의 속성 중 하나가 추가, 제거 또는 변경 될 때 호출됩니다.
다음과 같이 변경된 속성의 이름, 변경되기 전의 값, 변경된 값을 세개의 인자로 받게 됩니다.
  attributeChangedCallback(name, oldValue, newValue) {
    super.attributeChangedCallback(name, oldValue, newValue);
    console.log(name, oldValue, newValue);
  }
}
property 변경 라이프사이클
엘리먼트의 property를 변경하게 될때의 라이프 사이클 순서입니다.
- someProperty.hasChanged
- requestUpdate
- performUpdate
- shouldUpdate
- update
- render
- firstUpdated
- updated
- updateComplete
하나씩 살펴보도록 하겠습니다.
1. someProperty.hasChanged
이전 포스팅에서 property의 hasChanged 옵션을 이용하여 업데이트를 제어 할 수 있었습니다.
  @property({
    hasChanged: (newVal, oldVal) => {
      console.log("has changed", oldVal, " to ", newVal);
      return true;
    },
  })
  name = "original-name";
2. requestUpdate
property의 hasChanged가 true라면 property의 setter가 실행 됩니다. 그리고 setter 내부의
this.requestUpdate("prop", oldVal) 를 실행하게 됩니다.
@customElement("lit-tomato")
class Tomato extends LitElement {
  private _name: string = "original-name";

  @property({
    hasChanged: (newVal, oldVal) => {
      return true;
    },
  })
  get name() {
    return this._name;
  }

  set name(val) {
    let oldVal = this._name;
    this._name = val;
    this.requestUpdate("prop", oldVal);
  }
  render() {
    return html`
      <style></style>
      <h1>Hello ${this.name}</h1>
      <button @click="${this.changeProperties}">changeProperties</button>
    `;
  }

  changeProperties() {
    this.name = "changed-name";
  }
}
3. performUpdate
기본적으로 performUpdate는 브라우저 이벤트 루프의 다음 실행이 끝난 후 마이크로 태스크로 예약됩니다. 일정을 잡으려면 performUpdate호출하기 전에 상태를 기다리는 비동기 메서드로 구현합니다 super.performUpdate(). 예를 들면 :
 async performUpdate() {
    console.log("performUpdate");
    await new Promise((resolve) => requestAnimationFrame(() => resolve()));
    super.performUpdate();
  }
4. shouldUpdate
업데이트 진행 여부를 제어합니다. 기본적으로 이 메서드는 항상 true를 반환합니다.
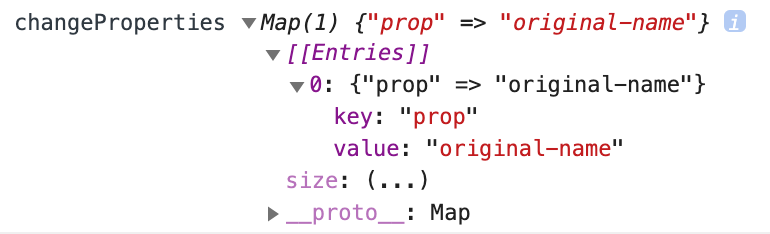
  shouldUpdate(changeProperties) {
    console.log("shouldUpdate?", changeProperties);
    super.shouldUpdate(changeProperties);
    return true;
  }
그림과 같이 콘솔에 변경된 값들의 이전 값이 출력 됩니다.
5. update
reflects property values to attributes(property값들을 attributes에 반영합니다.
lit-html의 render를 호출 합니다.
6. render
lit-html의 render를 이용하여 DOM을 렌더링 합니다.
7. firstUpdated
돔이 처음으로 업데이트 되었을때 호출 됩니다. 엘리먼트의 템플릿이 처음 만들어 졌을때 한번만 실행하기 위해 사용 됩니다.
  firstUpdated(changedProperties) {
    console.log("first updated!");
    super.firstUpdated(changedProperties);
  }
8. updated
돔이 업데이트되어 렌더링된 후에 호출 됩니다.
  updated(changedProperties) {
    console.log("updated", changedProperties);
    super.updated(changedProperties);
  }
9. updateComplete
updateComplete 는 Promise 로 업데이트가 끝났을때 resolve 합니다.
  async changeProperties() {
    this.name = "changed-name";
    await this.updateComplete;
    console.log("update completed!");
  }
한번에 보기
@customElement("lit-tomato")
class Tomato extends LitElement {
@property({
hasChanged: (newVal, oldVal) => {
console.log("has changed", oldVal, " to ", newVal);
return true;
},
})
name = "original-name";
connectedCallback() {
super.connectedCallback();
console.log("connected");
}
disconnectedCallback() {
super.connectedCallback();
console.log("disconnected");
}
async performUpdate() {
console.log("performUpdate");
await new Promise((resolve) => requestAnimationFrame(() => resolve()));
super.performUpdate();
}
shouldUpdate(changeProperties) {
console.log("shouldUpdate?", changeProperties);
super.shouldUpdate(changeProperties);
return true;
}
firstUpdated(changedProperties) {
console.log("first updated!");
super.firstUpdated(changedProperties);
}
updated(changedProperties) {
console.log("updated", changedProperties);
super.updated(changedProperties);
}
render() {
return html`
<style></style>
<h1>Hello ${this.name}</h1>
${console.log("render!!")}
<button @click="${this.changeProperties}">changeProperties</button>
`;
}
async changeProperties() {
this.name = "changed-name";
await this.updateComplete;
console.log("update completed!");
}
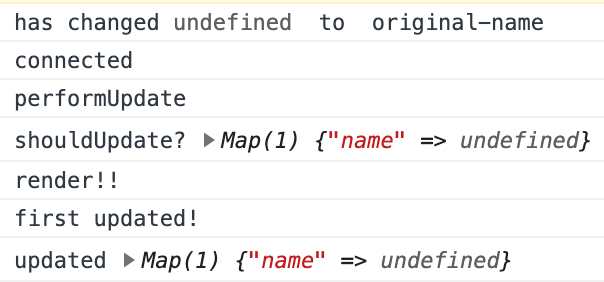
}실행한 후 처음 페이지에 접속하여 커스텀 엘리먼트를 불러왔을 때
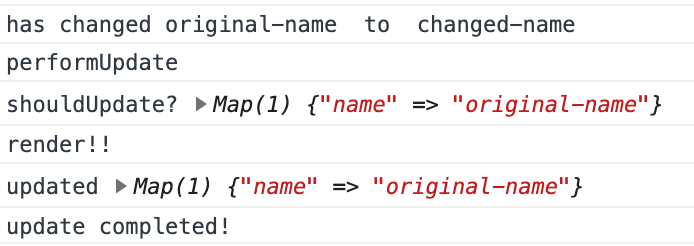
버튼을 클릭하였을 때
😆😆