블로그에서 보기 : https://lit-blog.vercel.app/post/lit-tutorial-4
이번 포스팅에는 LitElement에서 바인딩(bind) 하는 것을 알아보도록 하겠습니다.
lit-html에서는 엘리먼트에 자바스크립트 표현식을 바인딩 하는 방법이 특별합니다.
> lit-html-biding
예제를 통해 살펴보도록 하겠습니다.
element
property
<input> 태그에 값을 변경하고 저장할 수 있도록 value와 change 이벤트를 넣어주도록 하겠습니다.
@customElement("lit-tomato")
class Tomato extends LitElement {
@property() value = "";
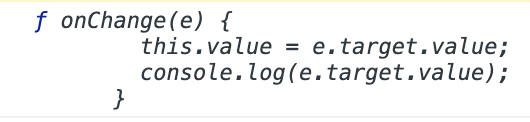
onChange(e) {
this.value = e.target.value;
console.log(e.target.value);
}
render() {
return html` <input .value="${this.value}" @keyup="${this.onChange}" /> `;
}
}<input>태그에 .value라는 값으로 value property를 넣어주었습니다. 여기서 속성에 ' . '이 붙어있다면 값은 <input>태그의 value property에 바인딩 되게 됨을 의미합니다.
' . '은 lit-html에서 property를 바인딩 할 때 사용됩니다.
event listerner
@keyup을 넣게 되면 <input>의 'keyup'에 이벤트에 onChange라는 이벤트 헨들러를 추가해 주게 됩니다. 결과적으로, <input>의 keyup 이벤트가 발생할 때 마다 value property가 변경되며 콘솔이 찍히게 됩니다.
attribute
이번에는 <input>의 '.value' 속성을 'value'로 변경해보도록 하겠습니다.
return html` <input value="${this.value}" @keyup="${this.onChange}" /> `;속성에 ' . '을 제거하였을때 어떤 차이가 있는지 개발자도구의 'Element'탭을 보면 직접적으로 볼 수 있습니다.
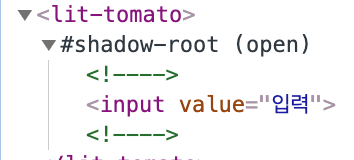
'value=' 와 같이 속성이름 앞에 기호가 없다면 attribute로 바인딩 되게 됩니다.
attribute를 전달해 주면 그림과 같이 html 속성으로 추가되는걸 볼 수 있습니다. 몇 가지 attribute를 더 사용해 보도록 하겠습니다.
  render() {
    return html`
      <input
        id="my-input"
        class="my-class"
        type="text"
        style="color:blue;"
        .value="${this.value}"
        @keyup="${this.onChange}"
      />
    `;
  }
이러한 값들을 attribute로 바인딩 할 수 있습니다.
boolean attribute
이번에는<input> 태그에 'disabled'를 추가해 보도록 하겠습니다.
      <input
        .value="${this.value}"
        @keyup="${this.onChange}"
        disabled="${false}"
      />
'disabled'를 추가하려하니 다음과 같은 경고가 나오게 됩니다.

해당 attribute는 boolean 타입이므로 boolean 바인딩을 사용하라는 경고 입니다. boolean 바인딩을 사용하기 위해서는 속성앞에 '?' 를 추가해 주어야 합니다.
  @property() value = "4";
  @property({ type: Boolean }) disabled = false;

  onChange(e) {
    this.value = e.target.value;
  }

  render() {
    return html`
      <input
        id="my-input"
        .value="${this.value}"
        @change="${this.onChange}"
        ?disabled="${this.disabled}"
      />
    `;
  }
이렇게 lit-html의 엘리먼트에 값을 바인딩 하는 것을 살펴 보았습니다.
그렇다면 커스텀 엘리먼트에서는 어떻게 사용해야 할까요?
커스텀 엘리먼트에서는 값들을 어떻게 바인딩하여 사용 할 수 있는지 알아보도록 하겠습니다.
custom element
앞에서 <input>태그를 사용하여 property를 바인딩 하였드이 커스텀 엘리먼트를 만들어 property를 바인딩 해보도록 하겠습니다. 우선 property를 가진 <lit-tomato>라는 엘리먼트를 만들어 <child-tomato>라는 컴포넌트를 바인딩 시키도록 하겠습니다.
앞의 코드에서 id는 attribute, .value는 property, @change는 event Listener, ?disabled는 boolean Attribute로 <input>태그에 바인딩 되었습니다. 만약 앞에 기호를 붙이지 않는다면 전부 attribute로 바인딩 되게 됩니다.
이번에는 커스텀 엘리먼트를 만들어 속성들을 바인딩해보도록 하겠습니다.
pages/lit-tomato.ts
import { LitElement, html, customElement, property } from "lit-element";
import "../components/child-tomato";

@customElement("lit-tomato")
class Tomato extends LitElement {
  render() {
    return html` <child-tomato></child-tomato> `;
  }
}

declare global {
  interface HTMLElementTagNameMap {
    "lit-tomato": Tomato;
  }
}
components/child-tomao.ts
import { LitElement, html, customElement, property } from "lit-element";

@customElement("child-tomato")
class ChildTomato extends LitElement {
  render() {
    return html`
      <style></style>
      <h1>i'm child-tomato</h1>
      <input />
    `;
  }
}

declare global {
  interface HTMLElementTagNameMap {
    "child-tomato": ChildTomato;
  }
}
<lit-tomato>에 앞에서와 같이 전달할 property를 만들도록 하겠습니다.
  @property({ type: String }) value = "toamto";
  @property({ type: Boolean }) disabled = true;

  onChange(e) {
    this.value = e.target.value;
    console.log(e.target.value);
}<input>에서와 동일하게 속성을 전달해 보도록 하겠습니다.
      <child-tomato
        id="my-input"
        .value="${this.value}"
        @change="${this.onChange}"
        ?disabled="${this.disabled}"
      ></child-tomato>
그리고 child-tomato가 값을 받았는지 확인해 보도록 하겠습니다.
components/child-tomao.ts
class ChildTomato extends LitElement {
  //*connectedCallback은 커스텀 엘리먼트가 문서의 DOM에 처음 연결될 때 호출됩니다.
  connectedCallback() {
    super.connectedCallback();
    console.log(this.id);
    console.log(this.value);
    console.log(this.change);
    console.log(this.disabled);
  }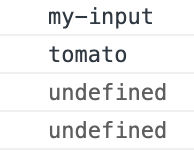
attribute 인 'id'와, property인 '.value'값이 출력 된 것을 확인 할 수 있었습니다.
이벤트 헨들러와 disabled 값은 어떻게 받아와야 할까요?
이벤트 헨들러를 @change로 전달하게 되면 onChange 함수를 값으로 전달받는 것이 아닌, <child-tomato>에 change 의 change 이벤트에 이벤트 리스너가 추가 됨을 의미합니다. 이를 확인하기위해 event를 발생시켜 보도록 하겠습니다.
components/child-tomao.ts
  connectedCallback() {
    super.connectedCallback();

    this.dispatchEvent(new Event("change"));

    // console.log(this.id);
    // console.log(this.value);
    // console.log(this.change);
    // console.log(this.disabled);
  }
콘솔에 'tomato'가 출력 되는 것을 확인 할 수 있었습니다.
좀 더 직접적으로 확인해 보기위해 이벤트 이름을 바꿔보도록 하겠습니다!
pages/lit-tomato.ts
      <child-tomato
        @jerrynim-custom-event="${this.onChange}"
      ></child-tomato>
class ChildTomato extends LitElement {
connectedCallback() {
super.connectedCallback();
this.dispatchEvent(new Event("jerrynim-custom-event"));동일하게 'tomato'가 출력되는 것을 확인 할 수 있었습니다.
그렇다면 <child-tomato>의 <input>태그에 onChange를 전달하여 사용하려면 어떻게 해야할가요?
<lit-tomato>에서 '@change'를 '.onchange'로 변경해 보도록 하겠습니다.
pages/lit-tomato.ts
      <child-tomato
        .onchange="${this.onChange}"
      ></child-tomato>
components/child-tomao.ts
  connectedCallback() {
    super.connectedCallback();
    console.log(this.onchange);
  }
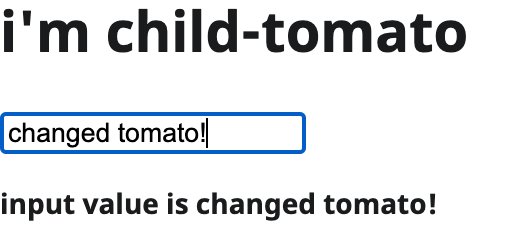
이벤트 헨들러를 property로 전달해주었습니다. 전달받은 이벤트 헨들러를 <input>태그의 @keyup 속성에 넣어주도록 하겠습니다. 그리고 전달받은 value를 띄우도록 하겠습니다.
class ChildTomato extends LitElement {
  customFunction: any;

  render() {
    return html`
      <style></style>
      <h1>i'm child-tomato</h1>
      <input .value="${this.value}" @keyup="${this.customFunction}" />
      <p>input value is ${this.value}</p>
    `;
  }
}

인풋안에 값을 입력하면 콘솔에 입력값이 출력 되는 걸 확인 할 수 있습니다.하지만 'input value is tomaoto'는 변경되지 않는 걸로 보아 <lit-tomato>의 value가 <child-tomato>에 바인딩 되지 않았다는 걸 알수 있습니다. 바인딩 시키기위해 <child-tomato>에 value property를 만들어 주도록 하겠습니다.
components/child-tomato.ts
class ChildTomato extends LitElement {
  @property({ type: String }) value = "";
이제 인풋에 값을 입력하면 <p>태그안의 this.value 값도 변경되 는것을 확인 할 수 있습니다.
이처럼 커스텀 엘리먼트에 property를 바인딩 하기 위해선 커스텀 엘리먼트에서 property를 선언해 주어야 합니다.
이전에 '?disabled'로 전달해준 속성의 값이 undefined 였습니다. ' ?' 기호는 attribute이기에 property처럼 값을 받지 못하였습니다. disabled 값을 바인딩하기 위해 커스텀 엘리먼트에 'disabled'라는 이름을 가진 attribute가 필요합니다. <child-tomato>에 'disabled'라는 attribute를 가진 property를 만들어 보도록 하겠습니다.
  @property({ type: Boolean, attribute: "disabled" }) disabledValue = false;

     <input
        .value="${this.value}"
        @keyup="${this.customFunction}"
        ?disabled="${this.disabledValue}"
      />
<lit-tomato>의 disabled 값은 'true'로 disabled 값이 잘 적용 된 것을 확인할 수 있습니다.
children
이번에는 <child-tomato>에게 html 템플릿을 전달해보도록 하겠습니다.
pages/lit-tomato.ts
import { LitElement, html, customElement, property } from "lit-element";
import "../components/child-tomato";

@customElement("lit-tomato")
class Tomato extends LitElement {
  render() {
    return html`<child-tomato><p>자식</p></child-tomato>`;
  }
}

declare global {
  interface HTMLElementTagNameMap {
    "lit-tomato": Tomato;
  }
}
components/child-tomato.ts
import { LitElement, html, customElement, property } from "lit-element";

@customElement("child-tomato")
class ChildTomato extends LitElement {
  render() {
    return html`
      <style></style>
      <div>자식 :</div>
    `;
  }
}

declare global {
  interface HTMLElementTagNameMap {
    "child-tomato": ChildTomato;
  }
}

자식을 나타내려면 어떻게 해야할까요?
첫번째 방법은 간단하게 this.children을 사용하면 됩니다.
components/child-tomato.ts
class TomatoChild extends LitElement {
  render() {
    return html`
      <style></style>
      <div>${this.children}</div>
    `;
  }
}
다른 방법은 쉐도우 돔의 <slot>태그를 사용하는 것입니다.
> slot MDN
    return html`
      <style></style>
      <div>자식 :</div>
      <slot></slot>
    `;
마치며...
Lit-html에서 property를 바인딩 하는 것을 알아 보았습니다. 바인딩하는 법만 알게된다면 투두리스트 정도의 웹을 만드는데 큰 어려움을 없을 거라 생각합니다.
다음 포스팅에서는 redux를 사용하여 전역 상태관리를 해보려고 합니다.
와 너무 알기 쉽게 적으신 좋은글이였어요! 꼭 한번 사용해보도록 해볼게요!
좋은글 감사합니다! :)