
이번 포스트에서는 Web View(웹 뷰)에 대하야 알아보려고 한다.
Web View란?
포스트 시작에 앞에 Web View가 어떤 기능을 구현할 수 있는지 알아보고자 한다.
Web View란 말 그대로 인터넷 Web에 대한 View를 제공한다. 따라서 HTML로 작성된 페이지를 표시할 수 있다.
DB에 있는 HTML로 작성된 파일을 가져와 표시하는 하이브리드 앱 형태부터 앱에서 직접 가지고 있는 HTML 파일을 표시하는 iOS 전용 앱까지 모두 Web View를 이용하여 구현이 가능하다.
여담이지만 Web View에 대하여 공부하던 중 알게된 내용으로 apple의 정책상 iPhone과 iPad 등에서 구동하는 웹 브라우저 엔진은 apple의 자체 웹 브라우저 엔진이자 사파리의 구동 엔진인 WebKit만이 사용 가능하다.
결국 그동한 사용하던 크롬이나 여러 모바일 웹 브라우저는 겉모습만 다르고 내부 동작은 모두 사파리와 동일했던것...
Web View 구현
1. storyboard 구성 및 Outlet 변수와 Action 함수 선언
이제 본격적으로 Web View를 구현하기 위하여 스토리 보드에서 아래과 같이 구성하였다.
- text field: url을 입력받기 위한 text field
- go button: 입력 받은 url 페이지로 이동하기 위한 버튼
- activity indicator: 로딩을 표시하기 위한 activity indicator
- WebKit View: web을 표시하기 위한 view
- tool bar: 뒤로가기, 앞으로가기, 새로고침, 로딩 멈춤 버튼을 구현하기 위한 tool bar
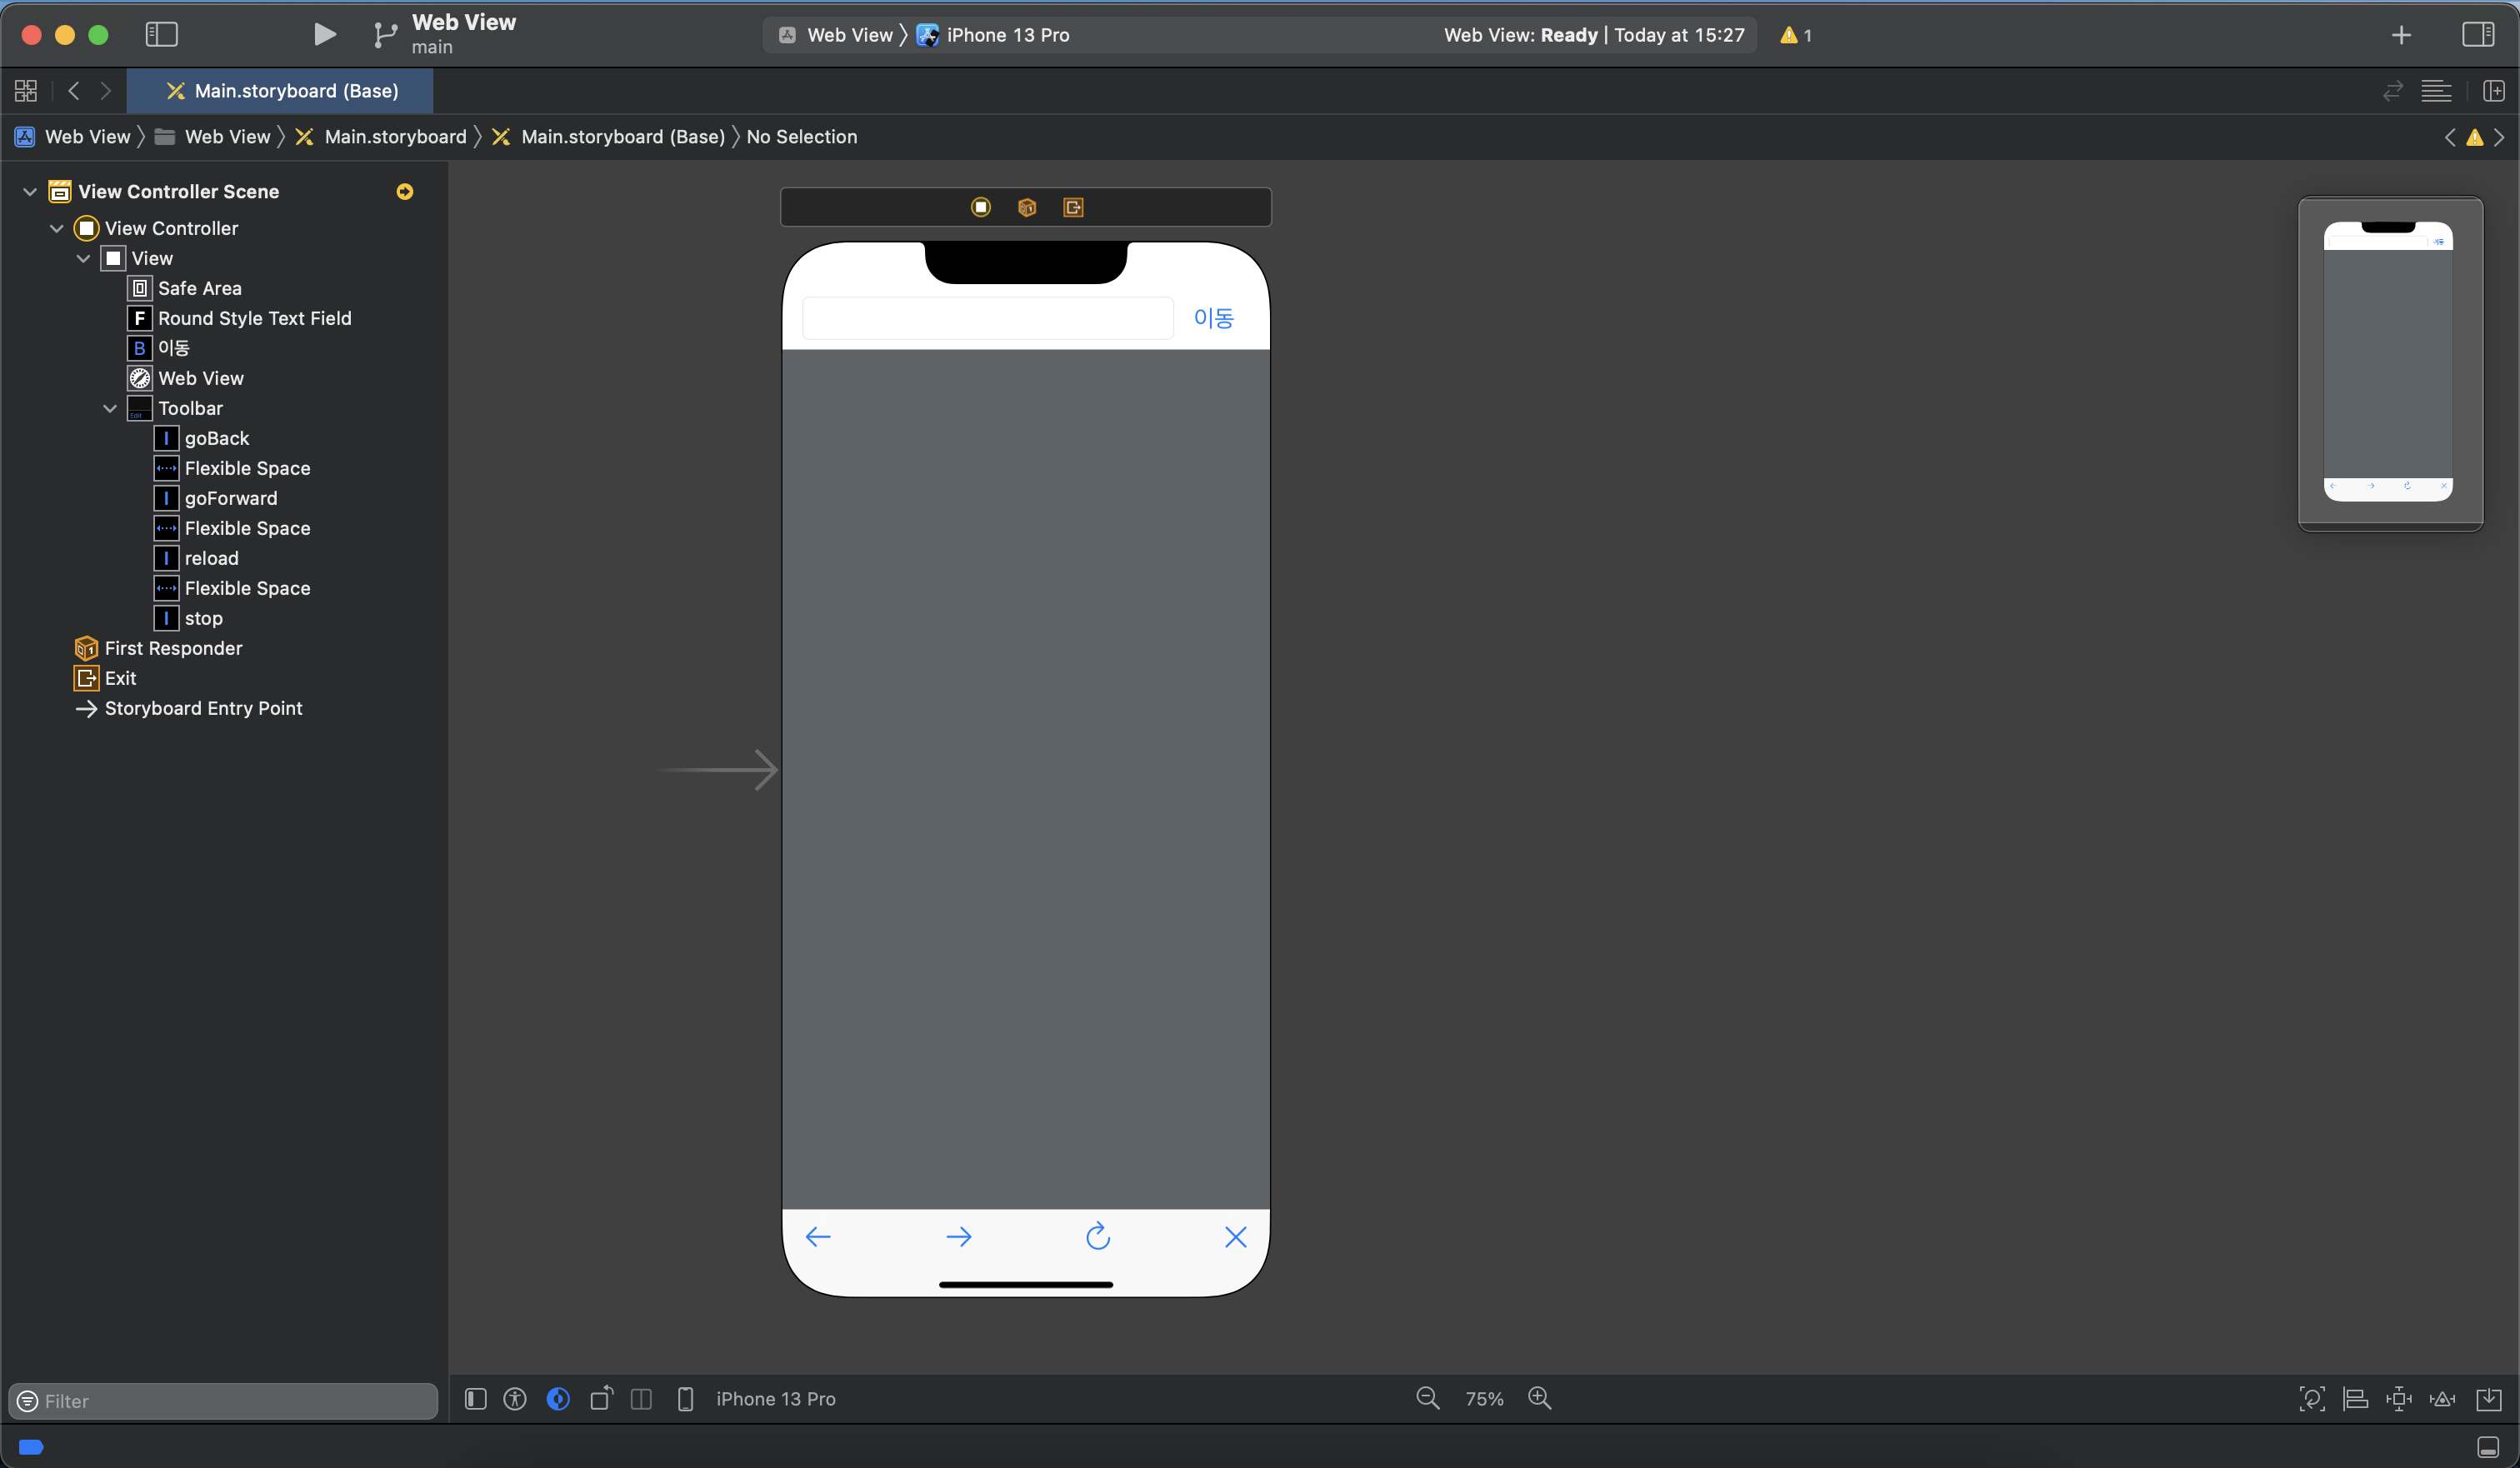
그리고 Lable과 WebKit View 객체는 Outlet 변수로 정의하고 button 객체는 Action 함수로 정의하고 객체와 연결한다.
import UIKit
import WebKit

class ViewController: UIViewController {
    @IBOutlet var urlTextField: UITextField!
    @IBOutlet var web: WKWebView!
    @IBOutlet var activityIndicator: UIActivityIndicatorView!

    override func viewDidLoad() {
        super.viewDidLoad()
        // Do any additional setup after loading the view.
    }

    @IBAction func btnUrlGo(_ sender: UIButton) {

    }

    @IBAction func btnGoBack(_ sender: UIBarButtonItem) {

    }

    @IBAction func btnGoForward(_ sender: UIBarButtonItem) {

    }

    @IBAction func btnReload(_ sender: UIBarButtonItem) {

    }

    @IBAction func btnStop(_ sender: UIBarButtonItem) {

    }
}
참고로 Web View를 구현하기 위한 여러 클래스는 WebKit frame work에 정의 되어 있으므로 WebKit frame work를 import 하도록 한다.
웹 페이지를 로드하기 위해서는 url을 URL 타입으로 변환하고 이것을 다시 URLRequest 타입으로 변환하여 WKWebView 타입 객체에 전달하는 과정을 거치므로 이에 대한 함수를 선언하도록 한다.
func loadWebPage(_ url: String) {
let stringToURL = URL(string: url)
let URLToRequest = URLRequest(url: stringToURL!)
web.load(URLToRequest)
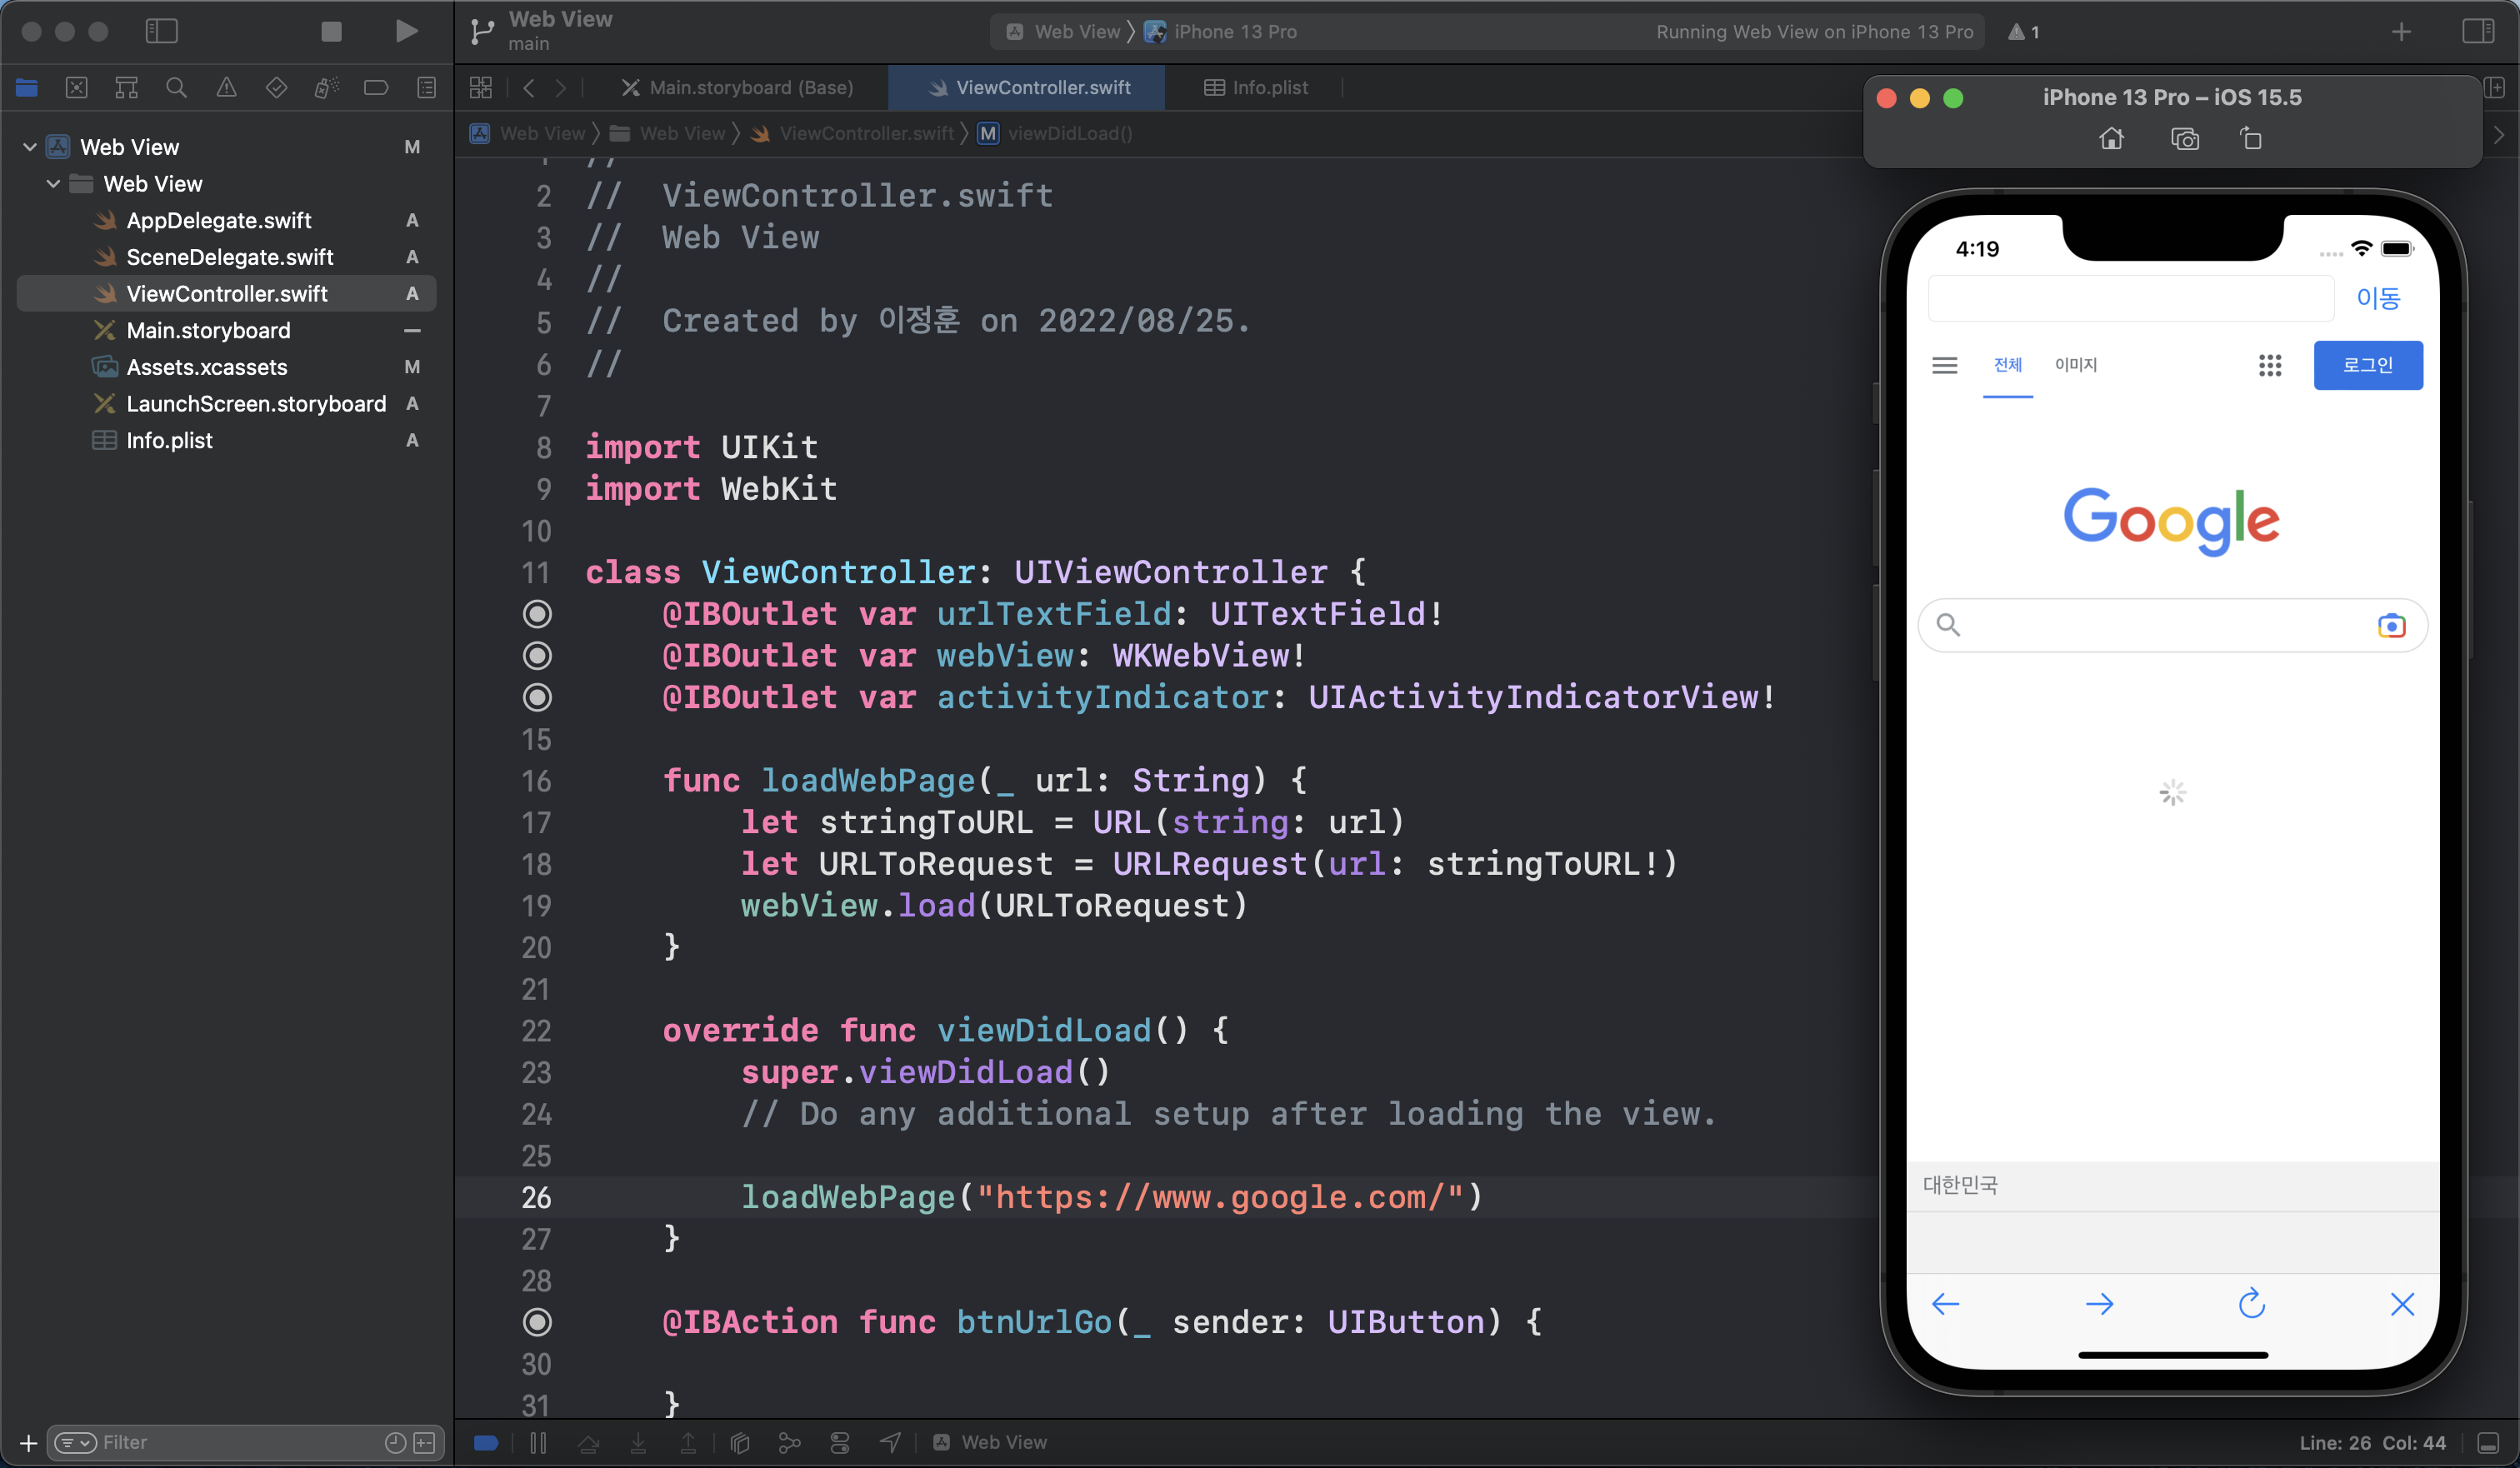
}이제 url로 웹 페이지를 로드할 수 있는 함수를 작성하였으니 앱이 처음 실행될때 google 메인 페이지가 로드 될수 있도록 viewDidLoad 함수 내부에 다음과 같이 작성한다.
override func viewDidLoad() {
        super.viewDidLoad()
        // Do any additional setup after loading the view.

        loadWebPage("https://www.google.com/")
    }
만약 로드하고자 하는 웹 페이지가 HTTP 형식이라면 apple 정책에 의거하여 보안상의 이유로 iOS 9부터 HTTP에 대한 연결 차단이 기본으로 설정 되어 있어 실행시 경고가 발생한다.
따라서 HTTP로 연결 하고자 한다면 App Transport Security (ATS)를 활성화하여 HTTP 연결을 허용하도록 설정한다.

위와 같이 Info.plist에 들어가서 App Transport Security를 추가하고 Allow Arbitrary Loads를 Yes로 설정한다.
여기까지 마친후 시뮬레이터로 앱을 실행하면 google 메인 화면이 정상적으로 로드 되는것을 확인할 수 있다.
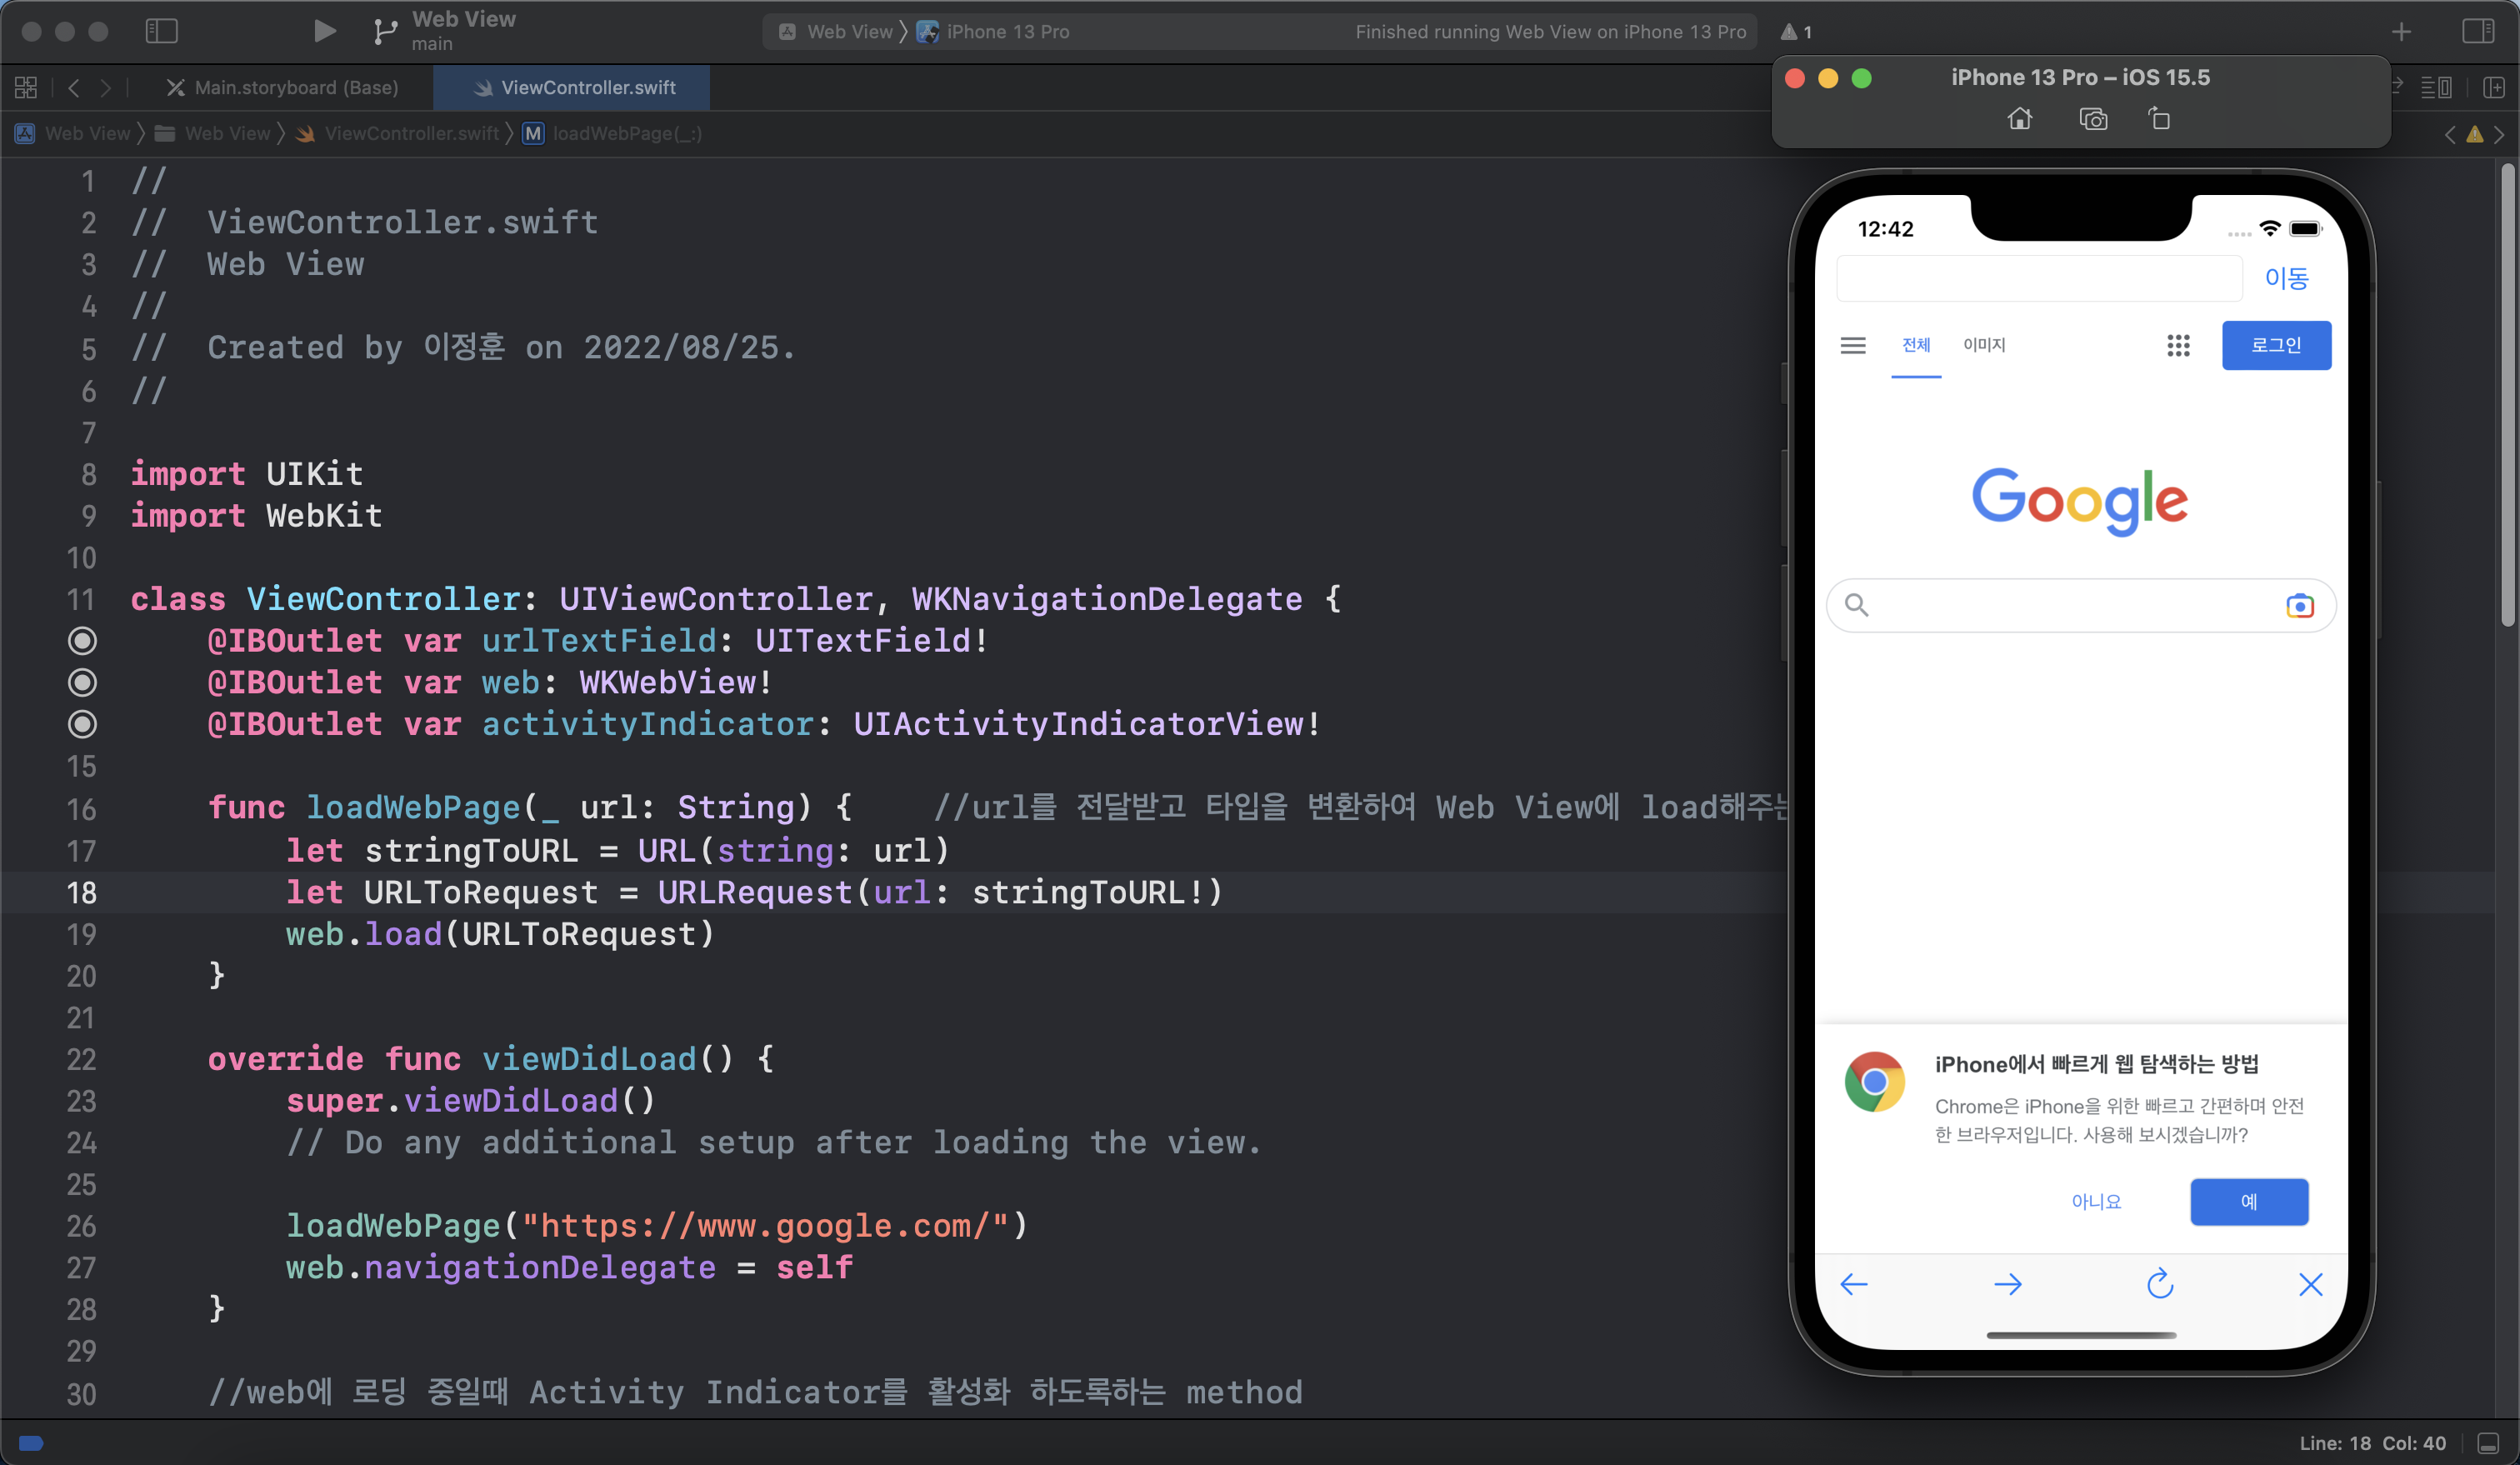
2. Activity Indicator
위에서 설명한 대로 Activity Indicator는 웹 페이지 로딩 상태를 표시하는 객체로 로딩 중에 표시되고 로딩이 끝나거나 로딩에 실패할 경우 없어지도록 구현하려고 한다.
현재 Activity Indicator는 Outlet 변수로 연결되어 있기 때문에 이것을 구현하기 위하여 delegate를 설정한다.
ViewController가 WKNavigationDelegate 프로토콜을 채택하도록하고 delegate를 self로 넘겨준다.
class ViewController: UIViewController, WKNavigationDelegate {

...
    override func viewDidLoad() {
        super.viewDidLoad()
        // Do any additional setup after loading the view.

        loadWebPage("https://www.google.com/")
        web.navigationDelegate = self
    }
여기서 잠깐 apple 공식 문서에서 WKNavigationDelegate 프로토콜의 정의를 살펴 보고자 한다.
Implement the methods of the WKNavigationDelegate protocol in the object you use to coordinate changes in your web view’s main frame. As the user attempts to navigate web content, the web view coordinates with its navigation delegate to manage any transitions. For example, you might use these methods to restrict navigation from specific links within your content. You might also use them to track the progress of requests, and to respond to errors and authentication challenges.
요약하자면, delegate method를 사용하여 Web View의 변경 사항(전환)에 대하여 관리하고 특정 링크에 대해 허가 및 제한을 할 수도 있으며 사용자의 요청에 대한 진행 과정(로딩 과정)도 추척할 수 있다고 한다.
따라서 WKNavigationDelegate 프로토콜를 채택하고 delegate method를 구현 함으로서 웹 페이지를 불러오는 진행 과정에 따라 delegate method가 호출 될 수 있도록 다음과 같이 구현한다.
    //web에 로딩 중일때 Activity Indicator를 활성화 하도록하는 method
    func webView(_ webView: WKWebView, didCommit navigation: WKNavigation!) {
        activityIndicator.startAnimating()    //animation 활성화
        activityIndicator.isHidden = false
    }

    //web가 로딩을 완료 했을때 Activity Indicator를 비활성화 하도록하는 method
    func webView(_ webView: WKWebView, didFinish navigation: WKNavigation!) {
        activityIndicator.stopAnimating()
        activityIndicator.isHidden = true
    }

    //web이 로딩을 실패 했을 경우 Activity Indicator를 비활성화 하도록하는 method
    func webView(_ webView: WKWebView, didFail navigation: WKNavigation!, withError error: Error) {
        activityIndicator.stopAnimating()
        activityIndicator.isHidden = true
    }
activity indicator의 delegate method를 모두 구현 후 시뮬레이터로 앱을 실행해보면 다음과 같이 페이지가 로딩 중인 경우 activity indicator가 활성화 되는 것을 볼 수 있다.

3. "이동" 버튼 구현
이제 상단의 text field에 입력을 받고 해당하는 url로 이동하는 기능을 가진 "이동" 버튼을 구현하려고 한다.
먼저 입력받은 url이 https://로 시작하는지 확인한다. 만약 url이 "https://" 로 시작한다면 입력 받은 url 그대로 loadWebPage 메서드로 넘겨 주도록 한다. 만약 "https://" 로 시작하지 않는다면 url에 "https://" 를 추가 후 loadWebPage 메서드로 넘겨 주도록 한다.
@IBAction func btnUrlGo(_ sender: UIButton) {
        if urlTextField.text!.hasPrefix("https://") {
            loadWebPage(urlTextField.text!)
        } else {
            urlTextField.text! = "https://" + urlTextField.text!
            loadWebPage(urlTextField.text!)
        }
    }
4. tool bar 버튼 구현
마지막으로 하단 tool bar의 4개 버튼에 대하여 각각 기능을 구현해 주려고 한다.
뒤로가기, 앞으로 가기, 새로 고침, 로딩 취소 버튼에 대한 기능은 WKWebView에 메서드로 구현 되어 있다. 따라서 구현하고자 하는 메서드를 다음과 같이 호출하도록 한다.
    @IBAction func btnGoBack(_ sender: UIBarButtonItem) {
        web.goBack()
    }

    @IBAction func btnGoForward(_ sender: UIBarButtonItem) {
        web.goForward()
    }

    @IBAction func btnReload(_ sender: UIBarButtonItem) {
        web.reload()
    }

    @IBAction func btnStop(_ sender: UIBarButtonItem) {
        web.stopLoading()
    }
전체 코드
import UIKit
import WebKit

class ViewController: UIViewController, WKNavigationDelegate {
    @IBOutlet var urlTextField: UITextField!
    @IBOutlet var web: WKWebView!
    @IBOutlet var activityIndicator: UIActivityIndicatorView!

    func loadWebPage(_ url: String) {    //url를 전달받고 타입을 변환하여 Web View에 load해주는 함수
        let stringToURL = URL(string: url)
        let URLToRequest = URLRequest(url: stringToURL!)
        web.load(URLToRequest)
    }

    override func viewDidLoad() {
        super.viewDidLoad()
        // Do any additional setup after loading the view.

        loadWebPage("https://www.google.com/")
        web.navigationDelegate = self
    }

    //web에 로딩 중일때 Activity Indicator를 활성화 하도록하는 method
    func webView(_ webView: WKWebView, didCommit navigation: WKNavigation!) {
        activityIndicator.startAnimating()    //animation 활성화
        activityIndicator.isHidden = false
    }

    //web가 로딩을 완료 했을때 Activity Indicator를 비활성화 하도록하는 method
    func webView(_ webView: WKWebView, didFinish navigation: WKNavigation!) {
        activityIndicator.stopAnimating()
        activityIndicator.isHidden = true
    }

    //web이 로딩을 실패 했을 경우 Activity Indicator를 비활성화 하도록하는 method
    func webView(_ webView: WKWebView, didFail navigation: WKNavigation!, withError error: Error) {
        activityIndicator.stopAnimating()
        activityIndicator.isHidden = true
    }

    @IBAction func btnUrlGo(_ sender: UIButton) {
        if urlTextField.text!.hasPrefix("https://") {
            loadWebPage(urlTextField.text!)
        } else {
            urlTextField.text! = "https://" + urlTextField.text!
            loadWebPage(urlTextField.text!)
        }
    }

    @IBAction func btnGoBack(_ sender: UIBarButtonItem) {
        web.goBack()
    }

    @IBAction func btnGoForward(_ sender: UIBarButtonItem) {
        web.goForward()
    }

    @IBAction func btnReload(_ sender: UIBarButtonItem) {
        web.reload()
    }

    @IBAction func btnStop(_ sender: UIBarButtonItem) {
        web.stopLoading()
    }
}
실행 화면
참고 자료: apple developer