
Alert이란?
alert이란 사용자에게 알림이나 경고 메세지를 나타내는 것을 말하며 사용자에게 주의를 주거나 혹은 특정 기능을 수행하게 할 수 있다.
이번 포스트에서는 로그인 화면을 구현하여 만약 ID나 password가 올바른 형식이 아닐때 alert를 발생하여 경고 메세지를 출력하는 어플리케이션은 만들어 보려고 한다.
Alert 구현
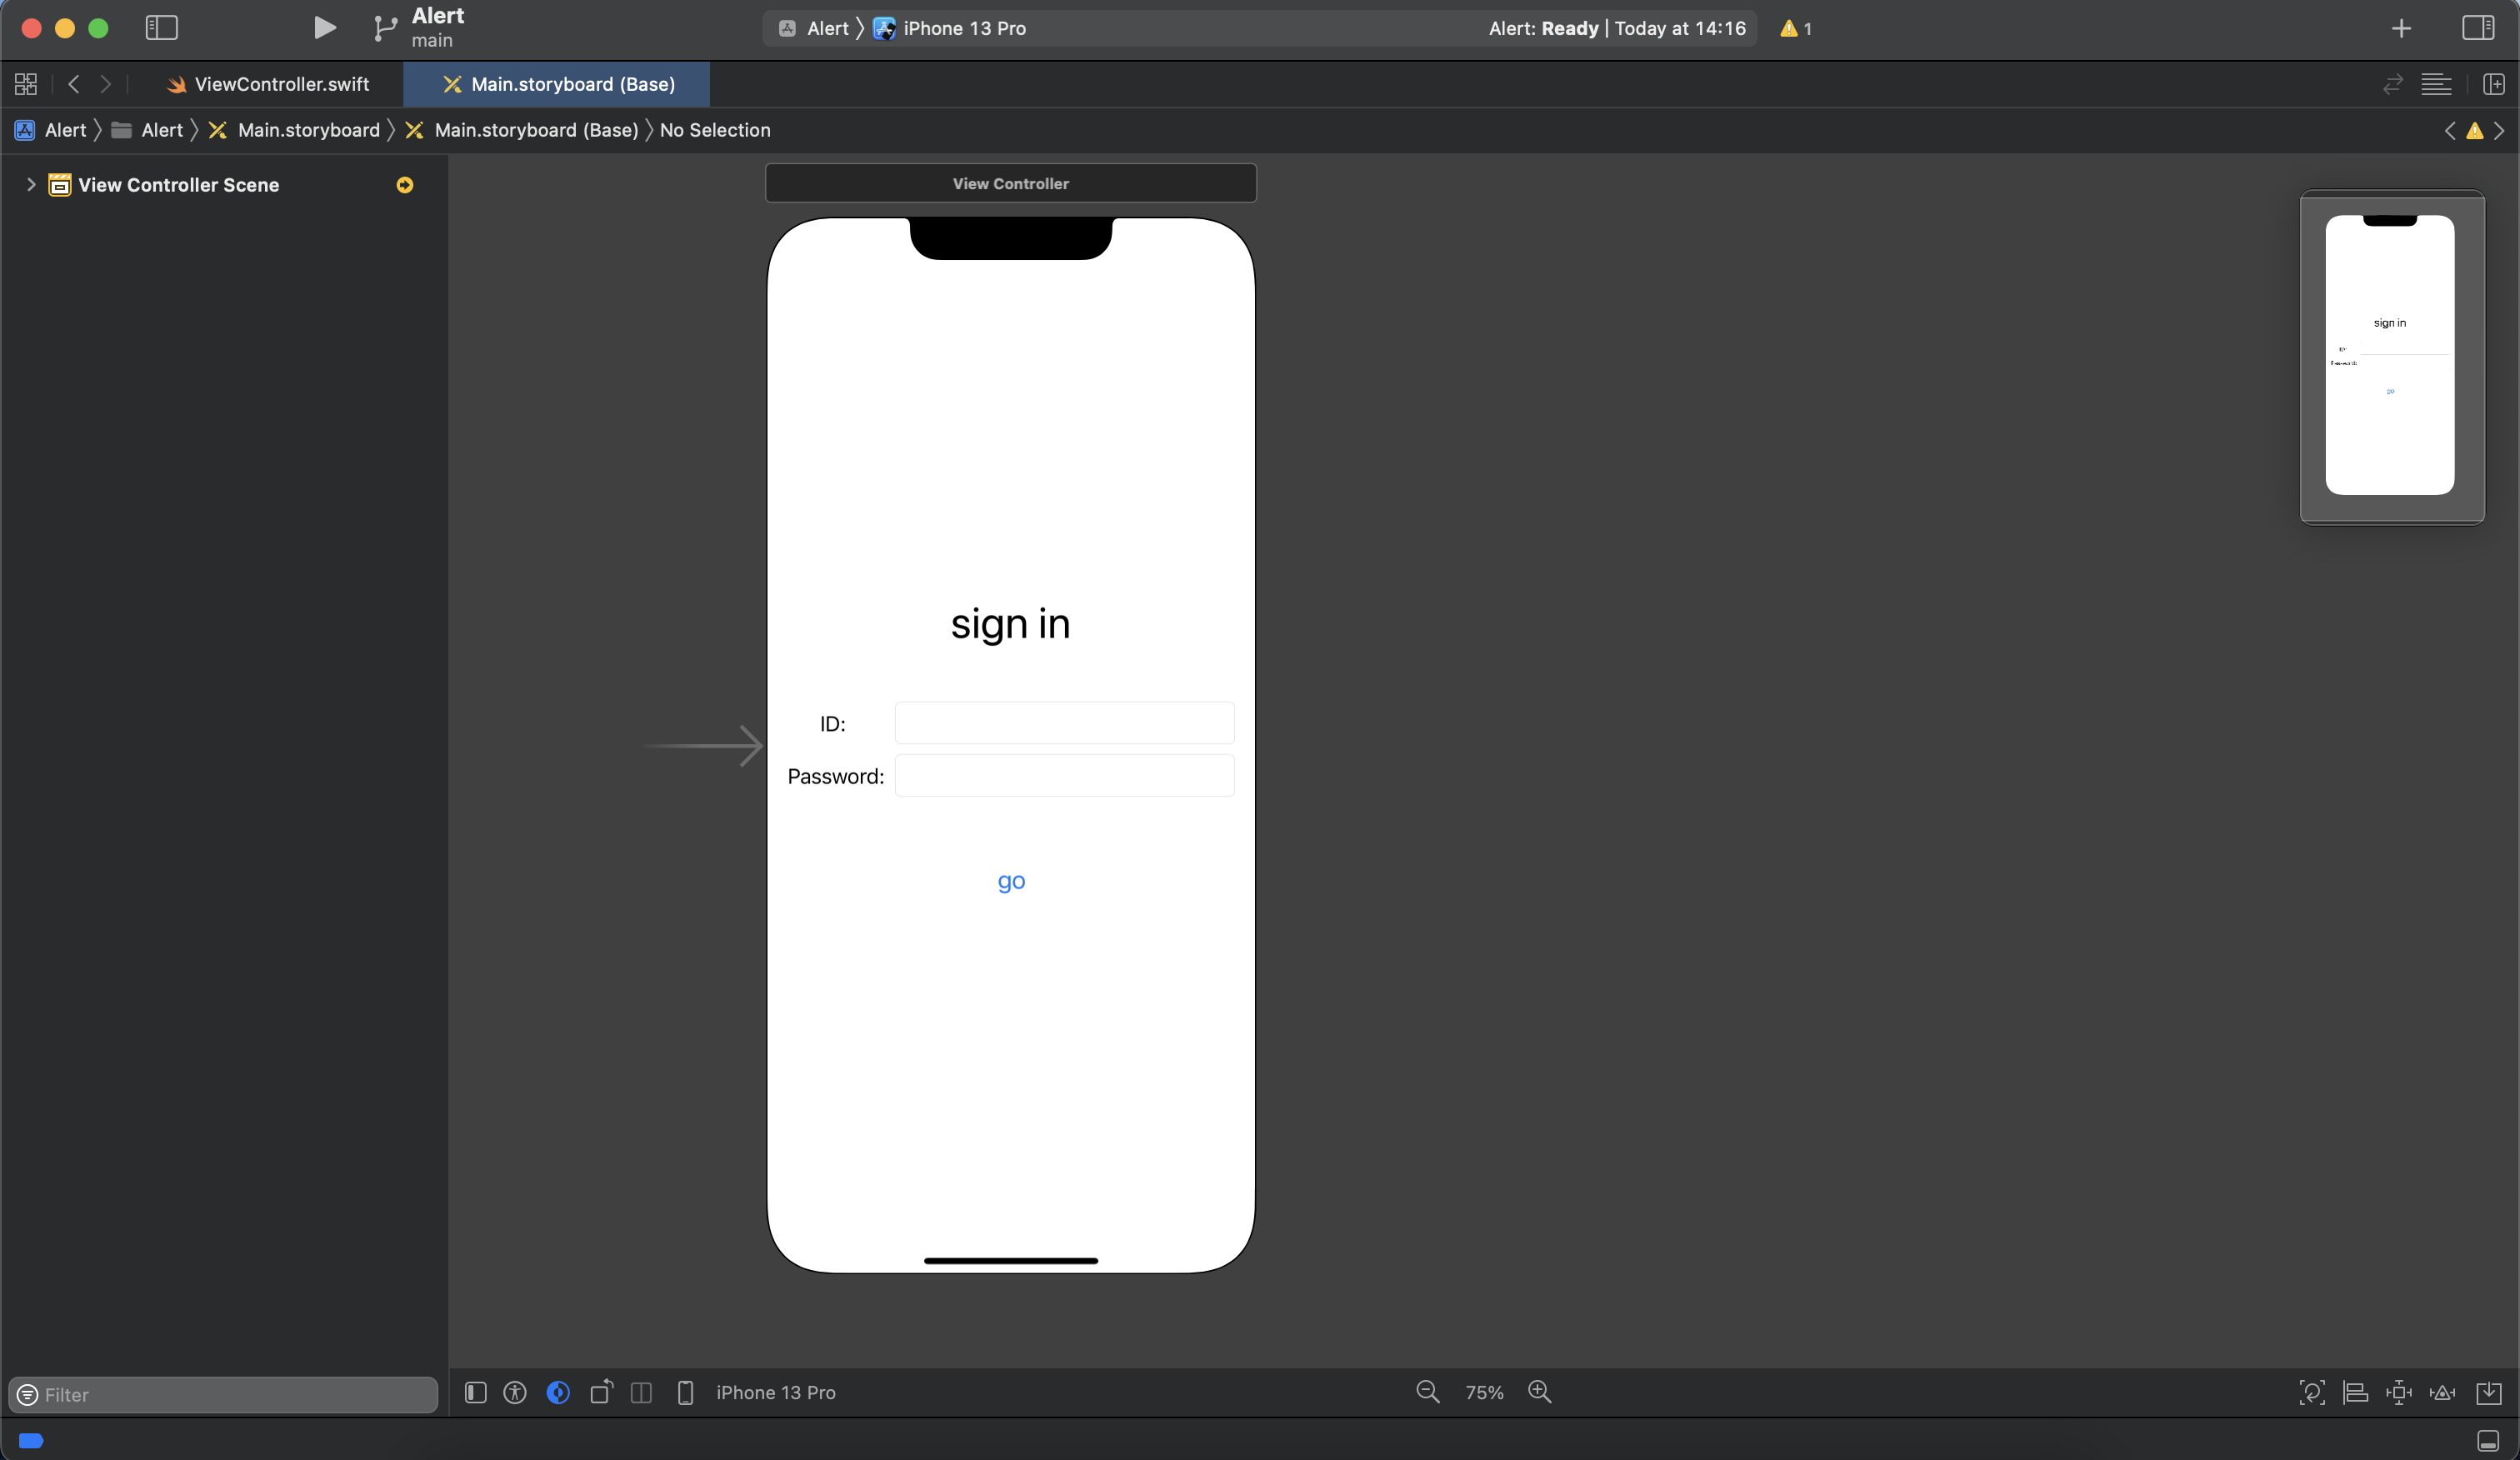
xcode의 storyboard에서 label과 text field, 그리고 button을 사용하여 로그인 화면을 만들고 ID text field와 password test field의 outlet 변수는 각각 IDTextField와 passwordTextField로 선언하고 button에 대한 action 함수는 btnGo로 선언하였다.
import UIKit

class ViewController: UIViewController {
    @IBOutlet var IDTextField: UITextField!
    @IBOutlet var passwordTextField: UITextField!

    override func viewDidLoad() {
        super.viewDidLoad()
        // Do any additional setup after loading the view.
    }

    @IBAction func btnGo(_ sender: UIButton) {

    }
}
이제 ID와 password가 올바른 형식이 아닐 경우 alert을 발생하기 위해 액션함수에 alert를 구현 하겠다.
@IBAction func btnGo(_ sender: UIButton) {
//id 혹은 password 중 올바른 형식이 아니리면 alert 발생
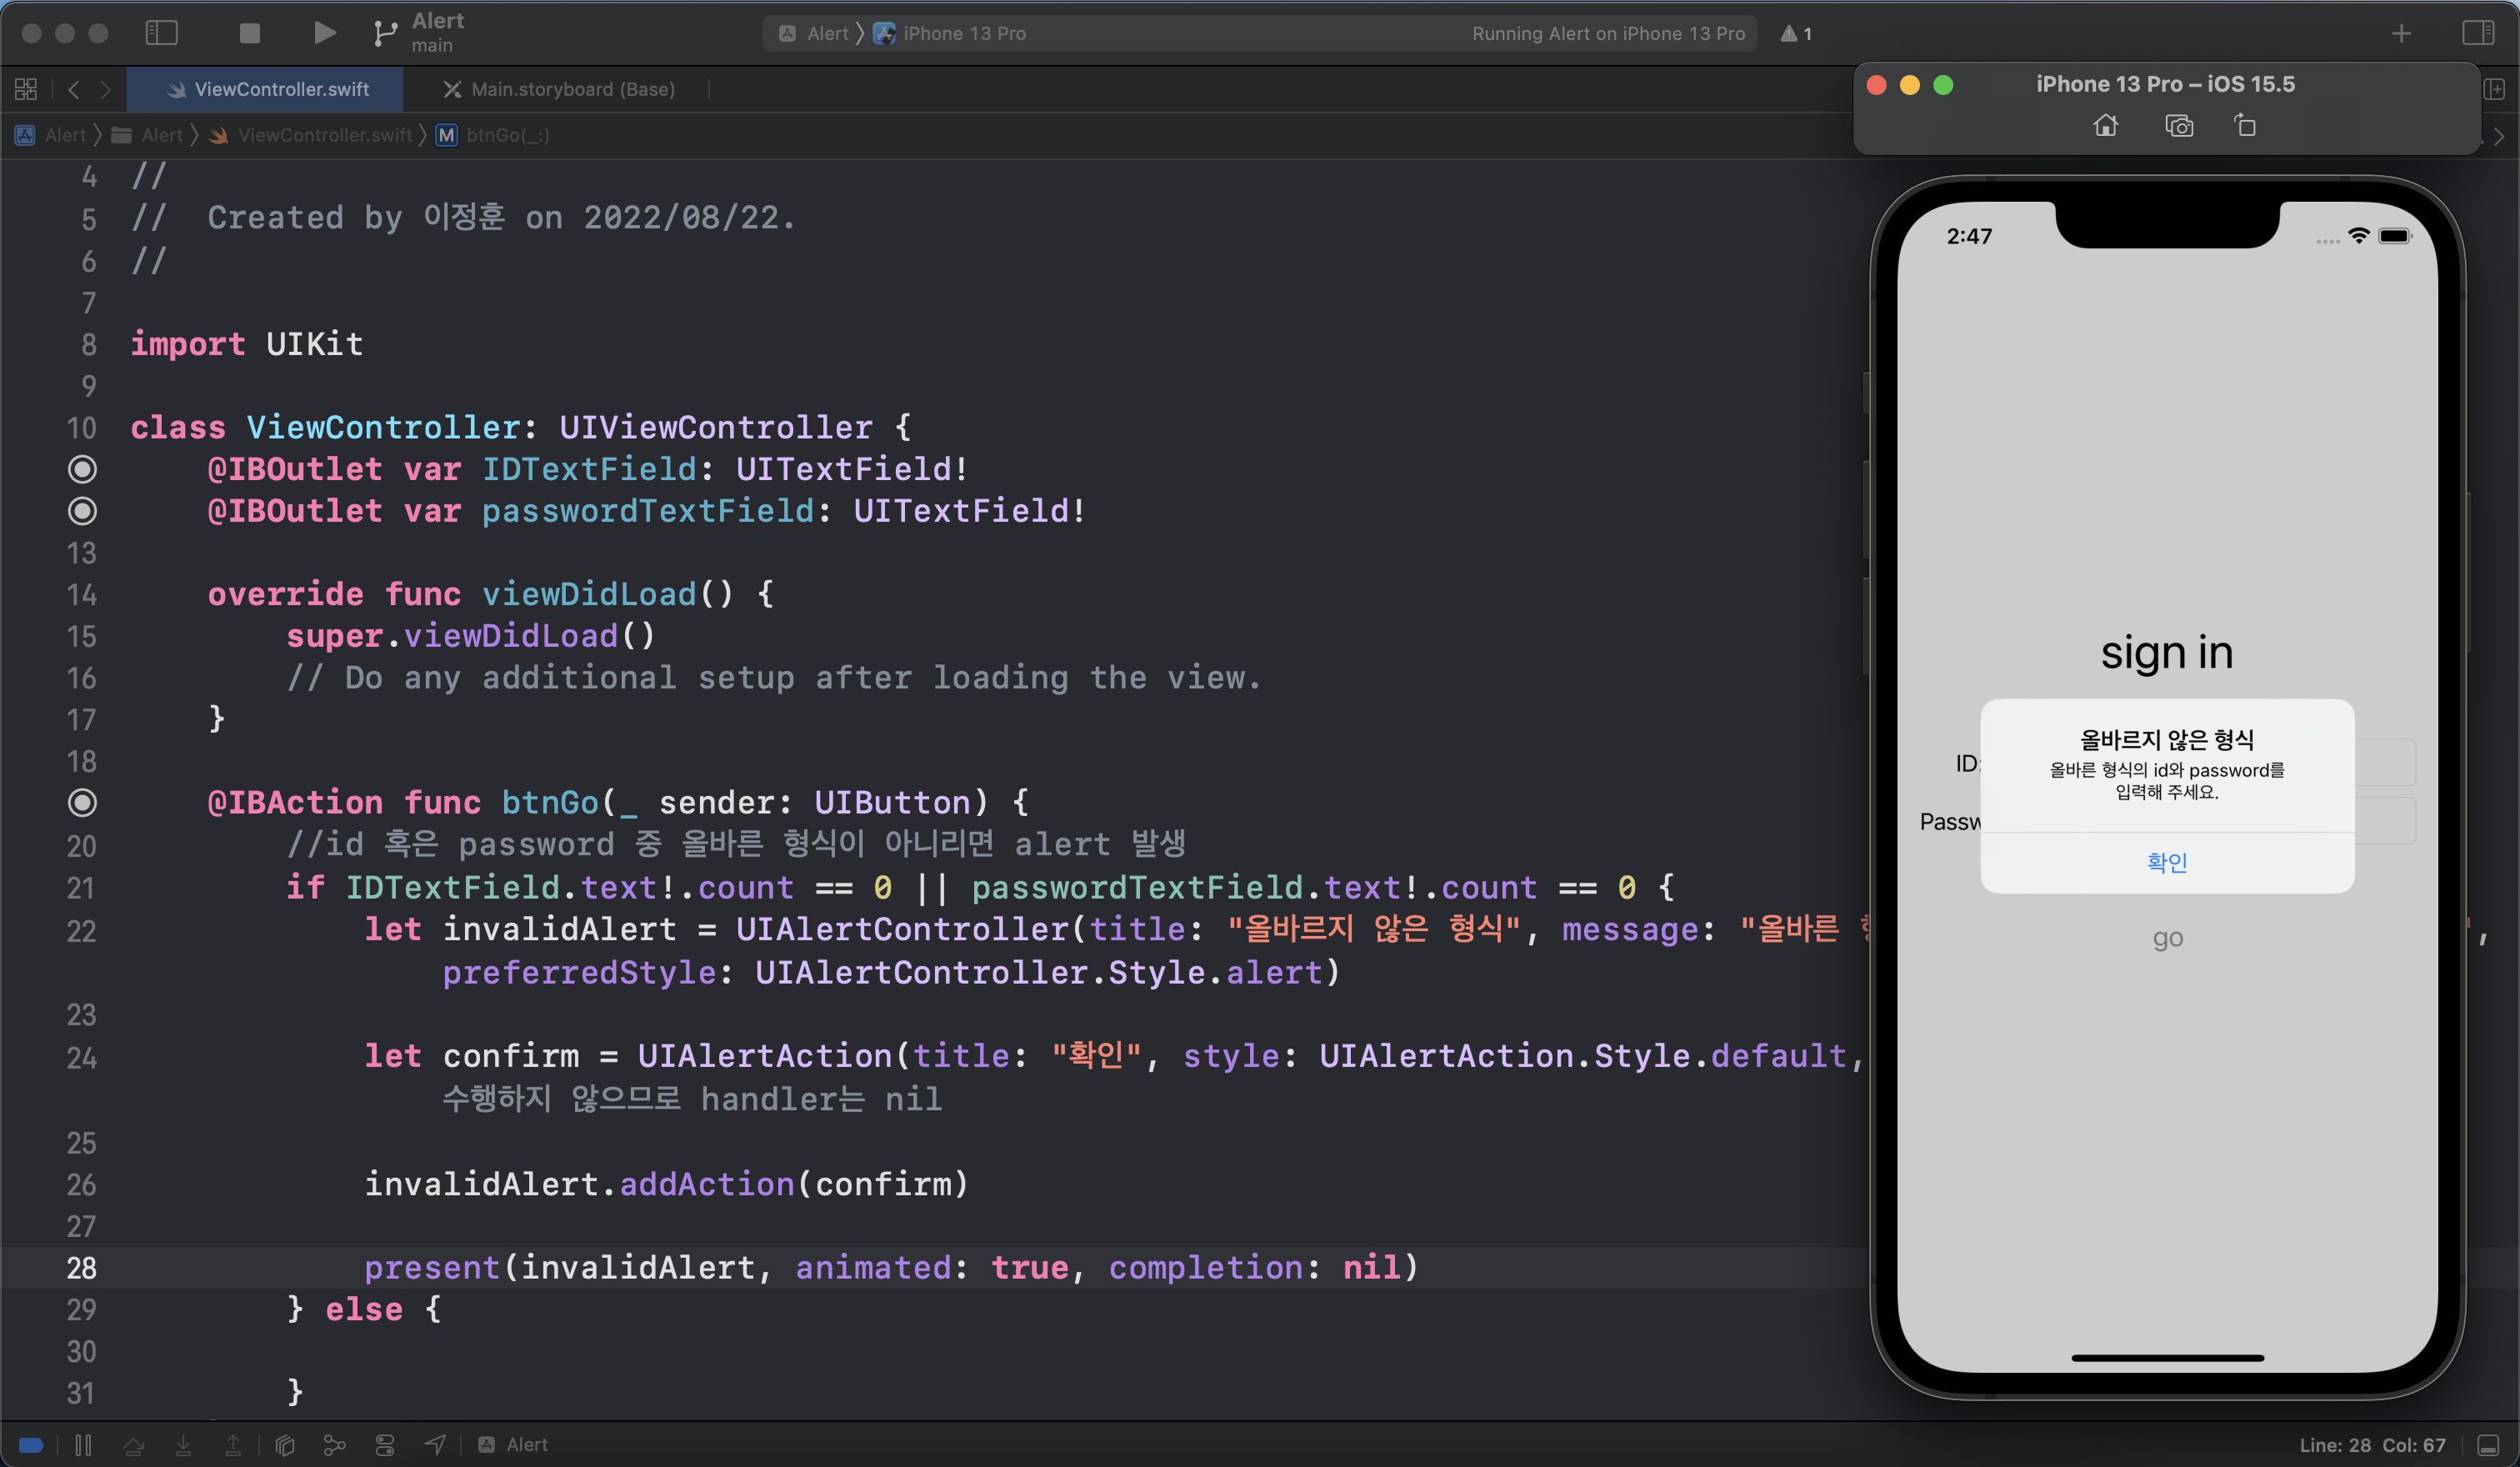
if IDTextField.text!.count == 0 || passwordTextField.text!.count == 0 {
let invalidAlert = UIAlertController(title: "올바르지 않은 형식", message: "올바른 형식의 id와 password를 입력해 주세요.", preferredStyle: UIAlertController.Style.alert)
let confirm = UIAlertAction(title: "확인", style: UIAlertAction.Style.default, handler: nil) //특별한 동작을 수행하지 않으므로 handler는 nil
invalidAlert.addAction(confirm)
present(invalidAlert, animated: true, completion: nil)
} else {
}
}ID와 password를 입력하는 textfield가 비어있을 경우 alert을 발생 하도록 하였고 UIAlertController는 사용자에게 alert 메세지를 보여주도록하며 UIAlertAction은 사용자가 alert의 버튼을 눌렀을 경우 수행할 이벤트를 구현한다.
하지만 ID와 password의 형식이 잘못 되었을 경우 특별한 작업을 수행하지 않을 것이므로 UIAlertAction의 handler parameter는 nil로 할당한다.
지금까지 alert으로 표시할 경우 문구와 동작을 정의 하였고 이제 alert이 실제로 화면에 표시 되기 위해서는 present 메서드를 구현해야 한다.
present 메서드
present는 화면을 전환하는 여러 방식 중 하나로 현재 view 위에 다른 view를 띄워주는 역할을 한다.
apple developer 문서에서 present 메서드의 정의는 다음과 같다.
func present(
    _ viewControllerToPresent: UIViewController,
    animated flag: Bool,
    completion: (() -> Void)? = nil
)
여기서 viewControllerToPresent parameter로 표시할 view를 전달하고 completion parameter는 view 전환이 끝난 후 수행할 작업을 전달한다.
현재 프로젝트에서는 invalidAlert를 view로 전달하고 view가 전달된 후 작업할 내용은 없으므로 completion parameter에 nil을 할당한다.
이제 시뮬레이터에서 앱을 실행하고 ID와 password 중 하나라도 문자열이 비어있을 경우 아래와 같이 alert을 발생하는 것을 볼 수 있다.
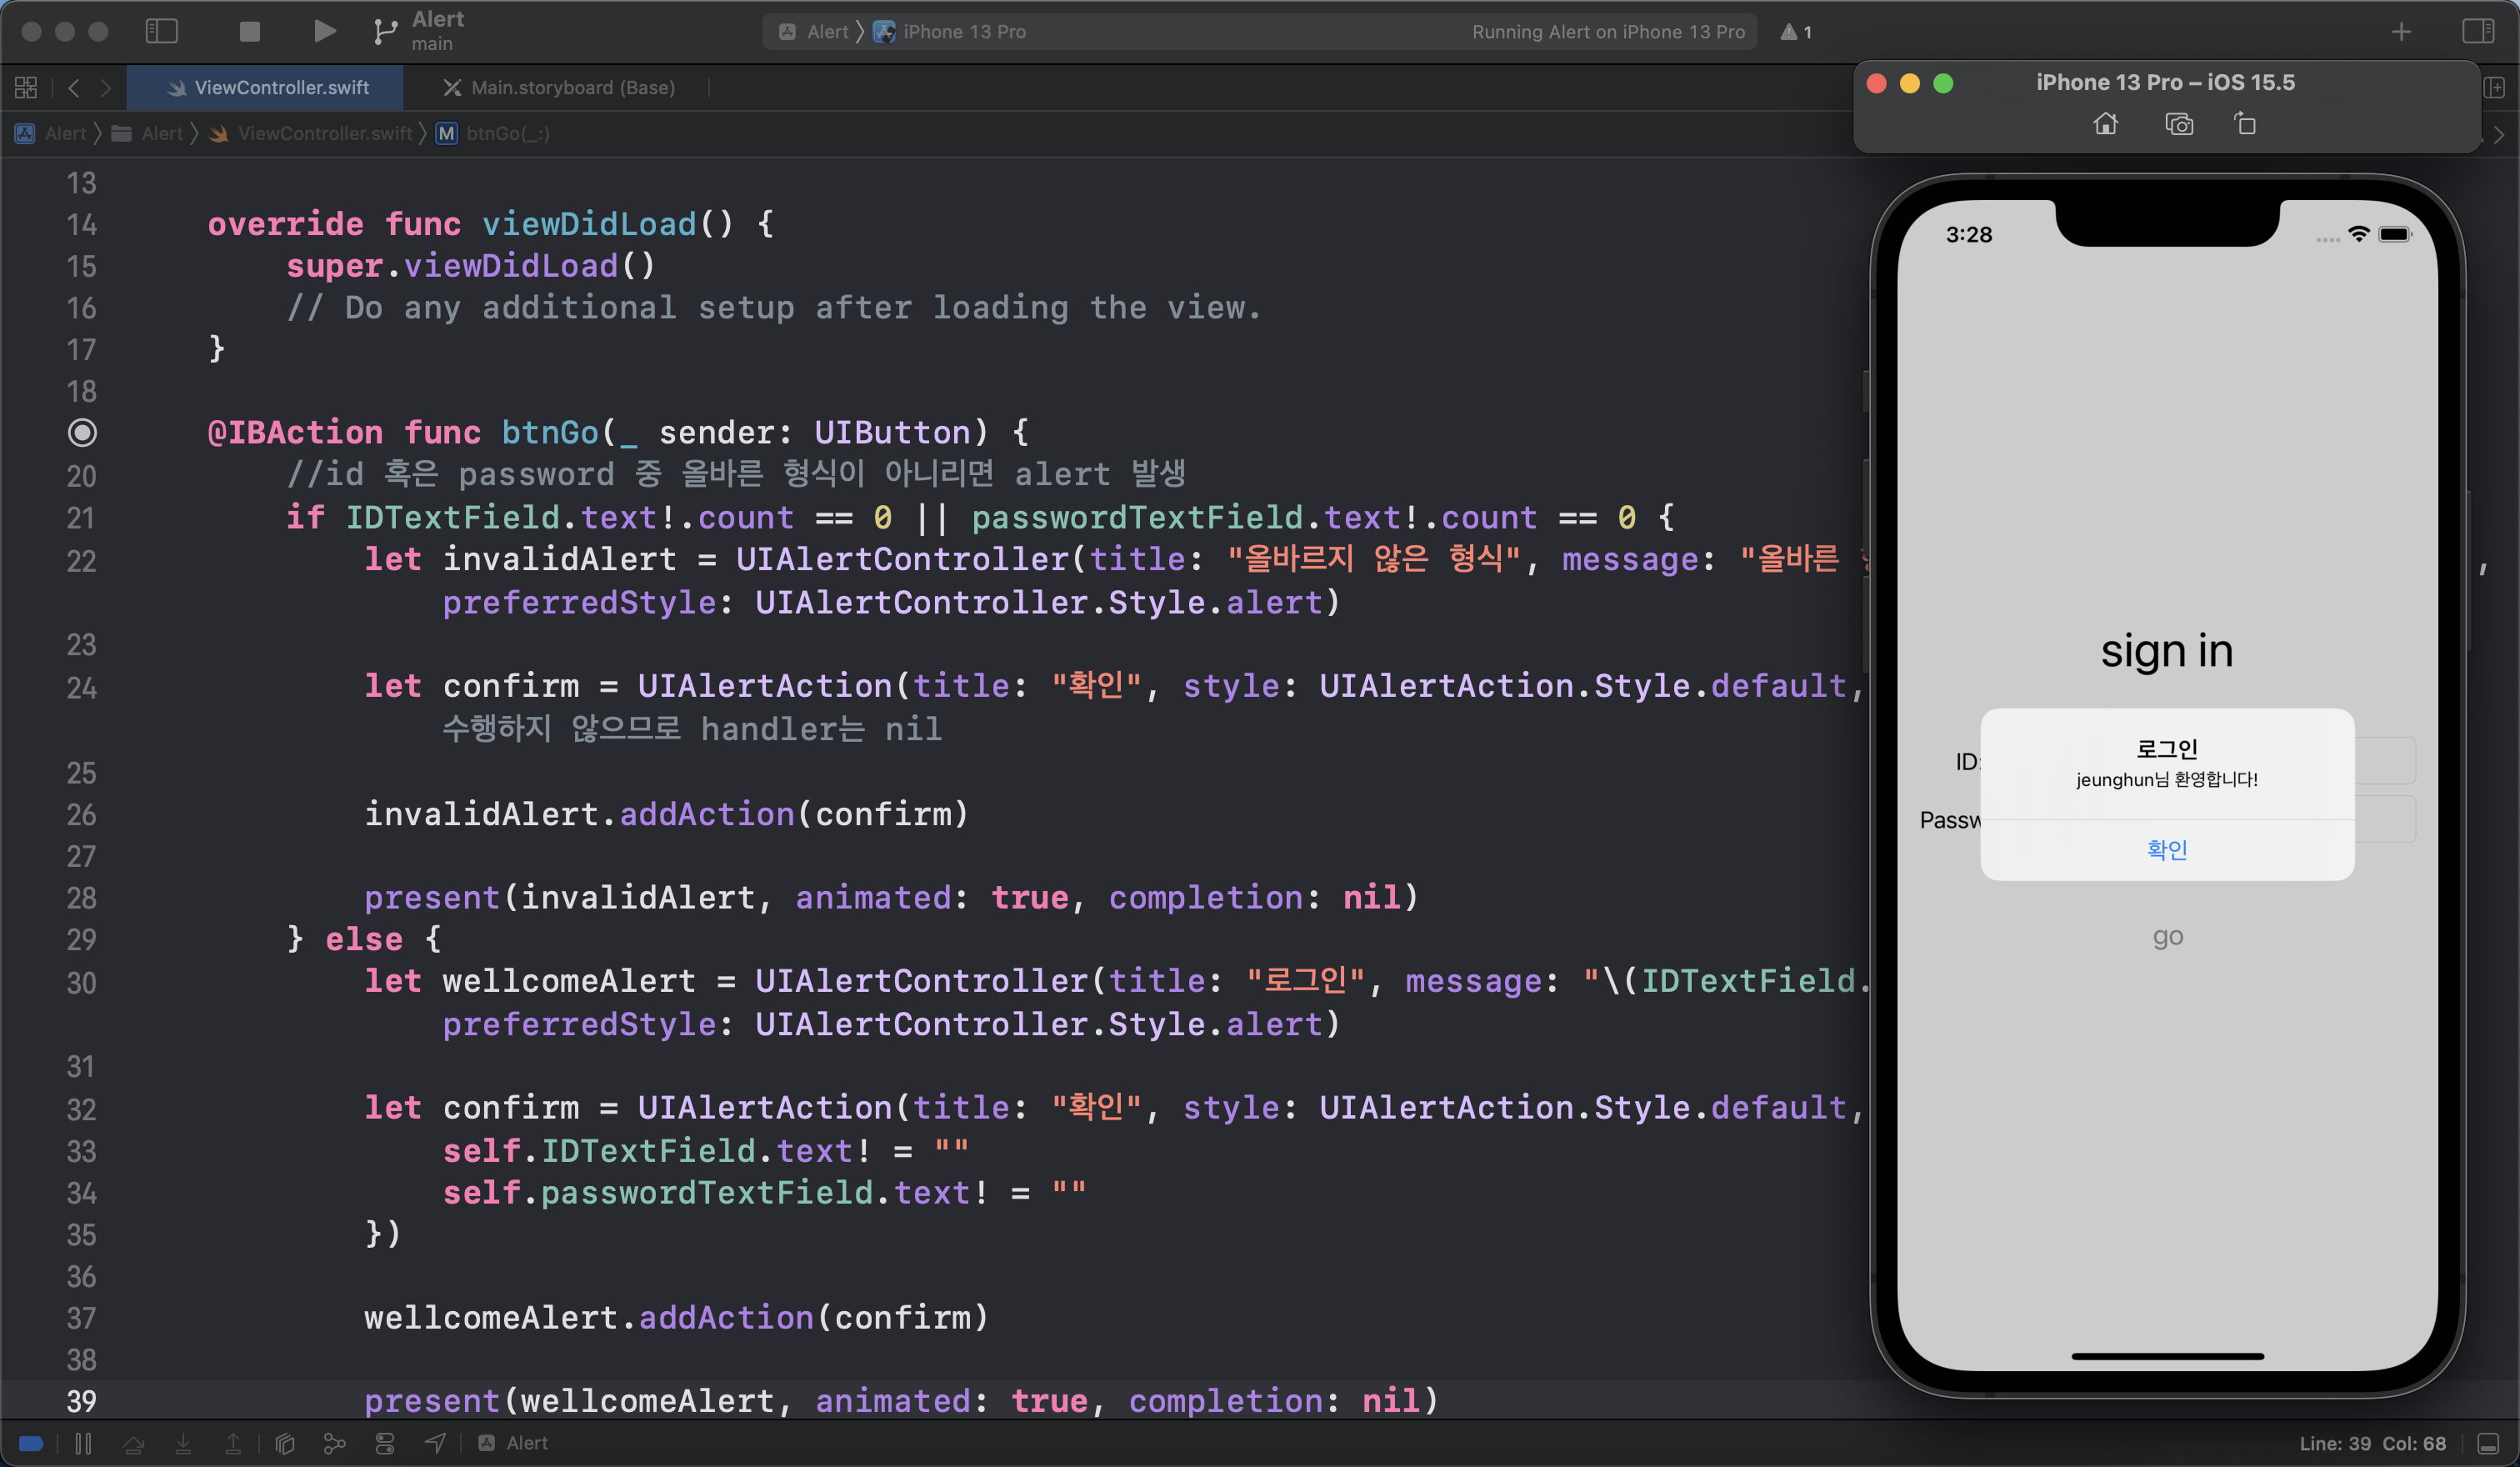
마지막으로 ID와 password가 올바른 형식으로 입력될 경우, "ㅇㅇㅇ님 환영합니다!"라는 alert을 표시하고 확인을 누를경우 text field를 모두 초기화 하도록 action 함수의 else 부분에 구현해 준다.
    @IBAction func btnGo(_ sender: UIButton) {
        //id 혹은 password 중 올바른 형식이 아니리면 alert 발생
        if IDTextField.text!.count == 0 || passwordTextField.text!.count == 0 {
            let invalidAlert = UIAlertController(title: "올바르지 않은 형식", message: "올바른 형식의 id와 password를 입력해 주세요.", preferredStyle: UIAlertController.Style.alert)

            let confirm = UIAlertAction(title: "확인", style: UIAlertAction.Style.default, handler: nil)    //특별한 동작을 수행하지 않으므로 handler는 nil

            invalidAlert.addAction(confirm)

            present(invalidAlert, animated: true, completion: nil)
        } else {
            let wellcomeAlert = UIAlertController(title: "로그인", message: "\(IDTextField.text!)님 환영합니다!", preferredStyle: UIAlertController.Style.alert)

            let confirm = UIAlertAction(title: "확인", style: UIAlertAction.Style.default, handler: { action in
                self.IDTextField.text! = ""
                self.passwordTextField.text! = ""
            })

            wellcomeAlert.addAction(confirm)

            present(wellcomeAlert, animated: true, completion: nil)
        }
    }
if문의 alert과의 차이점이라면 확인을 눌렀을 경우 ID와 password의 text field를 모두 빈 문자열로 만들어 주기위하여 UIAlertAction의 handler parameter에 빈 문자열을 만들어 주는 closure를 전달했다는 것이다.
UIAlertAction handler
apple developer 문서에 handler에 대한 정의는 다음과 같다.
handler
A block to execute when the user selects the action. This block has no return value and takes the selected action object as its only parameter.
요약하자면 handler는 선택된 action 객체를 유일한 전달인자로 가지며 사용자가 action을 선택할 경우 실행되는 parameter이다.
따라서 위의 코드는 확인 버튼이 눌리는 action이 발생하였을때 text field의 문자열을 빈 문자열로 만드는 closure가 실행 된다.
이제 시뮬레이터로 결과를 확인하면 alert이 정상적으로 표시되는 것을 확인할 수 있다.
전체 코드
import UIKit

class ViewController: UIViewController {
    @IBOutlet var IDTextField: UITextField!
    @IBOutlet var passwordTextField: UITextField!

    override func viewDidLoad() {
        super.viewDidLoad()
        // Do any additional setup after loading the view.
        passwordTextField.isSecureTextEntry = true    //password를 입력하는 text field 보이지 않게 처리
    }

    @IBAction func btnGo(_ sender: UIButton) {
        //id 혹은 password 중 올바른 형식이 아니리면 alert 발생
        if IDTextField.text!.count == 0 || passwordTextField.text!.count == 0 {
            let invalidAlert = UIAlertController(title: "올바르지 않은 형식", message: "올바른 형식의 id와 password를 입력해 주세요.", preferredStyle: UIAlertController.Style.alert)

            let confirm = UIAlertAction(title: "확인", style: UIAlertAction.Style.default, handler: nil)    //특별한 동작을 수행하지 않으므로 handler는 nil

            invalidAlert.addAction(confirm)

            present(invalidAlert, animated: true, completion: nil)
        } else {
            let wellcomeAlert = UIAlertController(title: "로그인", message: "\(IDTextField.text!)님 환영합니다!", preferredStyle: UIAlertController.Style.alert)

            let confirm = UIAlertAction(title: "확인", style: UIAlertAction.Style.default, handler: { action in
                self.IDTextField.text! = ""
                self.passwordTextField.text! = ""
            })

            wellcomeAlert.addAction(confirm)

            present(wellcomeAlert, animated: true, completion: nil)
        }
    }
}
참고 자료: apple developer