들어가며
웹서핑이나 개발을 하다 보면 한 페이지에 이미지가 다수 등장하는 페이지를 만나게 될 때가 있다.
개발자 도구를 켜고 네트워크 탭에서 Img 필터를 걸면 브라우저가 요청한 이미지 리소스를 확인할 수 있다.
img 태그의 src 속성에 할당된 이미지 URL을 통해 해당 이미지 리소스를 요청하게 되는데,
유저의 뷰포트 내에 들어오지 않은 이미지 리소스를 요청하는 것은 불필요한 요청이 될 수 있다.
특히 이미지가 다수 등장하는 페이지에서 서버로부터 받아오는 여러 데이터의 fetch 요청과 함께 다수의 이미지 리소스가 요청될 경우 퍼포먼스 이슈를 야기할 수 있다.
이번 포스트에서는 Image Lazy Loading을 구현하는 방법 중 하나를 정리하고,
소소하게 UX를 챙기는 방법도 정리해보려고 한다.
시작
다음과 같은 피드를 페이지에 그려보자.
cosnt feeds = [
	{
		id: 0,
		title: "피드 #0",
		imageUrl: "https://dummyimage.com/300x400/000/fff",
	},
    {
    	id: 1,
    	title: "피드 #1",
    	imageUrl: "https://dummyimage.com/300x399/000/fff",
  	},
    ...
    {
      id: 28,
      title: "피드 #28",
      imageUrl: "https://dummyimage.com/300x372/000/fff",
  	},
    {
      id: 29,
      title: "피드 #29",
      imageUrl: "https://dummyimage.com/300x371/000/fff",
    },
]
컨테이너는 App.js이다.
// App.tsx
function App() {
  return (
    <div className="App">
      {feeds.map((f) => (
        <Feed key={f.id} feed={f} />
      ))}
    </div>
  );
}
피드 컴포넌트는 다음과 같다.
// Feed.tsx
interface Props {
feed: {
id: number;
title: string;
imageUrl: string;
};
}
const Feed = ({ feed }: Props) => {
return (
<div className="Feed">
<img className="Feed__img" src={feed.imageUrl} alt={"img"} />
<h6 className="Feed__title">{feed.title}</h6>
</div>
);
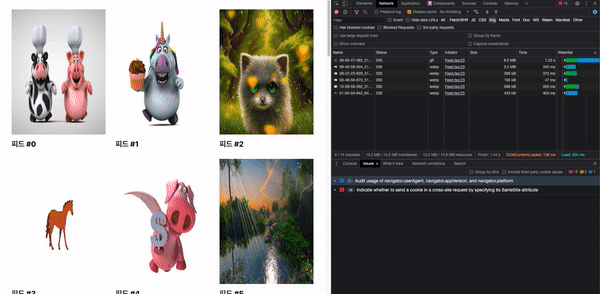
};그리고 프로젝트를 실행하면, 다음과 같이 화면에 들어오지 않은 피드의 이미지까지 모두 요청한 것을 확인할 수 있다.
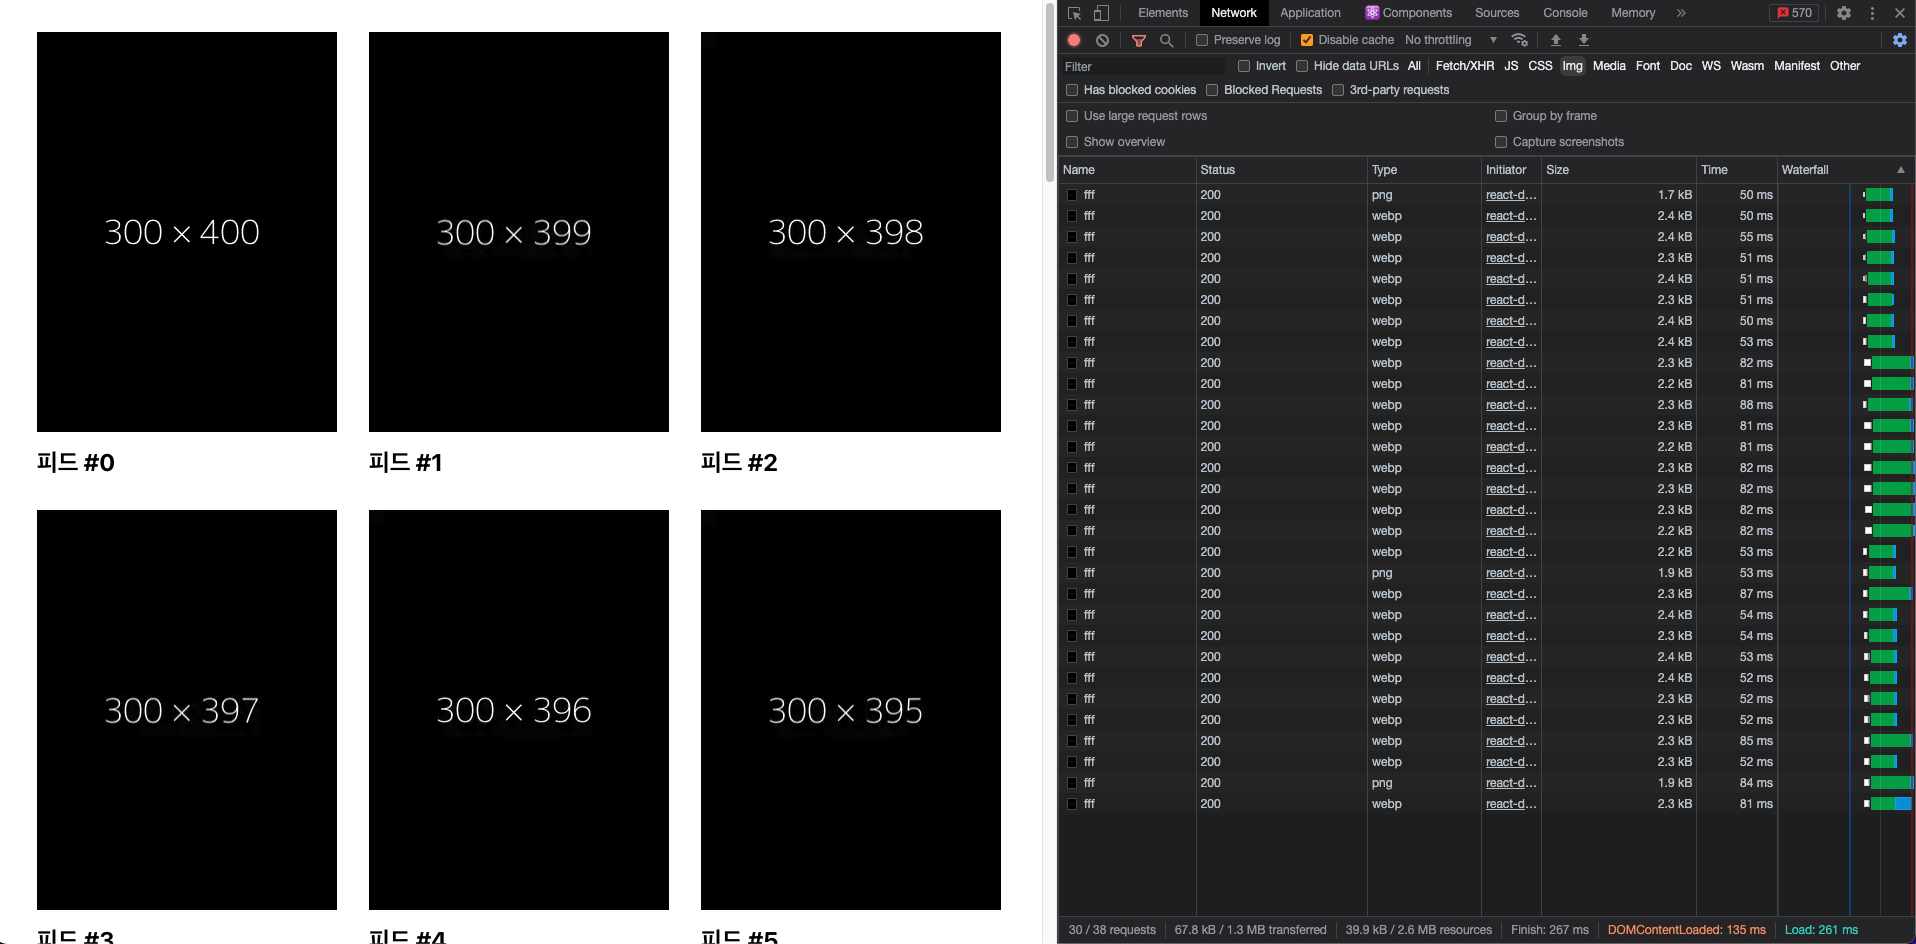
참고로, 항상 이미지를 새롭게 요청하도록 Disable cache에 체크를 해둔 상태이다.
해당 설정을 체크하지 않으면 브라우저는 동일한 이미지 URL 요청은 캐시를 통해 응답한다.
첫번째 스텝
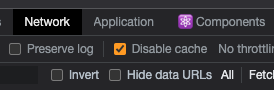
img 태그의 src 속성에 이미지 URL이 있으면 해당 이미지 리소스를 요청한다고 했다.
그러면 img 태그의 src 속성을 없애면 어떻게 될까?
// Feed.tsx
interface Props {
  feed: {
    id: number;
    title: string;
    imageUrl: string;
  };
}

const Feed = ({ feed }: Props) => {
  return (
    <div className="Feed">
      <img className="Feed__img" alt={"img"} />
      <h6 className="Feed__title">{feed.title}</h6>
    </div>
  );
};
그렇다. 엑박이(alt) 뜬다.
뷰포트 내에 들어오지 않은 이미지 리소스의 요청이 이루어지지 않은 건 맞지만, 뷰포트 내에 들어온 이미지 리소스는 정상적으로 요청이 이루어져야 한다.
그렇다면 뷰포트 내에 들어온 이미지의 src 속성을 살려주도록 하자.
뷰포트 내에 들어오지 않은 DOM 자체를 렌더링하지 않는 것도 하나의 방법일 것이다. react-window 라이브러리에 대해서 따로 알아보자.
두번째 스텝
img 태그에 src 속성 대신 data-src 속성에 imageUrl을 넣어주고,
Intersection Observer API를 이용해 뷰포트 내에 들어온 img 태그는 data-src 속성의 imageUrl을 src 속성으로 넣어주도록 하자.
Intersection Observer API를 사용하기 쉽게 리액트 커스텀 훅으로 만들어보면 다음과 같다.
// useIsIntersecting.ts
import { RefObject, useCallback, useEffect, useRef, useState } from "react";

interface Args extends IntersectionObserverInit {
  freezeOnceVisible?: boolean;
}

const useIsIntersecting = (
  elementRef: RefObject<Element>,
  {
    threshold = 0,
    root = null,
    rootMargin = "0%",
    freezeOnceVisible = false,
  }: Args
) => {
  const [entryState, setEntryState] =
    useState<IntersectionObserverEntry | null>(null);
  const isIntersectingRef = useRef(false);
  const frozen = isIntersectingRef.current && freezeOnceVisible;

  const updateEntry = useCallback(
    ([nextEntryState]: IntersectionObserverEntry[]) => {
      if (isIntersectingRef.current !== nextEntryState.isIntersecting) {
        setEntryState(nextEntryState);
        isIntersectingRef.current = nextEntryState.isIntersecting;
      }
    },
    []
  );

  useEffect(() => {
    const node = elementRef?.current;
    const hasIOSupport = !!window.IntersectionObserver;
    if (!hasIOSupport || frozen || !node) return undefined;

    const observerParams = { threshold, root, rootMargin };
    const observer = new IntersectionObserver(updateEntry, observerParams);

    observer.observe(node);

    return () => observer.disconnect();
  }, [elementRef, threshold, root, rootMargin, frozen, updateEntry]);

  return { entryState, isIntersecting: !!entryState?.isIntersecting };
};

export default useIsIntersecting;
대략적인 사용법 및 동작원리는 다음과 같다.
1. img 태그에 전달한 ref를 useIsIntersecting 훅의 첫번째 파라미터로 넘긴다.
2. 상황에 맞는 옵션 값을 useIsIntersecting 훅의 두번째 파라미터로 넘긴다.
3. img 태그가 노출되는 정도에 따라 Intersection Oberserver가 이전과 현재의 isIntersecting 여부를 비교하여 entryState를 업데이트하고, 이를 반환한다.
따라서 Feed 컴포넌트를 다음과 같이 수정하자.
// Feed.tsx

...

const Feed = ({ feed }: Props) => {
  const imgRef = useRef<HTMLImageElement>(null);
  const { isIntersecting } = useIsIntersecting(imgRef, {
    threshold: 0.1,
    freezeOnceVisible: true,
  });

  useEffect(() => {
    if (isIntersecting && imgRef.current) {
      imgRef.current.src = imgRef.current.dataset.src!;
    }
  }, [isIntersecting]);

  return (
    <div className="Feed">
      <img
        ref={imgRef}
        data-src={feed.imageUrl}
        className="Feed__img"
        alt={"img"}
      />
      <h6 className="Feed__title">{feed.title}</h6>
    </div>
  );
};

export default Feed;
간단한 설명을 첨부하자면 다음과 같다.
1. 옵션으로 전달한 root와 rootMargin이 없으므로, 기준은 뷰포트가 된다.
2. threshold를 0.1로 설정하였으므로, img 태그가 뷰포트 내에 10% 이상 노출될 경우 isIntersecting 값은 true가 되고, 10% 미만으로 노출될 경우 isIntersecting 값은 false가 된다.
3. freezeOnceVisible 값을 true로 설정하였으므로 한번 이상 노출될 경우 useIsIntersecting 훅의 useEffect문 내부의 클린업 함수에 의해 Intersection Oberserver가 disconnect된다.
이제 실행해보자.
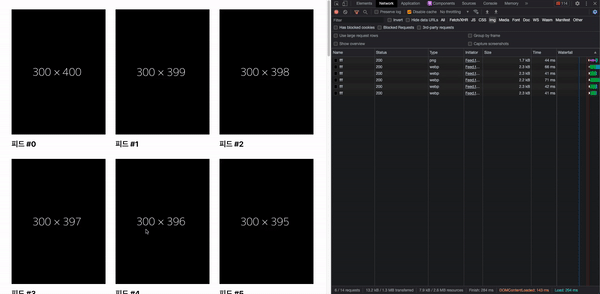
이제 뷰포트 내에 10% 이상 노출된 이미지만 요청을 보내고 있는 모습을 확인할 수 있다.
마지막 스텝
현재 페이지에서 요청 중인 이미지의 사이즈를 보면 2.2KB, 2.3KB로 매우 작다는 것을 알 수 있다.
따라서 상당히 빠르게 이미지를 불러오는 것을 확인할 수 있는데, 만약 이미지 사이즈가 굉장히 크다면 어떨까?
이미지 로딩 속도에 의해 이미지 영역이 텅 비어있거나, 뚝하고 등장하거나, 뚜둑뚜둑 끊기면서 렌더링되는 모습을 볼 수도 있다.
더 사이즈 큰걸 못 찾아서 크게 어색하진 않은거 같다 ㅎ..
해당 이미지의 1px x 1px에서 추출한 색상을 placeholder로 지정하거나, 저사양 이미지를 먼저 placeholder로 지정하는 등 여러가지 UX 향상 기법이 있지만, 간단하게 opacity transition 효과만 적용해보고자 한다.
피드 컴포넌트를 다음과 같이 수정해보자.
// Feed.tsx

...

const Feed = ({ feed }: Props) => {
  const [isLoaded, setIsLoaded] = useState(false);
  const imgRef = useRef<HTMLImageElement>(null);
  const { isIntersecting } = useIsIntersecting(imgRef, {
    threshold: 0.1,
    freezeOnceVisible: true,
  });

  useEffect(() => {
    if (isIntersecting && imgRef.current) {
      imgRef.current.src = imgRef.current.dataset.src!;
    }
  }, [isIntersecting]);

  return (
    <div className="Feed">
      <img
        ref={imgRef}
        data-src={feed.imageUrl}
        className={`Feed__img ${isLoaded ? "Feed__img--isLoaded" : ""}`}
        alt={"img"}
        onLoad={() => {
          setIsLoaded(true);
        }}
      />
      <h6 className="Feed__title">{feed.title}</h6>
    </div>
  );
};
그리고 css 파일도 수정해준다.
/* Feed.css */

.Feed__img {
  ...
  opacity: 0;
  transition: opacity 0.2s;
}

.Feed__img--isLoaded {
  opacity: 1;
}
그러면 이전보다 좀 더 부드럽게 이미지가 렌더링되는 모습을 확인할 수 있다.
물론 tradeoff가 없진 않다. 상태 추가에 따른 리렌더링, 렌더링 지연 등의 이슈가 있다.
마무리
간단하게 Image Lazy Loading 구현 방법 중 하나와 UX를 향상시킬 수 있는 방법을 정리해봤는데, 다른 더 좋은 방법들도 비교해서 정리해보면 각각의 방법을 선택하는 데 있어 확실한 근거를 더할 수 있을 듯하다.
잘못된 부분은 피드백 주시면 감사하겠습니다. 🙏
