최근에 토스트 메시지를 개발해야할 일이 있어서 Implementing animated toasts in React를 참고하여 새롭게 컴포넌트를 만들었는데, 이를 다시 정리해보려고 한다.
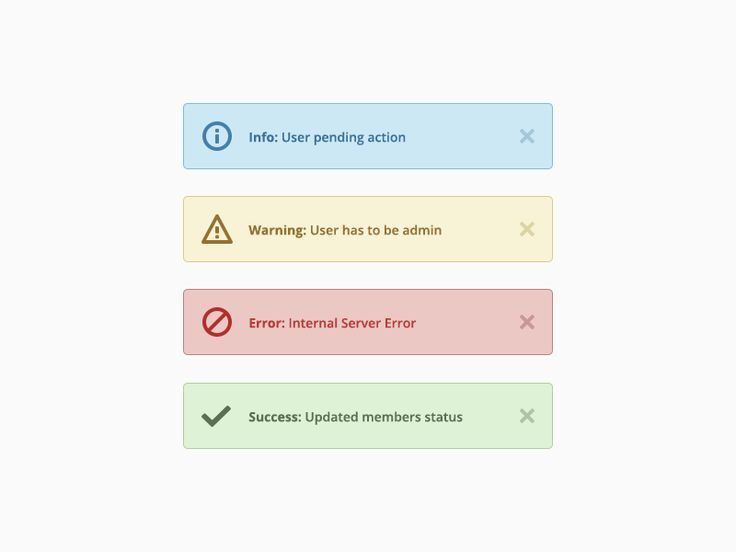
결과물은 다음과 같다.
프로젝트 생성
먼저 Typescript 기반의 React 프로젝트를 생성하자.
yarn create react-app portal-toast --template typescript
라이브러리 설치
Framer motion, Recoil 라이브러리를 설치해주자.
yarn add framer-motion && yarn add recoil스타일링은 별도의 라이브러리 없이 css로 해결하도록 하자.
개발 방향
- 어떤 컴포넌트에서든 토스트 메시지를 핸들링할 수 있도록 화면에 렌더링 되어야 하는 토스트 메시지 리스트를 Recoil을 통해 전역상태로 관리하고, 이를 커스텀 훅으로 만들어 사용하기 편리하게끔 한다.
- 어떤 컴포넌트 위치에서든 토스트 메시지가 DOM 구조의 최상단에 위치할 수 있도록 React의 createPortal 기능을 활용한다.
- 토스트 메시지가 애니메이션 효과와 함께 나타나고, 사라지게 하기 위해 framer motion의 AnimatePresence와 motion을 활용한다.
전역상태 관리하기
먼저 어떤 토스트 메시지를 화면에 렌더링해야할지 관리할 수 있는 전역상태를 선언하고, 이를 커스텀 훅으로 관리해보자.
// atoms.ts

export const TOAST_TYPE = {
  toastA: "toastA",
  toastB: "toastB",
  toastC: "toastC",
} as const;

export type ToastType = keyof typeof TOAST_TYPE;

export const ToastList = atom<ToastType[]>({
  key: "ToastList",
  default: [],
});ToastList라는 키를 갖는 atom을 통해 ToastType에 해당하는 토스트 메시지들을 관리할 수 있다. 토스트 메시지 관리를 용이하게 하기 위해 커스텀 훅을 만들어보자.
// useToastList.ts

import { useCallback } from "react";
import { useRecoilState } from "recoil";
import { ToastList, ToastType } from "./atoms";

const useToastList = () => {
  const [toastList, setToastList] = useRecoilState<ToastType[]>(ToastList);

  const show = useCallback(
    (toastType: ToastType) => {
      setToastList((prev) => prev.concat(toastType));
    },
    [setToastList]
  );

  const close = useCallback(
    (toastType: ToastType) => {
      setToastList((prev) => prev.filter((t) => t !== toastType));
    },
    [setToastList]
  );

  const closeAll = () => {
    setToastList([]);
  };

  return {
    toastList,
    show,
    close,
    closeAll,
  };
};

export default useToastList;
토스트 메시지들은 여러 종류의 토스트가 함께 렌더링될 수 있으므로 배열 형태로 관리되고, 특정 toastType을 show와 close 메소드의 파라미터로 넘겨줌으로써 원하는 토스트 메시지를 보여주거나 지울 수 있다. 모든 토스트 메시지를 지우기 위해 closeAll 메소드 역시 존재한다.
Recoil을 사용하기 위해서 RecoilRoot로 앱을 감싸주자.
// index.tsx

...

root.render(
  <React.StrictMode>
    <RecoilRoot>
      <App />
    </RecoilRoot>
  </React.StrictMode>
);
포탈과 토스트 컨테이너 만들기
그럼 위에서 만든 훅을 통해 토스트 메시지를 담아내는 토스트 컨테이너를 만들어보자.
먼저 토스트 컨테이너를 그리기 위해서 포탈을 만들어야 하는데, 포탈을 만들기 위해선 포탈의 root가 될 DOM이 필요하다.
// index.html
<!DOCTYPE html>
<html lang="en">
...
	<body>
    	<div id="root"></div>
        <div id="toast-root"></div>
    </body>
</html>
index.html에 toast-root를 id로 갖는 div 태그를 만들어준다.
다음으로 토스트 컨테이너 컴포넌트를 생성해보자.
// ToastContainer.tsx

import { ReactNode, useEffect } from "react";
import { createPortal } from "react-dom";
import { AnimatePresence, motion } from "framer-motion";
import { ToastType } from "./atoms";
import useToastList from "./useToastList";

interface Props {
  children: ReactNode;
  toastType: ToastType;
  config?: {
    duration: number;
  };
}

const ToastContainer = ({
  children,
  toastType,
  config = { duration: 3000 },
}: Props) => {
  const ref = document.querySelector("#toast-root");
  const { duration } = config;
  const { toastList, close } = useToastList();

  const isShown = toastList.includes(toastType);

  useEffect(() => {
    if (!isShown) {
      return undefined;
    }

    const timer = setTimeout(() => {
      close(toastType);
    }, duration);

    return () => {
      clearTimeout(timer);
    };
  }, [close, duration, isShown, toastType]);

  if (!ref) {
    return null;
  }

  return createPortal(
    <AnimatePresence>
      {isShown && (
        <motion.div
          key={toastType}
          layout
          initial={{ opacity: 0.5, y: 24 }}
          animate={{ opacity: 1, y: 0 }}
          exit={{ opacity: 0.5, y: 12 }}
          transition={{ ease: "easeOut" }}
        >
          {children}
        </motion.div>
      )}
    </AnimatePresence>,
    ref
  );
};

export default ToastContainer;
토스트 메시지의 내용을 children으로 받는 토스트 컨테이너가 완성됐다.
props로 넘겨받은 toastType이 전역상태인 toastList에 저장되어 있으면 isShown 플래그가 true가 되면서 props로 넘겨받은 children이 렌더링된다.
createPortal에 넘겨준 ref, 즉 #toast-root 태그의 자식으로 렌더링되며, framer motion의 AnimatePresence와 motion.div를 통해 opacity, position 변화와 함께 부드럽게 등장하게 된다.
이렇게 등장한 토스트 메시지는 props로 넘겨준 config의 duration(ms)에 해당하는 시간이 흐르면 close(toastType) 호출에 의해 사라진다. 이때, 마찬가지로 AnimatePresence와 motion.dev를 통해 opacity, position 변화와 함께 부드럽게 사라지게 된다.
기본적인 토스트 컨테이너의 위치를 css를 통해 잡아주도록 하자.
// App.css

#toast-root {
  position: fixed;
  left: 40px;
  bottom: 24px;
  z-index: 9999;

  display: flex;
  flex-direction: column;
  gap: 16px;
}
토스트 메시지 만들기
그럼 예시로 보여줄 토스트 메시지를 만들어보자.
// ToastA.tsx

import { TOAST_TYPE } from "./atoms";
import ToastContainer from "./ToastContainer";

const ToastA = () => {
  return (
    <ToastContainer toastType={TOAST_TYPE.toastA}>
      <div className="Toast">Toast A</div>
    </ToastContainer>
  );
};

export default ToastA;
위와 같은 방식으로 ToastB, ToastC를 만들 수 있다.
간단하게 스타일링을 해주면 다음과 같다.
// App.css

...

.Toast {
  box-sizing: border-box;

  display: flex;
  align-items: center;
  width: 320px;
  height: 64px;
  padding: 12px 20px;

  border-radius: 32px;
  box-shadow: 0px 4px 16px rgba(0, 0, 0, 0.25);
  background: #080a0d;
  color: #fff;
}
그러면 이제 토스트 메시지까지 준비가 끝이 났다.
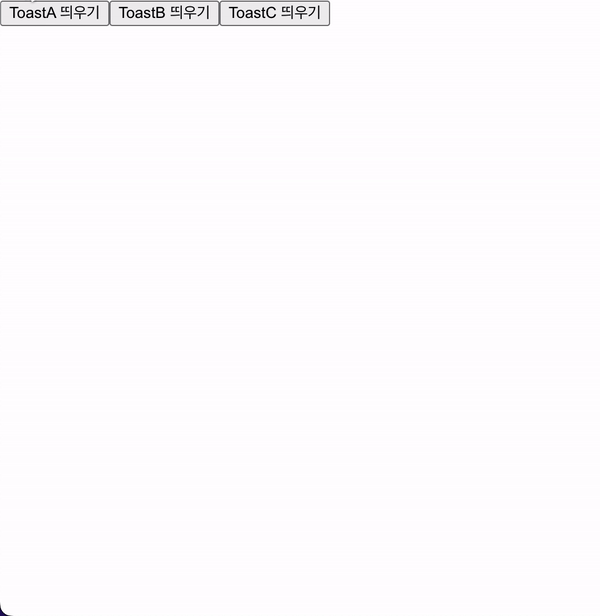
이제 토스트 메시지를 띄울 수 있는 버튼을 만들어보자.
토스트 메시지 띄우기
App.tsx에 버튼을 만들고, 토스트 메시지를 렌더링해보자.
// App.tsx

import { MouseEventHandler } from "react";
import { ToastType, TOAST_TYPE } from "./atoms";
import ToastA from "./ToastA";
import ToastB from "./ToastB";
import ToastC from "./ToastC";
import useToastList from "./useToastList";
import "./App.css";

function App() {
  const { show } = useToastList();

  const handleClick: MouseEventHandler = (e) => {
    const { toastType } = (e.currentTarget as HTMLButtonElement).dataset as {
      toastType: ToastType;
    };
    show(toastType);
  };

  return (
    <div className="App">
      <button onClick={handleClick} data-toast-type={TOAST_TYPE.toastA}>
        ToastA 띄우기
      </button>
      <button onClick={handleClick} data-toast-type={TOAST_TYPE.toastB}>
        ToastB 띄우기
      </button>
      <button onClick={handleClick} data-toast-type={TOAST_TYPE.toastC}>
        ToastC 띄우기
      </button>
      <ToastA />
      <ToastB />
      <ToastC />
    </div>
  );
}

export default App;
그러면 커스텀 훅을 통해 앱 내부의 어느곳에서나 토스트 메시지를 다루기 편한 구조가 완성된다.

현재 구조에서는 ToastA, ToastB, ToastC 간 순서가 고정되어 있다는 한계를 갖는데 이는 ToastContainer의 motion.div의 스타일 값을 수정함으로써 해결할 수 있을 것이다. 그 밖에도 하나의 토스트 메시지를 동시에 여러개를 띄우지는 못하는 등의 문제가 있지만, 어디까지 기능이 필요하고 얼만큼의 범용성을 갖게 할지에 따라서 조금씩 수정하며 사용해볼 수 있을 것 같다.
Reference
