코틀린 화면중에서 메인화면을 구성할때 상단바랑 하단 네비게이션바와 Drawer는 동일하게 들어가는데 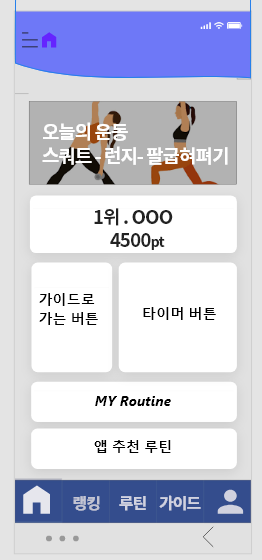
매 프레그먼트마다 기능들을 넣어놓는것 보다 동일된 기능은 한 activity에 몰아넣고 중앙에있는 페이지를 fragment로 나눠서 하단버튼을 누를때마다 fragment를 바꿔주는 식으로 만들기로했다!
1.fragment_main_page_part.xml 중앙이 빈 layout만들기
xml layout을 만들어준다!
<androidx.drawerlayout.widget.DrawerLayout
    xmlns:android="http://schemas.android.com/apk/res/android"
    xmlns:tools="http://schemas.android.com/tools"
    android:layout_width="match_parent"
    android:layout_height="match_parent"
    android:id="@+id/main_drawer_layout"
    xmlns:app="http://schemas.android.com/apk/res-auto"
    tools:context=".fragment.MainPagePartFragment">

    <androidx.constraintlayout.widget.ConstraintLayout
        android:layout_width="match_parent"
        android:layout_height="match_parent">

            <include
                android:id="@+id/include3"
                layout="@layout/fragment_tool_bar" />

       //중간 생략

            <androidx.constraintlayout.widget.Guideline
                android:id="@+id/guideline8"
                android:layout_width="wrap_content"
                android:layout_height="wrap_content"
                android:orientation="horizontal"
                app:layout_constraintGuide_percent="0.9" />

            <FrameLayout
                android:id="@+id/frameLayout"
                android:layout_width="0dp"
                android:layout_height="0dp"
                app:layout_constraintBottom_toTopOf="@+id/linearLayout"
                app:layout_constraintEnd_toEndOf="parent"
                app:layout_constraintStart_toStartOf="parent"
                app:layout_constraintTop_toBottomOf="@+id/include3">

            </FrameLayout>
    </androidx.constraintlayout.widget.ConstraintLayout>
    <com.google.android.material.navigation.NavigationView
        android:id="@+id/main_navigationView"
        android:layout_width="wrap_content"
        android:layout_height="match_parent"
        android:layout_gravity="start"
        app:headerLayout="@layout/main_drawer_header"
        app:menu="@menu/main_drawer_nagivation">

    </com.google.android.material.navigation.NavigationView>
</androidx.drawerlayout.widget.DrawerLayout>
상단바는 include해주어서 넣어주었고 중간에 하단바는 constraint layout에다가 LinearLayout을 집어넣고 5개의 버튼을 넣었다. 모든 핸드폰에서 하단 10%만 차지하게 90% 부분에 guideline을 만들고 하단바를 가이드 라인에다가 constraint를 부여했다. 프로젝트를 진행하면서 일정 비율로 화면을 구성하고자 하는 부분은 지금까지는 전부 guideline에다가 constraint를 부여하는 방식으로 코드를 짜고있다..
그리고 중앙에 있는 FrameLayout이 다른 fragment들이 들어올 공간이다! 저 빈공간에 다른 fragment들을 추가해서 화면전환을 만들거다! 중간에 빈공간의 FrameLayout의 id를 frameLayout으로 부여한걸 기억!!!
이 layout에는 DrawerLayout이 있는데 이 블로그를 참고 해서 만들었다.
2. 중앙에 넣을 fragment 만들기
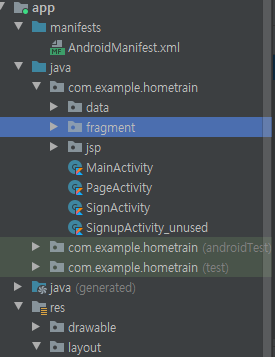
위와 같이 fragment package폴더를 만들어서 HomeFragment 라는 blank fragment를 새로 만들어준다
다른 블로그 보면 만드는거다 스샷찍어서 나와있는데 다만들고 블로그에 쓰는거라...쉽지않다..ㅎㅎ
fragment 클래스 파일을 생성하면 layout폴더에 fragment_home.xml 파일이 생성된다.
거기에다가 layout을 만들면 된다!!! 우선은 UI디자인 신경안쓰고 기능구현부터 하고있기때문에 버튼만 넣어서 만들었다.
fragment_home.xml
<?xml version="1.0" encoding="utf-8"?>
<androidx.constraintlayout.widget.ConstraintLayout xmlns:android="http://schemas.android.com/apk/res/android"
    xmlns:app="http://schemas.android.com/apk/res-auto"
    xmlns:tools="http://schemas.android.com/tools"
    android:id="@+id/homeFragment"
    android:layout_width="match_parent"
    android:layout_height="match_parent"
    android:background="@color/gray"
    tools:context=".fragment.HomeFragment">

    <androidx.constraintlayout.widget.Guideline
        android:id="@+id/guideline2"
        android:layout_width="wrap_content"
        android:layout_height="wrap_content"
        android:orientation="horizontal"

        app:layout_constraintGuide_percent="0.9" />


    <Button
        android:id="@+id/btn_home_daily"
        android:layout_width="0dp"
        android:layout_height="100dp"
        android:layout_marginStart="35dp"
        android:layout_marginTop="16dp"

        android:layout_marginEnd="35dp"
        android:background="@color/white"
        android:shadowColor="@color/gray"
        android:text="오늘의운동"
        app:layout_constraintEnd_toEndOf="parent"
        app:layout_constraintHorizontal_bias="0.0"
        app:layout_constraintStart_toStartOf="parent"
        app:layout_constraintTop_toTopOf="parent" />

    <Button
        android:id="@+id/btn_home_ranking"
        android:layout_width="0dp"
        android:layout_height="70dp"
        android:layout_marginStart="35dp"
        android:layout_marginTop="15dp"
        android:layout_marginEnd="35dp"

        android:background="@color/white"
        android:shadowColor="@color/gray"
        android:text="1위 .000 \n 4500pt "
        app:layout_constraintEnd_toEndOf="parent"
        app:layout_constraintHorizontal_bias="0.0"
        app:layout_constraintStart_toStartOf="parent"
        app:layout_constraintTop_toBottomOf="@+id/btn_home_daily" />

    <Button
        android:id="@+id/btn_home_guide"
        android:layout_width="0dp"
        android:layout_height="140dp"

        android:layout_marginStart="35dp"
        android:layout_marginTop="20dp"
        android:layout_marginEnd="10dp"
        android:background="@color/white"
        android:shadowColor="@color/gray"
        android:text="가이드로 가는 버튼
"
        app:layout_constraintEnd_toStartOf="@+id/guideline4"
        app:layout_constraintHorizontal_bias="1.0"
        app:layout_constraintStart_toStartOf="@+id/guideline5"
        app:layout_constraintTop_toBottomOf="@+id/btn_home_ranking" />

  //중간 생략
</androidx.constraintlayout.widget.ConstraintLayout>
나는 총 5개의 fragment만 만들었지만 예시로는 두개만 만들어야겠다.
GuideMainFragment를 생성해준다!
fragment_guide_main.xml 파일을 수정!
이 layout은 부위별로 운동을 나누어서 운동설명하는 가이드 화면의 메인 화면인데 코드는 같이 졸프하는 친구가 작성했다!!
<?xml version="1.0" encoding="utf-8"?>
<androidx.constraintlayout.widget.ConstraintLayout xmlns:android="http://schemas.android.com/apk/res/android"
    xmlns:app="http://schemas.android.com/apk/res-auto"
    xmlns:tools="http://schemas.android.com/tools"
    android:id="@+id/guideMainFragment"
    android:layout_width="match_parent"
    android:layout_height="match_parent"
    android:background="@color/gray"
    tools:context=".fragment.HomeFragment">

    <androidx.constraintlayout.widget.Guideline
        android:id="@+id/guideline2"
        android:layout_width="wrap_content"
        android:layout_height="wrap_content"
        android:orientation="horizontal"
        app:layout_constraintGuide_percent="0.9" />


    <LinearLayout
        android:id="@+id/linearLayout2"
        android:layout_width="match_parent"
        android:layout_height="0dp"
        android:layout_marginStart="15dp"
        android:layout_marginEnd="15dp"
        android:layout_weight="9"
        android:orientation="vertical"
        app:layout_constraintBottom_toBottomOf="parent"
        app:layout_constraintEnd_toEndOf="parent"
        app:layout_constraintStart_toStartOf="parent"
        app:layout_constraintTop_toTopOf="parent">

        <LinearLayout
            android:layout_width="match_parent"
            android:layout_height="0dp"
            android:layout_weight="4"
            android:orientation="vertical">

            <FrameLayout
                android:layout_width="match_parent"
                android:layout_height="65dp"
                android:layout_weight="1"
                android:padding="12dp">

                <ImageView
                    android:layout_width="300dp"
                    android:layout_height="40dp"
                    android:layout_gravity="center_horizontal"
                    android:scaleType="centerCrop"
                    android:src="@drawable/shape_rectangle" />

                <TextView
                    android:layout_width="wrap_content"
                    android:layout_height="wrap_content"
                    android:layout_gravity="center_horizontal"
                    android:padding="2dp"
                    android:text="상체"
                    android:textColor="@color/black"
                    android:textSize="30dp" />


            </FrameLayout>

            <ScrollView
                android:layout_width="370dp"
                android:layout_height="180dp"
                android:layout_gravity="center_horizontal"
                android:layout_weight="3"
                android:background="@drawable/shape_rectanglegray"
                android:fillViewport="true"
                android:scrollbars="none">

                <RelativeLayout
                    android:layout_width="match_parent"
                    android:layout_height="match_parent">

                    <Button
                        android:id="@+id/btn_chest"
                        android:layout_width="150dp"
                        android:layout_height="50dp"
                        android:layout_marginLeft="20dp"
                        android:layout_marginTop="20dp"
                        android:background="@drawable/button_purple"
                        android:text="가슴"
                        android:textSize="20dp" />


                    <Button
                        android:id="@+id/side"
                        android:layout_width="150dp"
                        android:layout_height="50dp"
                        android:layout_marginLeft="20dp"
                        android:layout_marginTop="230dp"
                        android:background="@drawable/button_purple"
                        android:text="옆구리"
                        android:textSize="20dp" />


                </RelativeLayout>

            </ScrollView>

        </LinearLayout>


        <LinearLayout
            android:layout_width="match_parent"
            android:layout_height="0dp"
            android:layout_weight="4"
            android:orientation="vertical">

            <FrameLayout
                android:layout_width="match_parent"
                android:layout_height="wrap_content"
                android:layout_weight="1"
                android:padding="12dp">

                <ImageView
                    android:layout_width="300dp"
                    android:layout_height="40dp"
                    android:layout_gravity="center_horizontal"
                    android:scaleType="centerCrop"
                    android:src="@drawable/shape_rectangle" />

                <TextView
                    android:layout_width="wrap_content"
                    android:layout_height="wrap_content"
                    android:layout_gravity="center_horizontal"
                    android:padding="2dp"
                    android:text="하체"
                    android:textColor="@color/black"
                    android:textSize="30dp" />


            </FrameLayout>
//중간 대량 생략
        </LinearLayout>

        <RelativeLayout
            android:layout_width="match_parent"
            android:layout_height="0dp"
            android:layout_weight="1">
        </RelativeLayout>

    </LinearLayout>

</androidx.constraintlayout.widget.ConstraintLayout>
스크롤 뷰를 이용해서 만들었다!
3. Activity에 fragment 불러오고 교체하기
fragment추가는 supportFragmentManager을 이용한다
PageActivity.kt
package com.example.hometrain


class PageActivity : AppCompatActivity() ,View.OnClickListener {


    override fun onCreate(savedInstanceState: Bundle?) {
        super.onCreate(savedInstanceState)

        val transaction = supportFragmentManager.beginTransaction()
        setContentView(R.layout.fragment_main_page_part)
        transaction.add(R.id.frameLayout,HomeFragment())
        transaction.commit()

        setSupportActionBar(main_layout_toolbar)
        supportActionBar?.setDisplayHomeAsUpEnabled(true) //드로어를 꺼낼 홈버튼 활상화
        supportActionBar?.setHomeAsUpIndicator(R.drawable.btn_menu)
        supportActionBar?.setDisplayShowTitleEnabled(false)  //타이틀 안보이게
        btn_home.setOnClickListener(this)
        btn_guide.setOnClickListener(this)
        btn_mypage.setOnClickListener(this)
        btn_routine.setOnClickListener(this)
        btn_ranking.setOnClickListener(this)
        btn_drawer.setOnClickListener(this)
    }

    override fun onOptionsItemSelected(item: MenuItem): Boolean {
        when (item.itemId) {
            android.R.id.home -> {
                main_drawer_layout.openDrawer(GravityCompat.START)
            }
        }
        return super.onOptionsItemSelected(item)
    }

    override fun onBackPressed() {
        if (main_drawer_layout.isDrawerOpen(GravityCompat.START)) {
            main_drawer_layout.closeDrawers()

        } else {
            super.onBackPressed()
        }
    }

    override fun onClick(v: View) {
        val transaction = supportFragmentManager.beginTransaction()
        when (v.id) {
            R.id.btn_home->{
                transaction.replace(R.id.frameLayout,HomeFragment())
                transaction.addToBackStack(null)
                transaction.commit()
            }
            R.id.btn_guide -> {
                transaction.replace(R.id.frameLayout,GuideMainFragment())
                transaction.addToBackStack(null)
                transaction.commit()
            }
            R.id.btn_mypage -> {
                transaction.replace(R.id.frameLayout,MyPageFragment())
                transaction.addToBackStack(null)
                transaction.commit()
            }
            R.id.btn_ranking -> {
                transaction.replace(R.id.frameLayout,RankingMainFragment())
                transaction.addToBackStack(null)
                transaction.commit()
            }
            R.id.btn_routine -> {
                transaction.replace(R.id.frameLayout,MyRoutineFragment())
                transaction.addToBackStack(null)
                transaction.commit()
            }
            R.id.btn_drawer -> {
                main_drawer_layout.openDrawer(GravityCompat.START)
            }

        }
    }

}
위에가 Activity 코드이다. Activity가 실행될때
setContentView 함수를 이용해서 중앙이빈 layout을 불러와준다.
그리고 supportFragmentmanager을 이용해서
앞에 만들어주었던 빈공간 frameLayout 빈 공간에다가 fragment를 넣어주는것이다!
val transaction = supportFragmentManager.beginTransaction()
transaction.add(R.id.frameLayout,HomeFragment())
transaction.commit()
transaction은 add(), replace(), remove()를 사용할수가 있다. 말그대로 fragment를 추가하고 교체하고 삭제하는 기능을 가지고 있는데 add를 해주면 그위에 덮어씌어진다. 위처럼 onClickListener를 이용해서 버튼을 누를때 마다 fragment를 교체해주었다.
addToBackStack(null)은 교체 transaction이 백스택에 저장이 되도록 지정하는거다! 사용자는 뒤로가기 버튼을 눌러 transaction을 되돌릴수 있다~
결과~
기능만 만들고있는 중이라 화면이 매우 지저분하고 안만들어진것도 많다...ㅠㅠ
뭔가 공부한걸 복습하는 느낌으로 블로그글을 쓰고있는데 굉장히 어렵다...! 남들이 도움되게 쓰는건 엄청 어렵다는걸 깨달아버렸다...! ㅎㅎ 나는 그냥 복습용..