시작 전에
- 유니티와 C#에 낯선 머신러닝 리서쳐가 작성한 포스트입니다
- 이 게시물은 다음의 유튜브 비디오에 기반합니다. 유튜브를 보면서 따라하는 게 더 편합니다
- https://www.youtube.com/watch?v=ggmArUbRvC4
- https://github.com/tapiralec/UnityInferenceTutorial
1. 유니티에서 3D 프로젝트 생성
- 유니티허브에서 New project 선택해서 3D 프로젝트 생성
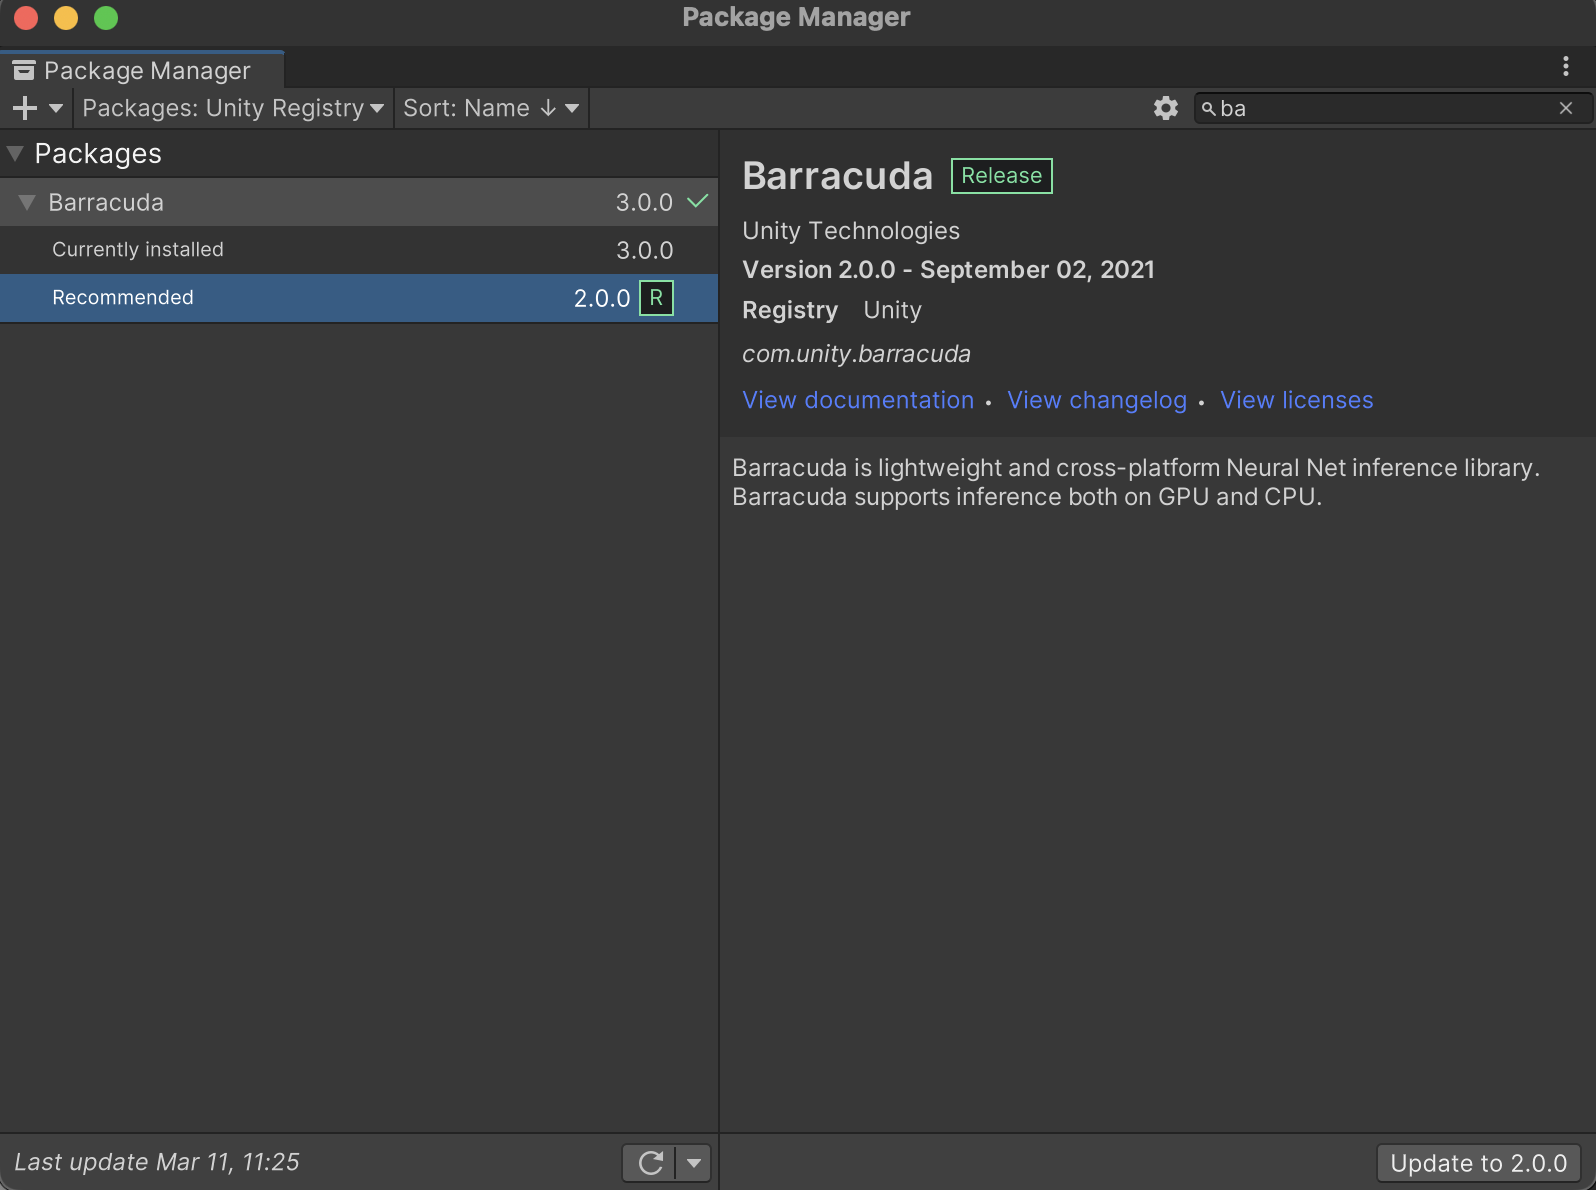
2. 유니티 바라쿠다 패키지 설치
- 유튜브 비디오 보다 최신 문서로 업데이트 되는 공식링크를 참고
- Packages/manifest.json 내 파일에
"com.unity.barracuda" : 2.0.0추가해주자 - 버전이 틀리더라도 걱정말아도 되는게 일단 추가가 되면 내 유니티에 맞는 버전을 추천해줌
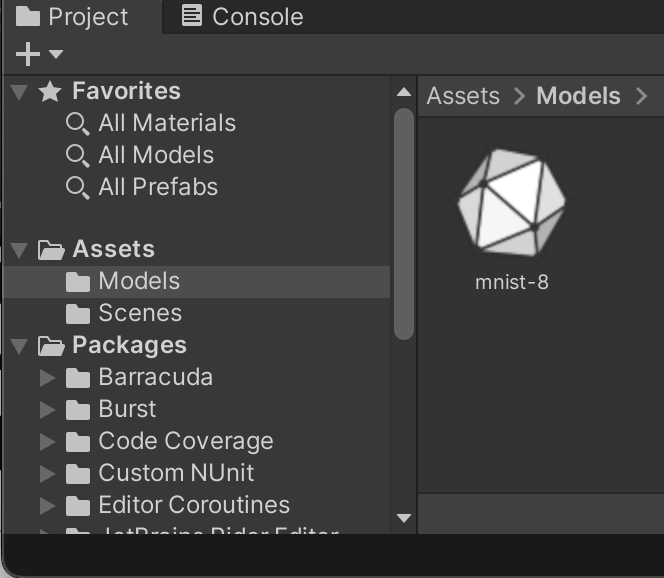
3. MNIST 분류 ONNX 모델 다운로드
- 유니티 바라쿠다 사용을 위해서는 딥러닝 프레임워크에 상관없이 사전학습된 모델을 사용하게 만들어주는 ONNX 기반의 MNIST 모델을 다운로드 받아야한다 (아니면 바라쿠다에서 튜토리얼 하라고 제공하는 기본 모델을 사용할 수도 있다. Model Asset 창에서 검색하면 나옴)
Asset > Models폴더를 만들어서 다운 받은 파일을 드래그 앤 드롭으로 넣어준다
4. 모델 사용을 위한 스크립트 작성
Asset > Scripts폴더를 만들어서GetInferenceFromModel.cs스크립트를 생성- C#은 거의 멘땅에 헤딩이었기 때문에(예전에 아두이노 실습 도와줄 때 몇번 했던 기억이..) 일단 대략적인 문법과 java의 기억을 떠올리며 한줄씩 이해해보고 필요하다면 주석을 작성했다
- 이 스크립트는 바라쿠다를 통해 먼저 모델 추론 관련 스크립트 부터 작성
// Import packages
using System;
using System.Collections;
using System.Collections.Generic;
using System.Linq; // List 데이터 관련 소스를 간단하게 만들어줌
using Unity.Barracuda;
using UnityEngine;

public class GetInferenceFromModel : MonoBehaviour
{

    public Texture2D texture; // Texture2D: 텍스쳐 생성, 수정을 위한 속성
    // 아래는 바라쿠다에서 쓰이는 타입들
    public NNModel modelAsset;
    private Model _runtimeModel;
    private IWorker _engine;

    [Serializable]
    public struct Prediction
    {
        // The most likely value for this prediction
        public int predictedValue;
        // The list of likelihoods for all the possible classes
        public float[] predicted;

        public void SetPrediction(Tensor t)
        {
            // 주어진 텐서 t에 대해 inference를 수행하는 과정
            predicted = t.AsFloats();
            // 가장 확률이 높은 클래스를 저장
            predictedValue = Array.IndexOf(predicted, predicted.Max());
            Debug.Log($"Predicted {predictedValue}");
        }
    }

    public Prediction prediction;

    // Start is called before the first frame update
    void Start()
    {
        // 모델 실행을 위한 런타임과 엔진 로드
        _runtimeModel = ModelLoader.Load(modelAsset);
        _engine = WorkerFactory.CreateWorker(_runtimeModel, WorkerFactory.Device.GPU);
        // Instantiate our prediction struct.
        prediction = new Prediction();
    }

    // Update is called once per frame
    void Update()
    {
        if (Input.GetKeyDown(KeyCode.Space))
        {
            // 그레이 스케일 텐서 만들기
            var channelCount = 1; //grayscale, 3 = color, 4 = color+alpha
            // Create a tensor for input from the texture.
            var inputX = new Tensor(texture, channelCount);

            // Peek at the output tensor without copying it.
            Tensor outputY = _engine.Execute(inputX).PeekOutput();
            // Set the values of our prediction struct using our output tensor.
            prediction.SetPrediction(outputY);

            // Dispose of the input tensor manually (not garbage-collected).
            inputX.Dispose();
        }
    }

    private void OnDestroy()
    {
        // Dispose of the engine manually (not garbage-collected).
        _engine?.Dispose();
    }
}-
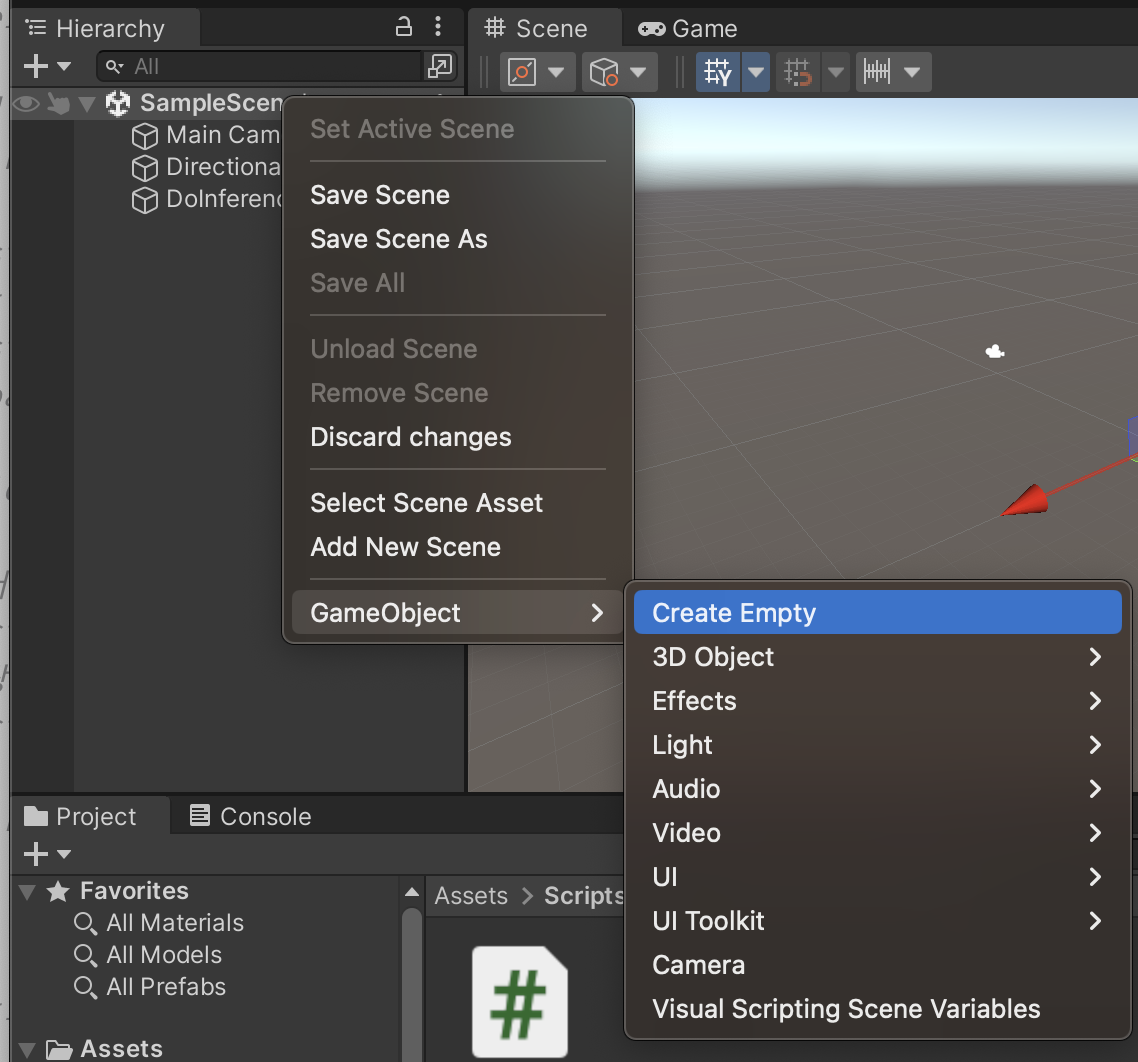
여기까지 작성했으면
DoInferencing이라는 새로운 오브젝트를 만들어준다 -
-
다음으로 스크립트를 다시 드래그해서 오른쪽 Inspector 창에 던져두고 아래 코드를 마저 작성한다
-

5. 텍스쳐 추가해서 모델 사용해보기
- 먼저 작업을 위해 GIMP이라는 이미지 에디터를 다운 받아 준다 (포토샵이나 그리판 써도 무방함)
파일 > 새 이미지 생성메뉴에서 28*28 이미지를 만들어주고 페인트칠 도구와 브러시를 이용해 숫자 손글씨 이미지를 만들어준다

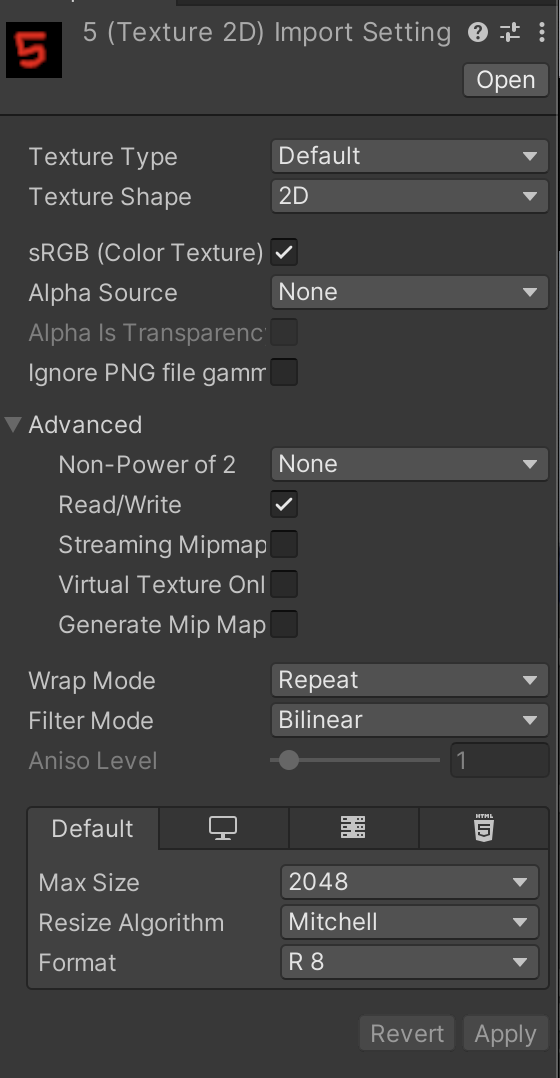
- 이렇게 만든 이미지를 Asset 폴더에 넣고 아래와 같이 설정해준다
- 그리고 다시 스크립트로 돌아가서
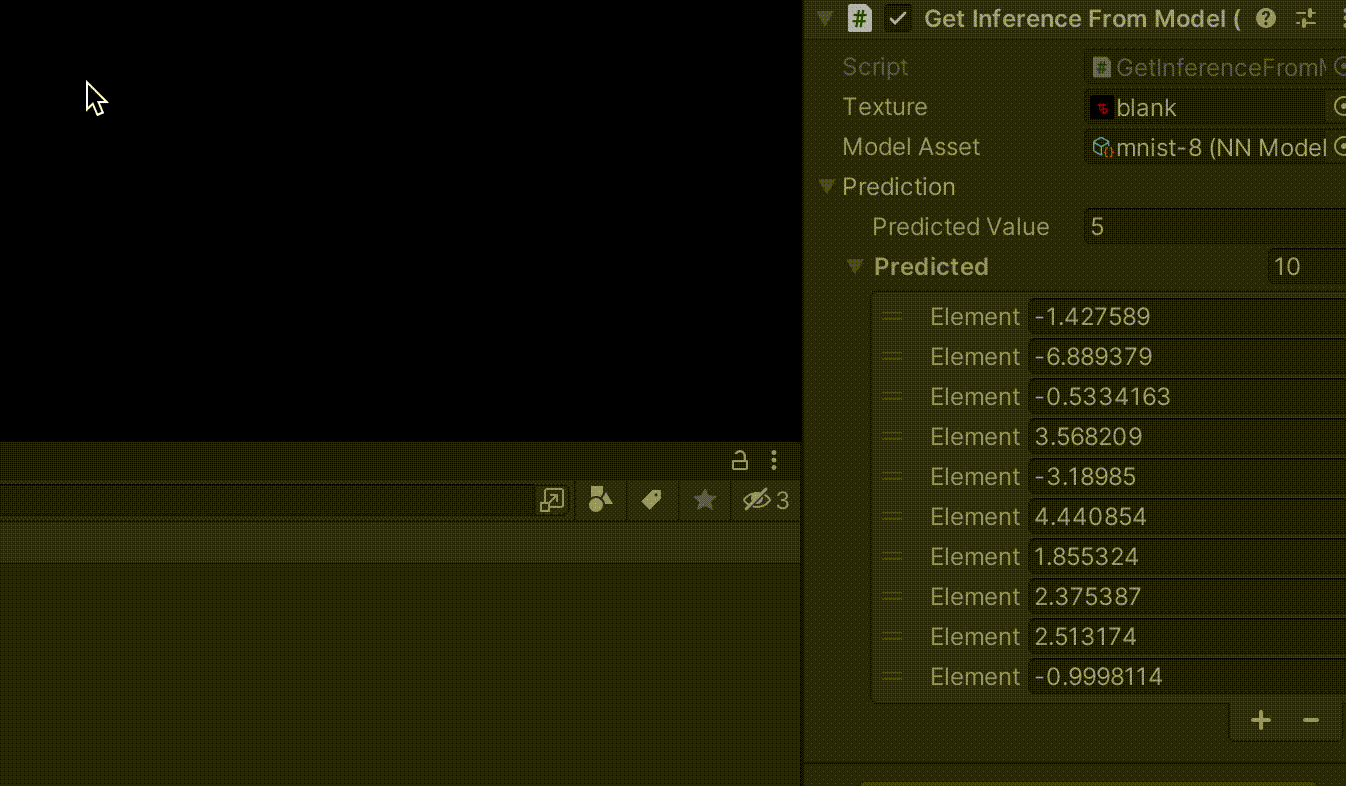
Texture에는 방금 넣은 텍스쳐를 드래그하고,Model Asset에는 MNist 모델을 드래그한 다음에 스페이스!를 눌러주면 예측값과 각 클래스별 logit을 확인할 수 있다 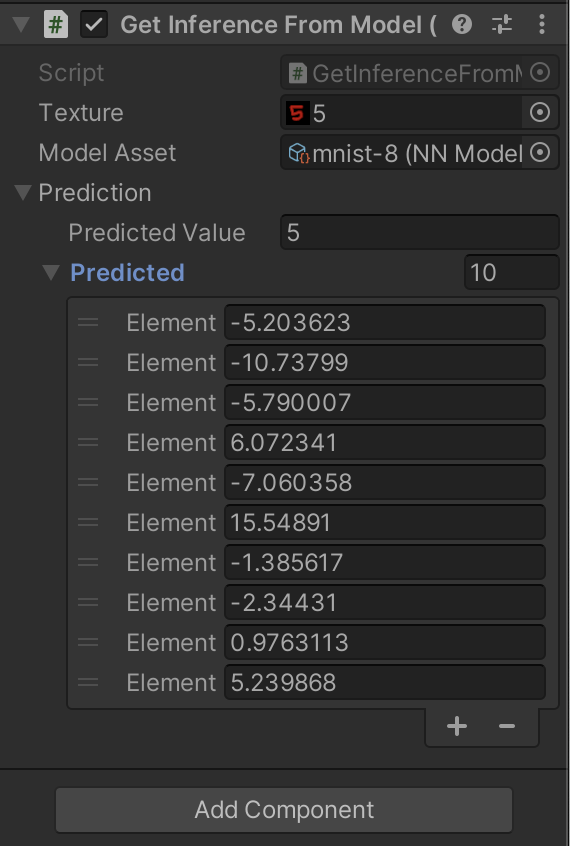
6. 내 손글씨를 인식하도록 수정하기
- MNIST 모델이 돌아가는 걸 확인했으니 여기서 약간 수정해 직접 마우스로 숫자를 적으면 MNIST 모델이 돌아가도록 해볼 거다
- 먼저 3D 오브젝트를 추가한 다음에
Plane라는 이름을 붙여준다 - 그리고 GIMP를 다시 켜서 검은색으로 칠해진 28*28도 하나 만들어
blank.png로 저장한다음에 에셋에 추가해준다 - 이제 오브젝트 위에 마우스 입력을 인식받을 수 있도록 돕는 스크립트를 작성해보자. 이름은
DrawOnTexture.cs라고 지으면 됨 - 이 스크립트에도 유튜브 동영상 업로더의 스크립트에 일부 한글 주석을 달아 두었다. 머신러닝쪽이라기 보단 유니티 개발 관련 코드가 많이 나와있어서 우선은 모르는 타입들이나 코드의 역할을 대략적으로 파악하고 넘어갔다
using System;
using System.Collections;
using System.Collections.Generic;
using UnityEngine;

public class DrawOnTexture : MonoBehaviour
{
    public Texture2D baseTexture;

    // Update is called once per frame
    void Update()
    {
        DoMouseDrawing();
    }

    /// <summary>
    /// 마우스로 텍스쳐를 그립니다
    /// </summary>
    /// <exception cref="Exception"></exception>

    private void DoMouseDrawing()
    {
        // Don't bother trying to run if we can't find the main camera.
        if (Camera.main == null)
        {
            throw new Exception("연결된 카메라를 찾을 수 없습니다");
        }

        // 마우스 버튼 눌렸는지 확인
        if (!Input.GetMouseButton(0) && !Input.GetMouseButton(1)) return;
        // 유니티에서 Ray는 지정한 위치에서 무한대로 발사되는 선 (광선!)
        // -> 이걸 이용하면 Ray에 닿은 물체 정보 반환가능
        // Cast a ray into the scene from screenspace where the mouse is.
        Ray mouseRay = Camera.main.ScreenPointToRay(Input.mousePosition);
        RaycastHit hit;

        // 마우스 작동 안할 때 확인
        // Do nothing if we aren't hitting anything.
        if (!Physics.Raycast(mouseRay, out hit)) return;
        // Do nothing if we didn't get hit.
        if (hit.collider.transform != transform) return;

        // 마우스 ray가 닿은 좌표 가져오기
        // Get the UV coordinate that the mouseRay hit
        Vector2 pixelUV = hit.textureCoord;
        pixelUV.x *= baseTexture.width;
        pixelUV.y *= baseTexture.height;

        // 색깔 관련 작업
        // Set the color as white if the lmb is being pressed, black if rmb.
        Color colorToSet = Input.GetMouseButton(0) ? Color.white : Color.black;


        // Update the texture and apply.
        baseTexture.SetPixel((int)pixelUV.x, (int)pixelUV.y, colorToSet);
        baseTexture.Apply();

    }
}- 스크립트까지 다 왔으면 이제
Plane에 만든 스크립트를 드래그 해두고, base Texture에는 아까만든blank.png이미지를 드래그 해준다 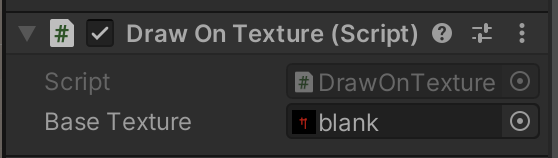
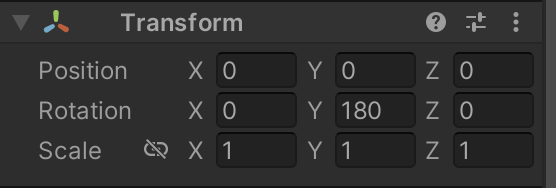
- 오브젝트도 180도 돌려준다
- 이렇게 설정을 완료했으면
DoInferencing오브젝트로 다시 돌아가서Play를 누르고 마우스 오른쪽 버튼을 통해 숫자를 쓴다음 스페이스를 눌러주면 - 완성!

끝마치며
- 머신러닝 모델 + 유니티 통해 입출력 이렇게 해봤는데 사이드 프로젝트에 필요한 정도로 유니티 다룰려면 유니티 튜토리얼 책도 한번 체크해봐야 코드 읽는데 도움이 될 거 같다
- 튜토리얼 코드 기록

도파민 중독