2024.1.29 (월)
통신으로 STM32 제어하기 (Windows)
LED 제어하기
-
udp_echoserver.c
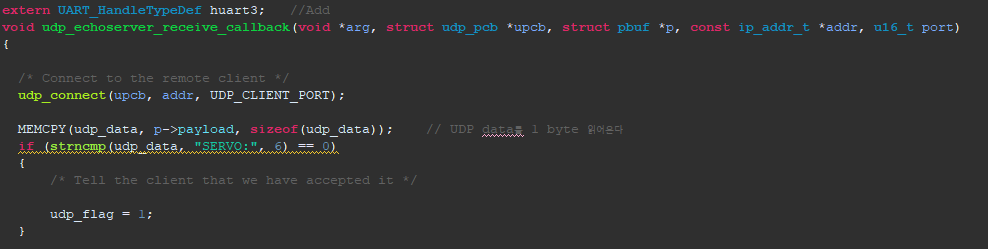 payload: 원본 데이터
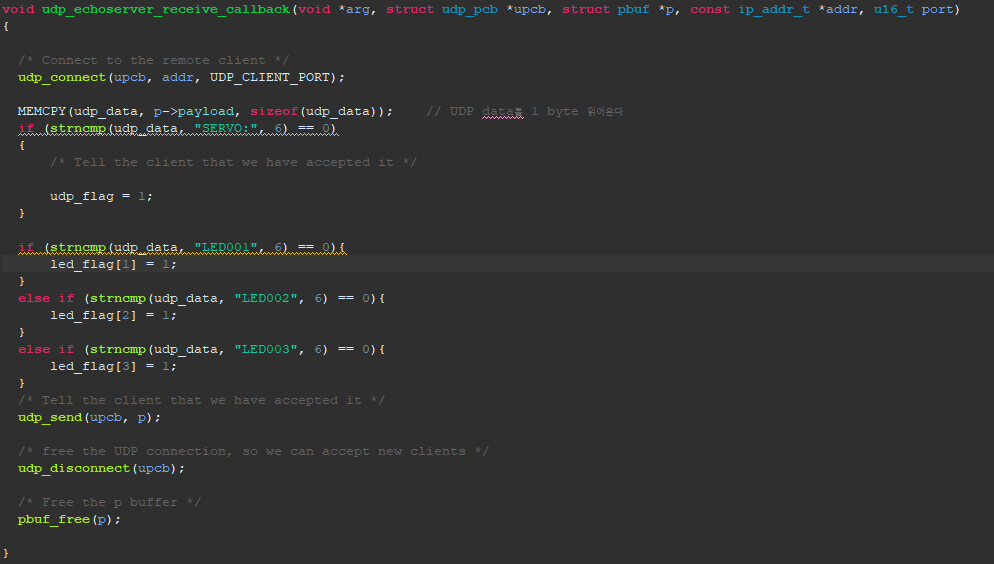
-
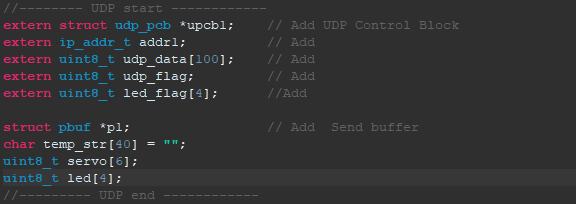
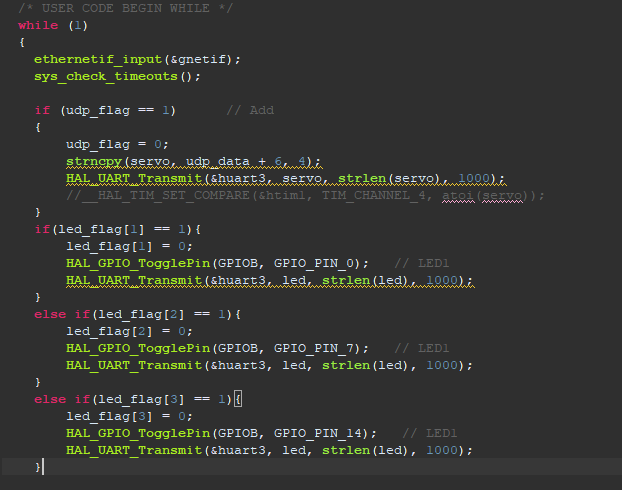
main.c
-
Hercules
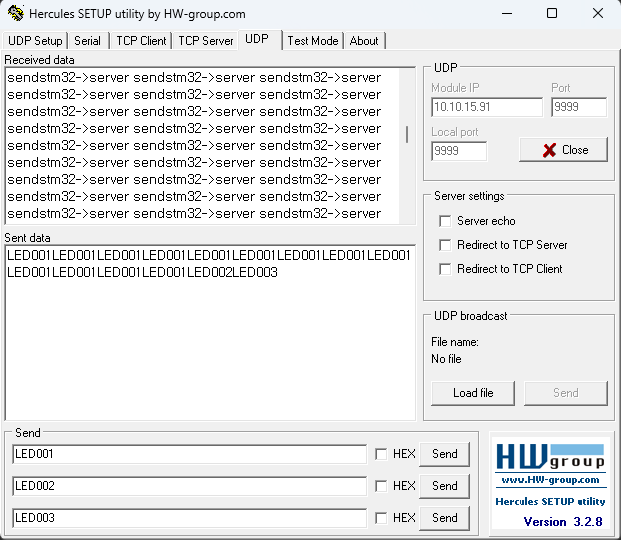
LED001을 send 누르면 LED 1번이 켜지고, 한 번 더 누르면 꺼진다. 2, 3번도 마찬가지
온습도 센서 제어하기
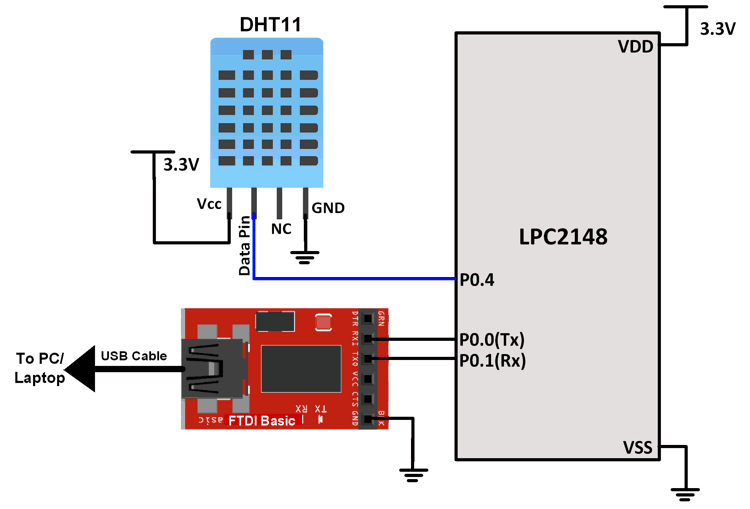 DATA : PA0
Code
- main.c
while (1) {
	if (TIM10_10ms_counter >= 150)
	{
		TIM10_10ms_counter=0;
		get_DHT11(temp_str);
		udp_connect(upcb1, &addr1, 9999);  // Add
		p1 = pbuf_alloc(PBUF_TRANSPORT, strlen((char *) temp_str), PBUF_POOL);
		if (p1 != NULL)
		{
			// copy data to pbuf
			pbuf_take(p1, (char *)temp_str, strlen((char *)temp_str));
			// send udp data
			udp_send(upcb1, p1);
			/* free the UDP connection, so we can accept new clients */
			udp_disconnect(upcb1);

			// free pbuf
			pbuf_free(p1);
		}
		else
		{
			HAL_UART_Transmit(&huart3,  "pbuf not allocated\n", strlen("pbuf not allocated\n"), 10);
		}
	}
}- DHT11.c
void get_DHT11(char *tmp)
{
uint8_t i_RH, d_RH, i_Tmp, d_Tmp;
TIM10_10ms_counter=0;
DHT11_trriger();
DHT11_DataLine_Input();
DHT11_dumi_read();
i_RH = DHT11_rx_Data();
d_RH = DHT11_rx_Data();
i_Tmp = DHT11_rx_Data();
d_Tmp = DHT11_rx_Data();
DHT11_DataLine_Output();
HAL_GPIO_WritePin(DHT11_PORT, DHT11_DATA_RIN, GPIO_PIN_SET);
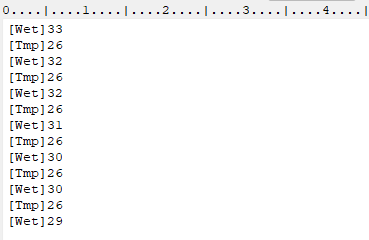
printf("[Tmp]%d\n",(int)i_Tmp);
printf("[Wet]%d\n",(int)i_RH);
sprintf(tmp, "[Tmp]%d\n [Wet]%d\n",(int)i_Tmp,(int)i_RH);
}결과
참고 사항
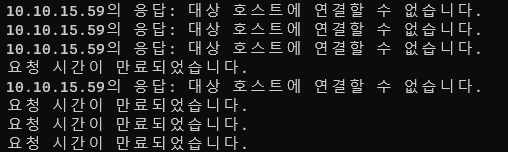 ping 찍었을 때 이와 같은 오류가 계속 뜰 때
1. 결선이 잘 되어 있는지 확인한다
하드웨어 모듈의 결선이 잘 되지 않았을 때 뜨기도 한다
2. STM32의 Reset 버튼을 누르거나 코드를 다시 다운로드 받는다
통신으로 STM32 제어하기 (Linux)
QT Creator에서 새로운 프로젝트 만들기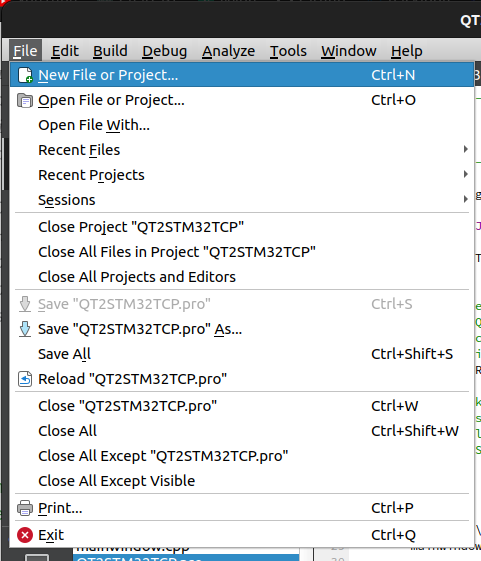 QT Widgets Application 선택
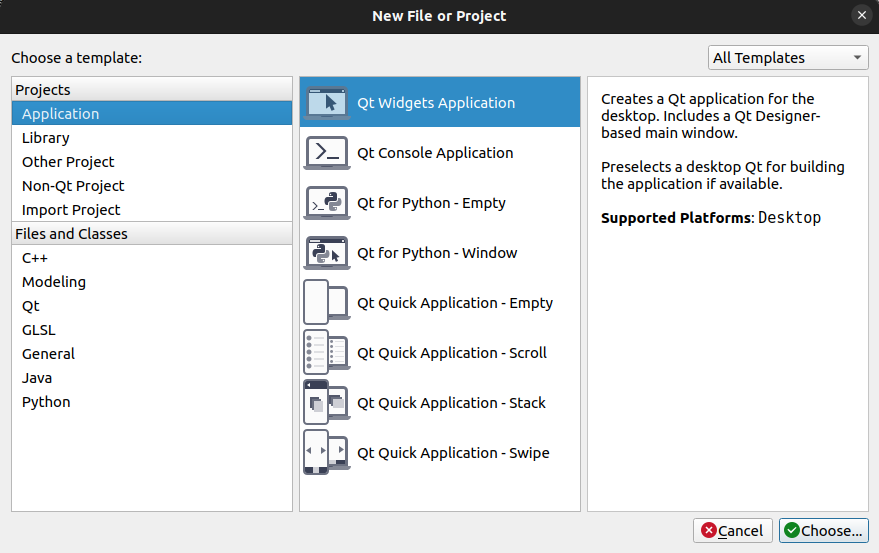 프로젝트 명과 경로 생성
 Kit 선택 >> 그냥 next
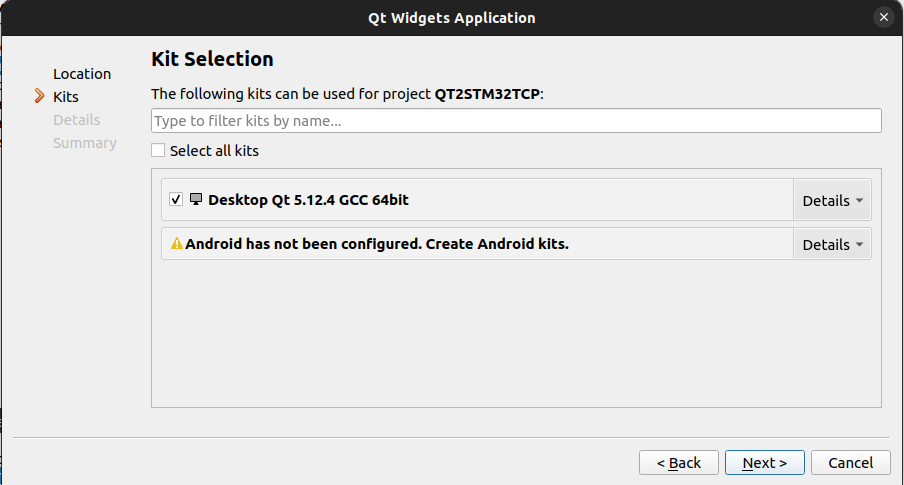 Main클래스도 그대로 next
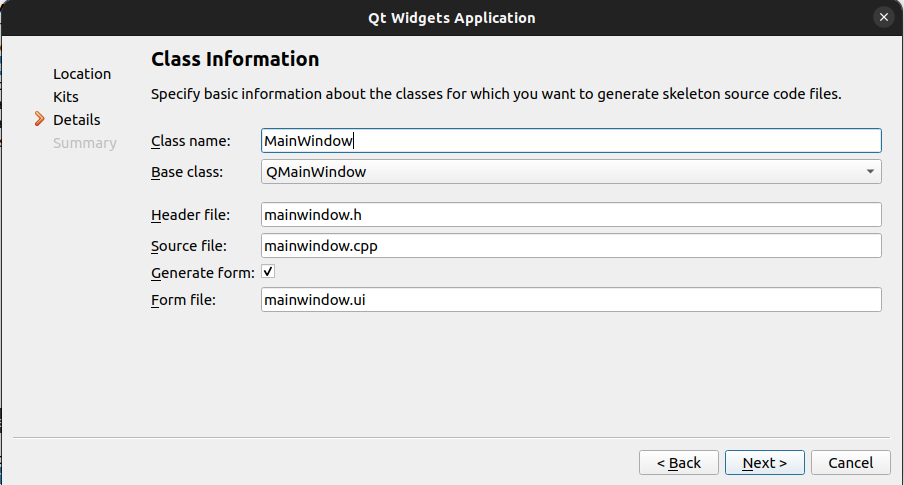 version control도 일단 none으로.. Finish 눌러서 마치기
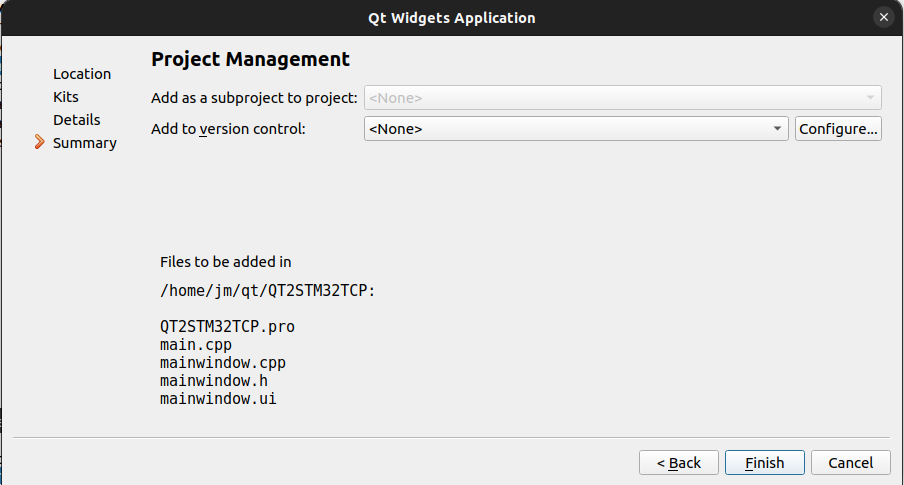
namespace : 동일한 변수 이름을 설정할 수 없도록 해주고 클래스 이름을 포장지로 싸서 사용자 친화적으로 이름을 설정할 수 있도록 한다.
TCP로 온습도 정보 받기
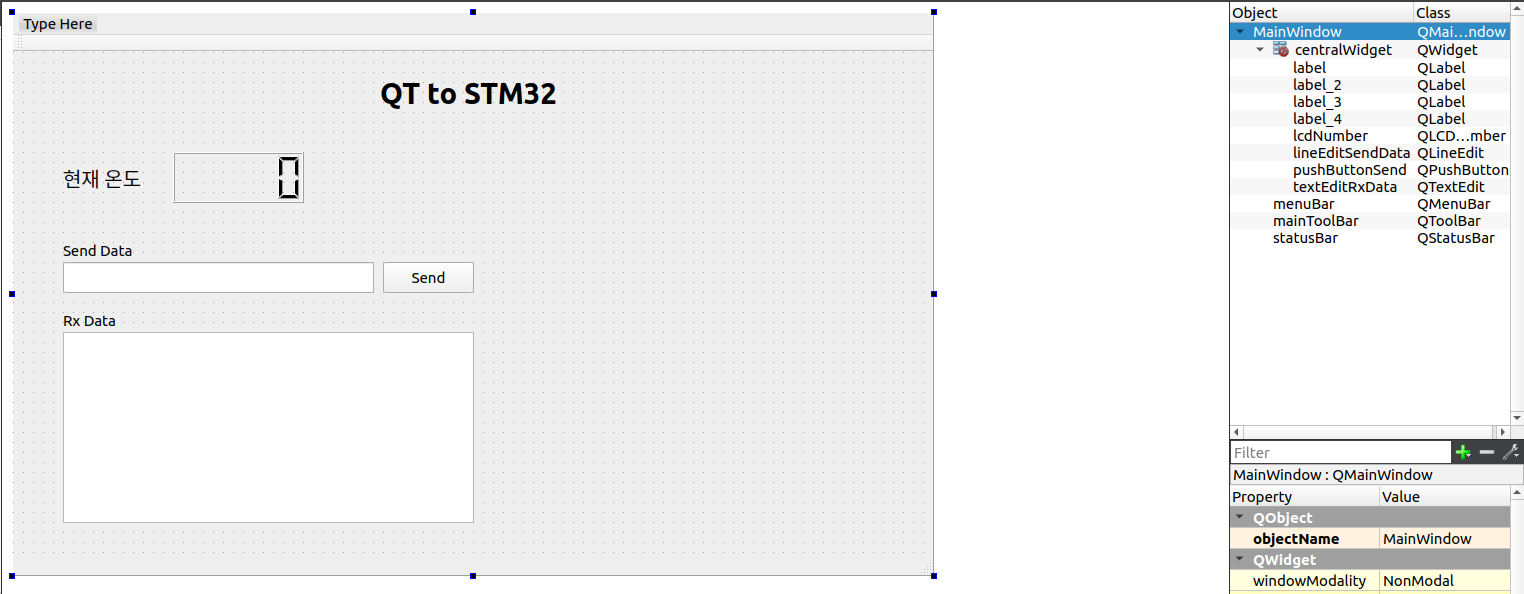
UI
Code
-
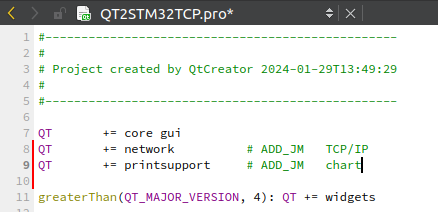
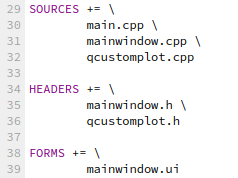
QT2STM32TCP.pro
-
mainwindow.h
#ifndef MAINWINDOW_H
#define MAINWINDOW_H

#include <QMainWindow>
#include <QUdpSocket>   // ADD_JM
#include <QTextStream>  // ADD_JM

namespace Ui {
class MainWindow;
}

class MainWindow : public QMainWindow
{
    Q_OBJECT

public:
    explicit MainWindow(QWidget *parent = nullptr);
    ~MainWindow();
public slots:   // call back function
    void readyRead();

private:
    Ui::MainWindow *ui;
    QUdpSocket *socket = nullptr;
};

#endif // MAINWINDOW_H- mainwindow.cpp
#include "mainwindow.h"
#include "ui_mainwindow.h"
#include "qcustomplot.h"    // ADD_JM
#include <QDebug>           // ADD_JM   stdio.h와 비슷
#include <QString>          // ADD_JM   c++의 string을 진화시킨 것

MainWindow::MainWindow(QWidget *parent) :
    QMainWindow(parent),
    ui(new Ui::MainWindow)
{
    ui->setupUi(this);

// ------------ TCP Start
    // 1. socket을 생성
    socket = new QUdpSocket(this);
    // 2. IP, SW, PORT 번호 등록
    bool result = socket->bind(QHostAddress::AnyIPv4, 9999);
    qDebug() << result;     // qDebug --> c++의 cout
    if (result) {
        qDebug() << "PASS";
    }
    else {
        qDebug() << "FAIL";
    }
    // SIGNAL : event 발생
    // SLOT : INT service routine (함수)
    // connect : mapping (연결시켜 주는 것)
    // socket으로부터 읽을 data가 존재하면 나의(this) readyRead()를 호출하여라
    connect(socket, SIGNAL(readyRead()), this, SLOT(readyRead()));

// ------------ TCP End
}

void MainWindow::readyRead()
{
    QByteArray Buffer;
    double temp_digit;      // 온도값
    QHostAddress sender;    // 송신자의 IP
    quint16 senderPort;     // 송신자의 SW PORT

    Buffer.resize(socket->pendingDatagramSize());

    // 3. socket으로부터 data를 read
    socket->readDatagram(Buffer.data(), Buffer.size(), &sender, &senderPort);
    Buffer.chop(1);     // [Tmp] 25\n가 왔을 때 \n을 제거 (마지막 byte를 제거)
    ui->textEditRxData->append(Buffer);     // 창의 맨 끝에 붙여 넣기
    ui->textEditRxData->show();             // 창에 display

    // LCD 창에 출력
    Buffer = Buffer.right(2);           // right(2) : [Tmp]25 맨 오른쪽부터 2자리를 자른다.
    // Buffer에는 25가 들어 있다. 25는 utf8 모드
    temp_digit = Buffer.toDouble();     // Buffer에 있는 내용을 double로 변환
    ui->lcdNumber->display(temp_digit); // LCD 창에 출력
}

MainWindow::~MainWindow()
{
    delete ui;
}
import가 안 되고 module not found 오류가 뜨면 QT2STM32TCP.pro가 잘 저장되었는지 확인하기
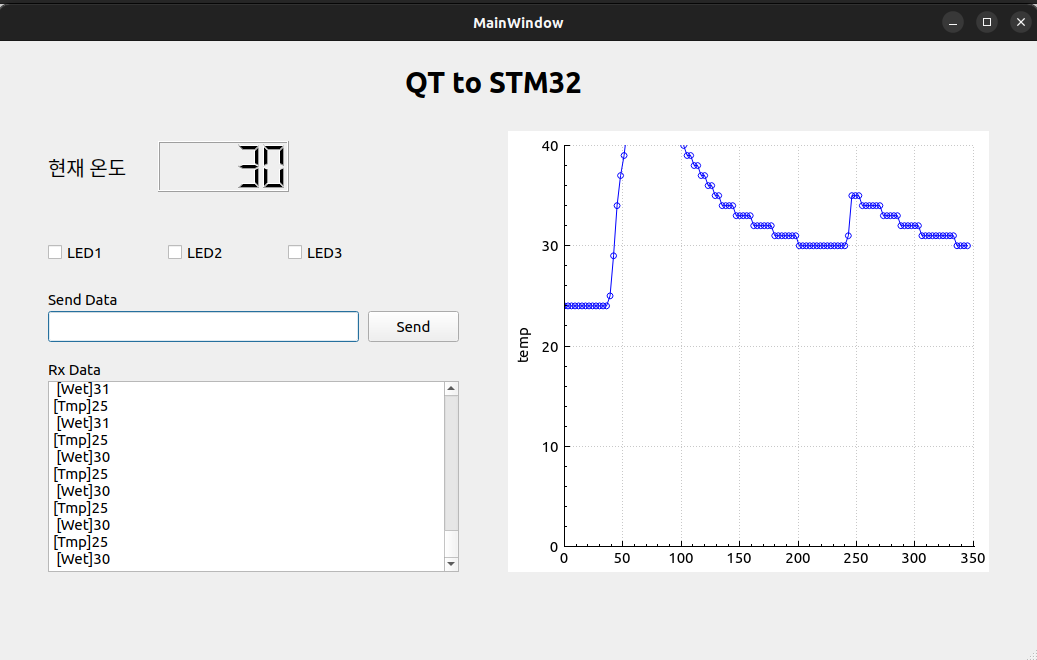
결과
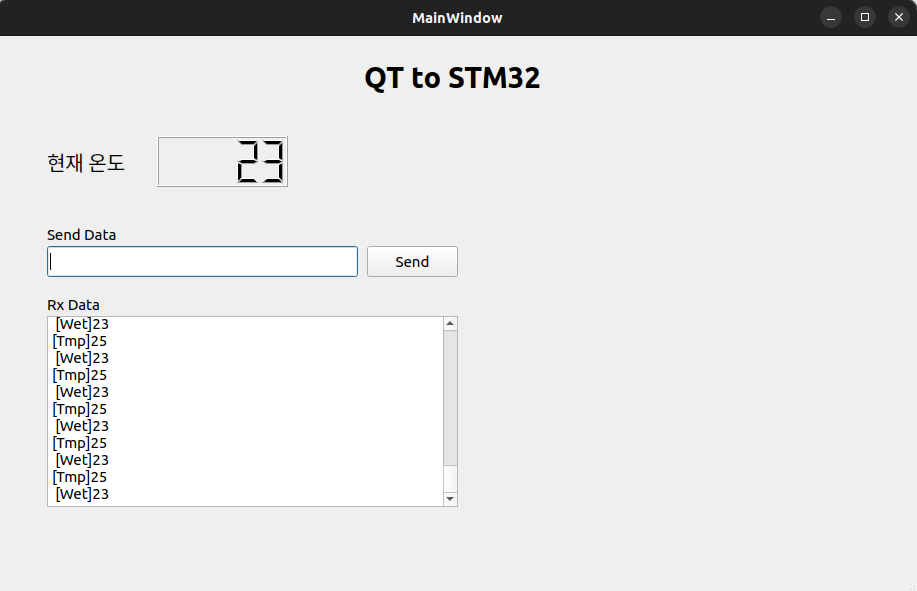 wet, tmp 데이터가 오지 않으면 ping 으로 잘 연결되어 있는지 확인하기
Linux와 STM32 연동해서 LED 제어하기
버튼 위에서 오른쪽 마우스 클릭하고 Go to slot
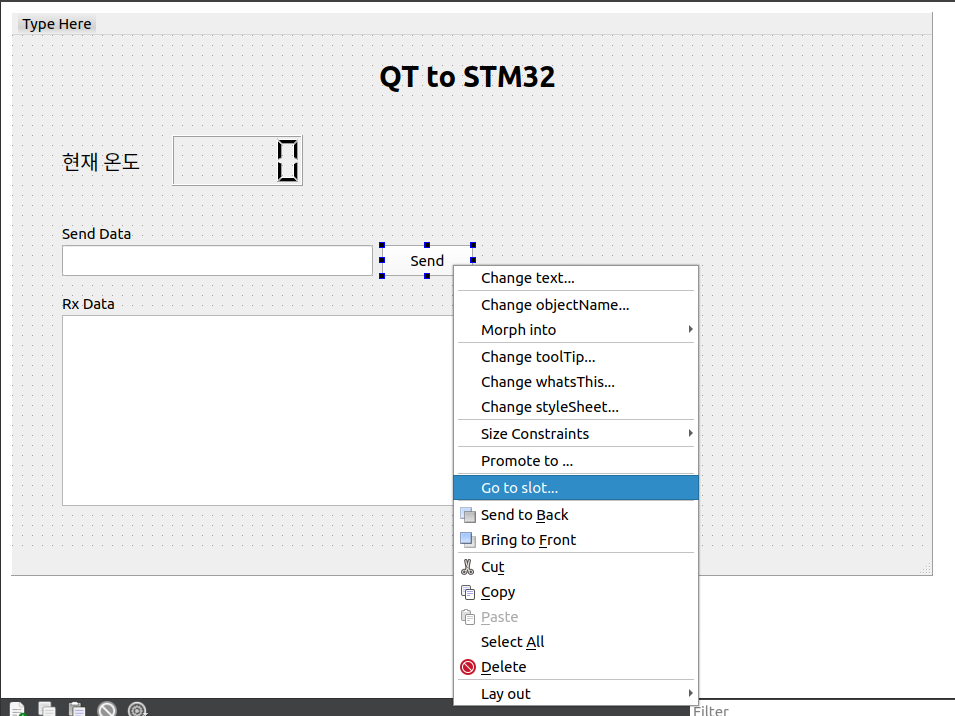 clicked() 메서드 선택하고 OK 버튼 누르기
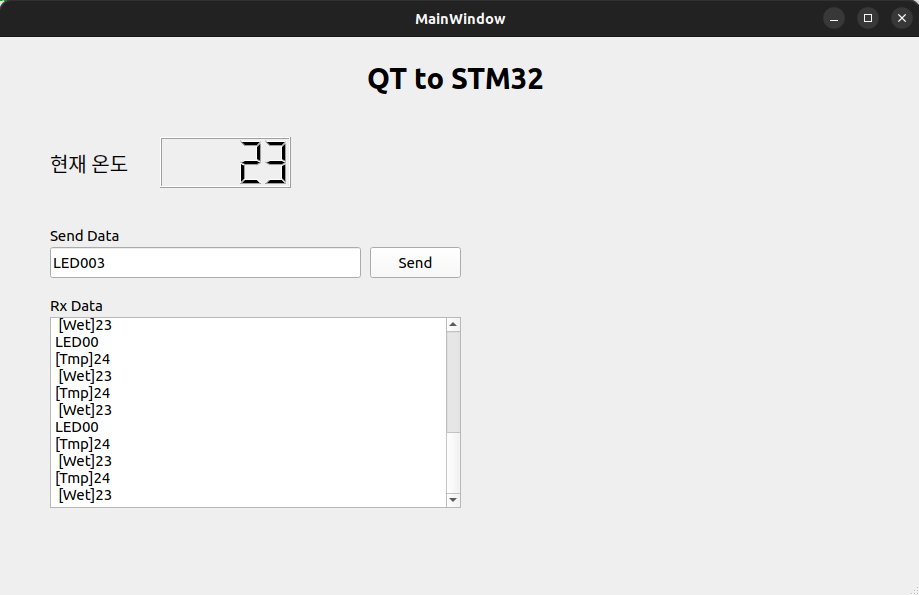 LED001을 치고 Send 버튼을 누르면 1번 LED가 켜진다. 2, 3번도 가능. 한 번 더 누르면 꺼진다
Code
- mainwindow.cpp
// 생성 경로 : send --> 마우스우클릭 --> go to slot --> click
void MainWindow::on_pushButtonSend_clicked()
{
    QByteArray Data;

    Data = ui->lineEditSendData->text().toUtf8();
    socket->writeDatagram(Data, QHostAddress("10.10.15.91"), 9999);
    // 10.10.15.91 : STM32 IP
}
CheckBox로 LED 제어하기
UI
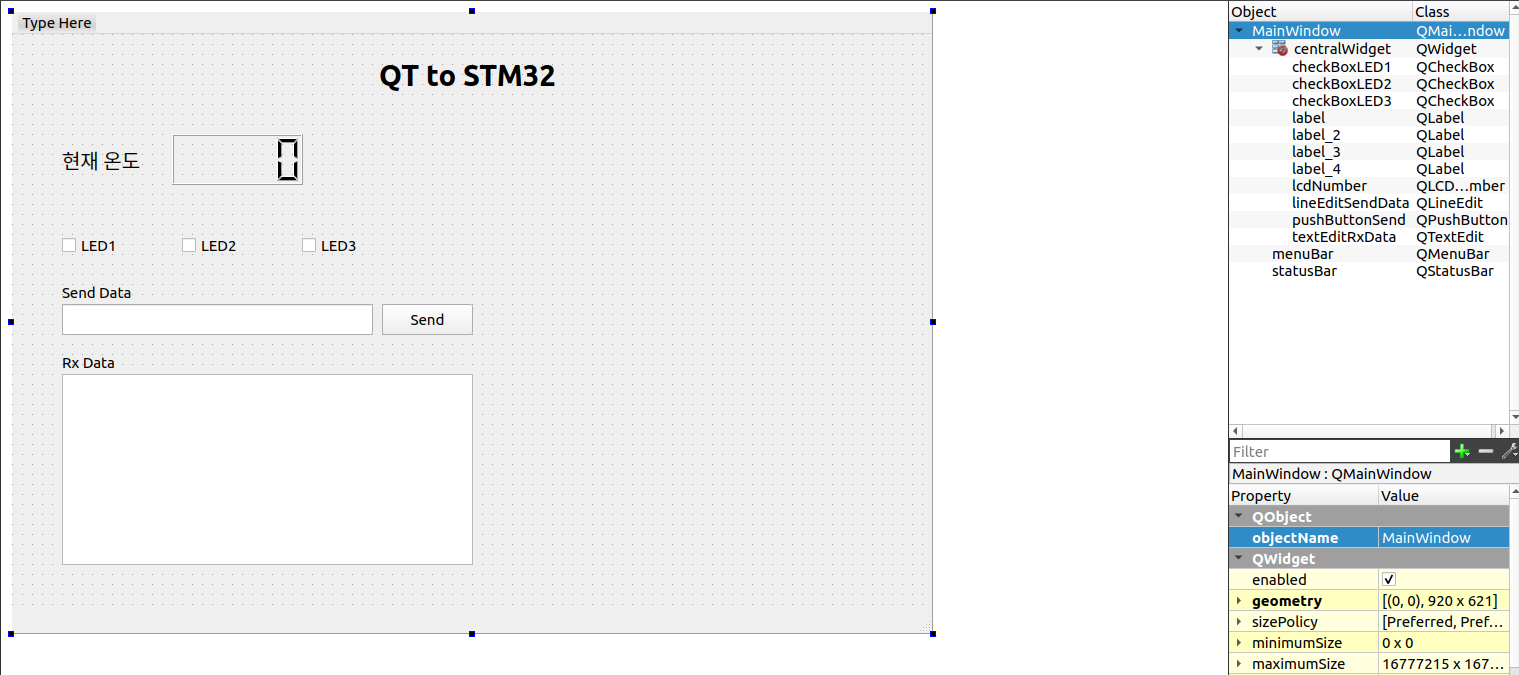 CheckBox 3개를 추가해주고 이름을 LED1~3으로 바꿔준다
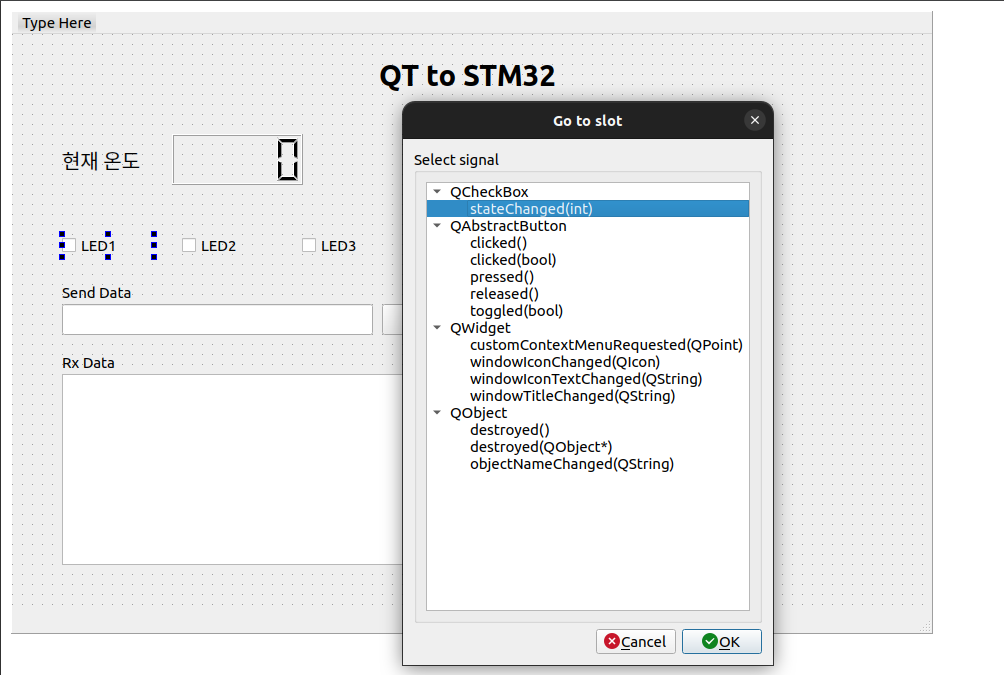 Button과 마찬가지로 체크 박스 위에서 마우스 우클릭을 한 후에 go to slot > stateChanged()를 선택해준다.
Code
- mainwindow.cpp
void MainWindow::on_checkBoxLED1_stateChanged(int arg1)
{
     QString buffer;
     QByteArray SendData;

     buffer.sprintf("LED001\n");
     SendData = buffer.toUtf8();    // ascii는 utf8과 값이 동일하여 변환을 굳이 할 필요 없다 (한글은 꼭 해야 함)
     socket->writeDatagram(SendData, QHostAddress("10.10.15.91"), 9999);
}
온도 차트 그리기
UI
widget 추가하기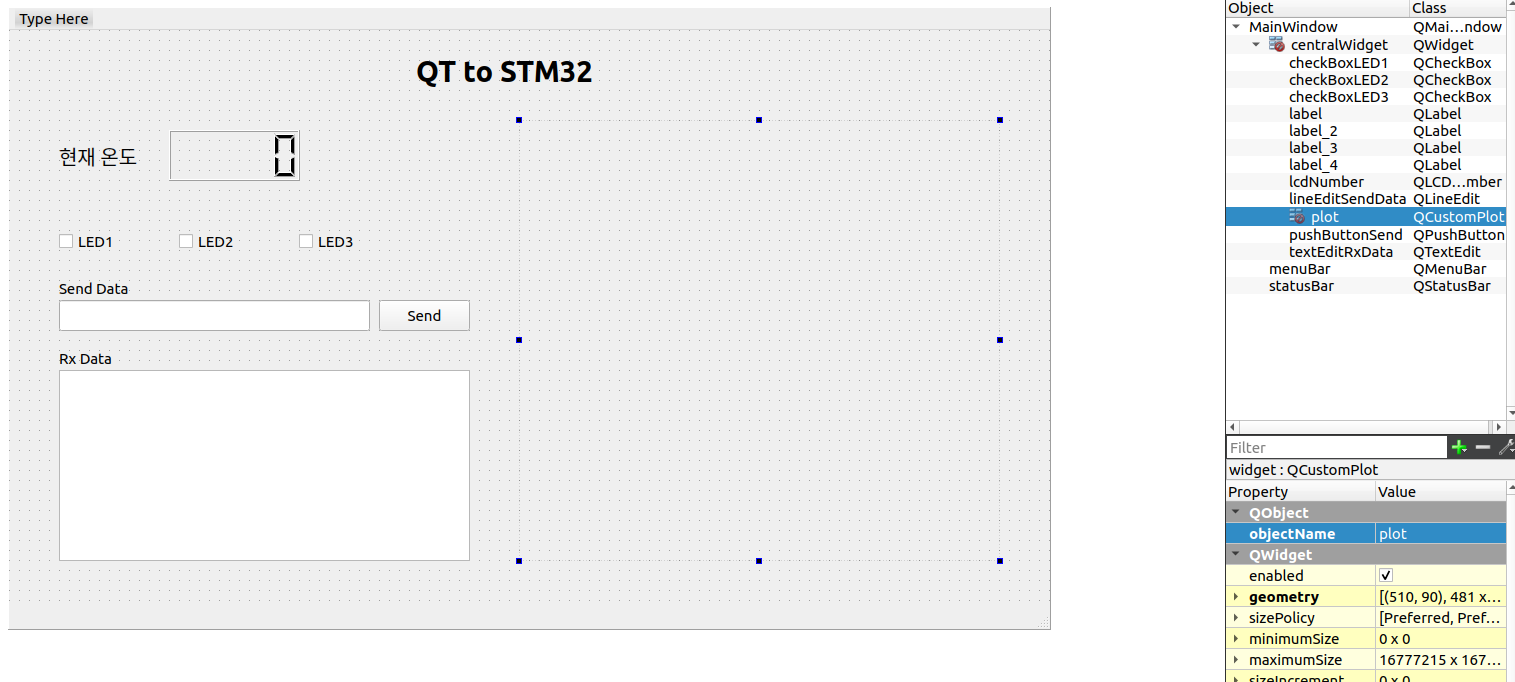 widget을 우클릭한 후 Promote to 클릭
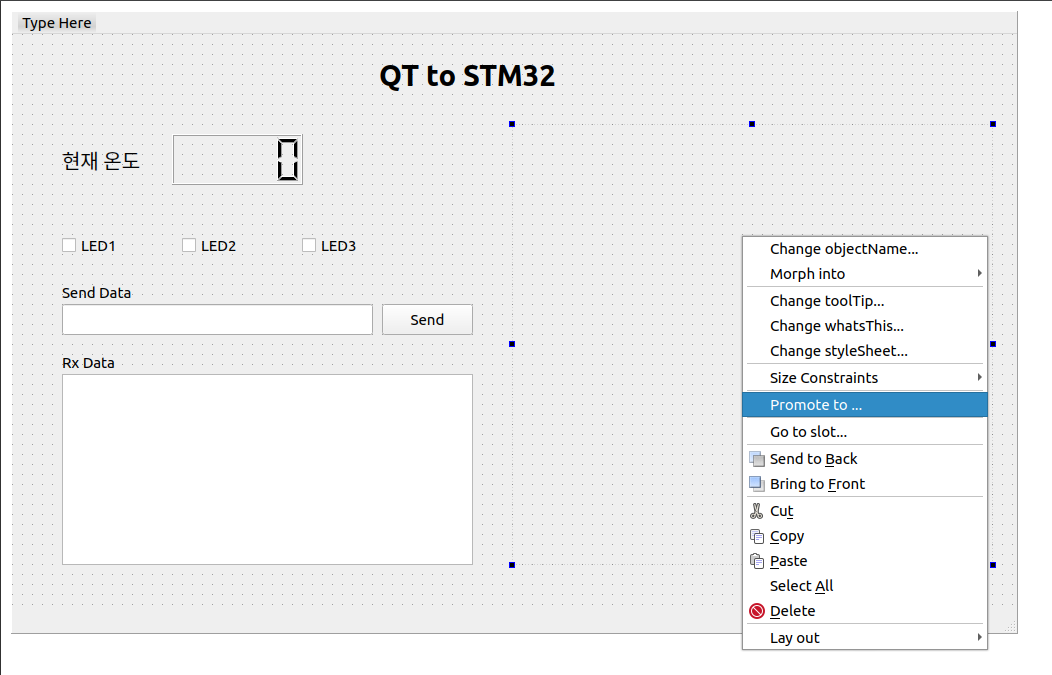 QCustomPlot으로 이름을 설정한 후 Add 버튼 누르고 Promote 버튼 누르기
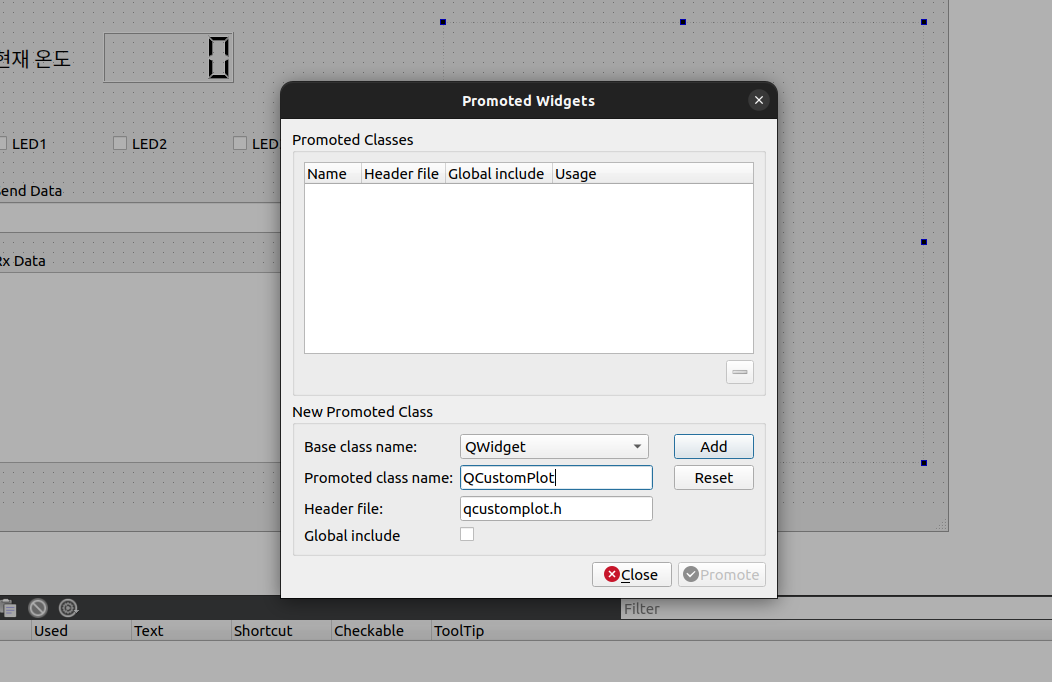
Code
- mainwindow.h
#ifndef MAINWINDOW_H
#define MAINWINDOW_H

#include <QMainWindow>
#include <QUdpSocket>   // ADD_JM
#include <QTextStream>  // ADD_JM

QT_BEGIN_NAMESPACE
namespace Ui { class MainWindow; }
QT_END_NAMESPACE

class MainWindow : public QMainWindow
{
    Q_OBJECT

public:
    MainWindow(QWidget *parent = nullptr);
    ~MainWindow();
    void add_point(double x, double y); // ADD
    void clear_data();                  // ADD
    void plot();                        // ADD

public slots:   // call back function
    void readyRead();

private slots:
    void on_pushButtonSend_clicked();

    void on_checkBoxLED1_stateChanged(int arg1);

private:
    Ui::MainWindow *ui;
    QUdpSocket *socket = nullptr;
    QVector <double> qv_x, qv_y;     // ADD
    QString temp;                    // ADD
};

#endif // MAINWINDOW_H- mainwindow.cpp
#include "mainwindow.h"
#include "ui_mainwindow.h"
#include "qcustomplot.h"    // ADD_JM
#include <QDebug>           // ADD_JM   stdio.h와 비슷
#include <QString>          // ADD_JM   c++의 string을 진화시킨 것

MainWindow::MainWindow(QWidget *parent) :
    QMainWindow(parent),
    ui(new Ui::MainWindow)
{
    ui->setupUi(this);

// ------------ TCP Start
    // 1. socket을 생성
    socket = new QUdpSocket(this);
    // 2. IP, SW, PORT 번호 등록
    bool result = socket->bind(QHostAddress::AnyIPv4, 9999);
    qDebug() << result;     // qDebug --> c++의 cout
    if (result) {
        qDebug() << "PASS";
    }
    else {
        qDebug() << "FAIL";
    }
    // SIGNAL : event 발생
    // SLOT : INT service routine (함수)
    // connect : mapping (연결시켜 주는 것)
    // socket으로부터 읽을 data가 존재하면 나의(this) readyRead()를 호출하여라
    connect(socket, SIGNAL(readyRead()), this, SLOT(readyRead()));

    ui->plot->setInteraction(QCP::iRangeDrag, true);
    ui->plot->setInteraction(QCP::iRangeZoom, true);
    ui->plot->addGraph();
    //ui->plot->xAxis->setLabel("time(s)");
    ui->plot->yAxis->setLabel("temp");
    ui->plot->yAxis->setRange(0.0, 40.0);
    ui->plot->graph(0)->setScatterStyle(QCPScatterStyle::ssCircle);     //점찍는 스타일 결정.
    ui->plot->graph(0)->setLineStyle(QCPGraph::lsLine);                 //라인 스타일 결정.
    connect(ui->plot, SIGNAL(mouseDoubleClickEvent(QMouseEvent*)), SLOT(QMouseEvent*));
// ------------ TCP End
}

void MainWindow::readyRead()
{
    QByteArray Buffer;
    double temp_digit;      // 온도값
    static int time = 0;

    QHostAddress sender;    // 송신자의 IP
    quint16 senderPort;     // 송신자의 SW PORT

    Buffer.resize(socket->pendingDatagramSize());

    // 3. socket으로부터 data를 read
    socket->readDatagram(Buffer.data(), Buffer.size(), &sender, &senderPort);
    Buffer.chop(1);     // [Tmp] 25\n가 왔을 때 \n을 제거 (마지막 byte를 제거)
    ui->textEditRxData->append(Buffer);     // 창의 맨 끝에 붙여 넣기
    ui->textEditRxData->show();             // 창에 display

    // LCD 창에 출력
    Buffer = Buffer.right(2);           // right(2) : [Tmp]25 맨 오른쪽부터 2자리를 자른다.
    // Buffer에는 25가 들어 있다. 25는 utf8 모드
    temp_digit = Buffer.toDouble();     // Buffer에 있는 내용을 double로 변환
    ui->lcdNumber->display(temp_digit); // LCD 창에 출력

    qDebug() <<"Message From :: " << sender.toString();
    qDebug() <<"Port From :: "<< senderPort;
    qDebug() <<"Buffer :: " << Buffer;

    add_point(time, temp_digit);
    time+=3;
    ui->plot->xAxis->setRange(0, time+3);
    plot();
}

void MainWindow::add_point(double x, double y){
    qv_x.append(x);
    qv_y.append(y);
}

void MainWindow::clear_data(){
    qv_x.clear();
    qv_y.clear();
}

void MainWindow::plot(){
    ui->plot->graph(0)->setData(qv_x, qv_y);
    ui->plot->replot();
    ui->plot->update();
}

MainWindow::~MainWindow()
{
    delete ui;
}

// 생성 경로 : send --> 마우스우클릭 --> go to slot --> click
void MainWindow::on_pushButtonSend_clicked()
{
    QByteArray Data;

    Data = ui->lineEditSendData->text().toUtf8();
    socket->writeDatagram(Data, QHostAddress("10.10.15.91"), 9999);
    // 10.10.15.91 : STM32 IP
}

void MainWindow::on_checkBoxLED1_stateChanged(int arg1)
{
     QString buffer;
     QByteArray SendData;

     buffer.sprintf("LED001\n");
     SendData = buffer.toUtf8();    // ascii는 utf8과 값이 동일하여 변환을 굳이 할 필요 없다 (한글은 꼭 해야 함)
     socket->writeDatagram(SendData, QHostAddress("10.10.15.91"), 9999);
}
결과
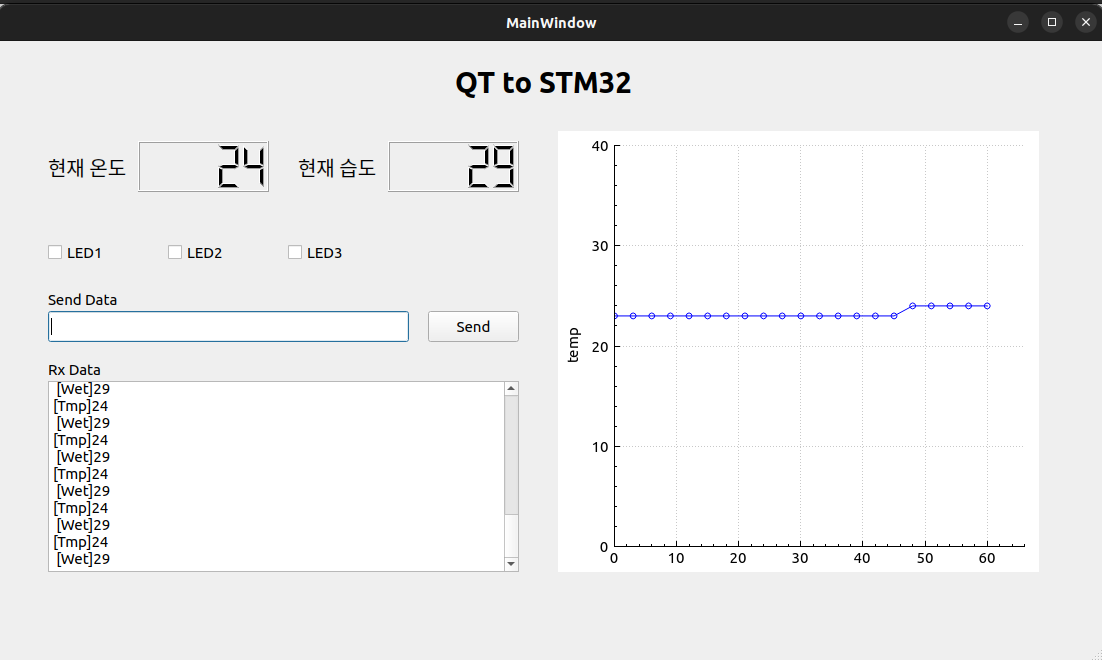
숙제 1 - 현재 습도도 표시하기
Code
- mainwindow.cpp
void MainWindow::readyRead()
{
    QByteArray Buffer;
    double temp_digit;      // 온도값
    double hydr_digit;      // 습도값

    // LCD 창에 출력
    // Buffer = Buffer.right(2);           // right(2) : [Tmp]25 맨 오른쪽부터 2자리를 자른다.
    // Buffer에는 25가 들어 있다. 25는 utf8 모드
    // temp_digit = Buffer.toDouble();     // Buffer에 있는 내용을 double로 변환
    temp_digit = Buffer.mid(5, 2).toDouble();
    ui->lcdNumber->display(temp_digit); // LCD 창에 출력

    hydr_digit = Buffer.right(2).toDouble();
    ui->lcdNumber_2->display(hydr_digit);
 }
숙제 2 - LED2, LED3 check box 구현
Code
- mainwindow.cpp
void MainWindow::on_checkBoxLED2_stateChanged(int arg1)
{
    QString buffer;
    QByteArray SendData;

    buffer.sprintf("LED002\n");
    SendData = buffer.toUtf8();    // ascii는 utf8과 값이 동일하여 변환을 굳이 할 필요 없다 (한글은 꼭 해야 함)
    socket->writeDatagram(SendData, QHostAddress("10.10.15.91"), 9999);
}

void MainWindow::on_checkBoxLED3_stateChanged(int arg1)
{
    QString buffer;
    QByteArray SendData;

    buffer.sprintf("LED003\n");
    SendData = buffer.toUtf8();    // ascii는 utf8과 값이 동일하여 변환을 굳이 할 필요 없다 (한글은 꼭 해야 함)
    socket->writeDatagram(SendData, QHostAddress("10.10.15.91"), 9999);
}
숙제 3 - Uni code와 UTF8의 관계
UNI CODE
유니코드는 국제적으로 전세계 언어를 모두 표시할 수 있는 표준코드이다. 즉, 글자와 코드가 1:1매핑되어 있는 ‘코드표'이다.
UTF8
유니코드를 통해 코드표를 정의하였고, 이 코드를 컴퓨터에 어떻게 저장할 것인지가 문제이다. 즉 인코딩(encoding)을 통해 컴퓨터가 이해할 수 있는 형태로 바꿔줘야 한다. UTF-8은 유니코드를 인코딩(encoding)하는 방식이다.

(거의 그대로)퍼가요~♥