CSS를 이용해 웹을 디자인할 수 있다.
웹을 꾸미고 싶을 때 CSS를 사용한다. CSS의 형태는 아래와 같다.
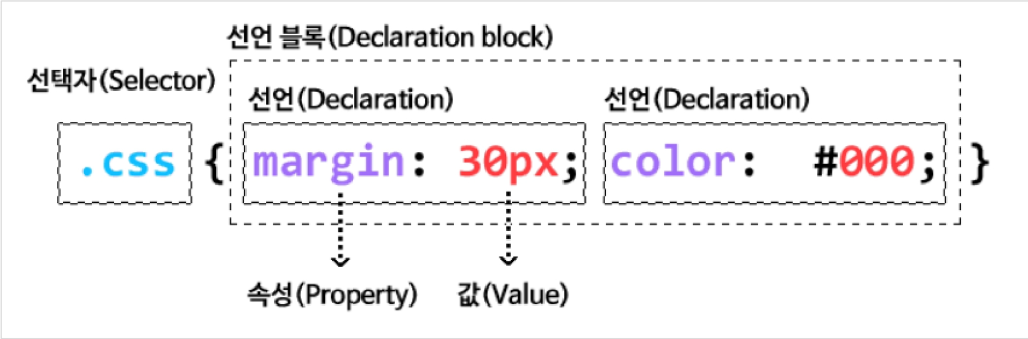
- 선택자 : 규칙이 적용되는 요소
- 선언 : 선택자에 적용할 스타일
- 속성 : 선택자에서 바꾸고 싶은 요소
- 값 : 속성에 적용할 값
CSS를 적용하는 데 크게 4가지 방법이 있다.
- link 태그를 사용하여 외부 스타일 시트를 적용
link 태그로 외부 스타일 시트를 적용할 수 있다. 대부분 rel, type, href 3가지 속성을 사용한다.
사용 예시는 아래와 같다.
// 1. html 파일
<!DOCTYPE html>
<html>
  <head>
    <meta charset="UTF-8" />
    <title>External Style Sheet</title>
    <link rel="stylesheet" type="text/css" href="../../../css/4-1.css" />
  </head>
  <body>
    <h2>External Style Sheet</h2>
    <p>Using External Style Sheet !!!</p>
  </body>
</html>
// 2. CSS 파일
h2 {color: magenta;}
p {background-color: skyblue; color: purple;}실행 결과는 아래와 같다.

- head 태그 내부의 style 태그에 @import를 사용하여 외부 스타일 시트를 적용
style 태그에 @import를 사용하여 외부 스타일 시트를 적용할 수 있다.
@import는 style 태그 최상단에 위치한다. 사용 예시는 아래와 같다.
<!DOCTYPE html>
<html>
  <head>
    <meta charset="UTF-8" />
    <title>External Style Sheet</title>
    <style type="text/css" media="screen">
      @import url("../../../css/4-1.css");
    </style>
  </head>
  <body>
    <h2>External Style Sheet</h2>
    <p>Using External Style Sheet !!!</p>
  </body>
</html>
실행 결과는 아래와 같다.
- head 태그 내부의 style 태그에 CSS 규칙을 작성
style 태그에 직접 CSS 규칙을 작성할 수 있다. @import와 동시 사용 가능하다.
사용 예시는 아래와 같다.
<!DOCTYPE html>
<html>
  <head>
    <meta charset="UTF-8" />
    <title>Embedded Style Sheet</title>
    <style type="text/css">
      h2 {
        color: magenta;
      }

      p {
        background-color: skyblue;
        color: purple;
      }
    </style>
  </head>
  <body>
    <h2>Embedded Style Sheet</h2>
    <p>Using Embedded Style Sheet !!!</p>
  </body>
</html>
실행 결과는 아래와 같다.

- 개별 요소마다 스타일을 지정
개별 요소마다 스타일을 지정할 수 있다. 사용 예시는 아래와 같다.
<!DOCTYPE html>
<html>
  <head>
    <meta charset="UTF-8" />
    <title>Inline Style Sheet</title>
  </head>
  <body>
    <h2 style="color: magenta">Inline Style Sheet</h2>
    <p style="background-color: skyblue; color: purple">Using Inline Style Sheet !!!</p>
  </body>
</html>
실행 결과는 아래와 같다.

스타일 적용 우선순위는 4 -> 3 -> 2 -> 1 순이다.
CSS는 다양한 선택자를 지원한다.
CSS 규칙 적용 타겟이 되는 선택자는 굉장히 다양하다. 종류는 아래와 같다.
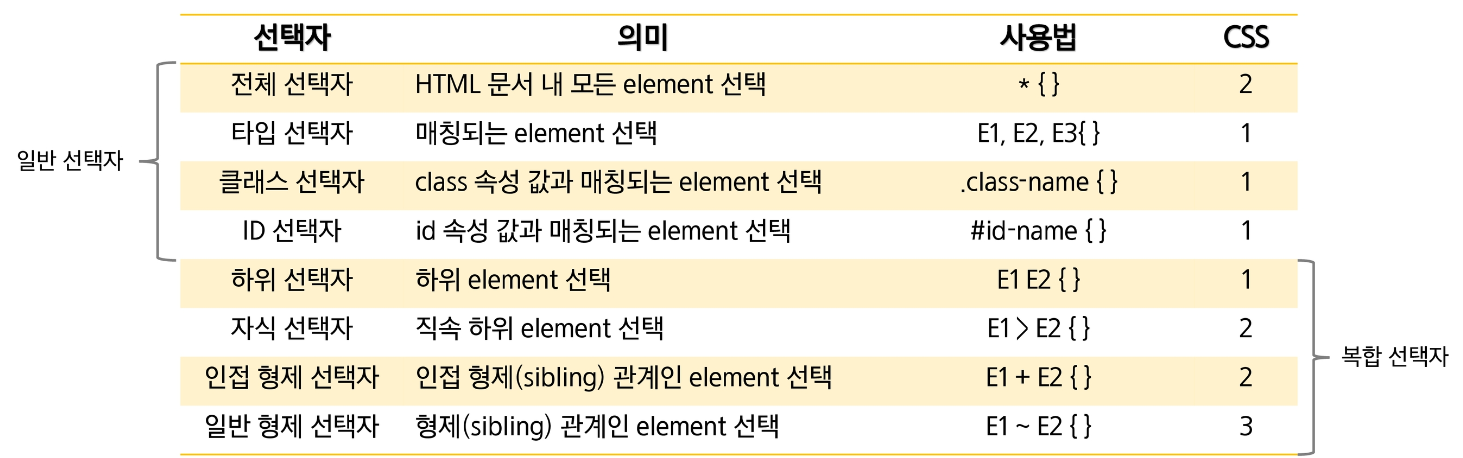
일반 선택자의 우선 순위는 전체 < 타입 < 클래스 < ID 순이다.
복합 선택자의 특징은 아래와 같다.
- 하위 선택자는 자식, 자손에 모두 적용한다.
- 자식 선택자는 자식에만 적용한다.
- 인접 형제 선택자는 첫 번째 형제에만 적용한다.
- 일반 형제 선택자는 모든 형제에 적용한다.
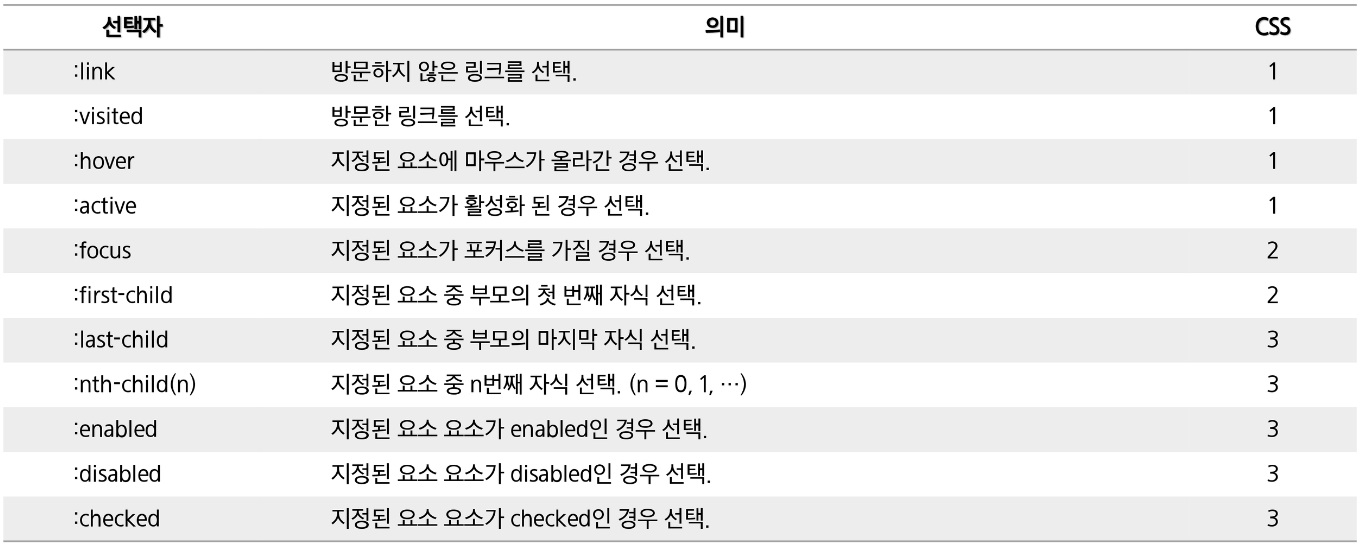
선택자 중 사용자 에이전트가 사용하는 가상의 클래스를 지정할 수 있다. 종류는 아래와 같다.
사용 예시는 아래와 같다.
<!DOCTYPE html>
<html>
  <head>
    <meta charset="UTF-8" />
    <title>Pseudo-classes Selector(가상클래스선택자)</title>

    <style type="text/css">
      a:link {
        color: gray;
        text-decoration: none;
      }
      a:visited {
        color: red;
        text-decoration: none;
      }
      a:hover {
        color: green;
        text-decoration: underline;
        font-weight: bold;
      }
      a:active {
        color: blue;
        text-decoration: none;
      }
    </style>
  </head>
  <body>
    <a href="http://www.google.com">Google</a>
    <a href="http://www.samsung.com">Samsung</a>
    <a href="http://www.naver.com">Naver</a>
    <a href="http://www.daum.net">Daum</a>
  </body>
</html>
실행 결과는 아래와 같다.

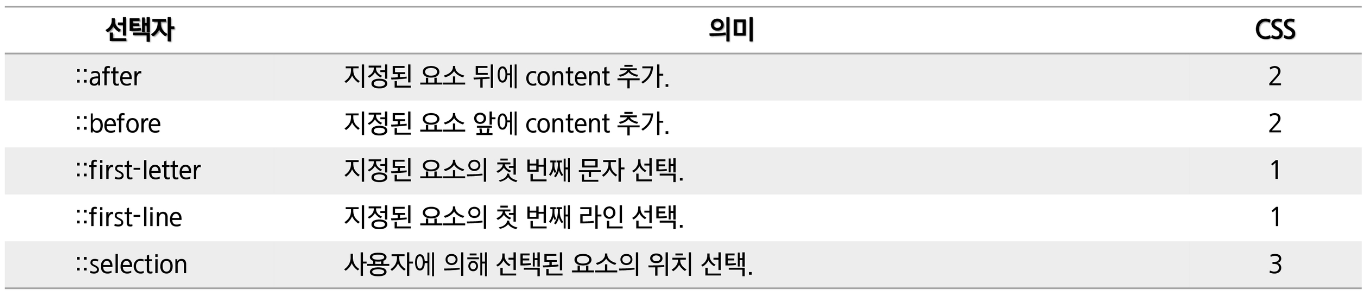
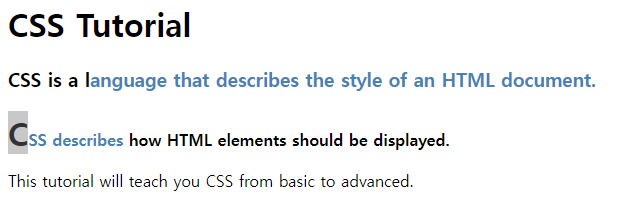
선택자 중 보이지 않는 가상의 요소를 선택할 수 있다. 종류는 아래와 같다.
사용 예시는 아래와 같다.
<!DOCTYPE html>
<html>
  <head>
    <meta charset="UTF-8" />
    <title>Pseudo-classes Selector(가상클래스선택자)</title>

    <style type="text/css">
      p.intro:first-letter {
        font-size: 200%;
      }

      p.intro:first-line {
        font-weight: bold;
      }

      p:last-child::after {
        content: "(source: www.w3schools.com)";
        color: orange;
      }

      ::selection {
        color: steelblue;
      }
    </style>
  </head>

  <body>
    <h1>CSS Tutorial</h1>
    <h3>CSS is a language that describes the style of an HTML document.</h3>
    <p class="intro">CSS describes how HTML elements should be displayed.</p>
    <p>This tutorial will teach you CSS from basic to advanced.</p>
  </body>
</html>
실행 결과는 아래와 같다. (파란색 부분은 드래그 후 결과)
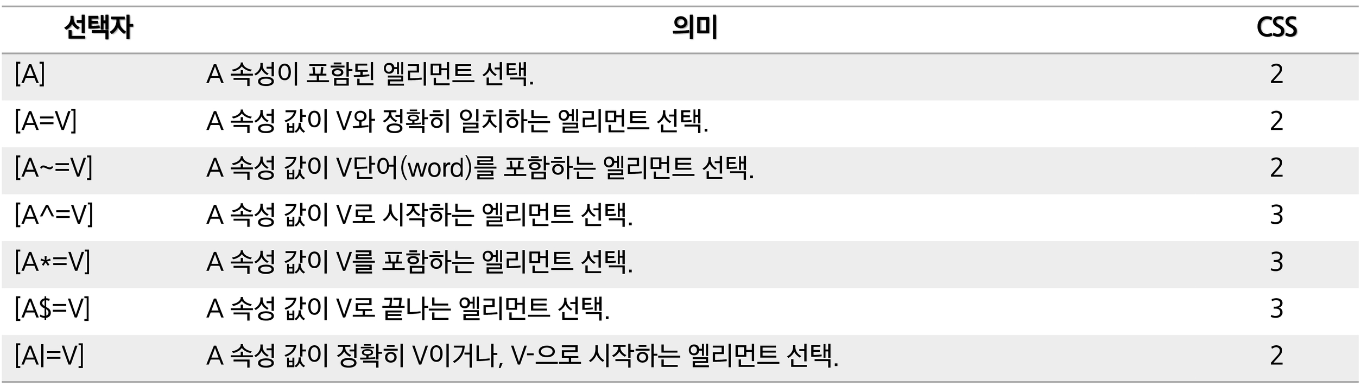
선택자 중 속성을 선택할 수 있다. 종류는 아래와 같다.
사용 예시는 아래와 같다.
<!DOCTYPE html>
<html>
  <head>
    <meta charset="UTF-8" />
    <title>Attribute Selector(속성선택자)</title>

    <style type="text/css">
      [title] {
        color: steelblue;
        font-weight: bold;
      }
      [title="two"] {
        border: 2px solid pink;
      }
      p[title="two"] {
        color: orange;
      }
      p[title~="second"] {
        background: silver;
      }
      p[class^="second"] {
        background: cyan;
      }
      p[class$="wrap"] {
        color: deeppink;
        font-weight: bold;
      }
      [class*="three"] {
        background: green;
      }
    </style>
  </head>
  <body>
    <div title="one">selector [attribute name]</div>
    <div title="two">selector [attribute name=value]</div>
    <p title="two">selector [attribute name=value]</p>
    <p title="first second third">selector [attribute name~=value]</p>
    <p class="second-container">selector [attribute name^=value]</p>
    <p class="second-wrap">selector [attribute name$=value]</p>
  </body>
</html>
실행 결과는 아래와 같다.

CSS는 다양한 속성을 지원한다.
CSS는 다양한 속성을 지원한다. 하나씩 살펴보자.
- Font 속성
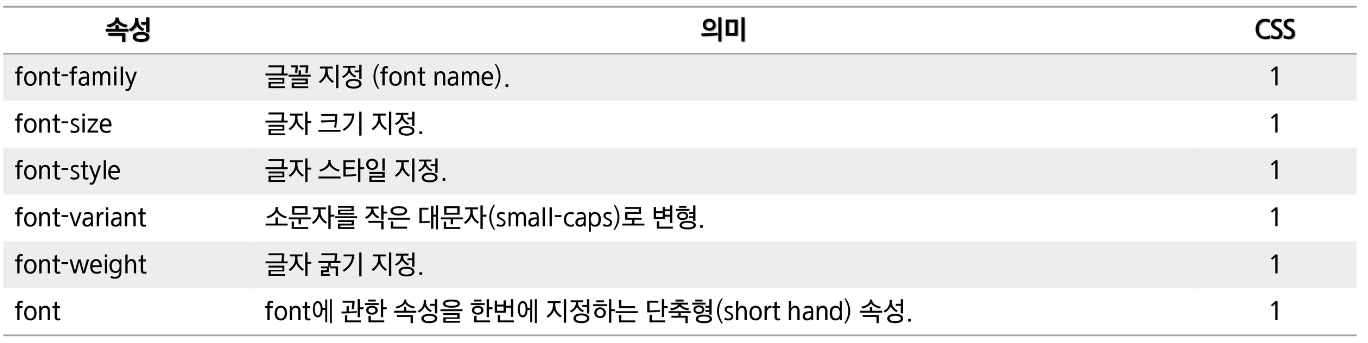
Font 속성으로 text의 글꼴, 굵기, 크기, 스타일 등을 지정할 수 있다.
Font 속성의 종류는 아래와 같다.
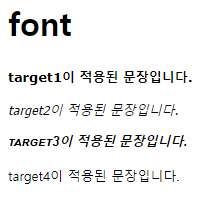
font 속성은 "font-style font-variant font-weight font-size font-family" 순으로 작성한다.
그 중 font-size와 font-family는 필수 값이며, 생략 시 기본 값이 적용된다.
사용 예시는 아래와 같다.
<!DOCTYPE html>
<html>
  <head>
    <meta charset="UTF-8" />
    <title>CSS Font Property(font)</title>

    <style type="text/css">
      /* 글씨 크기가 132px이고 행간격이 1.7em인 bold체 Verdana 글꼴 */
      #target1 {
        font: bold 13px/1.7em Verdana;
      }
      /* 글씨 크기가 13px인 italic체 Tahoma 글꼴 */
      #target2 {
        font: italic 13px Tahoma;
      }
      /* Full option */
      #target3 {
        font: italic small-caps bold 13px/1.7em Arial;
      }
      /* bold가 순서에 맞지 않아서 이후의 sans-serif 글꼴 무시 */
      #target4 {
        font: 13px/1.5em bold sans-serif;
      }
    </style>
  </head>
  <body>
    <h1>font</h1>
    <p id="target1">target1이 적용된 문장입니다.</p>
    <p id="target2">target2이 적용된 문장입니다.</p>
    <p id="target3">target3이 적용된 문장입니다.</p>
    <p id="target4">target4이 적용된 문장입니다.</p>
  </body>
</html>
실행 결과는 아래와 같다.
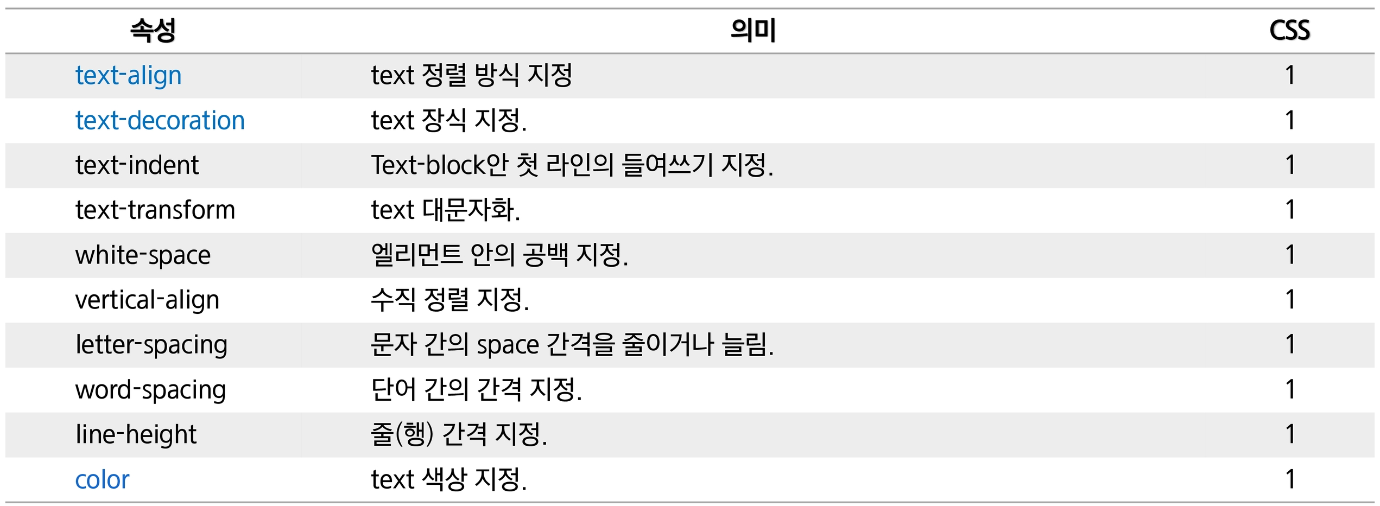
- Text 속성
Text 속성으로 글자, 공간, 단어, 문단들이 보여주는 속성을 정의할 수 있다.
Text 속성의 종류는 아래와 같다.
- 사용자 인터페이스 속성
사용자 인터페이스 속성으로 화면에 출력되는 요소들에 디자인 요소를 추가할 수 있다.
사용자 인터페이스 속성의 종류는 아래와 같다.

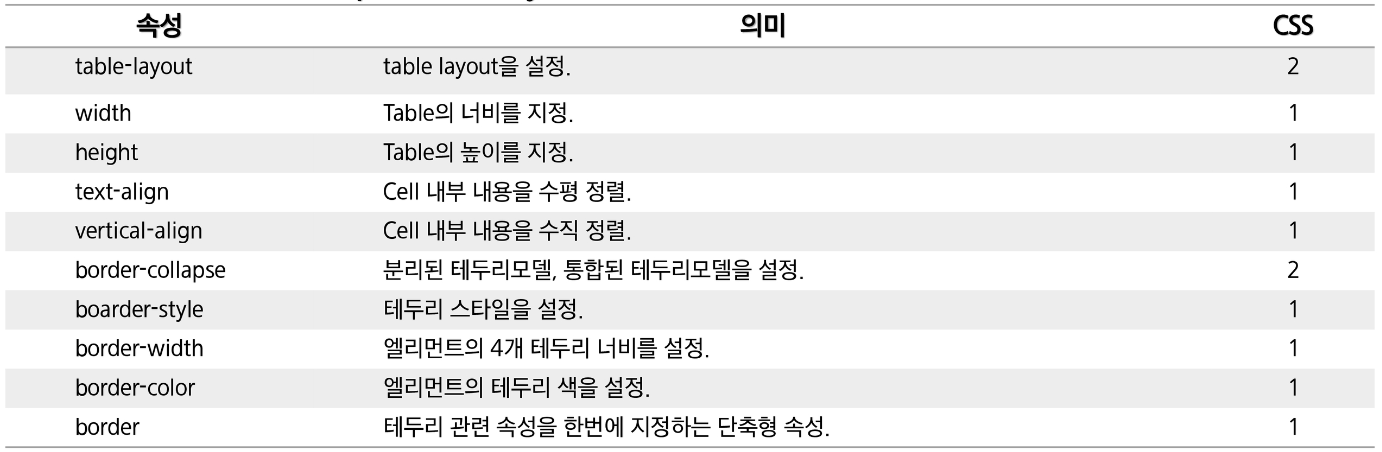
- 테이블 & 테두리 속성
테이블 & 테두리 속성으로 테이블의 너비나 높이를 지정하고, Cell 내부 내용을 정렬할 수 있다.
테이블 & 테두리 속성의 종류는 아래와 같다.
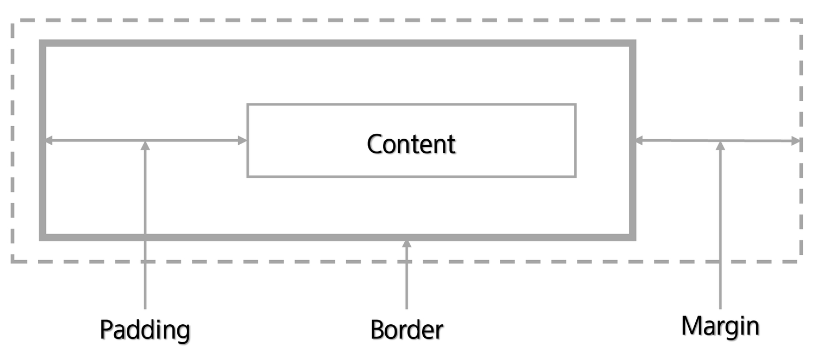
CSS는 Box Model을 지원한다.
CSS의 모든 요소는 컨텐트, 패딩, 테두리, 마진 순으로 둘러 쌓여 있다.
아래 그림을 참고하자.
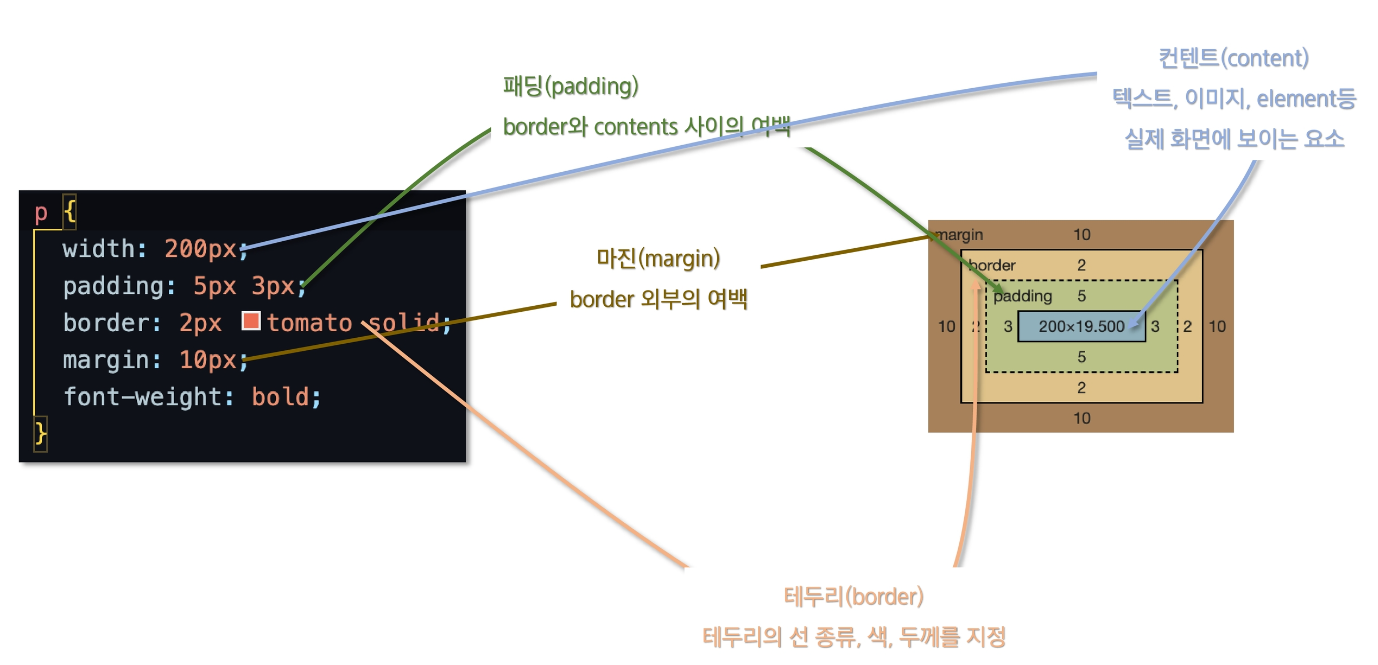
패딩과 마진은 주는 값이 유동적이다. 값에 따른 의미는 아래와 같다.
- 값이 하나면 모든 면에 적용.
- 값이 2개면 top, bottom / left, right에 적용.
- 값이 3개면 top / left, right / bottom에 적용.
- 값이 4개면 top / right / bottom / left에 적용.
CSS는 레이아웃 형태를 설정할 수 있도록 지원한다.
display 속성으로 웹 페이지의 레이아웃을 결정할 수 있다. 종류는 아래와 같다.
- block : 항상 새로운 줄에서 시작, 해당 라인의 전체 너비를 차지,
width, height 속성 지정이 가능, inline level 요소가 들어갈 수 있음- inline : 컨텐트 만큼만 가로 폭 차지, width & height & margin-top & margin-bottom 지정 불가능,
line-height로 상하 여백 지정 가능- inline-block : inline과 같이 새로운 라인에서 시작하지는 않지만 block처럼 크기 지정 가능
- none : HTML 요소를 렌더링하지 않도록 설정한다. 따라서 요소의 공간이 할당되지 않는다.
- flex : 해당 요소의 자식 요소를 설정에 맞게 크기를 조절한다.
컨텐츠 수평 정렬을 위해서 block은 margin : 0 auto를 사용하고 inline은 text-align : center를 사용한다.
CSS는 요소 위치를 설정할 수 있도록 지원한다.
포지셔닝으로 문서의 위치를 지정하거나 객체의 가시성을 다룰 수 있다. 하나씩 살펴보자.
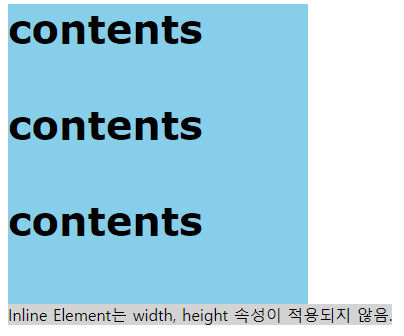
- width, height
block 요소의 너비와 높이를 결정할 수 있다. 사용 예시는 아래와 같다.
<!DOCTYPE html>
<html>
  <head>
    <meta charset="UTF-8" />
    <title>Position Property(width, height)</title>

    <style type="text/css">
      div {
        width: 300px;
        height: 300px;
        top: 0px;
        left: 0px;
        font: bold 40px Verdana;
        background-color: skyblue;
      }
      span {
        width: 300px;
        height: 300px;
        background-color: lightgray;
      }
    </style>
  </head>
  <body>
    <div>
      contents<br /><br />
      contents<br /><br />
      contents<br /><br />
    </div>
    <span>Inline Element는 width, height 속성이 적용되지 않음.</span>
  </body>
</html>
실행 결과는 아래와 같다.
- position
position 속성은 4가지 값이 존재한다.
1. static : 기본값, top과 left에서의 거리를 지정할 수 없다.
2. relative : 원래 출력될 위치에서 지정된 top과 left만큼 떨어진 곳에 요소를 출력한다.
3. absolute : 자신의 상위 요소에서 top, left, right, bottom을 정한 후 요소를 출력한다.
4. fixed : 항상 화면에서 지정된 위치에 존재한다.
- overflow
overflow 속성으로 요소에 속한 내용이 요소 크기보다 클 경우를 다룰 수 있다.
overflow 속성은 3가지 값이 존재한다.
1. visible : 요소의 크기를 넘어 모든 내용을 출력한다.
2. hidden : 요소의 크기가 넘어선 내용은 출력하지 않는다.
3. auto : 요소의 크기를 넘어선 내용은 스크롤바를 이용하여 출력한다.
- float
float 속성으로 박스가 화면의 어느 위치에 배치할 것인지를 설정할 수 있다.
float 속성은 2가지 값이 존재한다.
1. left : 그림이나 박스가 왼쪽에 배치된다.
2. right : 그림이나 박스가 오른쪽에 배치된다.
사용 예시는 아래와 같다.
<!DOCTYPE html>
<html>
  <head>
    <meta charset="UTF-8" />
    <title>Position Property(float)</title>

    <style type="text/css">
      .output {
        background: lightgray;
        font: 12px/1.5em Verdana;
        font-family: "Verdana", "gulim", "굴림", "굴림체";
        padding: 10px;
        text-align: justify;
        height: 200px;
      }
      #div1 {
        width: 100px;
        height: 100px;
        background: orange;
        float: left;
      }
      #div2 {
        width: 100px;
        height: 100px;
        background: steelblue;
        float: right;
      }
    </style>
  </head>
  <body>
    <div class="output">
      <div id="div1">Block-Level<br />float: left</div>
      <div id="div2">Block-Level<br />float: right</div>
      float test!!! float test!!! float test!!! float test!!! float test!!! float test!!! float
      test!!! float test!!! float test!!! float test!!! float test!!! float test!!! float test!!!
      float test!!! float test!!! float test!!! float test!!! float test!!! float test!!! float
      test!!! float test!!! float test!!! float test!!! float test!!! float test!!! float test!!!
      float test!!! float test!!! float test!!! float test!!!
    </div>
  </body>
</html>
실행 결과는 아래와 같다.

- visibility
visibility 속성으로 요소를 화면에 보이거나 숨길 수 있다.
visibility 속성은 2가지 값이 존재한다.
1. visible : 해당 요소가 화면에 표시된다.
2. hidden : 요소의 공간이 할당하지만 해당 요소가 보이지 않는다.