User-service
📌 프로젝트 생성
- 파일명:
user-service dependencies
- DevTools, Lombok, Web, Eureka Discovery Client, H2 Database
📌 프로젝트 기본 설정
- application.yml 설정
spring:
  application:
    name: e-user-service

server:
  port: 0

eureka:
  instance:
    instance-id: ${spring.application.name}:${spring.application.instance_id:${random.value}}
  client:
    fetch-registry: true
    register-with-eureka: true
    service-url:
defaultZone: http://127.0.0.1:8761/eureka- UserServiceApplication.java 수정
@SpringBootApplication
@EnableDiscoveryClient
public class EUserServiceApplication {

    public static void main(String[] args) {
        SpringApplication.run(EUserServiceApplication.class, args);
    }

}- UserController.java 추가
package com.example.euserservice.controller;

import org.springframework.web.bind.annotation.GetMapping;
import org.springframework.web.bind.annotation.RequestMapping;
import org.springframework.web.bind.annotation.RestController;

@RestController
@RequestMapping("/")
public class UserController {

    @GetMapping("/health_check")
    public String status(){
        return "It's Working in User Service";
    }

}
- 실행결과

📌 application.yml 설정
- application.yml 수정
spring:
application:
name: e-user-service
server:
port: 0
eureka:
instance:
instance-id: ${spring.application.name}:${spring.application.instance_id:${random.value}}
client:
fetch-registry: true
register-with-eureka: true
service-url:
defaultZone: http://127.0.0.1:8761/eureka
#임의로 추가하여 작성함.
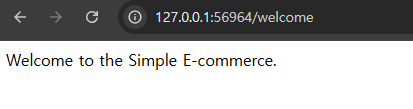
greeting:
message: Welcome to the Simple E-commerce.방법1) application.yml 설정 파일 직접 적용
package com.example.euserservice.controller;

import org.springframework.beans.factory.annotation.Autowired;
import org.springframework.core.env.Environment;
import org.springframework.web.bind.annotation.GetMapping;
import org.springframework.web.bind.annotation.RequestMapping;
import org.springframework.web.bind.annotation.RestController;

@RestController
@RequestMapping("/")
public class UserController {

    private Environment env; //추가

    @Autowired
    public UserController(Environment env) {
        this.env = env; //생성자를 통해 설정 파일 사용
    }

    @GetMapping("/health_check")
    public String status(){
        return "It's Working in User Service";
    }

    @GetMapping("/welcome")
    public String welcome(){
    	//lombok 사용하여 getter/setter 명시적으로 작성하지 않아도 사용 가능
        return env.getProperty("greeting.message");
    }

}
방법2) @Value 를 사용하여 적용
- Greeting.java 클래스 추가
package com.example.euserservice.vo;

import lombok.AllArgsConstructor;
import lombok.Data;
import lombok.NoArgsConstructor;
import org.springframework.beans.factory.annotation.Value;
import org.springframework.stereotype.Component;

@Component
@Data
//@AllArgsConstructor : Args를 모두 가지고 있는 생성자 추가
//@NoArgsConstructor : default 생성자 추가
public class Greeting {

    @Value("${greeting.message}")
    private String message;
}
- UserController.java 수정
package com.example.euserservice.controller;

import com.example.euserservice.vo.Greeting;
import org.springframework.beans.factory.annotation.Autowired;
import org.springframework.core.env.Environment;
import org.springframework.web.bind.annotation.GetMapping;
import org.springframework.web.bind.annotation.RequestMapping;
import org.springframework.web.bind.annotation.RestController;

@RestController
@RequestMapping("/")
public class UserController {

	//직접 주입은 비추천! 해당 예제에서는 간단하게 하기 위해 사용
    @Autowired
    private Greeting greeting;

    @GetMapping("/health_check")
    public String status(){
        return "It's Working in User Service";
    }

    @GetMapping("/welcome")
    public String welcome(){
        return greeting.getMessage(); //lombok 사용하여 자동 getter/setter 생성
    }

}- 실행결과

새싹 개발자