Login 성공 처리
📌 개요
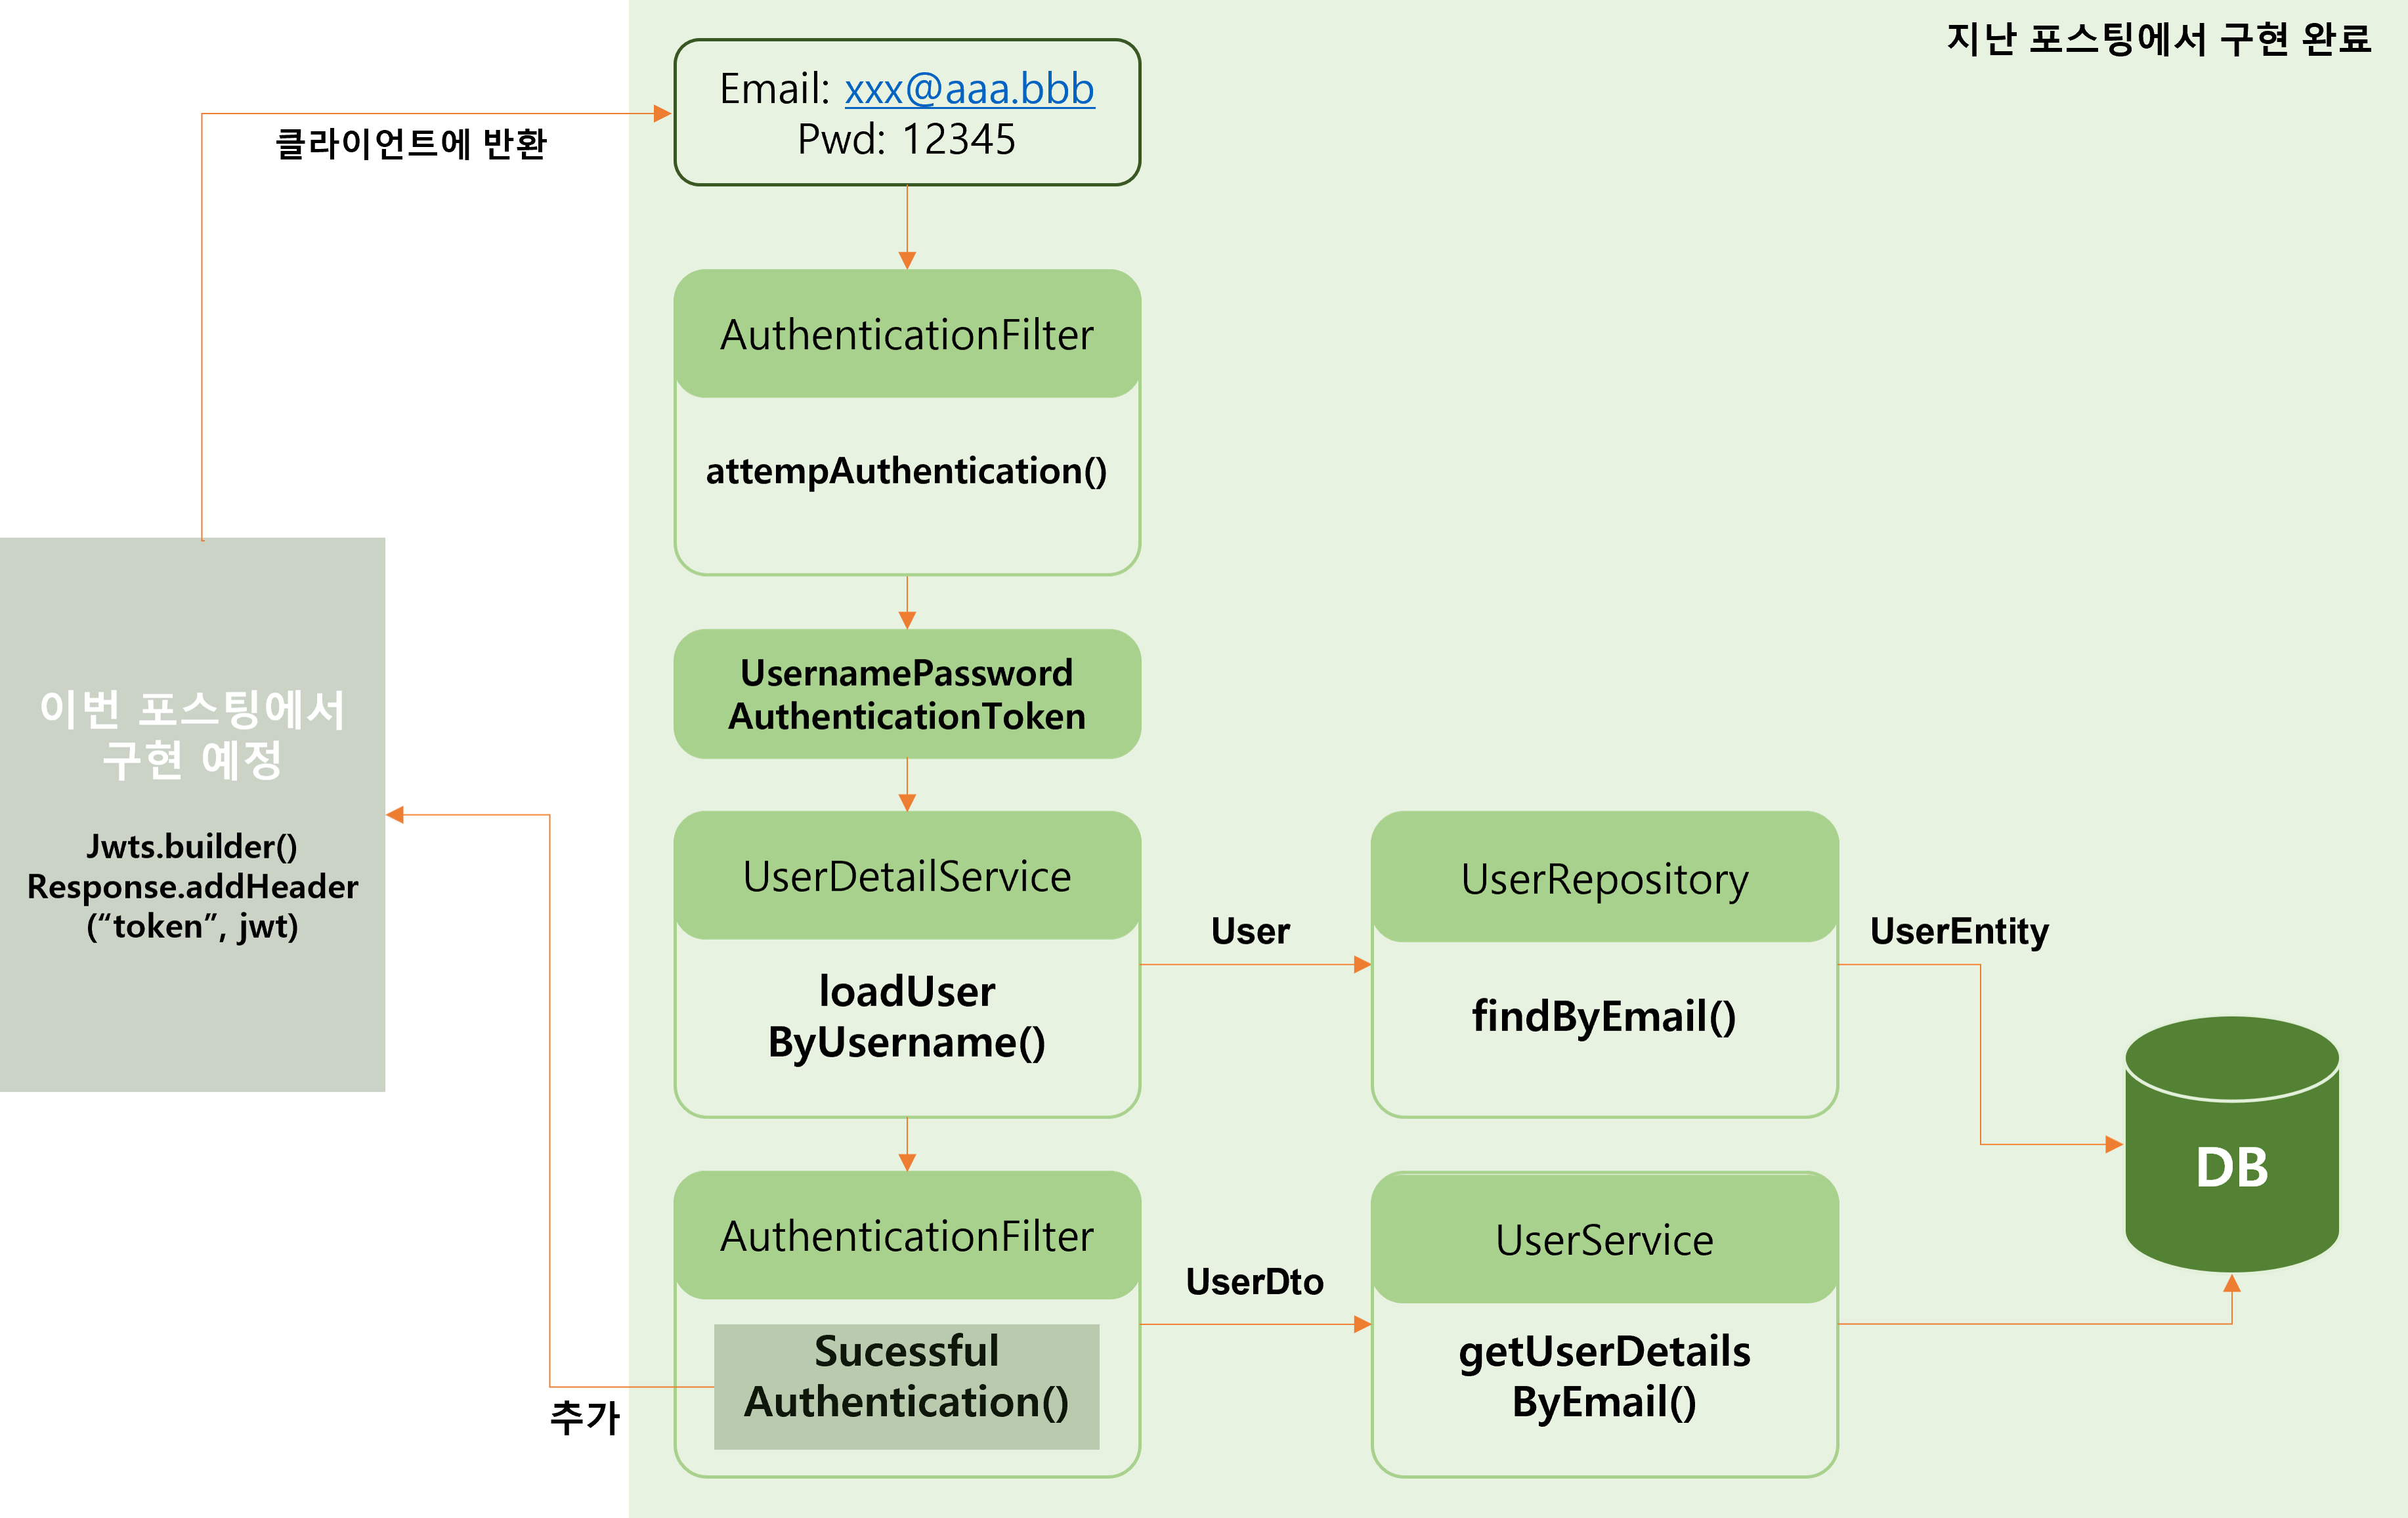
- 지난 포스팅에서
AuthenticationFilter의attempAuthentication()를 통해 Email을 통해 사용자 정보를 조회하여 해당 Email과 Password를 사용하여 Token을 발급 받음 - 이번 포스팅에서는
AuthenticationFilter내의successfulAuthentication()메서드를 통해 JWT 토큰을 발급하여 JWT 토큰을 통해 정상적으로 로그인이 된 상태를 클라이언트에게 전달하는 과정 구현
JWT(Json Web Token)란?
- Json 객체에 인증에 필요한 정보들을 담은 후 비밀키로 서명한 토큰
- 인터넷 표준 인증 방식
- 공식적으로 인증(Authentication) & 권한허가(Authorization) 방식으로 사용됨
- 프로세스
1. 사용자가 아이디와 비밀번호 혹은 소셜 로그인을 이용하여 서버에 로그인 요청
2. 서버는 비밀키를 사용해 json 객체를 암호화한JWT 토큰을 발급
3. JWT를 헤더에 담아 클라이언트에 보냄
🔗 출처: 😎 알고 쓰자, JWT(Json Web Token).- 장점
- 클라이언트 독립적인 서비스(Stateless)
- CDN
- No Cookie-Session (No CSRF, 사이트간 요청 위조)
- 지속적인 토큰 저장
📌 소스코드
1. user-service
- UserService.java 수정
package com.example.euserservice.service;

import com.example.euserservice.dto.UserDto;
import com.example.euserservice.jpa.UserEntity;
import org.springframework.security.core.userdetails.UserDetailsService;

public interface UserService extends UserDetailsService {
    UserDto createUser(UserDto userDto);
    UserDto getUserByUserId(String userId);
    Iterable<UserEntity> getUserByAll();
    UserDto getUserDetailsByEmail(String userName); //추가
}- UserServiceImple.java 수정
//getUserDetailsByEmail() 메서드 추가
@Override
    public UserDto getUserDetailsByEmail(String email) {
        UserEntity userEntity = userRepository.findByEmail(email);
        if (userEntity == null)
            throw new UsernameNotFoundException(email);

        ModelMapper mapper = new ModelMapper();
        mapper.getConfiguration().setMatchingStrategy(MatchingStrategies.STRICT);

        UserDto userDto = mapper.map(userEntity, UserDto.class);
        return userDto;
    }
2. 의존성 주입
- pom.xml 수정
<dependency>
    <groupId>io.jsonwebtoken</groupId>
    <artifactId>jjwt-api</artifactId>
    <version>0.11.5</version>
</dependency>
<dependency>
    <groupId>io.jsonwebtoken</groupId>
    <artifactId>jjwt-impl</artifactId>
    <version>0.11.5</version>
</dependency>
<dependency>
    <groupId>io.jsonwebtoken</groupId>
    <artifactId>jjwt-jackson</artifactId>
    <version>0.11.5</version>
</dependency>
3. user-service
- application.yml 수정
token:
  expiration_time: 86400000 #하루 (60*60*24*1000)
secret: make_my_secret_user_token #512바이트가 넘는 문자여야 함.- AthenticationFilter.java 수정
import io.jsonwebtoken.Jwts;
import io.jsonwebtoken.security.Keys;
import javax.crypto.SecretKey;

//successfulAuthentication() 구현
 @Override
    protected void successfulAuthentication(HttpServletRequest req, HttpServletResponse res, FilterChain chain,
                                            Authentication auth) throws IOException, ServletException {

        String userName = ((User) auth.getPrincipal()).getUsername();
        UserDto userDetails = userService.getUserDetailsByEmail(userName);

        byte[] secretKeyBytes = Base64.getEncoder().encode(environment.getProperty("token.secret").getBytes());

        SecretKey secretKey = Keys.hmacShaKeyFor(secretKeyBytes);

        Instant now = Instant.now();

        String token = Jwts.builder()
                .setSubject(userDetails.getUserId())
                .setExpiration(Date.from(now.plusMillis(Long.parseLong(environment.getProperty("token.expiration_time")))))
                .setIssuedAt(Date.from(now))
                .signWith(secretKey)
                .compact();

        res.addHeader("token", token);
        res.addHeader("userId", userDetails.getUserId());
    }
소스코드 설명
- auth.getPrincipal()
➡ 인증된 사용자의 주요 정보(보통은 사용자 정보 객체)를 반환- secretKey
➡application.yml파일에서 설정한token.secret값을 읽음
➡ 이 비밀 키를Base64로 인코딩하여byte[]형식으로 변환하고,Keys.hmacShaKeyFor()를 통해 HMAC-SHA 알고리즘을 사용하여 SecretKey 객체 생성
➡ JWT의 서명에 사용되어 토큰이 발급될 때 이 키로 서명하여 JWT의 무결성 보장- Instant.now()
➡ 현재 시간(=UTC 기준)을Instant객체로 가져옴- builder()
➡setSubject(): 사용자 식별자
➡setExpiration(): 토큰의 만료 시간
➡setIssuedAt(): 토큰이 발급된 발급 시간
➡signWith(secretKey): 비밀키를 사용하여 토큰 서명
➡compact(): JWT 토큰을 문자열로 반환하여 최종적으로 생성된 토큰 반환- addHeader()
➡ HTTP 응답 헤더에 추가
💡 JWT 토큰의 서명?
JWT는 헤더(Header), 페이로드(Payload), 서명(Signature) 3가지로 구성
- 헤더: 토큰의 타입(JWT)과 서명 알고리즘(HMAC, RSA 등)을 정의
- 페이로드: 실제로 전송하려는 데이터를 포함
- 서명: 토큰이 변경되지 않았음을 보장하고, 발급자가 토큰을 생성했음을 증명하는 부분
➡ 토큰의 무결성(=발급된 후 변경되지 않았음)과
진위(=특정 서버(발급자)에 의해 생성되었음을 증명)를 보장하는데 사용
➡ 서명을 확인하려면 발급자만 알고 있는 비밀 키를 사용해야 하기 때문임
📌 실행결과
-
DEBUG
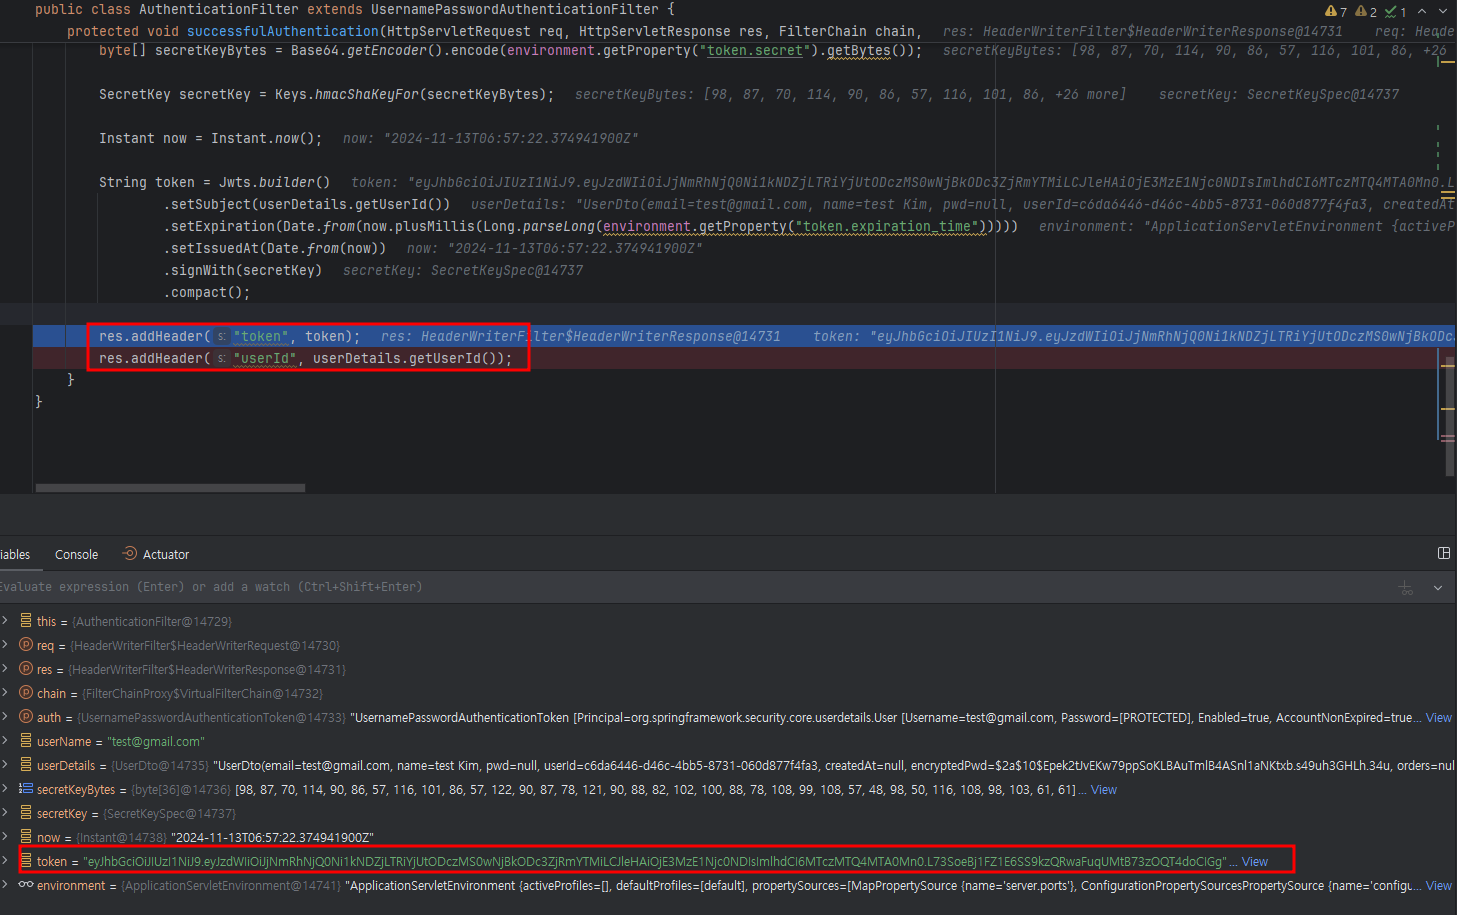
-
최종 실행결과 (사용자에게 반환 결과)
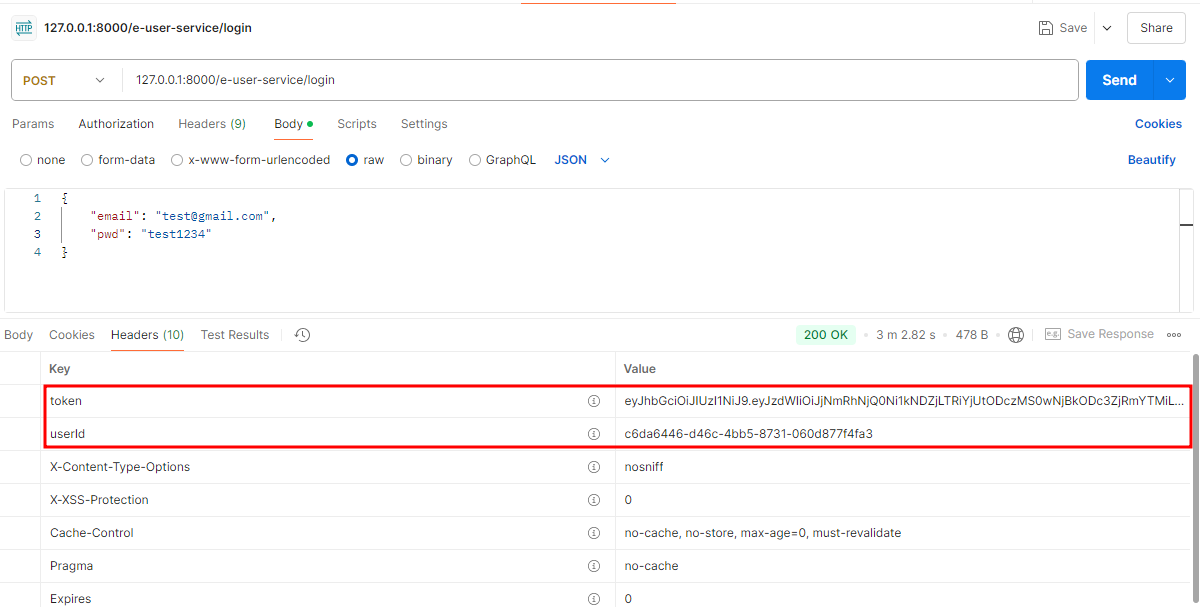
➡ 토큰을 사용하여 정상적으로 로그인이 됨을 서버에 알린 것을 확인

새싹 개발자