산술, 할당, 증감 연산자
  // 산술 (Artihmetic)

  console.log(1+2)
  console.log(5-7)
  console.log(3 * 4)
  console.log(10 /2)
  console.log(7%5) // 나머지


function isEven(num)
{
    return num % 2 ===0
}


console.log(isEven(3)) //false
console.log(isEven(12)) //true

// 할당
let a = 3 // const : 재할당 불가능한 변수

//a = a + 2
a -=2
console.log(a)

// 증감(Increment & Decrement)

let a = 3
console.log(a++)
console.log(++a)
console.log(a)
부정, 비교 연산자
// 부정(Negation) boolean 값으로 출력

console.log(!true)
console.log(!false)

console.log(!0) //true
consolel.log(!!0)
console.log(!!!0) //true
console.log(!null) //true
console.log(!undefined) //true
console.log(!NAN) //true
console.log(!'')//true

console.log(!{})//false
console.log(![]) //false```

```// 비교(Comparison)

const a = 1
const b = 3

// 동등 (형 변환)
console.log(a==b) //false

// 부등 (형 변환)
console.log(a != b) //true

// 일치
console.log(a === b) //false

// 불일치
console.log(a !== b) //true

// 큼
console.log(a > b) // false

// 크거나 같음
console.log(a >=b) //false

// 작음
console.log(a < b) //true

// 작거나 같음
console.log(a <= b) //true
논리 연산자(Logical)
// AND(그리고) 연산자
const a = true
const b = false

// a도 참이고 b도 참
if(a && b) {
    console.log('모두가 참')
}

// OR (또는) 연산자
if(a || b) {
    console.log('하나 이상이 참!')
}

console.log(true && false) // false
console.log(1 && 0) // 0
console.log(1 && 2 && 0) // 0
console.log(1 && 0 &&  2) //0
console.log(0 && 1 && 2) // 0 이라고 거짓 데이터 반환하고 바로나옴
console.log('A' && 'B' && '') // 거짓 빈 문자 반환
console.log('A' && ' B' && 'C') // C 출력

// OR 연산자
console.log(flase || true) //true
console.log( 0 || 1) // 1
console.log(false || 0 || {}) // 빈 객체데이터는 참이므로 {} 출력
console.log(false || [] || null) // [] 참 . 끝남 여기서 [] 출력
console.log(function() {} || undefined || '')
// 함수는 참  . 여기서 바로 반환
console.log(false || 0 || NAN)
// 거짓 넘어가고, 거짓 넘어가고 , 거짓인데 마지막이므로 NAN 반환
Nullish 병합, 삼항 연산자
// Nullish 병합 (Nullish Coalescing)

const n = 0

// OR 연산자를 사용한 경우.
const num1 = n || 7
//왼 > 오른쪽으로 거짓이 아닌 참이라는 데이터를 찾는데,
// 거짓 데이터 기준
console.log(num1) // 7 출력


//Nullish 병합 연산자를 사용한 경우
const num2 = n ?? 7
// 왼 > 오는 동일하나 null, undefined 데이터는 건너뛰고 나머지 데이터 만나면 반환
// null, undefined 기준

console.log(num2) // 0 출력


console.log(null ?? 1) // 1
console.log(undefined ?? 2) // 2
console.log(null ?? undefined ) //undefined
console.log(null ?? 1 ?? 2) // 1에서 출력되고 나옴
console.log(false ?? 1 ?? b) // false 출력
console.log(0 ?? 1 ?? 2) // 0 출력

const a = 1

if(a < 2) {
    console.log('참!')
}
else {
    console.log('거짓')
} // 참


// 삼항 연산자
// 조건 ? 참 : 거짓
console.log(a < 2 ? '참!' : '거짓..')

function getAlert(message){
    return message ? message : '메시지가 존재하지 않습니다!'
}
console.log(getAlert('안녕하세요~'))
console.log(getAlert('')) // 빈문자는 대표적으로 거짓.
전개 연산자
// 전개 연산자(Spread Operator)

const a =[1,2,3]
const b = [4,5,6]
console.log(...a) // 1,2,3
///... : 전개 연산자


console.log(1,2,3) // 1,2,3

const c = a.concat(b) // [1,2,3,4,5,6]

const d = [a, b]
console.log(d) // [[1,2,3], [4,5,6]]


const f = [...a, ...b]
console.log(f) // [...[1,2,3], ...[4,5,6]]
// 최종 출력 : [1,2,3,4,5,6]
// ...은 그 전개연산자가 붙어있는 배열 데이터의 대괄호를 날려주는 역할
// 전개 연산자는 배열데이터가 아닌 객체데이터에서도 사용 가능

const a ={x : 1, y : 2}
const b ={y:3,  z: 4}

const c = Object.assign({},a , b)
console.log(c)
//{x:1, y:3, z:4}
// 객체데이터의 각각의 속성은 고유해야하기 때문에 기존값에서 새로운 값으로 덮어쓰기가 되어ㅓㅆ다.

const d = {a, b}
console.log(d) //{a : {x:1, y:2}, B: {y:3, z: 4}}


const f = {...a, ...b}
console.log(f) // {x:1, y:3, z: 4}
// 전개 연산자
function fn(x, y, z){
console.log(x,y,z)
}
fn(1,2,3) //1,2,3
const a =[1,2,3]
// 전개 연산자 사용 X
fn(a[0], a[1], a[2])
// 전개 연산자 사용
fn(...a)
fn(a) // y,z는 undefined가 된다구조 분해 할당
// 구조 분해 할당(Destructing assignment)

let a =0
let b =0
let c =0
const arr = [1,2,3]

// const a = arr[0]
// const b = arr[1]
// const c = arr[2]

;[,b,c] = arr
;[]
;()

console.log(b,c) // 1 2 3
const arr =[1,2,3]
const [a, ...rest] = arr
console.log(a, rest) /// 1 [2,3]구조 분해 할당 문법을 객체 데이터에서 사용하는 방법
// 구조 분해 할당(Destructing assignment)
```// 구조 분해 할당(Destructing assignment)

const obj = {
   a:1,
   b:2,
   c:3
}

//  불필요하게 너무 많은 코드
// const a = obj.a // 1
// const b = obj.b
// const c = obj.c
// console.log(a,b,c) // 1 2 3

// 객체 구조 분해 문법 할당 사용
const {a, b} = obj // 객체 구조 분해 할당
console.log(a,b) // 1 2

const [] = arr // 배열 구조 분해 할당은 데이터가 나열되어 있기 때문에 많아지면 순서에 맞춰서 해야하는데
// 객체 데이터는 특정한 데이터에 속성이름이 부여가 되어있어서 데이터를 바로 찾을 수 있다.

const { x = 4, a: heropy, y: ten  =10 } = obj // x라는 값이 없으면 4로 할당을 해주겟다. 만약 객체 안에 값이 있으면 4는 무시됨


console.log(x, heropy, ten) //undefined
// 구조 분해 할당(Destructing assignment)
const obj = {
a:1,
b:2,
c:3,
x:7,
y:100
}
const { c , ...rest } = obj // 3, 객체데이터(c 속성은 없음)
console.log(c, rest)
// 구조 분해 할당은 배열과 객체 데이터에서 전개 연산자를 조합해서 사용할 수 있으며
// 나머지를 의미하는 rest를 사용한다. (변수명이 바뀌어도 되기는 한다. )---> 우리가 작성해야하는 js 코드를 굉장히 많이 줄일 수 있다.
선택적 체이닝
= (Optional Chaining)
const userA = {
    naem : 'HEROPY',
    age: 85,
    address: {
        country: 'Korea',
        city : 'Seoul'
    }
}

const userB  = {
    name : 'Neo',
    age: 22
}

function getCity(user){
   return user.address?.city || '주소 없음.' //왼 > 오 처음 만나는 ture 데이터를 반환
}

console.log(getCity(userA)) // seoul
console.log(getCity(userB)) // 주소 없음
if, switch 조건문
if 조건문
// 1. 조건 한 개
if(조건문){
    //
}

// 2. 조건이 참과 거짓
if(조건) {
    //
}
else {
    //
}

// 3. 조건이 여러개
if(조건1) {
    //
} else if(조건2) {
    //
} else if(조건3) {
    //
} else {
    //
}
switch 조건문
function isPositive(number) {
    if(number > 0) {
        return '양수입니다'
    }
    else if(number <0) {
        return '음수입니다'
    }
    else {
        return '0'
    }
    //return undefined  작성한 것과 작성하지 않은 것 과 같음
}

console.log(isPositive(1)) // 양수입니다
console.log(isPositive(10)) // 양수입니다
console.log(isPositive(-2)) // undefined ,조건이 거짓. -> else지정 :  음수입니다
console.log(isPositive(0)) // 0

switch(조건) {
    case 값1:
    // 조건이 '값1'일 때 실행
    break
    case 값2 :
    // 조건이 '값2'일 때 실행
    break
    default :
    // 조건이 '값1'도 '값2'도 아닐 때 실행
}

function price(fruit) {
    let p
    switch(fruit) {
        case 'Apple':
            p =1000
            break
        case 'Banana':
            p = 1500
            break
        case 'Cherry':
            p=2000
            break
        default:
            p = 0
    }
    return p
}

console.log(price('Apple'))
consolel.log(price('Banana'))
console.log(price('Cherry'))
console.log(price('Hello')) // 0

function price(fruit) {

    switch(fruit) {
        case 'Apple':
            return 1000 //return 이 실행되면 단순 switch 문이 아닌 함수 자체가 종료돼서 나옴
        // break를 사용할 필요 X
        case 'Banana':
            return 1500
        case 'Cherry':
            return 2000
        default:
            return 0
    }

}


// if문으로 변경
function price(fruit) {
    if(fruit ==='Apple') {
       return 1000
    }else if(fruit==='Banana') {
        return 1500
    }else if(fruit==='Cherry') {
        return 2000
    }else {
        return 0
    }
}
fruit가 정확하게 특정한 값으로 떨어지는 경우는 switch가 좋다? (그러나 , 어디까지나 맘대로!)
-> switch는 언제나 if로
-> if 는 switch 로 안될 수도 있다.
for, for of, for in 반복문
for (초기화; 조건; 증감) {
    // 반복 실행 코드
}

for(let i=0; i < 10; i += 1 ) {
    console.log(i)
}

for (초기화; 조건; 증감) {
    // 반복 실행 코드
}

for(let i=9; i > -1; i -= 1 ) {
   if( i % 2 === 0 ){
    continue // 현재 반복을 종료하고 다음 반복으로 넘어가는 기능 consol.log 실행 X
   }
    console.log(i)
}
break:반복을 완전히 종료
continue: 현재 반복만 종료하고 다음 반복으로 넘어간다
for(const fruit of fruits) {
    console.log(fruit)
}
// of 뒤에는 반복하고자 하는 배열 데이터
for of 반복문
// For of 반복문

const users = [
    {
        name:'HEROPY',
        age: 85
    },
    {
        name: 'Neo',
        age: 22
    },
    {
        name: 'Lewis',
        age : 34
    }
]

for(let i=0; i<3; i+=1) {
    console.log(users[i].name) // 이렇게 나오는 데이터는 객체데이터이므로 점 표기법 사용가능
}

for(const user of users) {
    console.log(user.name)
}
for in 반복문 (객체데이터일 때 사용)
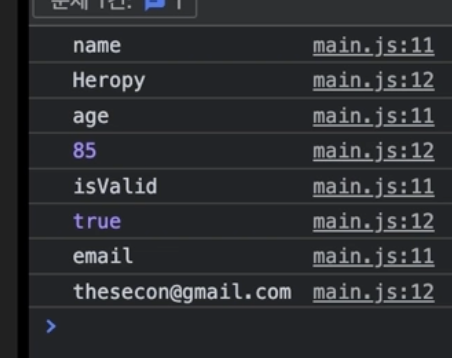
// for in 반복문 (객체 데이터일 때.)

const user= {
    name : 'HEROPY',
    age : 85,
    isValid : true,
    email: 'wjdwlswn23@naver.com'
}

for(const key in user){
    console.log(key)
    console.log(user[key])
}
객체 데이터는 내부의 속성이 순서를 가지지 않는다. 단순하게 객체 데이터가 가지고 있는 속성의 개수만큼만 반복을 한다.
While, Do While 반복문
// While 반복문
// 조건이 거짓이 되는 시점이 존재해야 반복이 멈춘다.

let n =0

while(n < 4) {
    console.log(n)
    n +=1
}
// 무한 반복이 될 수 있기 때문에 주의!

// Do While 반복문

let a = 0
// while(a) {
//     console.log(a)
// }

do{
    console.log(a)
} while (a) // 0이 원래 대표적 거짓데이터이지만 출력이 된다.- 기존 while문은 조건이 거짓이면 아무것도 실행하지 않지만, do while은 조건문이 거짓이더라도 최초 한 번은 실행한다.
for 과 While의 비교
-
for : 배열 데이터, 객체 데이터를 다루는 것에 특화되어있으므로 해당사항이 있을 때 실행하고
그 외에는 취향 차이 정도로만 편하게 사용하면 된다. -
일단은 for을 우선적으로 사용하고 익숙해지면 선택적으로 사용해도 된다.

개인 개발 공부, 정리용 🔗