
라이프사이클 다이어그램
우선 vue공식홈페이지의 라이프 사이클 다이어그램을 살펴보자
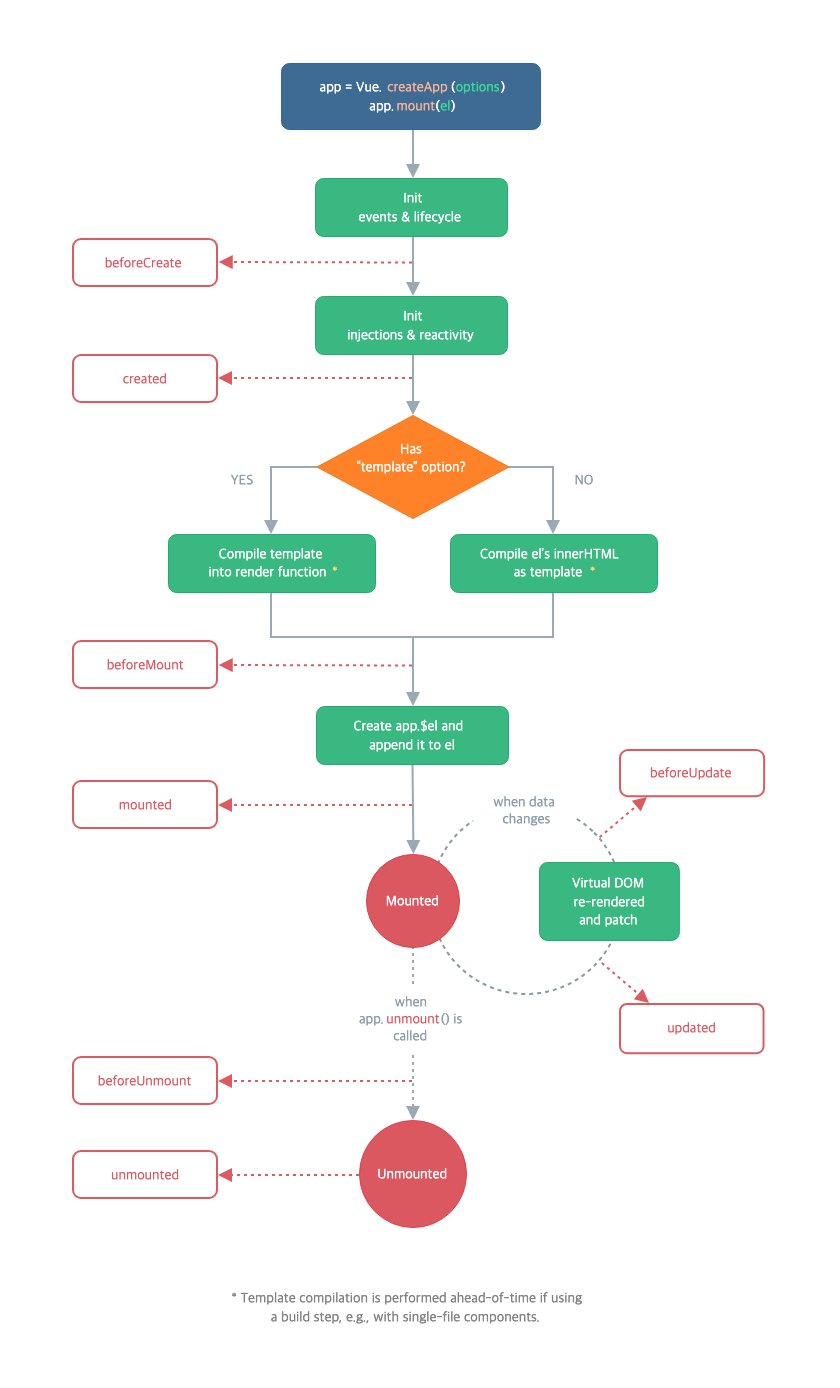
정리하자면 beforeCreate, create, beforeMount, mouted, beforeUpdate, updated, beforeUnmount, unmounted로이루어져 있는것을 확인할 수 있다.
이때 주의해야 할 점은 다이어그램이 무조건 위에서 아래로 일어나는것이 아니기 때문에 특정 시점에서 동작을 하므로 어떤 라이프 사이클에서 로직을 써줄지 고민하도록하자.
각 사이클의 특징
우선 어플리케이션 인스턴스에 들어갈 속성과 html태그는 아래와 같다.
 <div id="app">
    <h1>{{count}}</h1>
  </div>
  <script>
    const App = {
      data() {
        return {
          count: 1
        }
      }
    }
    ...
</script>
각 라이프사이클 훅들은 options에서 작성할 수 있다.
beforeCreate
시점: html 태그들과 reactivity들이 만들어지기 전이다.
      beforeCreate() {
        console.log(document.querySelector('h1')) // null
        console.log(this.couter) // undefined
      },
따라서 콘솔을 확인해보면 h1과 데이터는 null과 undefined가 각각 나오는것을 확인할 수 있다.
created
시점: reactivity들과 데이터 주입등과 같은 option 처리는 하지만 html template들은 렌더링되기전이다
      created() {
        console.log(document.querySelector('h1')) // null
        console.log(this.count) // 1
      }
data는 잘 나오지만 html tag는 여전히 null인것을 확인할 수 있다.
beforeMount
시점: created와 유사하다 결과도 created 훅과 동일하게 나온다. 차이점이라면, beforeMount는 html을 읽은 후 트리만 만들어졌고, 실제 렌더링은 일어나기 직전이라 결과가 created와 동일하게 나오는것 같다.
      beforeMount() {
        console.log(document.querySelector('h1')) // null
        console.log(this.cout) // 1
      }
mounted
시점: 렌더링 된 직후에 발생한다.
      mounted() {
        console.log(document.querySelector('h1')) //<h1>1</h1>
        console.log(this.count) // 1
      }
따라서 querySelector의 결과도 잘 나오는것을 확인할 수 있다.
beforeUpdate
시점: 데이터는 변경되었지만 화면에 반영되기 전 상황이다.
      beforeUpdate() {
        console.log(document.querySelector('h1').innerHTML) // 1
        console.log(this.count) // 2
      },
위와 같이 훅을 설정한 후 콘솔에서 vm.counter = 2로 변경을 한다면
1, 2의 결과를 확인할 수 있다.
이를 통해 데이터는 변경되었지만, 화면에 반영되기 전이라는것을 유추할 수 있다.
updated
시점: 데이터도 변경되었고 실제로 화면에도 반영된 직후이다.
      updated() {
       console.log(document.querySelector('h1').innerHTML) // 2
       console.log(this.counter) // 2
      }
beforeUnmount와 unmounted
인스턴스가 unmount가 된다면 beforeUnmount와 unmounted가 차례로 호출이 된다.
아직은 어떤 경우에 써야되는지 잘 모르겠다😂