우리동네 미세먼지 APP
오늘을 사용자의 위치를 불러와 해당 지역의 실시간 대기 정보를 알려주는 App을 만든다!
크게는 미세먼지와 초미세먼지의 정보를 알려준다.
추가적으로 아황산가스 / 일산화탄소 등 기타 정보들도 알려준다.
🚩 사용 기술 및 도구
언어 : Kotlin (100%)
환경 : Android Studio
- Fused Location Provider API
- 공공데이터 API
- 카카오 로컬 API
- View Binding
- okhttp
- coroutine
- retrofit
🚩 작품 설명
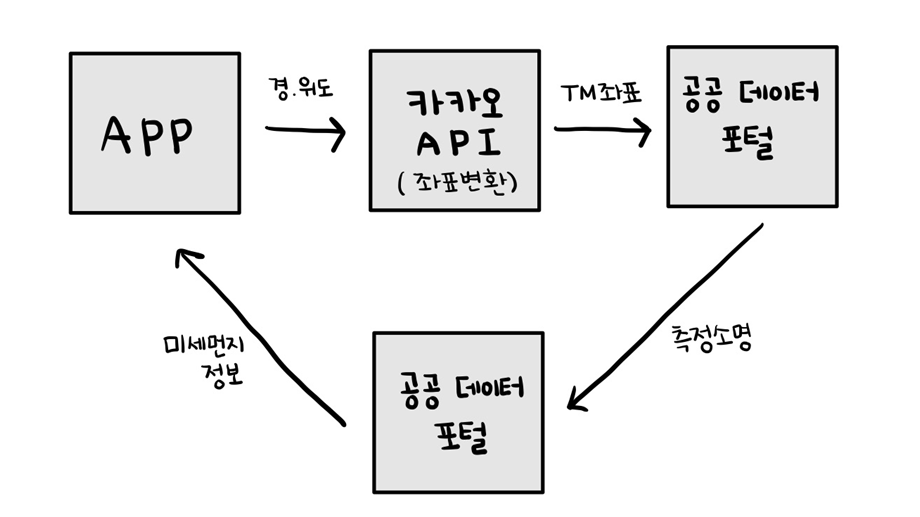
API를 3가지 이용한다.
(1) Fused Location Provider API
(2) Kakao - 좌표 변환 API
(3) 공공데이터 포털 - 에어코리아 (대기오염정보 , 측정소정보) API
사용자의 위치 정보 불러온 다음
위 API들을 이용하여 '근접 측정소 정보 불러오기 / 실시간 대기 정보 불러오기' 를 해준다.
🚩 기능 살펴보기
◾ 사용자의 위치 정보 가져오기
사용자의 기기에서 위치 값을 가져오기 위해 'Fused Location Provider API' 를 사용한다.
우선, 두가지 권한이 필요하다!
// Manifest.xml
<uses-permission android:name="android.permission.ACCESS_FINE_LOCATION" />
<uses-permission android:name="android.permission.ACCESS_COARSE_LOCATION" />

// 위치값 가져오기
private var cancellationTokenSource: CancellationTokenSource? = null
private lateinit var fusedLocationProviderClient: FusedLocationProviderClient
fusedLocationProviderClient = LocationServices.getFusedLocationProviderClient(this)

cancellationTokenSource = CancellationTokenSource()
fusedLocationProviderClient.getCurrentLocation(
            LocationRequest.PRIORITY_HIGH_ACCURACY,
            cancellationTokenSource!!.token
        ).addOnSuccessListener { location ->
            Log.d("위치 정보","${location.latitude}, ${location.longitude}")
	}
◾ KAKAO API 통해 위치값(GPS)을 TM값으로 변환하기
 // 코루틴 스콥프
private val scope = MainScope()

scope.launch {
    // 코루틴 시작
    val monitoringStation = Repository.getNearbyCenter(location.latitude, location.longitude)
}
◾ 공공데이터 - 에어코리아로 대기 정보 가져오기
(+ 아래는 측정소 정보 가져오기 코드입니다. 대기 정보 가져오기는 비슷한 코드로 진행되어 생략합니다! 자세한건 Git에서)
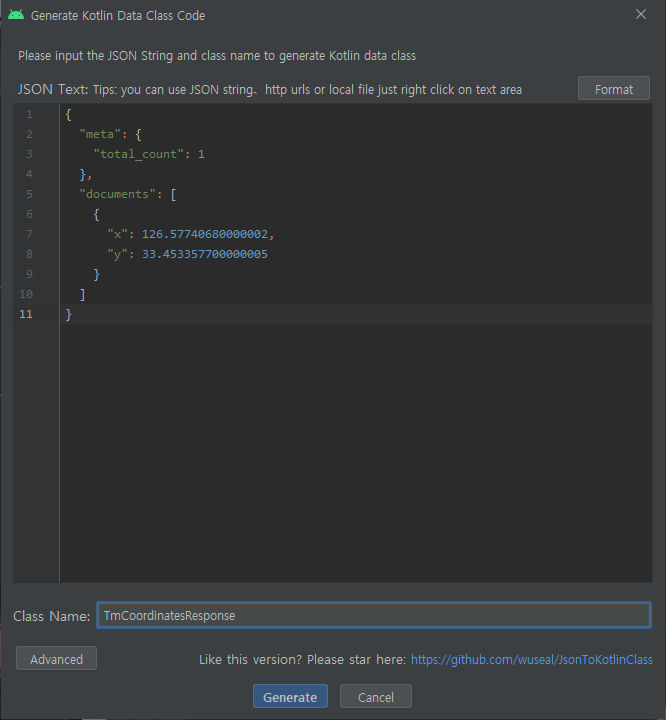
api 통신을 통해 받아온 json을 data class로 만들어야한다.
이를 편리하게 해주는 플로그인이 있는데 'JSON to Kolin Class'이다.
json 응답 형식을 붙여넣으면 그걸 토대로 모델을 만들어준다.
api 를 빠르게 테스트 해볼때 주로 사용한다고 한다.
예시로 받은 json 데이터를 아래와 같이 붙여넣으면 자동으로 data class를 생성해준다.

- 생긴 모습 :

이제 생성된 데이터 클래스를 사용하여 통신을 해보자!
object Repository {

    suspend fun getNearbyCenter(latitude: Double, longitude: Double): Station? {
        val tmCoordinates = kakaoLocalAPI.getTmCoordinates(longitude, latitude)
            .body()?.documents
            ?.firstOrNull() // 첫번째 값 없으면 null
        val tmX = tmCoordinates?.x
        val tmY = tmCoordinates?.y
        Log.d("ttt", "" + tmX + " " + tmY)
        return airKoreaAPIService
            .getNearbyCenter(tmX!!, tmY!!)
            .body()
            ?.response
            ?.body
            ?.stations
            ?.minByOrNull { // 가장 작은 값 또는 null \
                it.tm ?: Double.MAX_VALUE
            }
    }


    private val airKoreaAPIService: AirKoreaAPI by lazy {
        Retrofit.Builder()
            .baseUrl(Url.AIR_KOREA_API_URL)
            .addConverterFactory(GsonConverterFactory.create())
            .client(buildHttpClient())
            .build()
            .create()
    }

	private fun buildHttpClient(): OkHttpClient =
        OkHttpClient.Builder().addInterceptor(HttpLoggingInterceptor().apply {
            level = if (BuildConfig.DEBUG) {
                // BODY =  다보여줌
                // DEBUG 일때만 다 보여주자!
                HttpLoggingInterceptor.Level.BODY
            } else {
                // NONE = 안보여줌
                HttpLoggingInterceptor.Level.NONE
            }
        }).build()
}
◾ 화면에 보여주기
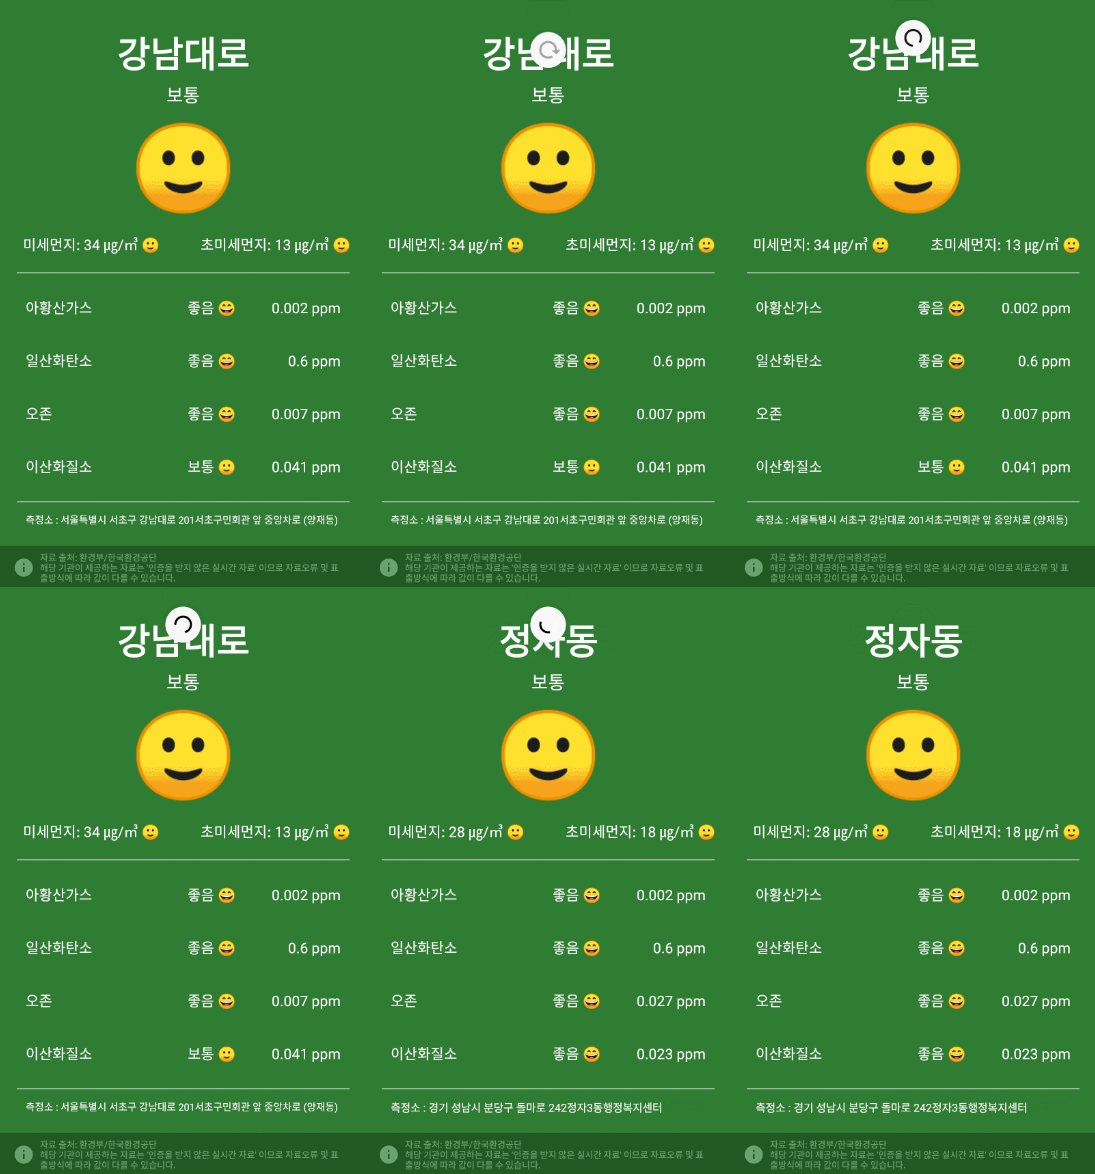
이제 대기 정보를 data Class 형식으로 받아왔으니 이를 가져와 layout에 뿌려주면 된다.
추가적으로 화면을 Swipe 하면 새로고침이 되도록 하기 위해 전체 layout을 SwipeRefreshLayout로 감싸주었다.
// 데이터를 토대로 화면 구성하기
fun displayAirQualityData(monitoringStation: Station, measuredValue: MeasuredValue) {
        // 뷰 서서히 보여지게
        binding.mainlayout.animate()
            .alpha(1F)
            .start()

        binding.measuringStationName.text = monitoringStation.stationName
        binding.measuringStationAddressTextView.text = "측정소 : ${monitoringStation.addr}"

        (measuredValue.khaiGrade ?: Grade.UNKNOWN).let { grade ->
            binding.root.setBackgroundResource(grade.colorResId)
            binding.totalGradeLabelTextView.text = grade.label
            binding.totalGradleImojiTextView.text = grade.emoji
        }
        with(measuredValue) {
            binding.fineDustInfoTextView.text =
                "미세먼지: $pm10Value ㎍/㎥ ${(pm10Grade ?: Grade.UNKNOWN).emoji}"
            binding.ultraFineDustInfoTextView.text =
                "초미세먼지: $pm25Value ㎍/㎥ ${(pm25Grade ?: Grade.UNKNOWN).emoji}"

            .
            .
            .
            (생략)
        }
}

// 화면 swipe시 새로고침
// SwipeRefreshLayout에 리스너를 달아준다.
binding.refresh.setOnRefreshListener {
	// 화면 그리기
	fetchAirQuality()
}
결과

