🚩 동기들끼리 SNS
대학교에 들어가서 꾸준히 활동한 동아리가 있다!
컴퓨터공학과 학술 동아리였는데 임원부터 부회장까지 하면서 개인적으로 애정이 많이 갔다ㅎㅎ
특히 동기들!! 이랑 휴학기간까지 5년동안 진짜 많은 걸 했다.
우리끼리 나중에 우리끼리의 SNS 앱 & 웹을 만들자!! 하는 얘기가 나왔고,
나는 바로 실행 해버리는 "ENFP" 라서 후딱 만들어봤다.
(여기까지 나의 TMI 대잔치,,,)
1. 사용 기술 및 도구
- 언어 : Kotlin (100%)
- 환경 : Android Studio
- Database : Firebase
- 그 외 : Glide, Facebook API, Goolge API, View Binding, okhttp, multidex
2. 작품 설명
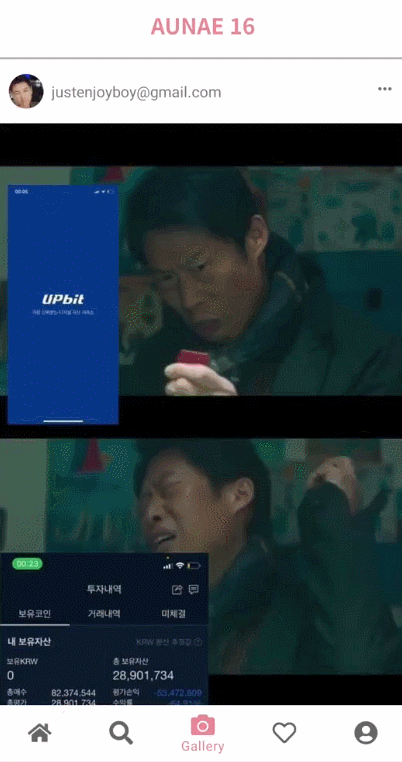
- 사진을 첨부한 게시글 작성
- 댓글 달기 , 좋아요 누르기
- 회원가입/로그인/로그아웃 ( 이메일 & Facebook & Google)
- 프로필 편집
- 팔로우 / 언팔로우
- 알림 기능 (팔로우, 댓글, 좋아요)
- 사진 다운로드
3. 기능 살펴보기
◾ 로그인 및 회원가입
위 기능들은 예전 다른 프로젝트에서도 여러번 사용해보았기 때문에 어렵지 않게 진행하였다.
방법은 따로 포스팅을 해두었다. 👉 Facebook 로그인 & Google 및 이메일 로그인
◾ 게시글 (+사진) 올리기
// 갤러리로 이동하기
private fun goGallery() {
        val galleryIntent = Intent(Intent.ACTION_PICK)
        galleryIntent.type = "image/*" //선택한 파일의 종류를 지정해준다 (이미지만 지정하겠다는 뜻)
        intent.putExtra("crop", true)
        startActivityForResult(galleryIntent, PICK_IMAGE_FROM_ALBUM)
}

// 이미지 크롭하기
private fun cropImage(uri: Uri?) {
        CropImage.activity(uri).setGuidelines(CropImageView.Guidelines.ON)
            .setCropShape(CropImageView.CropShape.RECTANGLE)
            .start(this)
}

// 사진을 Storage에 업로드
private fun contentUpload() {
        //현재 시간을 String으로 만들기
        //20210306_141238
        val timestamp = SimpleDateFormat("yyyyMMdd_HHmmss", Locale.getDefault()).format(Date())
        //만약 나라를 지정하지않고 단말기의 설정된 시간으로 하고 싶다면 Locale.getDefault(), 한국으로 하고 싶으면 Locale.KOREA
        val fileName = "IMAGE_$timestamp.png"

        //서버 스토리지에 접근하기!
        val storageRef = storage?.reference?.child("images")?.child(fileName)

        // 서버 스토리지에 파일 업로드하기!
        storageRef?.putFile(photoUri!!)?.continueWithTask() {
            return@continueWithTask storageRef.downloadUrl
            //나중에 이미지를 다른 곳에서 불러오고 할떄 url을 가져올수있게해놓음
        }?.addOnSuccessListener {
            upload(it, fileName)
            Toast.makeText(this, getString(R.string.upload_success), Toast.LENGTH_SHORT).show()
        }?.addOnCanceledListener {
            //업로드 취소 시
        }?.addOnFailureListener {
            //업로드 실패 시
	}
}

// Storage 업로드 된 사진의 uri를 가지고
// Firestore에 게시물 업로드
private fun upload(uri: Uri, fileName: String) {
	//contentDto 객체를 생성한다.
	val contentDto = ContentDto(
              imageUrl = uri.toString(),
              uid = auth?.currentUser?.uid,
              userId = auth?.currentUser?.email,
              explain = contentEditText.text.toString(),
              timestamp = System.currentTimeMillis().toLong(),
              imageStorage = fileName
        )

        //Dto를 Firestore에 추가
        firestore?.collection("images")?.document()?.set(contentDto)

        //액티비티 종료
        setResult(Activity.RESULT_OK)
        finish()
}
◾ 팔로우 / 언팔로우
팔로워의 경우 Firebase DB를 사용하여 관리 하였다.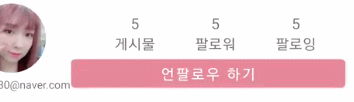 'Follow' Document에 사용자의 uid로 컬렉션을 두었다.
아래 필드로는 followers와 followings를 두고, 해당되는 사용자의 uid를 저장하였다.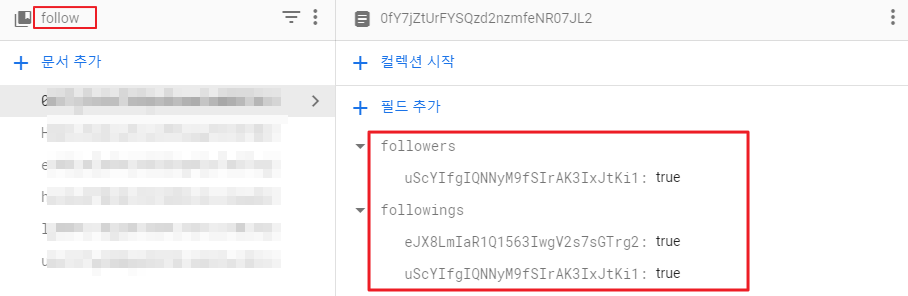
이는 Follow Dto 데이터 클래스를 생성하여 리스트를 주고 받았다.
data class FollowDto(
    // 이 사람을 팔로잉하는 사람들
    var followers : MutableMap<String, Boolean> = HashMap(),

    // 이 사람이 팔로잉 중인 사람들
    var followings : MutableMap<String, Boolean> = HashMap()
)
실제 팔로우 / 언팔로우의 경우 다음과 같이 구현하였다.
목록에 유저의 uid가 있는지 확인 후 상황에 따라 팔로우/언팔로우를 한다.
val firestore = FirebaseFirestore.getInstance()
val currentUid = FirebaseAuth.getInstance().currentUser!!.uid
val txDocTargetUser = firestore?.collection("follow")?.document(this.targetUserId!!)
	//Firestore에 데이터 저장 : runTransaction{...}
    	firestore.runTransaction {
            // it : Transaction
            // it.get(Document) : 해당 Document 받아오기
            // it.set(Document, Dto 객체) : 해당 Document에 Dto 객체 저장하기
            var followDto = it.get(txDocTargetUser).toObject(FollowDto::class.java)

            if (followDto == null) {
                followDto = FollowDto().apply {
                    followers[currentUid!!] = true
                    notifyFollow()
                }
            } else {
                with(followDto) {
                    if (followers.containsKey(currentUid!!)) {
                    	// 언팔로우
                        followers.remove(currentUid!!)
                    } else {
                    	// 팔로우
                        followers[currentUid!!] = true
                        notifyFollow()
                    }
                }
            }
	it.set(txDocTargetUser, followDto)
	return@runTransaction
}
◾ 좋아요 기능
 좋아요 기능의 경우에도 사실 위의 팔로우 / 언팔로우 기능과 많이 유사하다.
좋아요 한 사용자의 uid를 저장한다.
유저가 목록에 없다면 '좋아요', 있다면 '좋아요 취소'를 한다.
◾ 댓글 달기
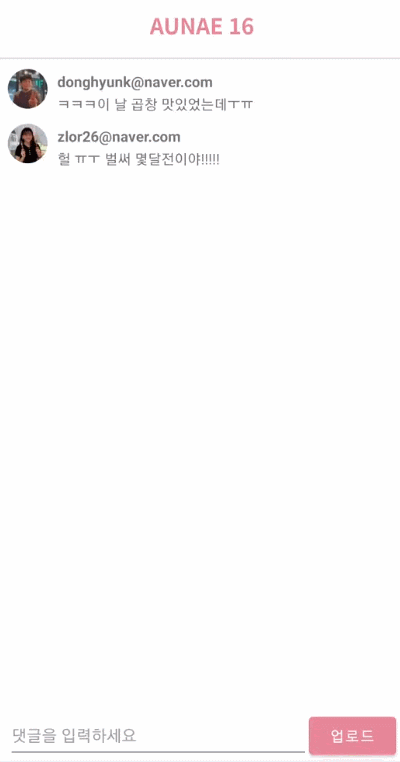
// Dto
data class ContentDto(
	// 게시글
    var uid: String? = "",
    ...
) {
    // 댓글
    // ContentDto.Comment 로 접근한다.
    data class Comment(
        //얘도 primary키 필요함!
        var uid: String? = "",
        var userId: String? = "",  // 업로드한 유저의 이메일
        var content: String? = "", //댓글 내용
        var timeStamp: Long? = null //댓글 작성 시간
    )
}

// 댓글 업로드 함수
private fun commentUpload() {
        val commentDto = ContentDto.Comment(
            uid = auth?.currentUser?.uid,
            userId = auth?.currentUser?.email,
            content = etCommentContent.text.toString(),
            timeStamp = System.currentTimeMillis()
        )
        // 알림 함수 실행
        notifyComment(commentDto.uid, commentDto.userId, commentDto.timeStamp)

        //Dto를 firebase에 추가!
        val doc = firestore?.collection("images")?.document(content_uid!!)

        firestore?.runTransaction {
            val contentDto = it.get(doc!!).toObject(ContentDto::class.java)
            doc.collection("comments").document().set(commentDto)
            if (contentDto != null) {
                contentDto.commentCount += 1
                it.set(doc, contentDto)
            }
        }
        etCommentContent.setText("")
        hideKeyboard()

}
◾ 사진 다운로드 받기
 downloadManager를 통해 사진을 기기에 다운로드 받는다.
다운로드 알림이 뜨다가 말아서 사알짝 멘붕이였다.
알고보니 setNotificationVisibility를 설정해주지 않아서 계속 진행되다가 알림창에서 사라지는 것이였다.
또, Directory 경로 설정을 Environment.DIRECTORY_DOWNLOADS 으로 하니
갤러리에서는 확인되지 않는 황당한 경우가 생겼다.
혹시 PICTURES인가..? 하고 해보니 간단하게 해결 되었다.
private fun downloadImage(url: String) {
            val downloadManager: DownloadManager =
                context?.getSystemService(Context.DOWNLOAD_SERVICE) as DownloadManager

            val request = DownloadManager.Request(Uri.parse(url))
            request.setNotificationVisibility(DownloadManager.Request.VISIBILITY_VISIBLE_NOTIFY_COMPLETED);
            request.setDestinationInExternalPublicDir(
                Environment.DIRECTORY_PICTURES,
                "Aunae" + ".jpg"
            )
            downloadManager.enqueue(request)
}
◾ 알림 기능
알림은 총 3가지 유형이 있다.
// Content.kt
const val NOTIFICATION_FAVORITE = 0
const val NOTIFICATION_FOLLOW = 1
const val NOTIFICATION_COMMENT = 2
알림의 정보를 담을 Dto를 생성해준다.
data class NotificationDto(
      var destinationUid:String? = "",
      var sender : String? = "",
      var senderUid : String? = "",
      var type : Int? = null,
      var timestamp: Long? = null,
      var timeInfo : String? = "",
      var contentUid : String? = ""
)
이제 정보를 담아 Firebase에 업로드 해준다.
예시로, 댓글 알림을 업로드 하는 함수이다.
 private fun notifyComment(uid: String?, email: String?, timeStamp: Long?) {
        if (uid == destination_uid)
            return
        val date = Date(timeStamp!!)

        // 날짜, 시간을 가져오고 싶은 형태 선언
        val dateFormat = SimpleDateFormat("yyyy/MM/dd HH:mm:ss", Locale("ko", "KR"))

        // 현재 시간을 dateFormat 에 선언한 형태의 String 으로 변환
        val timeData = dateFormat.format(date)

        val notificationDto = NotificationDto().apply {
            destinationUid = destination_uid
            sender = email
            senderUid = uid
            type = NOTIFICATION_COMMENT
            timestamp = timeStamp
            timeInfo = timeData.toString()
            this.contentUid = content_uid
        }
        FirebaseFirestore.getInstance().collection("notifications").document().set(notificationDto)
}
AlarmFragment에서 사용자는 자신에게 온 알림을 확인 할 수 있다.
FirebaseFirestore.getInstance().collection("notifications")
                .whereEqualTo("destinationUid", currentId)
                .addSnapshotListener { value, error ->
                    notifyDtoList.clear()
                    notifyId.clear()
                    if (value == null) return@addSnapshotListener
                    value.forEach {
                        notifyDtoList.add(it.toObject(NotificationDto::class.java))
                        notifyId.add(it.id)
                    }
notifyDataSetChanged()
최대한 기능을 구현한 코드들을 담아보려했는데 너무 길어져서
RecyclerView나 BottomNavigation 등과 같이 다른 포스팅에서도 다룬 적 있는 기능들은 제외해보았다!
만들고 나서 동기들이 사용을 해줄 때 마다 뿌듯함을 느낀다.
웹 버전도 동기들이 빨리 만들어줘서 연동을 해보길 기대해본다!
Git 보러가기