
✏️ 6. 뷰(UI) 작성 & 테스트
✔️ 해당 게시물에 모든 댓글 가져오기
✏️ CommentController
@RestController // = @Controller + @ResponseBody
public class CommentController {
    @Autowired
    CommentService commentService;

    // 게시물 번호를 받으면 그 게시물에 달린 모든 댓글을 반환하는 메서드
    @RequestMapping("/comments") // comments?bno=1080
    public ResponseEntity<List<CommentDto>> list(Integer bno) {
        List<CommentDto> list = null;

        try {
             list = commentService.getList(bno);
             return new ResponseEntity<List<CommentDto>>(list, HttpStatus.OK); // 200
        } catch (Exception e) {
           e.printStackTrace();
           // 사용자가 잘못 요청해서 에러나니까 400번대를 날린다.
           return new ResponseEntity<List<CommentDto>>(HttpStatus.BAD_REQUEST); // 400
        }
    }
    ...
✏️ SimpleRestController
@Controller
public class SimpleRestController {

    @GetMapping("/test")
    public String test() {
        return "test";
    }
...
✏️ test.jsp
<%@ page contentType="text/html;charset=UTF-8" language="java" %>
<html>
<head>
    <title>Title</title>
    <script src="https://code.jquery.com/jquery-1.11.3.js"></script>
</head>
<body>
<h2>commentTest</h2>
<button id="sendBtn" type="button">SEND</button>
<div id="commentList"></div> <!--댓글 목록을 보여줌(ajax를 이용해서 불러올꺼임)-->
<script>
    // 임시로
    let bno = 1;

    let showList = function (bno) {
        $.ajax({
            type:'GET',       // 요청 메서드
            url: '/JTI/comments?bno=' + bno,  // 요청 URI
            dataType : 'json', // 전송받을 데이터의 타입, 생략해도 됨: 기본이 json
            success : function(result) {
                // result가 오면 commentList에 담기
                // 댓글목록 가져온 것을 commmentList에 담게 됨
                $("#commentList").html(result);
            },
            error   : function(){ alert("error") } // 에러가 발생했을 때, 호출될 함수
        }); // $.ajax()

    }

    $(document).ready(function(){


        $("#sendBtn").click(function() {
            showList(bno);

        });
    });
</script>
</body>
</html>- bno를 1로 가정하고 bno가 호출이 되면 GET으로 요청이 가서 1번에 있는 댓글들을 다 가져온다.
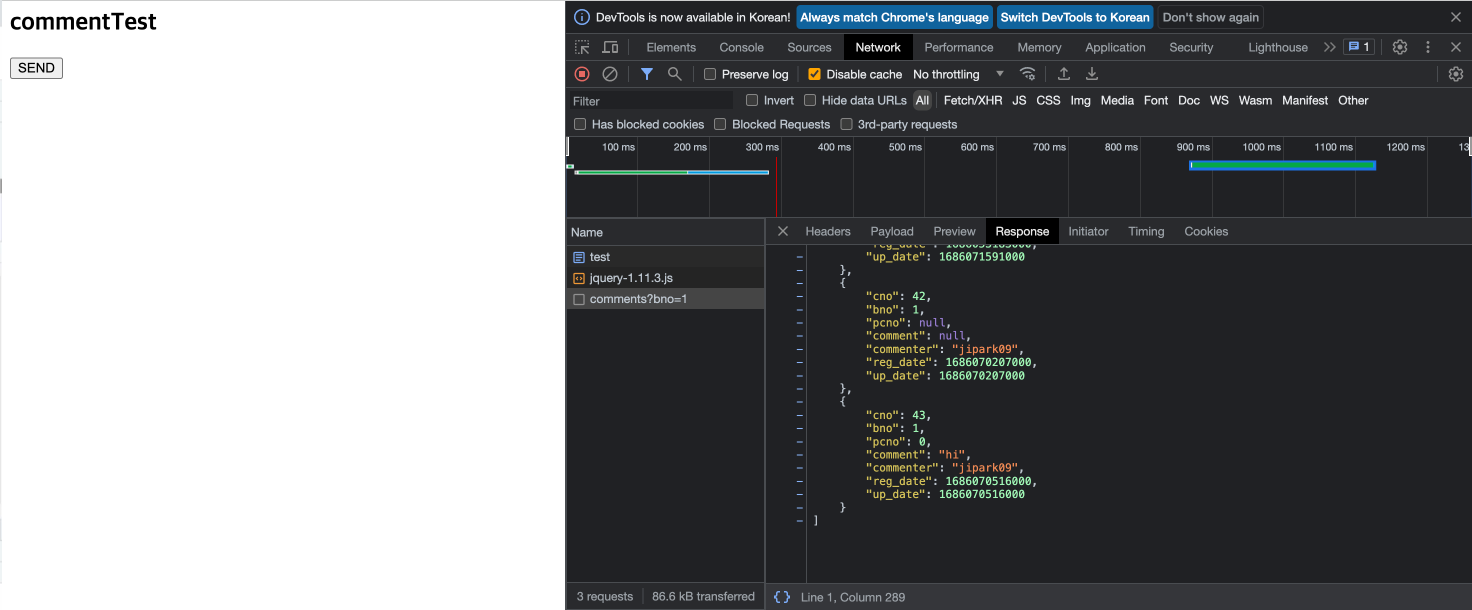
- 버튼을 누르자 댓글들이 commentList에 담긴 것을 확인할 수 있었다.
❗️값이 안들어왔을 때 TIP!
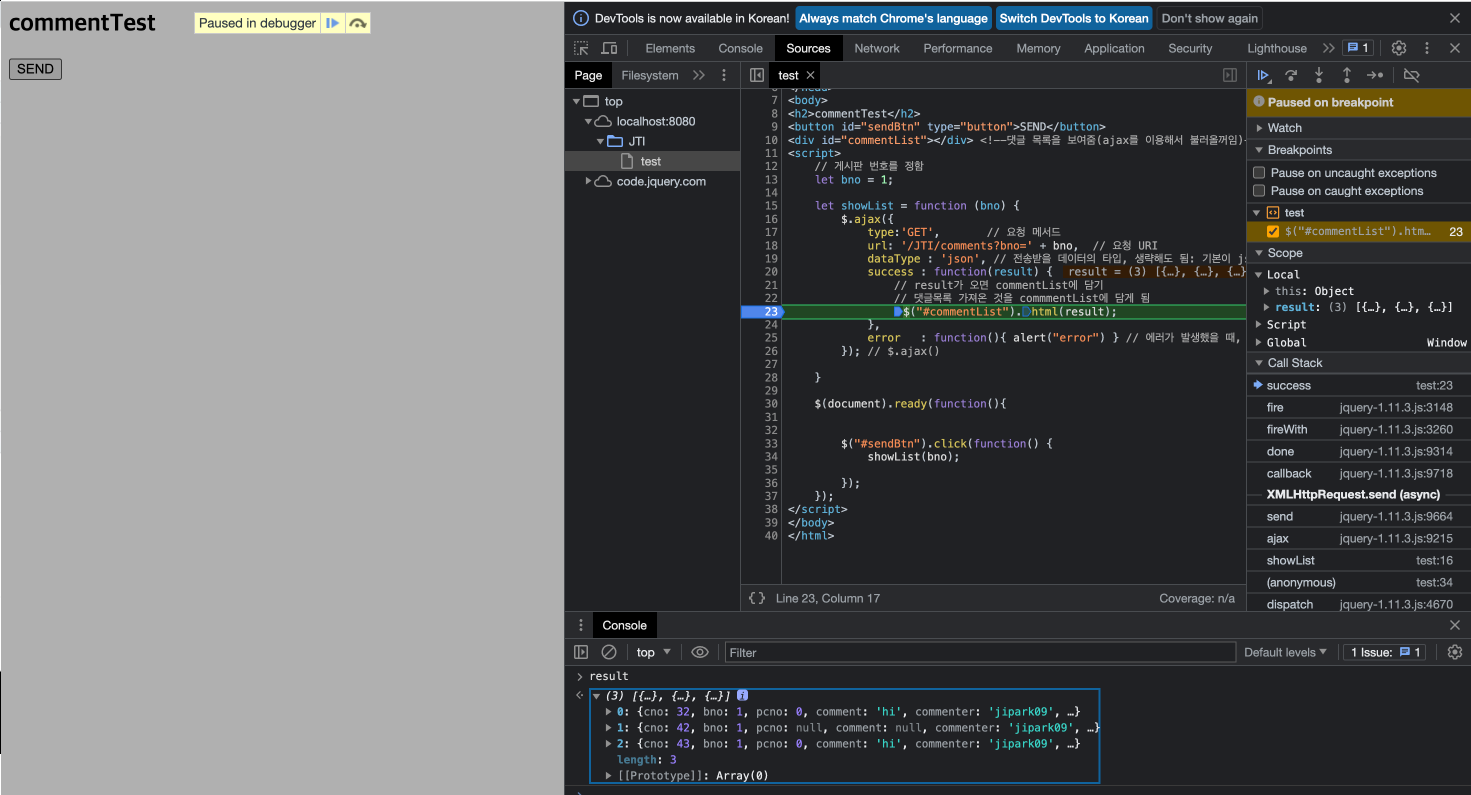
- 값이 안들어오거나 확인하고 싶을 때, Sources에 들어가서 해당 코드에 브레이크를 걸고 다시 send버튼을 눌러본다. 그리고 콘솔창에 들어올 값인
result를 쳐본다.
✏️ 해당 게시물의 댓글들을 <li>로 나오게 수정
<%@ page contentType="text/html;charset=UTF-8" language="java" %>
<html>
<head>
    <title>Title</title>
    <script src="https://code.jquery.com/jquery-1.11.3.js"></script>
</head>
<body>
<h2>commentTest</h2>
<button id="sendBtn" type="button">SEND</button>
<div id="commentList"></div> <!--댓글 목록을 보여줌(ajax를 이용해서 불러올꺼임)-->
<script>
    // 임시로
    let bno = 1;

    let showList = function (bno) {
        $.ajax({
            type:'GET',       // 요청 메서드
            url: '/JTI/comments?bno=' + bno,  // 요청 URI
            dataType : 'json', // 전송받을 데이터의 타입, 생략해도 됨: 기본이 json
            success : function(result) {
                // result가 오면 commentList에 담기
                // 댓글목록 가져온 것을 commmentList에 담게 됨
                // 들어오는 배열을 toHtml이라는 함수를 이용해서 <li>태그로 만든다음 그것을 commentList에 넣는다.
                $("#commentList").html(toHtml(result));
            },
            error   : function(){ alert("error") } // 에러가 발생했을 때, 호출될 함수
        }); // $.ajax()

    }

    $(document).ready(function(){


        $("#sendBtn").click(function() {
            showList(bno);

        });
    });

    // 배열들어온 것을 <li>태그를 이용해서 전체 <ul>를 구성한 다음에 그것을 넣을 것이다.
    let toHtml = function (comments) {
        let tmp = "<ul>";

        // 댓글 하나하나 들고와서 tmp에 쌓는다.
        comments.forEach(function (comment) {
            tmp += '<li data-cno=' + comment.cno
            tmp += ' data-pcno=' + comment.pcno
            tmp += ' data-bno=' + comment.bno + '>'
            // span태그에 넣어야 나중에 작성자만 따로 읽어오기 쉽다.
            tmp += ' commenter=<span class="commenter">' + comment.commenter + '</span>'
            tmp += ' comment=<span class="comment">' + comment.comment + '</span>';
            tmp += ' up_date=' + comment.up_date
            tmp += '</li>'
        })

        return tmp + "</ul>"; // ul을 html로 반환한다.
    }
</script>
</body>
</html>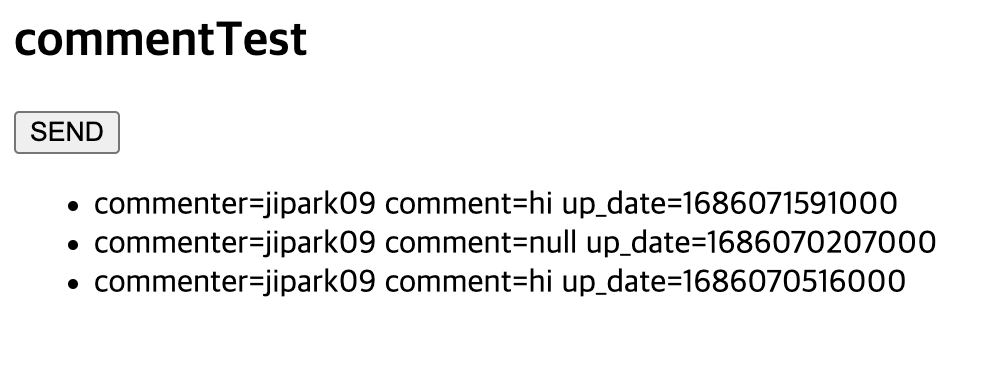
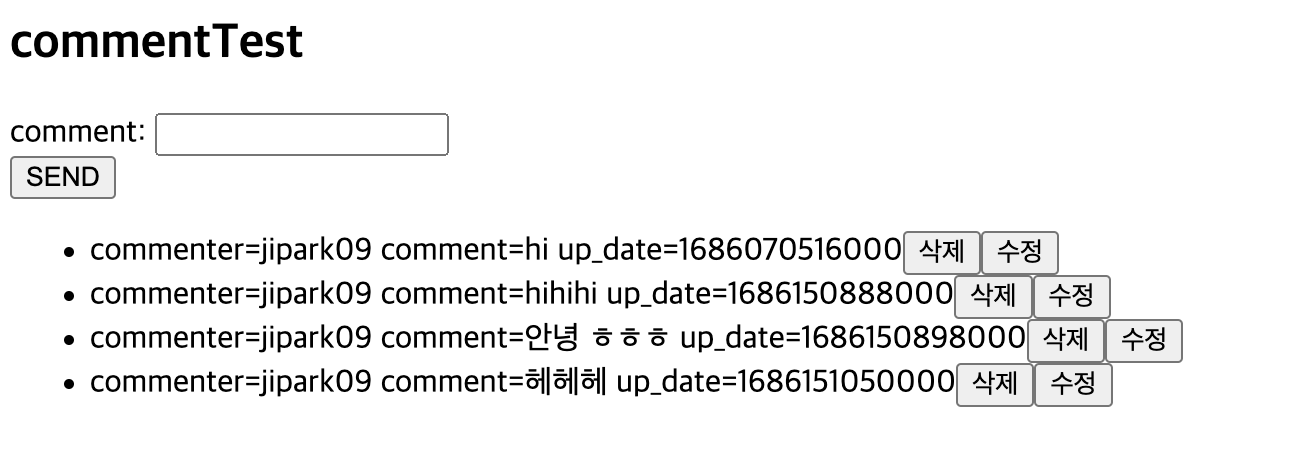
- commenter를 들고오기 쉽게 할려고 <span> 태그로 감싸놨다.
- up_date는 ms로 나왔다. 나중에 Date로 바꿔주면 됨
✔️ 댓글 삭제 구현하기
 let toHtml = function (comments) {
        let tmp = "<ul>";

        // 댓글 하나하나 들고와서 tmp에 쌓는다.
        comments.forEach(function (comment) {
            tmp += '<li data-cno=' + comment.cno
            tmp += ' data-pcno=' + comment.pcno
            tmp += ' data-bno=' + comment.bno + '>'
            // span태그에 넣어야 나중에 작성자만 따로 읽어오기 쉽다.
            tmp += ' commenter=<span class="commenter">' + comment.commenter + '</span>'
            tmp += ' comment=<span class="comment">' + comment.comment + '</span>';
            tmp += ' up_date=' + comment.up_date
            tmp += '<button class="delBtn">삭제</button>' <!-- 삭제추가-->
            tmp += '</li>'
        })

        return tmp + "</ul>"; // ul을 html로 반환한다.
}- 삭제 버튼 끼워넣기
- 버튼 클릭했을 때 삭제 요청 보내기
- 각 댓글마다 버튼이 하나씩 있는 거라서
delBtn을 class로 할 수밖에 없다.
❌ .delBtn 작동 되지 않음
	$(document).ready(function(){

        $("#sendBtn").click(function() {
            showList(bno);

        });

        $(".delBtn").click(function () {
            alert("delete!!!")
        });
});- delBtn은 SEND 버튼을 누르기 전에는 없다. 그래서 이벤트를 걸수가 없다.
sendBtn을 눌러서 showList를 호출했지만, 요청했는데 결과가 오지 않았다. 비동기 호출이기 때문에! 요청이 와야 삭제 버튼이 만들어지는데 요청이 오기전에 delBtn click 함수가 실행이 되면 이벤트가 걸리지 않는다.
➡️ 이벤트는 고정된 요소에다가 걸어야 한다.
💡 동적으로 생성되는 요소에 이벤트 거는 방법
⭕️ 수정: 고정되어 있는 <div id="commentList"></div>에다가 이벤트 걸기
		// $(".delBtn").click(function () {
 		$("#commentList").on("click", ".delBtn", function () {
            alert("delete!!!")
});-
이 시점에 delBtn은 없어도 commentList는 있다. 이 commentList안에있는 delBtn 클래스에다가 클릭 이벤트를 건다.
-
확인됐으니까 함수 만들면 됨!
// $(".delBtn").click(function () {
$("#commentList").on("click", ".delBtn", function () {
// li가 버튼의 부모
let cno = $(this).parent().attr("data-cno");
let bno = $(this).parent().attr("data-bno");
$.ajax({
type: 'DELETE',
url: '/JTI/comments/' + cno + '?bno=' + bno,
success : function (result) {
alert(result)
// 삭제된 다음에 새로 갱신되어야 함
showList(bno);
}
});
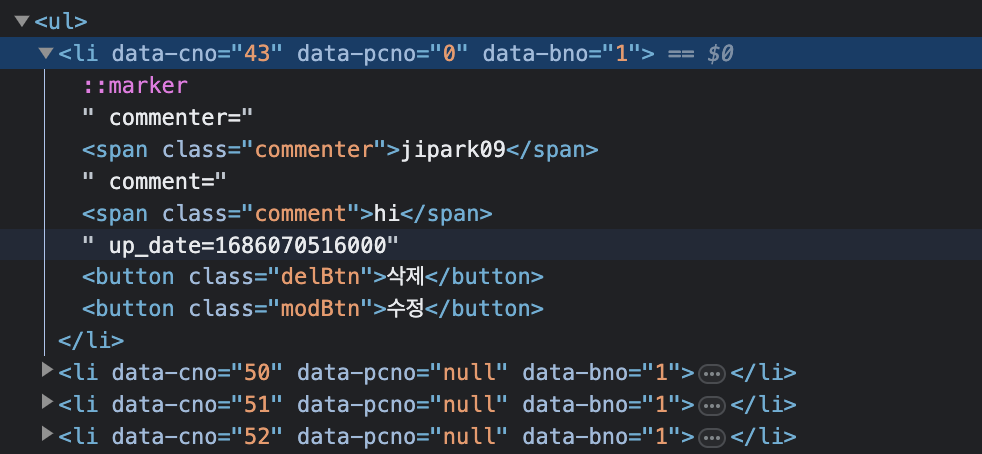
});❗️ data-
- 사용자정의 attribute.
: 우리가 맘대로 만들 수 있다. 근데 규칙이data-를 붙이게 정해져 있다. 안붙여도 되는데 태그 하나하나에 속성이 되게 많아서 없는 줄 알고 썼다가 기존 속성과 충돌나면 안되니까 접두사에data-를 붙여준다.
💡 참조한 element 속성 보기

✔️
$0: 내가 참조한 element에 대한 참조
➡️dir로 해당 element에 대한 속성들을 볼 수 있다.
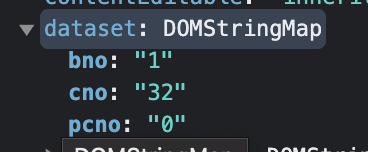
dir($0)내부 안에 보니까dataset이라는 것이 있다.
:data-로 시작하는 것들은 dataset이라는 속성안에 map형태로 쌓인다.
✏️ 최종
<%@ page contentType="text/html;charset=UTF-8" language="java" %>
<html>
<head>
    <title>Title</title>
    <script src="https://code.jquery.com/jquery-1.11.3.js"></script>
</head>
<body>
<h2>commentTest</h2>
<button id="sendBtn" type="button">SEND</button>
<div id="commentList"></div> <!--댓글 목록을 보여줌(ajax를 이용해서 불러올꺼임)-->
<script>
    // 임시로
    let bno = 1;

    // 댓글 가져오기 함수
    let showList = function (bno) {
        $.ajax({
            type:'GET',       // 요청 메서드
            url: '/JTI/comments?bno=' + bno,  // 요청 URI
            dataType : 'json', // 전송받을 데이터의 타입, 생략해도 됨: 기본이 json
            success : function(result) {
                // result가 오면 commentList에 담기
                // 댓글목록 가져온 것을 commmentList에 담게 됨
                // 들어오는 배열을 toHtml이라는 함수를 이용해서 <li>태그로 만든다음 그것을 commentList에 넣는다.
                $("#commentList").html(toHtml(result));
            },
            error   : function(){ alert("error") } // 에러가 발생했을 때, 호출될 함수
        }); // $.ajax()

    }

    $(document).ready(function(){


        $("#sendBtn").click(function() {
            showList(bno);

        });

        // $(".delBtn").click(function () {
        $("#commentList").on("click", ".delBtn", function () {
            // li가 버튼의 부모
            let cno = $(this).parent().attr("data-cno");
            let bno = $(this).parent().attr("data-bno");

            $.ajax({
                type: 'DELETE',
                url: '/JTI/comments/' + cno + '?bno=' + bno,
                success : function (result) {
                    alert(result)
                    // 삭제된 다음에 새로 갱신되어야 함
                    showList(bno);
                }
            });
        });
    });

    // 배열들어온 것을 <li>태그를 이용해서 전체 <ul>를 구성한 다음에 그것을 넣을 것이다.
    let toHtml = function (comments) {
        let tmp = "<ul>";

        // 댓글 하나하나 들고와서 tmp에 쌓는다.
        comments.forEach(function (comment) {
            tmp += '<li data-cno=' + comment.cno
            tmp += ' data-pcno=' + comment.pcno
            tmp += ' data-bno=' + comment.bno + '>'
            // span태그에 넣어야 나중에 작성자만 따로 읽어오기 쉽다.
            tmp += ' commenter=<span class="commenter">' + comment.commenter + '</span>'
            tmp += ' comment=<span class="comment">' + comment.comment + '</span>';
            tmp += ' up_date=' + comment.up_date
            tmp += '<button class="delBtn">삭제</button>'
            tmp += '</li>'
        })

        return tmp + "</ul>"; // ul을 html로 반환한다.
    }
</script>
</body>
</html>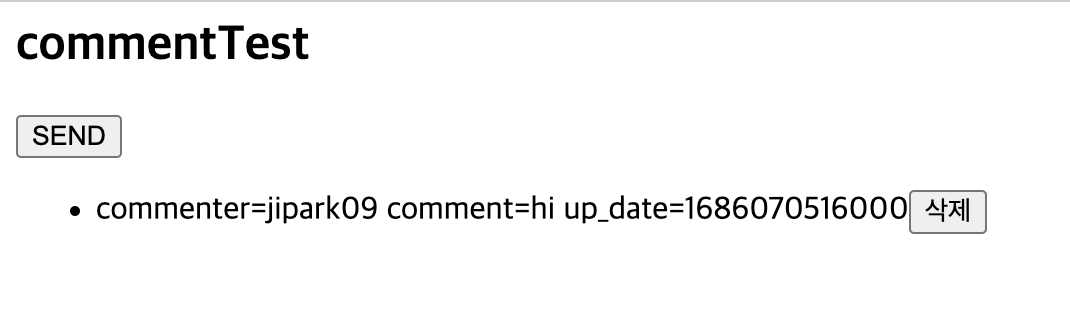
✔️ 댓글 쓰기 구현
- 쓰기 할려면 input 태그를 만들어 줘야 한다.
        $("#sendBtn").click(function() {
    	    // input 태그의 내용을 comment에 담는다.
	        let comment = $("input[name=comment]").val();

          	// 댓글 공백 방지
          	if(comment.trim() == '') {
                alert("댓글을 입력해주세요");
                $("input[name=comment]").focus();
                return;
            }

            // 쓰기
            $.ajax({
                type: 'POST',
                url: '/JTI/comments?bno=' + bno,
                headers: {"content-type" : "application/json"},
                data : JSON.stringify({bno:bno, comment:comment}), // 전송할 데이터를 JSON으로!
                success : function (result) {
                    alert(result)
                    showList(bno); //  쓰기가 성공했을 때 보여줄꺼임
                }


            });

});-
입력할 내용을 보내주면 알림창뜨고 화면에 댓글 목록 보여줌. 댓글이 달렸으니까 갱신해줘야 함
-
input 태그의 내용을 comment에 담고 그 comment를 JSON으로 자바스크립트 객체로 만들어서 보낸다. 그럼 Controller가 받는다.
-
댓글에 공백으로는 전송하지 못하게 조건문을 넣는다.
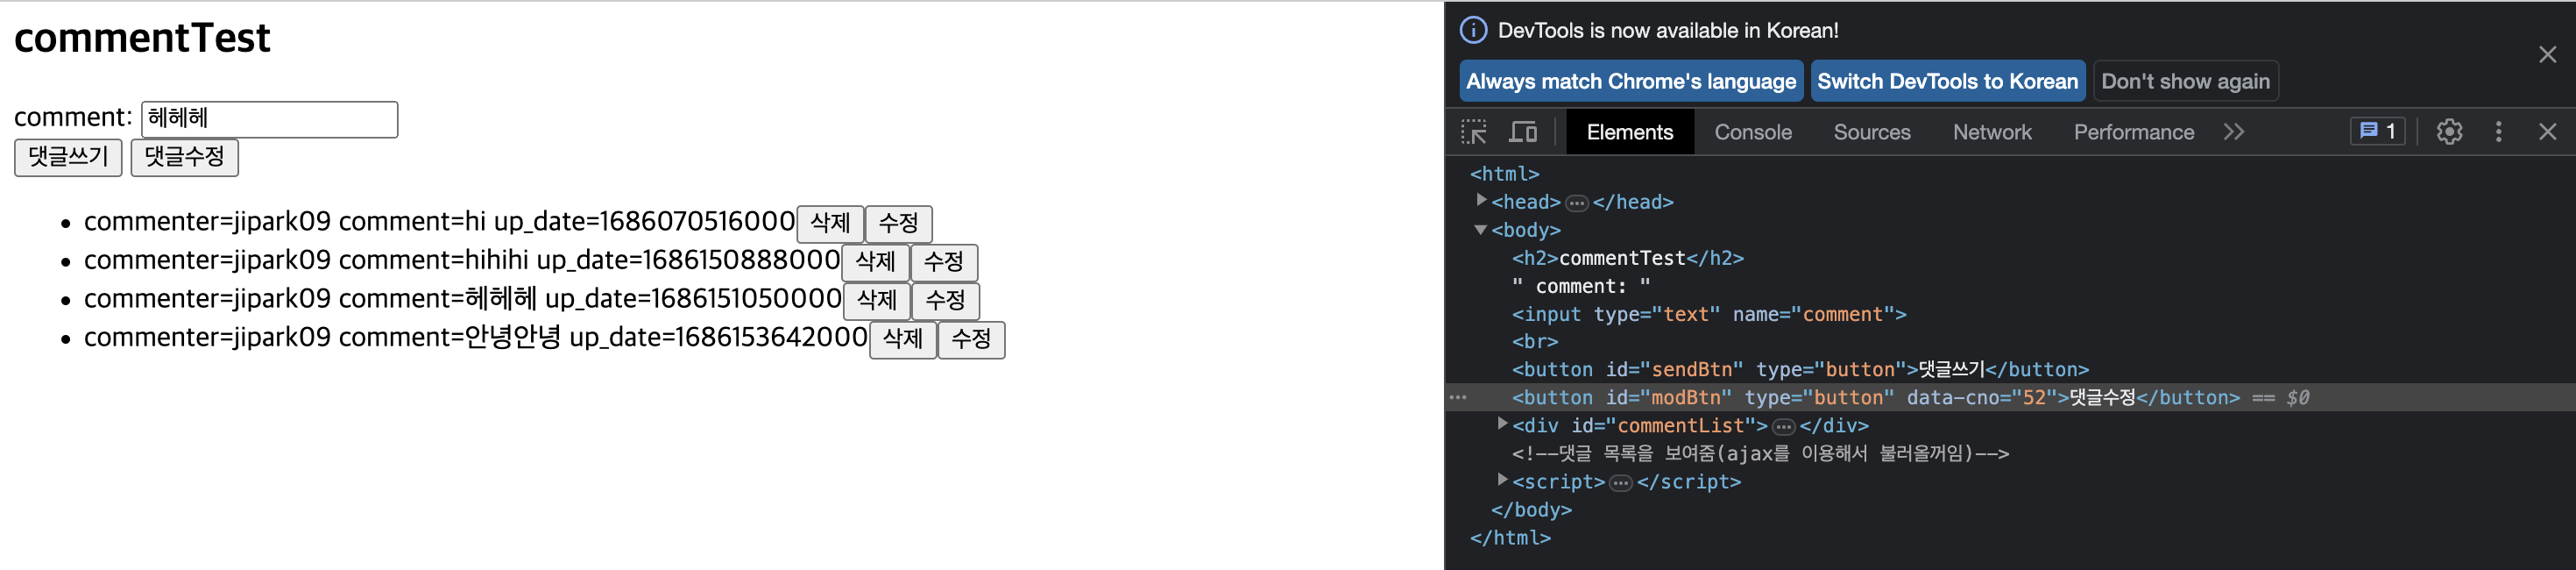
✔️ 댓글 수정 구현
- 먼저 처음부터 댓글 목록이 다 뜨게 만든다.
 $(document).ready(function(){
	showList(bno);
   ...
tmp += '<button class="modBtn">수정</button>';- document 시작할 때 바로 댓글 목록 보여주기
- 수정 버튼 만들어주기
- 해당 댓글에 수정을 누르면 comment input value에 comment 나오게 하기
- SEND 옆에 MODIFY 만들어서 수정 처리하는 버튼 만들기
➡️ 댓글쓰기 / 댓글수정으로 변경!
1️⃣ comment의 내용을 input 값에 넣어주기
2️⃣ Controller에 cno 전달하기
		$("#commentList").on("click", ".modBtn", function () {
            let cno = $(this).parent().attr("data-cno");
            let comment = $("span.comment", $(this).parent()).text();

            //1. comment의 내용을 input에 뿌려주기
            $("input[name=comment]").val(comment);
            //2. cno 번호를 전달하기
            $("#modBtn").attr("data-cno", cno);

        })
💡 해당 부모의 span 태그 안에 있는 comment에서 해당 내용 들고오기
$("span.comment", $(this).parent()).text()
: 부모는<li>를 의미
- 수정할 때는 cno만 있으면 됨
💡 버튼에다가 속성 추가
$("#modBtn").attr("data-cno", cno);
: 버튼을 클릭했을 때 해당 버튼에 연결된 데이터를 가져와서 특정 작업을 수행하는 등의 동작을 구현할 수 있다. 또한 속성에 저장된 정보를 활용하여 동적으로 콘텐츠를 업데이트하거나 상태를 변경하는 등의 작업을 수행할 수 있다.
3️⃣ 댓글 수정 버튼 눌렀을 때, 처리하는 함수 만들기
		$("#modBtn").click(function() {
            let comment = $("input[name=comment]").val();
            let cno = $(this).attr("data-cno");

            if(comment.trim() == '') {
                alert("댓글을 입력해주세요");
                $("input[name=comment]").focus();
                return;
            }

            // 쓰기
            $.ajax({
                type: 'PATCH',
                url: '/JTI/comments' + cno,
                headers: {"content-type" : "application/json"},
                data : JSON.stringify({cno:cno, comment:comment}), // 전송할 데이터를 JSON으로!
                success : function (result) {
                    alert(result);
                    showList(bno); //  수정이 성공했을 때 보여줄꺼임
                },
                error : function () {alert("error")}
            });
        });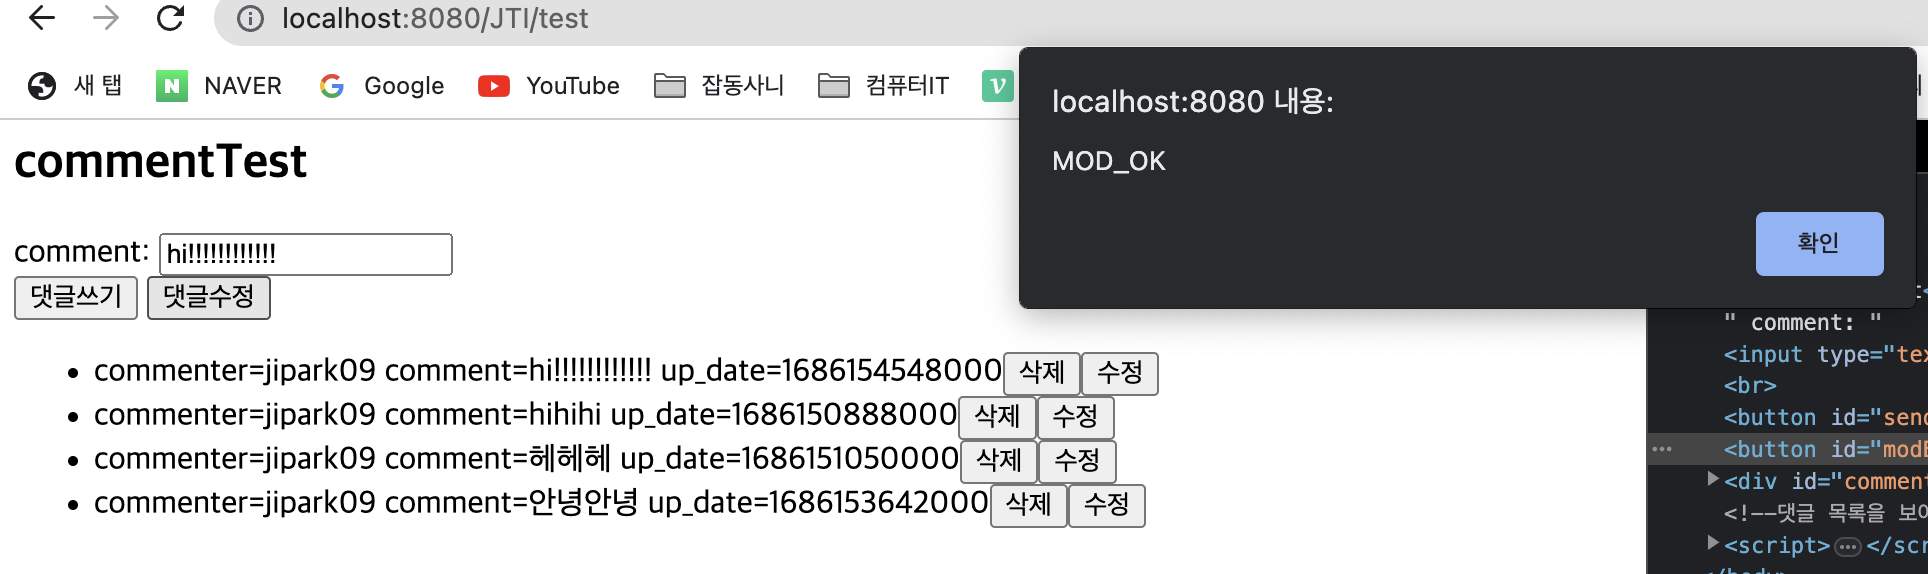
✔️ view code
<%@ page contentType="text/html;charset=UTF-8" language="java" %>
<html>
<head>
    <title>Title</title>
    <script src="https://code.jquery.com/jquery-1.11.3.js"></script>
</head>
<body>
<h2>commentTest</h2>
comment: <input type="text" name="comment"><br>
<button id="sendBtn" type="button">댓글쓰기</button>
<button id="modBtn" type="button">댓글수정</button>
<div id="commentList"></div> <!--댓글 목록을 보여줌(ajax를 이용해서 불러올꺼임)-->
<script>
    // 임시로
    let bno = 1;

    // 댓글 가져오기 함수
    let showList = function (bno) {
        $.ajax({
            type:'GET',       // 요청 메서드
            url: '/JTI/comments?bno=' + bno,  // 요청 URI
            dataType : 'json', // 전송받을 데이터의 타입, 생략해도 됨: 기본이 json
            success : function(result) {
                // result가 오면 commentList에 담기
                // 댓글목록 가져온 것을 commmentList에 담게 됨
                // 들어오는 배열을 toHtml이라는 함수를 이용해서 <li>태그로 만든다음 그것을 commentList에 넣는다.
                $("#commentList").html(toHtml(result));
            },
            error   : function(){ alert("error") } // 에러가 발생했을 때, 호출될 함수
        }); // $.ajax()

    }

    // document 시작
    $(document).ready(function(){
        showList(bno);

        $("#sendBtn").click(function() {
            let comment = $("input[name=comment]").val();

            if(comment.trim() == '') {
                alert("댓글을 입력해주세요");
                $("input[name=comment]").focus();
                return;
            }

            // 쓰기
            $.ajax({
                type: 'POST',
                url: '/JTI/comments?bno=' + bno,
                headers: {"content-type" : "application/json"},
                data : JSON.stringify({bno:bno, comment:comment}), // 전송할 데이터를 JSON으로!
                success : function (result) {
                    alert(result);
                    showList(bno); //  쓰기가 성공했을 때 보여줄꺼임
                },
                error : function () {alert("error")}
            });
        });

        // $(".delBtn").click(function () {
        $("#commentList").on("click", ".delBtn", function () {
            // li가 버튼의 부모
            let cno = $(this).parent().attr("data-cno");
            let bno = $(this).parent().attr("data-bno");

            $.ajax({
                type: 'DELETE',
                url: '/JTI/comments/' + cno + '?bno=' + bno,
                success : function (result) {
                    alert(result)
                    // 삭제된 다음에 새로 갱신되어야 함
                    showList(bno);
                }
            });
        });

        $("#commentList").on("click", ".modBtn", function () {
            let cno = $(this).parent().attr("data-cno");
            let comment = $("span.comment", $(this).parent()).text();

            //1. comment의 내용을 input에 뿌려주기
            $("input[name=comment]").val(comment);
            //2. cno 번호를 전달하기
            $("#modBtn").attr("data-cno", cno);

        })

        $("#modBtn").click(function() {
            let comment = $("input[name=comment]").val();
            let cno = $(this).attr("data-cno");

            if(comment.trim() == '') {
                alert("댓글을 입력해주세요");
                $("input[name=comment]").focus();
                return;
            }

            // 쓰기
            $.ajax({
                type: 'PATCH',
                url: '/JTI/comments/' + cno,
                headers: {"content-type" : "application/json"},
                data : JSON.stringify({cno:cno, comment:comment}), // 전송할 데이터를 JSON으로!
                success : function (result) {
                    alert(result);
                    showList(bno); //  수정이 성공했을 때 보여줄꺼임
                },
                error : function () {alert("error")}
            });
        });
    });

    // 배열들어온 것을 <li>태그를 이용해서 전체 <ul>를 구성한 다음에 그것을 넣을 것이다.
    let toHtml = function (comments) {
        let tmp = "<ul>";

        // 댓글 하나하나 들고와서 tmp에 쌓는다.
        comments.forEach(function (comment) {
            tmp += '<li data-cno=' + comment.cno;
            tmp += ' data-pcno=' + comment.pcno;
            tmp += ' data-bno=' + comment.bno + '>';
            // span태그에 넣어야 나중에 작성자만 따로 읽어오기 쉽다.
            tmp += ' commenter=<span class="commenter">' + comment.commenter + '</span>';
            tmp += ' comment=<span class="comment">' + comment.comment + '</span>';
            tmp += ' up_date=' + comment.up_date;
            tmp += '<button class="delBtn">삭제</button>';
            tmp += '<button class="modBtn">수정</button>';
            tmp += '</li>';
        })

        return tmp + "</ul>"; // ul을 html로 반환한다.
    }
</script>
</body>
</html>
Reference
: https://fastcampus.co.kr/dev_academy_nks

Fill in my own colorful colors🎨