css import
-
CSS 파일을 import해서 사용
-
css 파일이 분리되더라도 namespace를 나눌 수 없기 때문에 네이밍이 겹칠 경우 cascading rule에 따라 생각했던 스타일과 달라질 수도 있다.

-
따라서 개발자가 스타일을 겹치지 않도록 스스로 관리해야 한다.
import './button.css';

function Button() {
  return (
    <button className="body-button">Submit</button>
  )
}
/* ./button.css */
.body-button {
background-color: blue;
color: white;
width: 140px;
height: 40px;
}css module
- 하나의 css module 파일 안에 작성한 스타일은 하나의 파일 namespace로 관리하기 때문에 위에서 스타일이 겹치는 상황을 해결할 수 있다.
import styles from "./input-with-button.module.css";

export function InputWithButton() {
  return (
    <div className={styles.container}>
    	<input type="text"name="text"className={styles.input}/>
        <button className={styles.button}>Submit</button>
    </div>
  );
}
/* ./input-with-button.module.css */
.container {
background: rgba(0, 0, 0, 0.05);
margin: 10px;
padding: 5px;
}
.input {
outline: none;
border: none;
background: white;
border-radius: 2px;
color: rgba(0, 0, 0, 0.8);
height: 40px;
}
.button {
background-color: cyan;
color: white;
border: none;
border-radius: 5px;
height: 40px;
width: 140px;
}
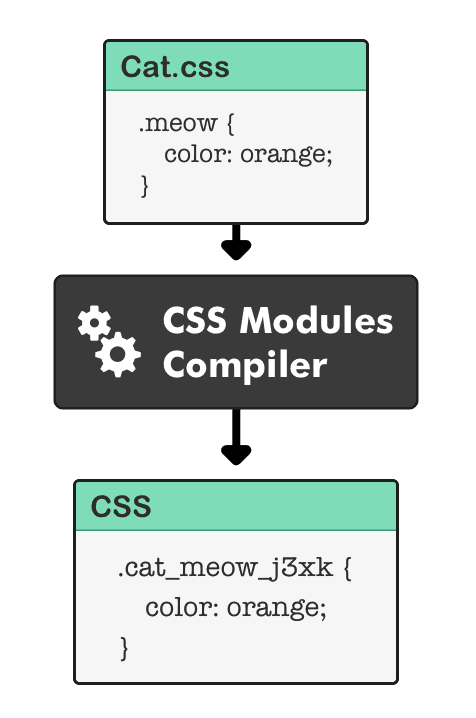
CSS Modules compiler가 중간에서 처리해서 아래와 같이 고유한 네이밍을 가질 수 있다.

Where do you get a CSS Modules compiler?
If you are using Webpack, you already have one.
Just add the "?modules" option to "css-loader"웹팩을 사용중이라면, css-loader의 옵션 중 하나인 modules을 true로 설정해주면 된다.
css in js
-
중복되는 네이밍을 피할 수 있는 것 뿐만 아니라 JavaScript와 CSS 사이의 상수와 함수를 쉽게 공유 할 수 있어 동적인 스타일도 쉽게 구현이 가능하다.
-
벤더 프리픽스(-webkit-, -moz, -webkit- 등)를 자동 생성
function Sample() {
  const[clicked, setClicked] = useState(false);

  return(
    <Container>
      <Button onClick={() => setClicked((bool) => !bool)} clicked={clicked}>Submit</Button>
    </Container>
  );
}

const Button= styled.button`
  background: ${({clicked}) => (clicked? "orangered" : "lavender")};
  color: ${({clicked}) => (clicked? "lavender" : "orangered")};
  padding: 12px 40px;
  border: none;
`;
css in js 방식을 추천??
css in js 방식은 위에서 언급한 장점이외에도 더 많은 장점들이 존재하지만 한편으로는 단점들도 존재한다. 예를 들면 애플의 홈페이지만 봐도 인터랙션한 동작들이 많은데 이때마다 스타일을 동적으로 생성하기 때문에 스타일이 복잡한 컴포넌트에서는 스타일 계산 비용이 커지기 때문에 적절하지 않을 수 있다.
그래서 무조건 css in js 방식을 고집하기보다는 만들어볼 웹 어플리케이션의 특성을 고려하여 적절한 선택을 하는 것이 좋다고 한다.
