display
- 요소의 렌더링 박스 유형을 결정하는 속성
| 키워드 | 설명 |
|---|---|
| block | block레벨 요소로 지정 |
| inline | inline레벨 요소로 지정 |
| inline-block | inline-block레벨 요소로 지정 |
| none | 화면에 표시하지 않음 |
❓ 참조
display : none인 경우 render tree에 없기 때문에 브라우저에서 보이지 않는다.(render tree는 보이는 부분만)
1. block 레벨 요소
- width, height, padding, margin 지정이
가능 - width를 지정해주지 않으면 화면 크기 전체의 가로폭을 차지함
- 항상 다음 줄에서 시작함
📝코드
div:nth-of-type(1) {
      background-color: red;
      color: white;
      padding: 10px;

}
div:nth-of-type(2) {
      background-color: blue;
      color: white;
      width: 300px;
      padding: 10px;

}<div>
<h2>블록 레벨 요소</h2>
<p>width, height 미지정 → width: 100%; height: auto;</p>
</div>
<div>
<h2>블록 레벨 요소</h2>
<p>width: 300px → width: 300px; height: auto;</p>
</div>💻결과

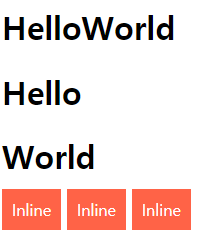
2. inline 레벨 요소
- width, height, margin(상, 하) 지정이
불가능 - content의 너비만큼 차지함
📝코드
span {
      background-color: tomato;
      color: white;
      padding: 10px;
}<h1>Hello<strong>World</strong></h1>
<h1>Hello</h1>
<h1>World</h1>
<span>Inline</span>
<span>Inline</span>
<span>Inline</span>💻결과

3. inline-block 레벨 요소
- block 레벨 요소와 동일하게 width, height, padding, margin 지정이
가능 - width를 지정해주지 않으면 content의 너비만큼 차지함
📝코드
.inline-block {
      display: inline-block;
}

.box1 {
      background-color: red;
      color: white;
      width: 100px;
}

.box2 {
      background-color: blue;
      color: white;
}<div class="inline-block box1">inline-block width 100px</div>
<div class="inline-block box2">inline-block</div>
💻결과

❓ 참조
- inline-block 레벨 요소 뒤에 공백(엔터, 스페이스 등)이 있는 경우, 정의하지 않은 space(4px)가 자동 지정
visibility
- 요소를 숨길 것인지 보이게 할 것인지를 결정
| 키워드 | 설명 |
|---|---|
| visible | 요소를 보이게 지정(default) |
| hidden | 요소를 안보이게 지정 |
| collapse | table 요소에 쓰이며 행이나 열이 보이지 않게 지정 |
❓ 참조
display: none은 해당 요소의 공간까지 사라지게 하지만visibility: hidden은 해당 요소의 공간은 사라지지 않고 남아있기 때문에 render tree에 존재
float
- 요소를
보통의 흐름에서 벗어나게 할 때 사용 - 대부분 요소의 display 값을 block으로 변경함 (display 값 변경 예외: inline-table, flex 등)
| 키워드 | 설명 |
|---|---|
| none | 요소를 떠 있게 하지 않게 지정(default) |
| left | 요소를 왼쪽으로 지정 |
| right | 요소를 오른쪽으로 지정 |
📝코드
.box {
      color: white;
      border-radius: 6px;
      width: 100px;
      height: 100px;
      text-align: center;
      line-height: 100px;
}

.b1, .b2 {
      float: left;
}
.b3, .b4 {
      float: right;
}

.b1 {
      background: red;
}
.b2 {
      background: orange;
}
.b3 {
      background: blue;
}
.b4 {
      background: purple;
}<div class="box b1">1</div>
<div class="box b2">2</div>
<div class="box b3">3</div>
<div class="box b4">4</div>💻결과

❓ 참조
float: right경우먼저 기술된 요소가 가장 오른쪽에 출력되므로 출력 순서가 역순
floating 요소는주변 요소에 영향을 주기 때문에 다음 요소에clear 속성을 이용하는 것이 좋다.
clear 속성은 block-level 요소만 적용 가능
