#14 PUT(수정), DELETE(삭제)
CRUD 중 Update 이용해 단어 수정
- CRUD
- Create: POST
- Read: GET
- Update: PUT
- Delete: DELETE
PUT
아는 단어인지 체크/미체크 하는 부분은 상태저장 필요
data.json에서 isDone 필드 업데이트해 수정해줘야함
Word.js _ toggleDone함수 수정
function toggleDone() {
    // setIsDone(!isDone); // 단순하게 state만 바꿔준 코드
    fetch(`http://localhost:3001/words/${word.id}`, {
      method : 'PUT',
      headers : {
        'Content-Type' : 'application/json',
      },
      body : JSON.stringify({
        ...word,
        isDone : !isDone
      }),
    })
    .then(res => {
      if(res.ok) {
        setIsDone(!isDone);
      }
    });
}- fetch 두번째 인자 객체에는 요청의 옵션들을 입력해줌.
- method는 PUT
- Content-Type은 보내는 리소스의 타입을 의미함 → 여기서는 json 형태로 보낼것
- 단순히 데이터를 가지고 오는 GET과 다르게, PUT은 수정을 위한 정보를 실어서 보내줘야함 → body안에 입력 → 기존 데이터 …word에 isDone을 바꿔서 넣어줌(이때 JSON 형변환해줘야함)
- 마지막으로 리턴된 Promise객체 응답이 ok면 상태를 바꿔준다.
DELETE(삭제)
삭제버튼을 누르면 confirm창을 띄워 물어보고, 삭제해보자!!
삭제요청하고, ok응답 받으면 컴포넌트 재렌더링 해줘야 단어 삭제된게 표시된다.
이때 null 리턴 → 아무것도 표현하지 않음
Word.js
import { useState } from "react";

export default function Word({ word: w }) {
	const [word, setWord] = useState(w);

	function del() {
		if(window.confirm('삭제 하시겠습니까?')){
		  fetch(`http://localhost:3001/words/${word.id}`, {
		    method: "DELETE",
	    }).then(res => {
				if(res.ok) {
				  setWord({ id: 0 });
	      }
	    });
	  }
	}

	if(word.id === 0) {
		return null;
	}
}- del함수 만들어서 삭제 버튼에 달아줌
- word 상태선언, 이때 props로 받는 word는 w라는 새로운 변수로 할당해줌
- word: w → props로 넘어온 word를 w라는 변수명으로 사용하겠다는 뜻
- 삭제되면 word의 id를 0으로 변경
- word의 id가 0이면 null 리턴
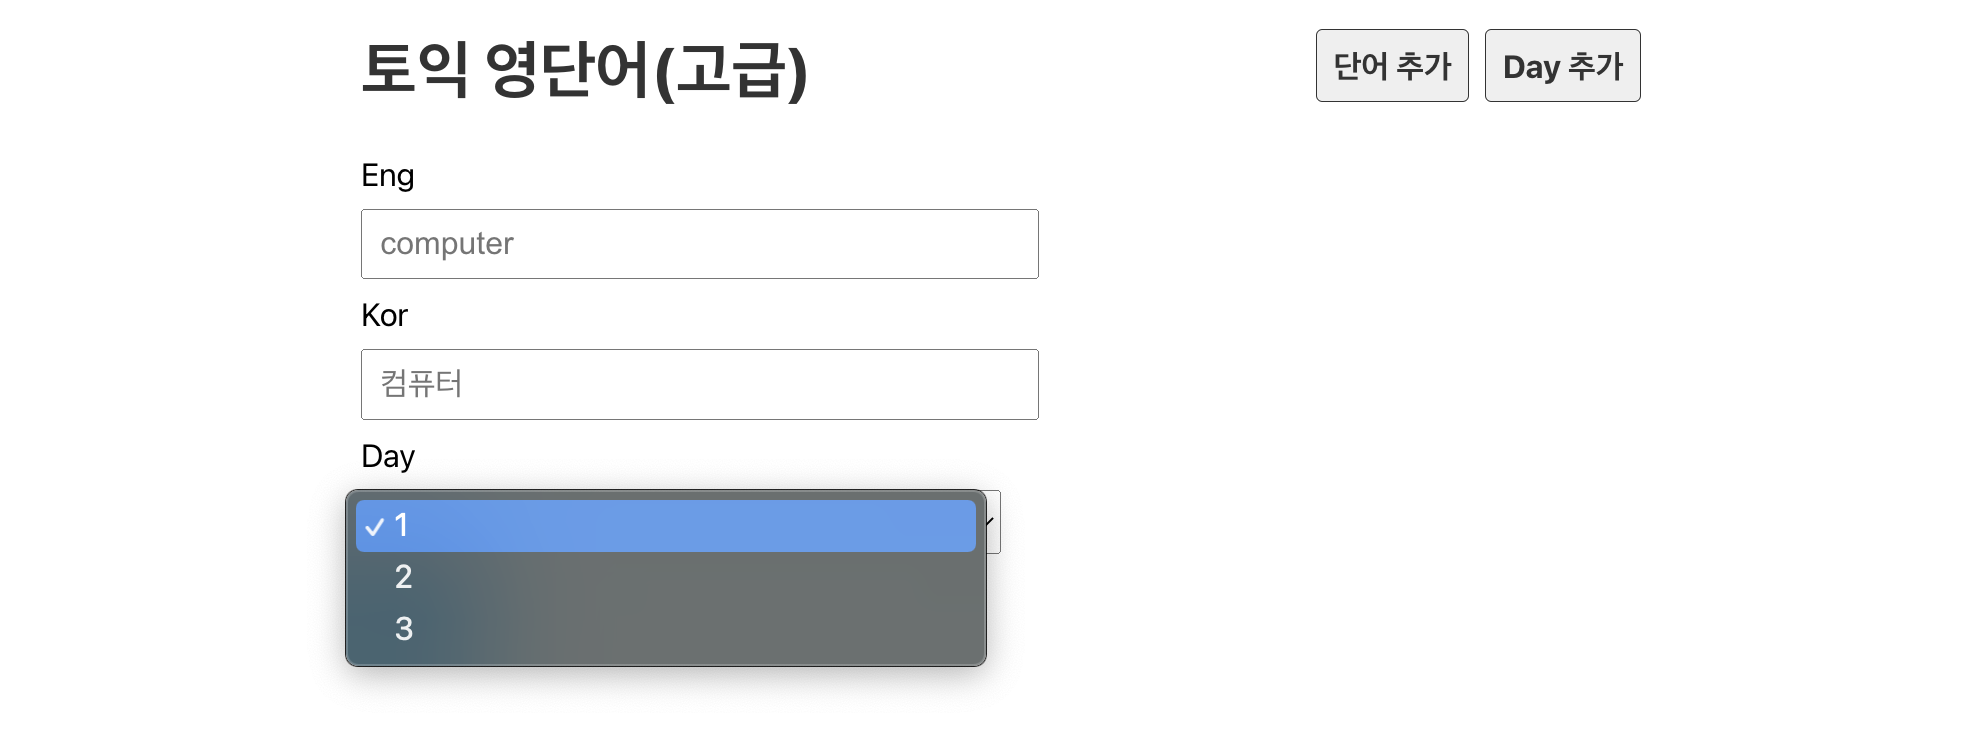
#15 POST(생성), useHistory()
POST: 단어 생성
CreateWord 컴포넌트 생성
CreateWord.js 컴포넌트 생성
App.js
<Route path='/create_word' element={<CreateWord />} />Header.js
<Link to="/create_word" className="link">
	단어 추가
</Link>
App.js와 Header에도 연결해줌
CreateWord.js
import useFetch from '../hooks/useFetch';

export default function CreateWord() {
  const days = useFetch("http://localhost:3001/days");

  // 기본 새로고침 막아줌
  function onSubmit(e) {
    e.preventDefault();
  }
  return (
    <form onSubmit={onSubmit}>
      <div className="input_area">
        <label>Eng</label>
        <input type="text" placeholder="computer" />
      </div>
      <div className="input_area">
        <label>Kor</label>
        <input type="text" placeholder="컴퓨터" />
      </div>
      <div className="input_area">
        <label>Day</label>
        <select>
          {days && days.map(day => (
            <option key={day.id} value={day.day}>
              {day.day}
            </option>
          ))}
        </select>
      </div>
      <button>저장</button>
    </form>
  );
}- 저장버튼 누르면 새로고침되는데, 버튼이 form태그 내에 있어서 그런것.
- 새로고침 막아주기 위해 onSubmit 함수 작성해줌
useRef Hook
DOM에 접근할 수있게 해줌 ex. 스크롤 위치 확인, 포커스 줄때
export default function CreateWord() {
  const days = useFetch("http://localhost:3001/days");

  // 기본 새로고침 막아줌
  function onSubmit(e) {
    e.preventDefault();
  }

  const engRef = useRef(null);
  const korRef = useRef(null);
  const dayRef = useRef(null);

  return (
    <form onSubmit={onSubmit}>
      <div className="input_area">
        <label>Eng</label>
        <input type="text" placeholder="computer" ref={engRef} />
      </div>
      <div className="input_area">
        <label>Kor</label>
        <input type="text" placeholder="컴퓨터" ref={korRef} />
      </div>
      <div className="input_area">
        <label>Day</label>
        <select ref={dayRef}>
          {days && days.map(day => (
            <option key={day.id} value={day.day}>
              {day.day}
            </option>
          ))}
        </select>
      </div>
      <button>저장</button>
    </form>
  );
}
useRef 생성해서 할당해줌
이렇게 연결해주면 돔 요소 생성된 후 접근할 수 있음
저장버튼 클릭하는 시기 → 렌더링 결과가 DOM에 반영된 직후
current 이용하면 해당 요소에 접근 가능
value는 input에 입력된 값을 얻을 수 있음
onSubmit 함수 내 fetch
fetch(`http://localhost:3001/words/`, {
        method : 'POST',
        headers : {
          'Content-Type' : 'application/json',
        },
        body : JSON.stringify({
          day : dayRef.current.value,
          eng : engRef.current.value,
          kor : korRef.current.value,
          isDone : false
        }),
      })
      .then(res => {
        if(res.ok) {
          alert('생성 완료되었습니다');
        }
      });
생성 완료후 해당 day 페이지로 이동하기
또~ 또 ~ 에러 ㅎㅎ
const history = useHistory();

.then(res => {
        if(res.ok) {
          alert('생성 완료되었습니다');
          history.push(`/day/${dayRef.current.value}`)
        }
      });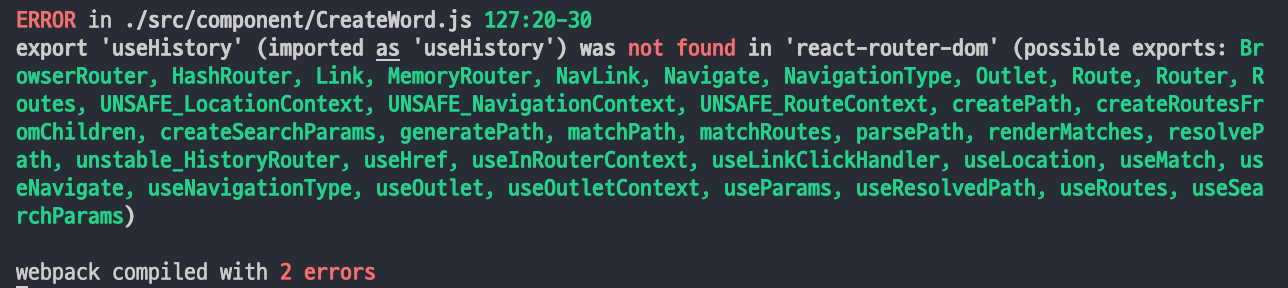
useHistory → useNavigate로 변경되었다고 함…
해결방법
import { useNavigate } from "react-router-dom";

const navigate = useNavigate();

.then(res => {
        if(res.ok) {
          alert('생성 완료되었습니다');
          navigate(`/day/${dayRef.current.value}`);
        }
      });
참고: https://velog.io/@seokkitdo/React-Link-useNavigate
useNavigate로 바꿔주고… 페이지 이동할수 있는 함수를 navigate변수에 저장 후 navigate의 인자로 설정한 path 넘겨주기
- Link와 차이점은 함수 호출을 통해 페이지를 이동하기 때문에 특정 조건 충족할 경우 페이지 이동 하게 할 수 있음.
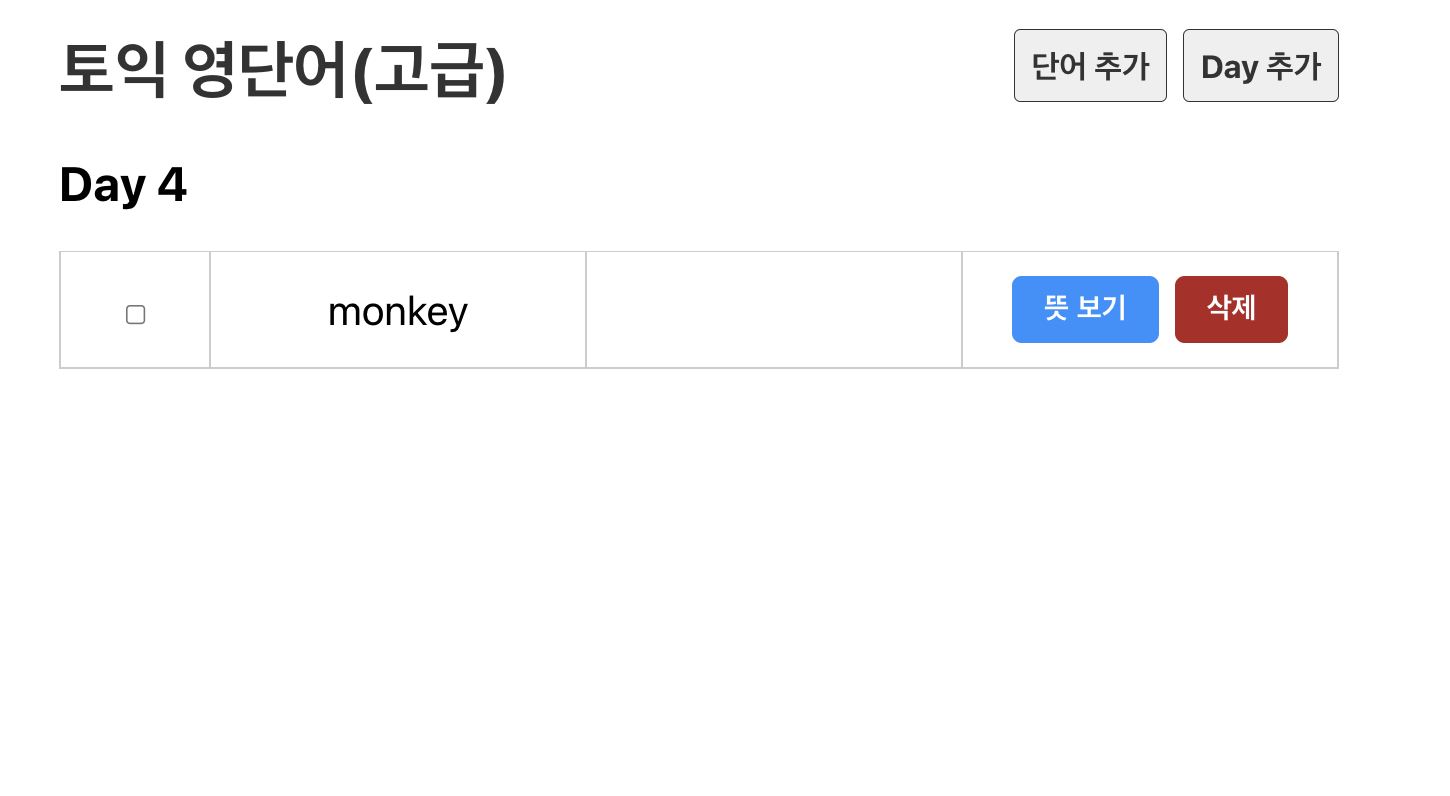
POST: 날짜 생성
CreateDay 컴포넌트 생성
createWord와 마찬가지로 컴포넌트 생성후 App.js, Header.js 연결해줌
CreateDay.js
import { useNavigate } from 'react-router-dom';
import useFetch from '../hooks/useFetch';

export default function CreateDay() {
  const days = useFetch("http://localhost:3001/days");
  const navigate = useNavigate();

  function addDay() {
    fetch(`http://localhost:3001/days/`, {
        method : 'POST',
        headers : {
          'Content-Type' : 'application/json',
        },
        body : JSON.stringify({
          day : days && days.length + 1
        }),
      })
      .then(res => {
        if(res.ok) {
          alert('생성 완료되었습니다');
          navigate(`/`); // 첫 화면으로 가도록
        }
      });
  }
  return <div>
    <h3>현재 일수 : {days && days.length}일</h3>
    <button onClick={addDay}>Day 추가</button>
  </div>;
}

성장하는 developer