우리 연구 Lightweight Part-Aware 3D Texture Editing via 2D-Based Methods의 목표는 2D 기반 파트 인식 기법을 활용해 3D 오브젝트의 특정 부위를 편집할 수 있는 경량화 텍스처링 파이프라인을 구현하는 것이다.
파이프라인 중 핵심 단계인 2D 텍스처 생성을 위해 어떤 모델이 적합할지 검토한 결과, 조건 기반 이미지 생성에 특화된 ControlNet-Inpaint를 실험 대상으로 선정했다.
이 글에서는 WebUI 환경에서 ControlNet-Inpaint를 활용해 실제로 특정 부위를 텍스처링할 수 있는지를 확인한 실험 과정과 CLI로 직접 구현한 과정을 담았다.
1. ControlNet
먼저 ControlNet에 대해 간략히 알아보자.
ControlNet 이란?
-
기존 Text-to-Image 모델인 Stable Diffusion에
스케치, 윤곽선 등 시각적 가이드를 추가해
원하는 형태나 구도를 더 정밀하게 제어할 수 있도록 확장한 모델 -
Stable Diffusion에 외부 조건(condition)을 명시적으로 부여해 이미지 생성 과정을 세밀하게 조정할 수 있도록 만든 확장 네트워크 구조가 특징이다.
-
기존에는 텍스트 프롬프트만으로 이미지를 생성했다면, ControlNet은 다음과 같은 low-level vision 정보를 함께 활영하여 결과물의 형태, 구성, 레이아웃을 더 정확하게 제어한다.
- 윤곽선 (Edge)
- Depth Map
- Pose Estimation
- Segmentation
ControlNet 아키텍처
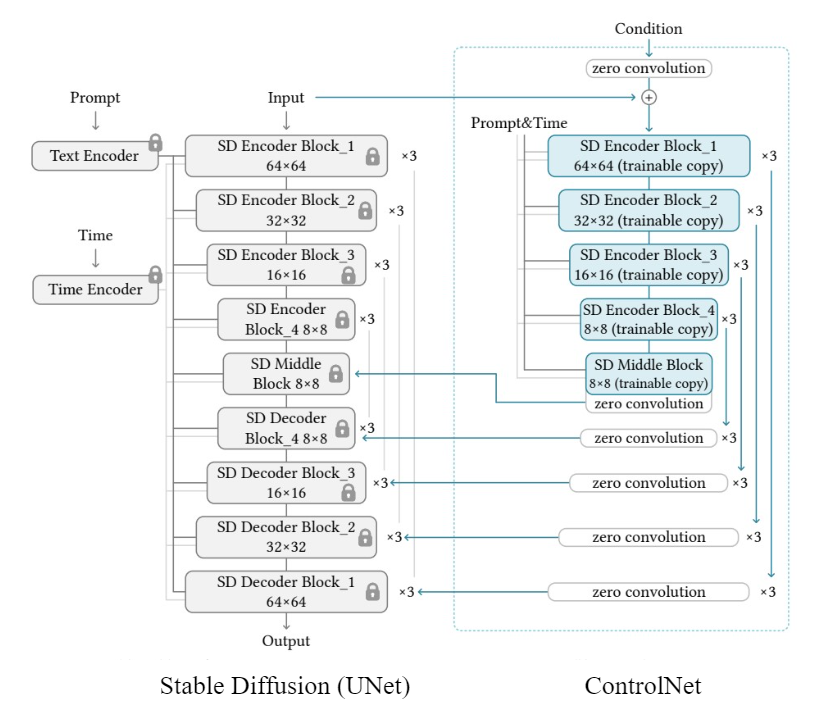
- Base 모델: Stable Diffusion 기반 U-Net 아키텍처
- Control branch: 각 U-Net 블록에 연결된 side branch로, 입력 condition에서 추출된 feature 전달
- Zero Convolution: 초기 가중치를 0으로 설정해 pretrained weight를 손상시키지 않음
ControlNet 의 장점
- 학습 시 base 모델의 weight는 freeze하고 control branch만 fine-tuning하여 학습 효율이 높다.
- 기존 pretrained 모델의 weight를 손상시키지 않아 성능을 유지하면서도 새로운 조건 입력에 유연하게 반응할 수 있다.
2. ControlNet-Inpaint
우리 연구에는 ControlNet 중에서도 Inpaint 에 특화된 모델을 사용했다.
ControlNet-Inpaint 란?
- 특정 부위를 복원하거나 새롭게 생성하는 데 특화된 Inpainting 전용 모델
- 텍스트 프롬프트 외에도
원본 이미지+마스크 정보를 활용하여 특정 영역만 편집 가능
ControlNet-Inpaint 의 특징
- 마스크 기반으로 특정 부위만 변경 가능
- 원본 구조 유지 및 context-aware 생성
- 프롬프트로 스타일·질감·객체 제어 가능
- Part-aware 편집에 최적화
우리 파이프라인에 ControlNet-Inpaint 가 적합한 이유
- 텍스트 + 이미지 + 마스크 조합으로 원하는 부위만 정확하게 텍스처링할 수 있다.
- 빠른 속도 (1장당 5~10초)와 낮은 VRAM 요구사항 (8GB)으로 경량화 목표와 일치한다.
3. Web UI로 ControlNet-Inpaint 실행하기
이제 WebUI 실험을 통해 ControlNet-Inpaint의 성능을 검증해보자.
참고한 자료는 다음과 같다.
Guidelines for using inpaint in A1111
sd-webui-controlnet
stable-diffusion-webui
0. 실행 환경
- GPU: RTX 3070 Ti Laptop
- OS: Windows 11
1. Stable Diffusion Web UI 설치
sd.webui.zip다운로드 후 압축 해제update.bat실행해 최신 버전으로 업데이트run.bat실행 후, 브라우저에서 http://127.0.0.1:7860 접속
2. ControlNet 확장 설치
Extensions→Install from URL- URL 입력 (https://github.com/Mikubill/sd-webui-controlnet.git) →
Install
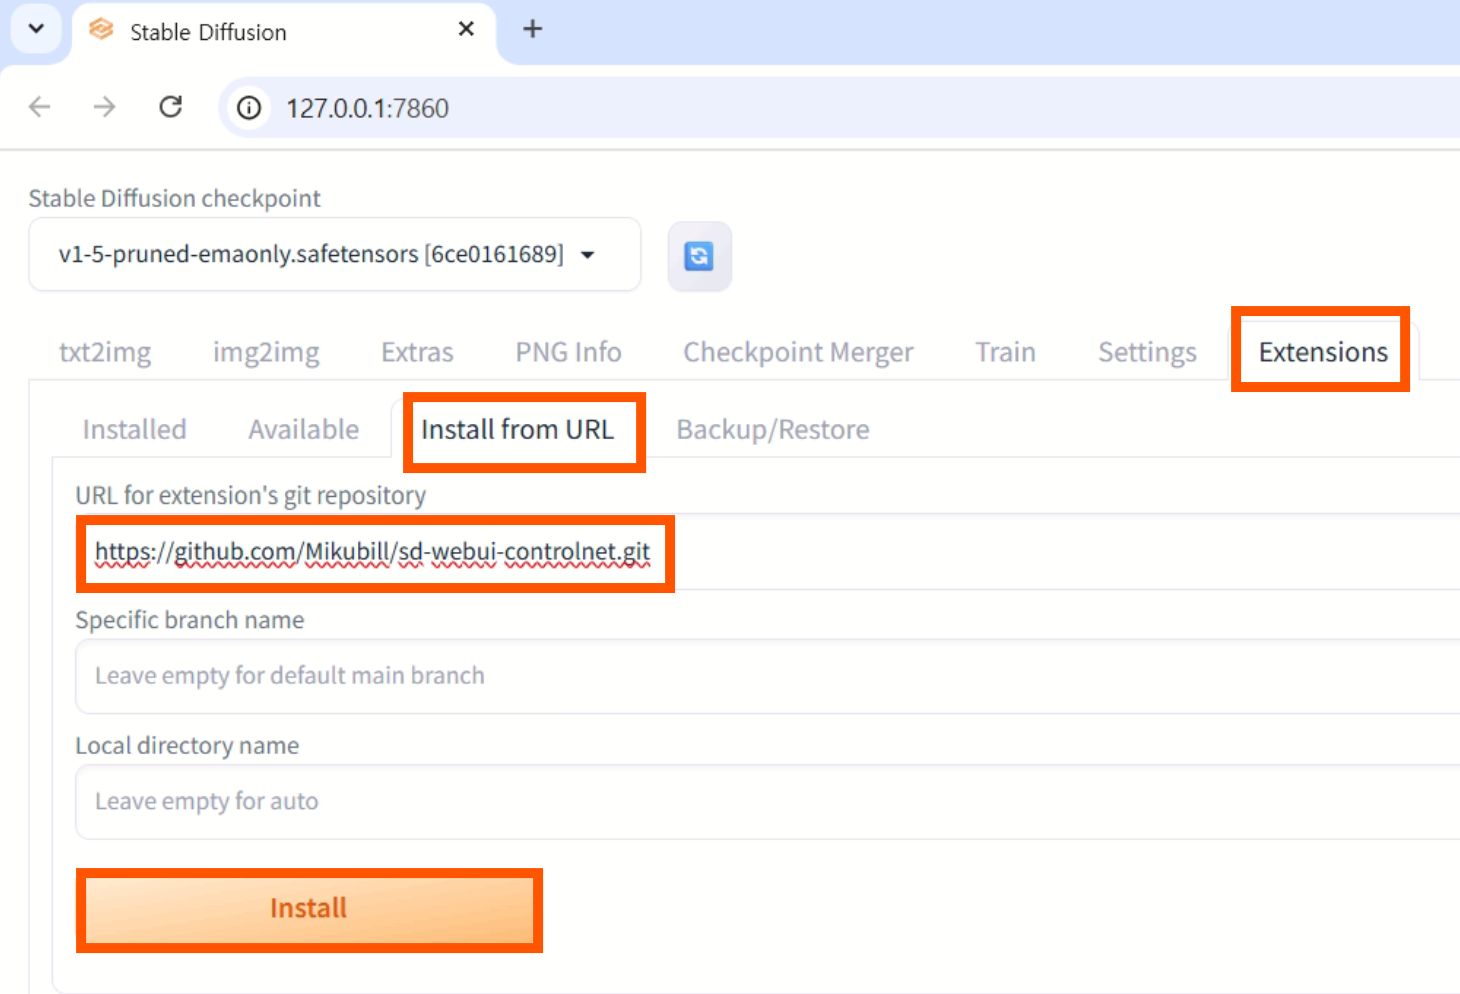
설치 완료 메시지 확인 Installed>Check for updates>Apply and restart UI클릭- 터미널 포함 전체 재시작
3. ControlNet-Inpaint 모델 다운로드
- Safetensors 다운로드
- 저장 경로:
sd.webui\webui\extensions\sd-webui-controlnet\models
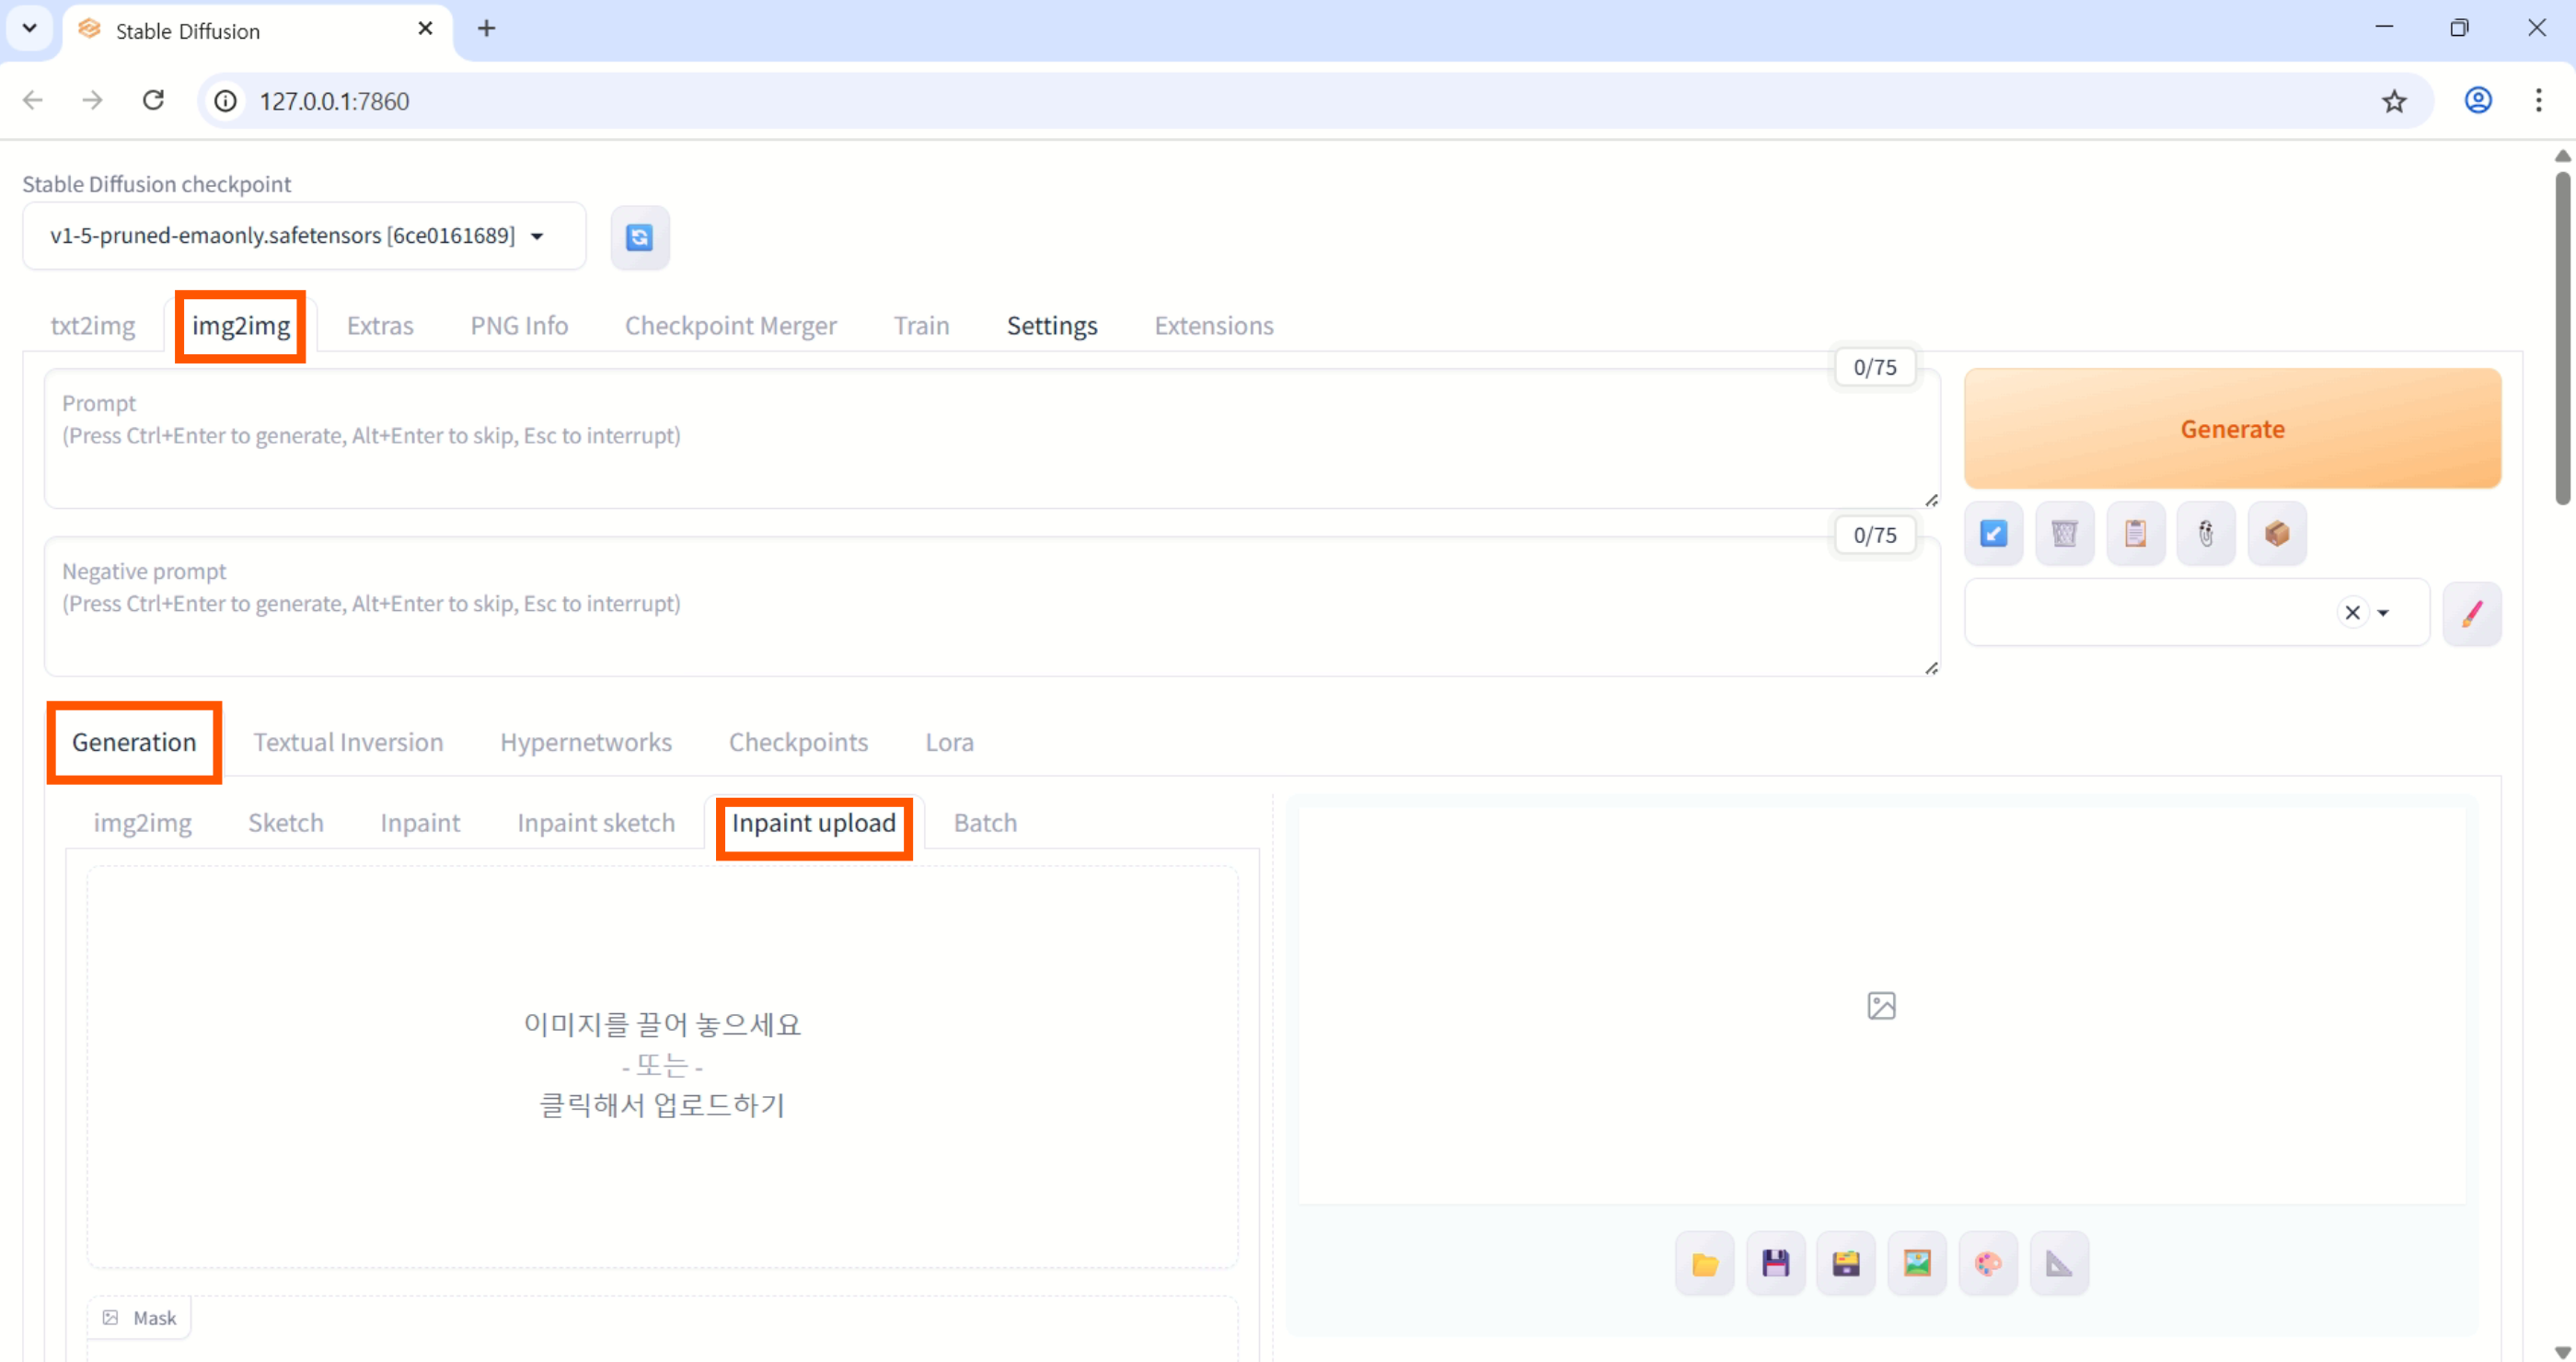
4. Inpaint 실행
-
img2img>Generation>Inpaint Upload
-
원본 이미지, 마스크 이미지 업로드
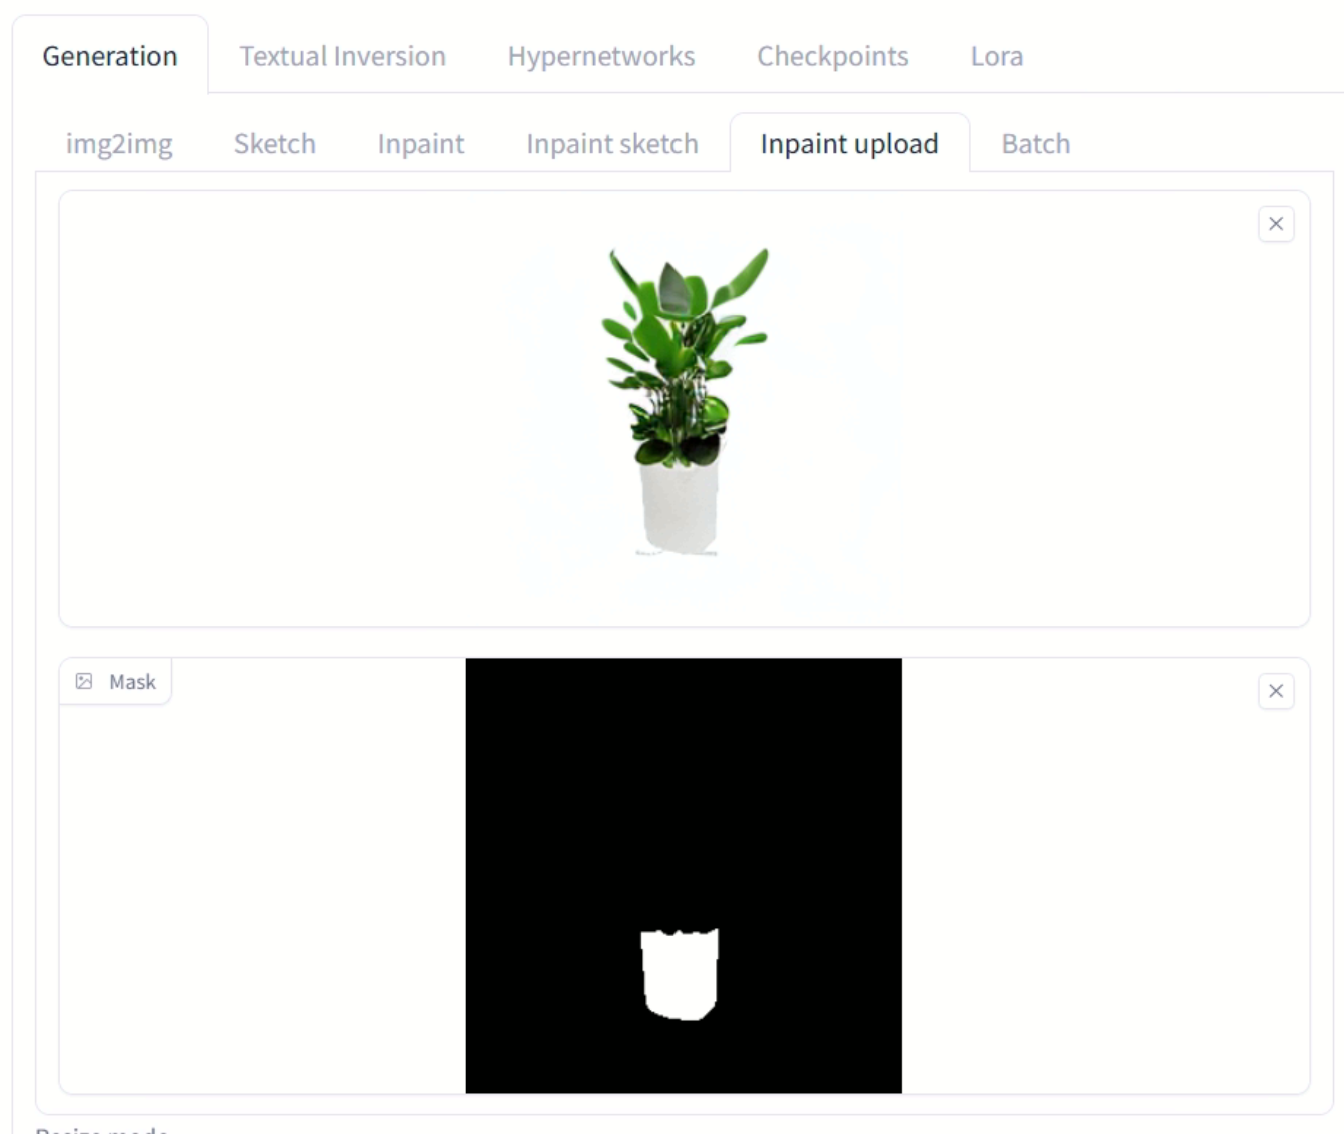
-
ControlNet 활성화
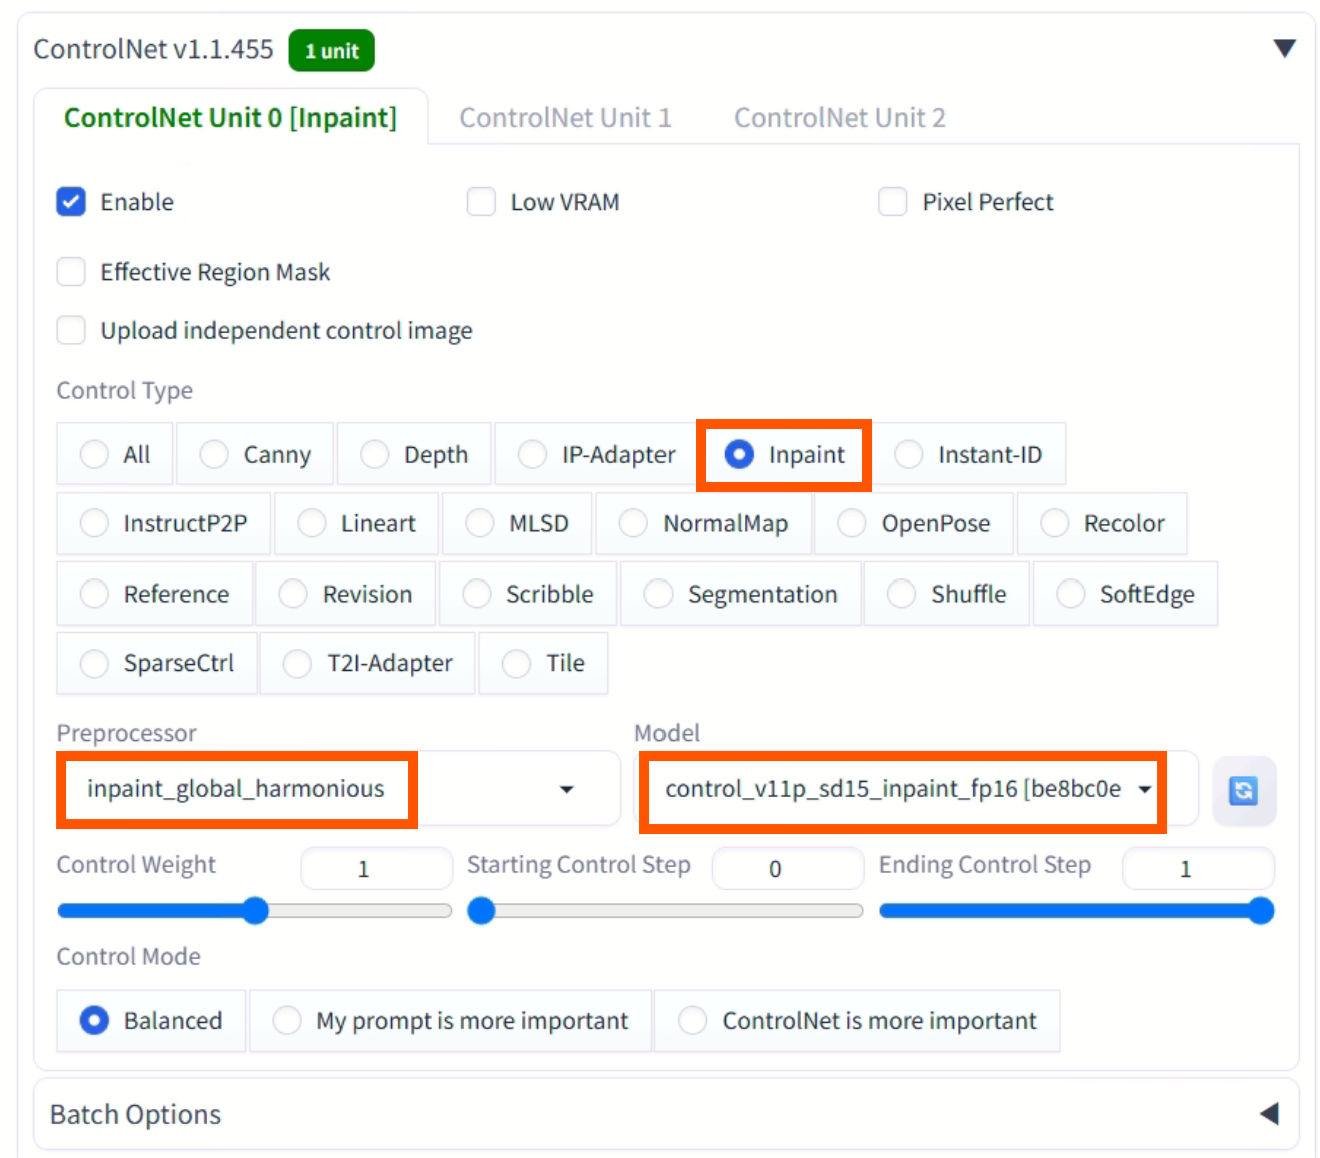
스크롤을 내려보면 ControlNet 패널이 보인다. 확장한 뒤 Enable을 눌러서 활성화해주고, Preprocessor와 Model을 설정해준다.
-
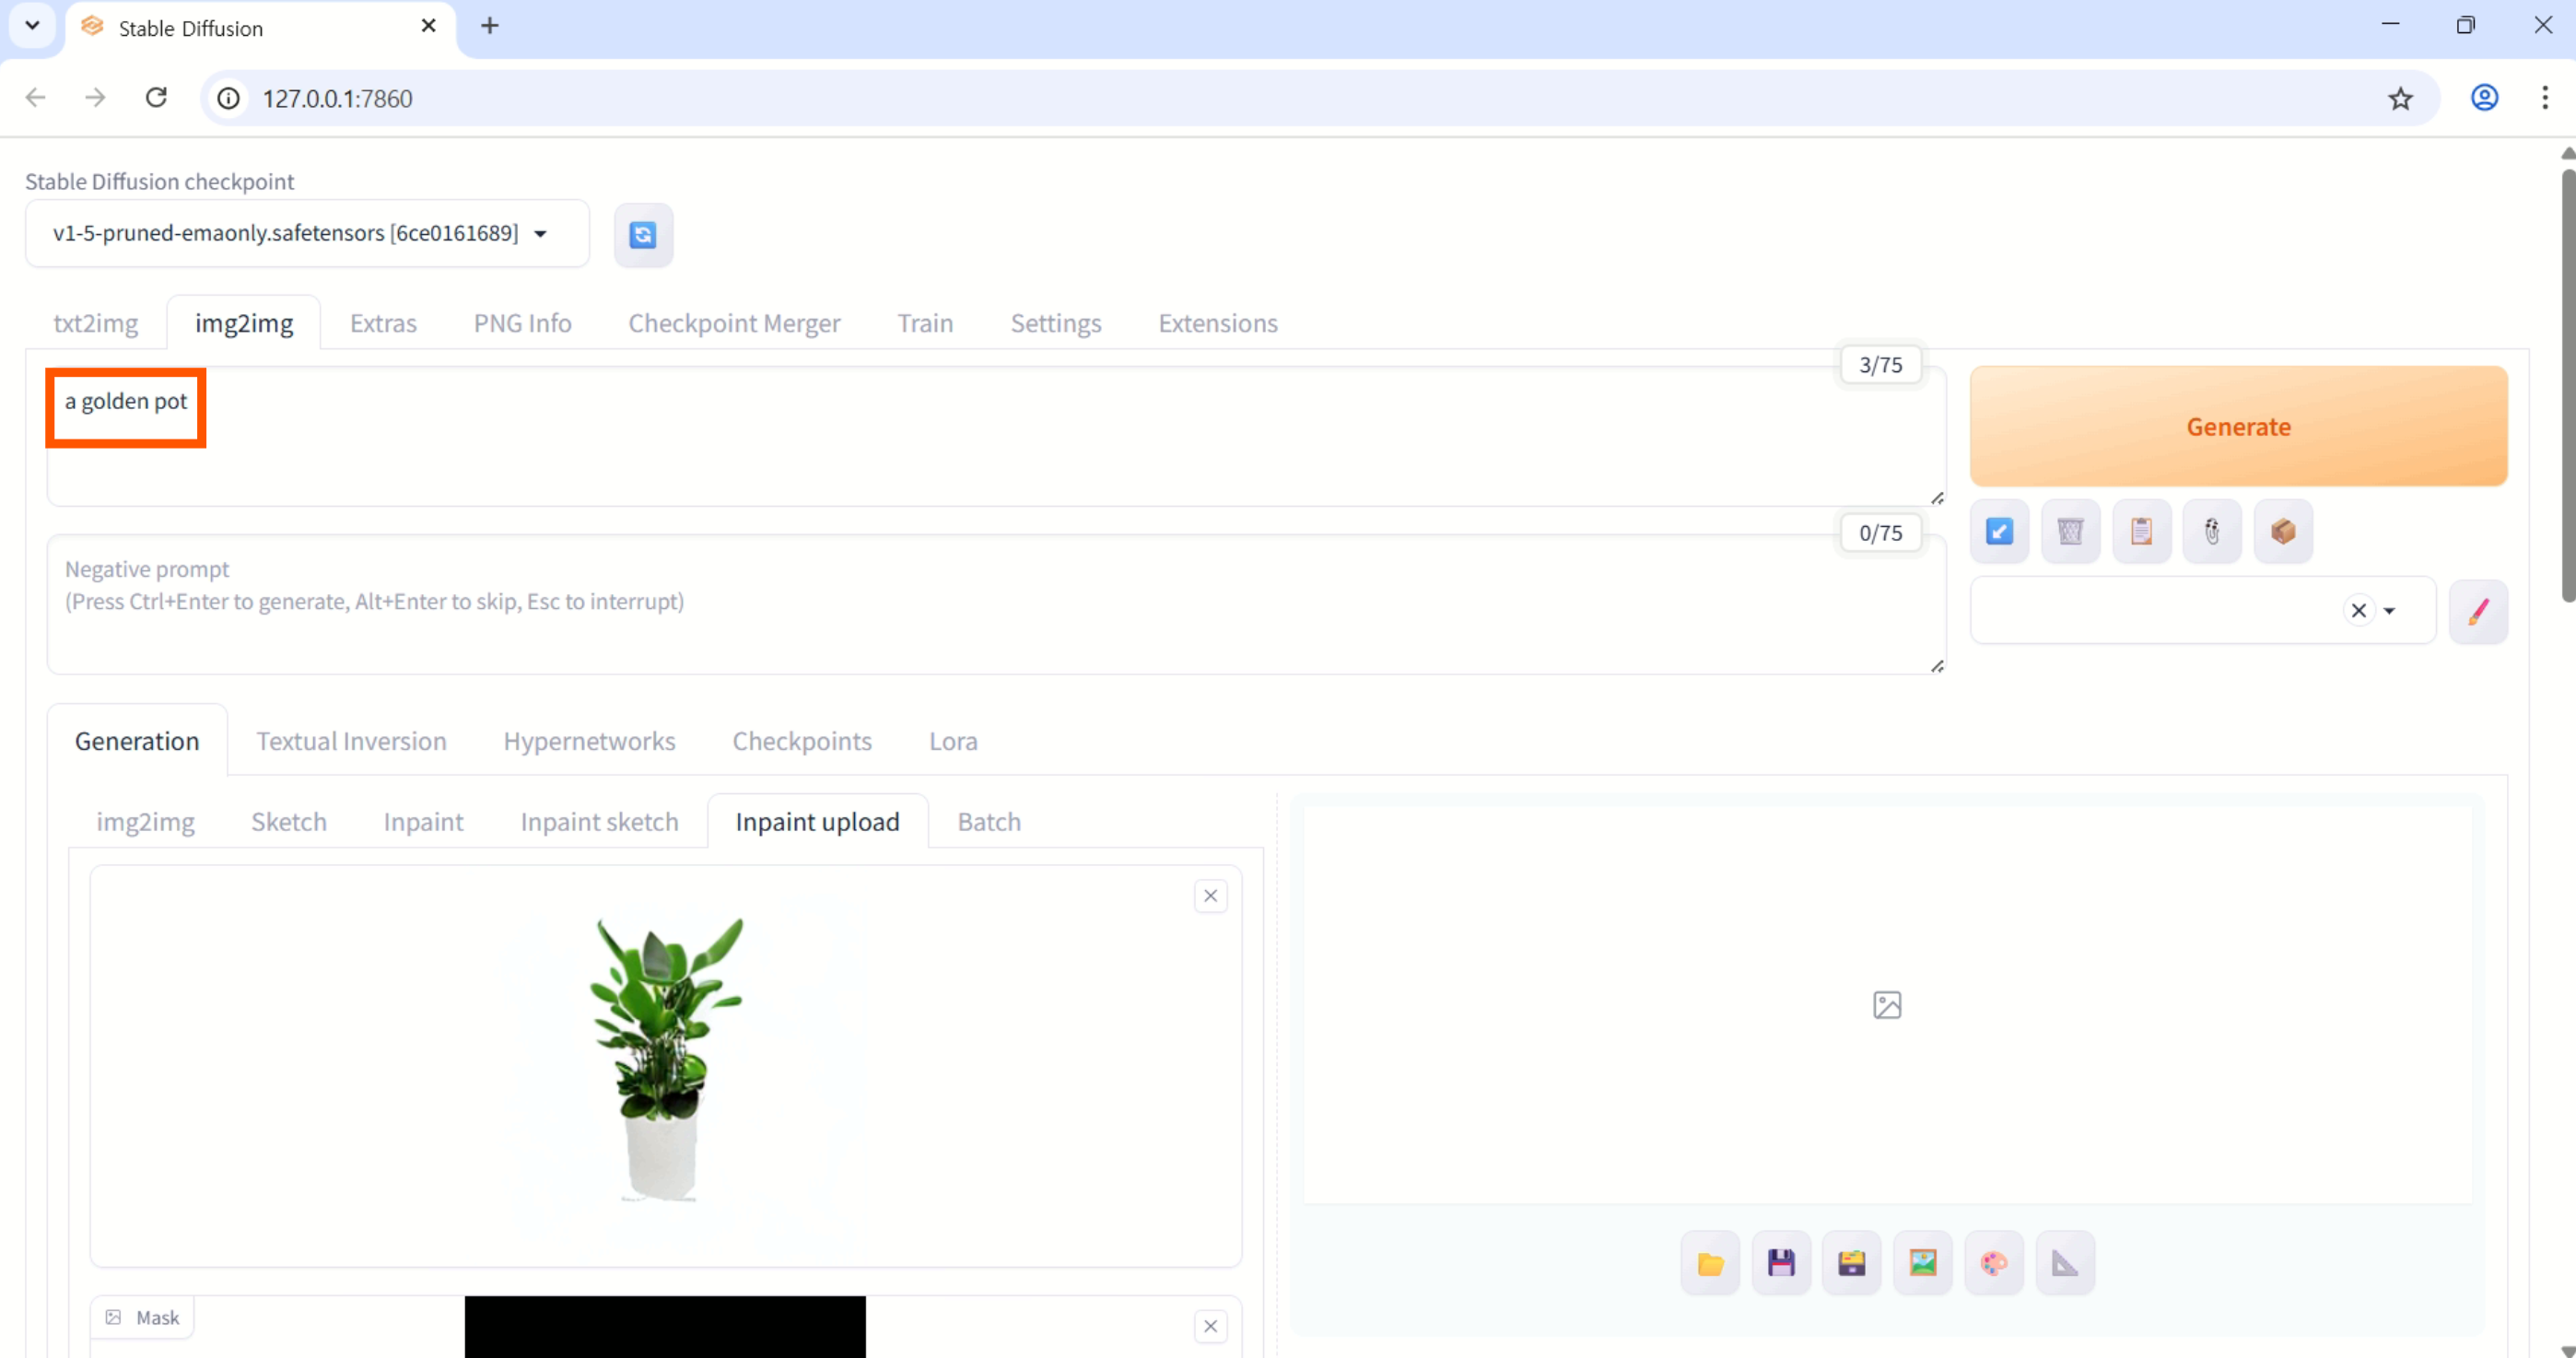
텍스트 프롬프트 입력 후 Generate 클릭
-
실행결과
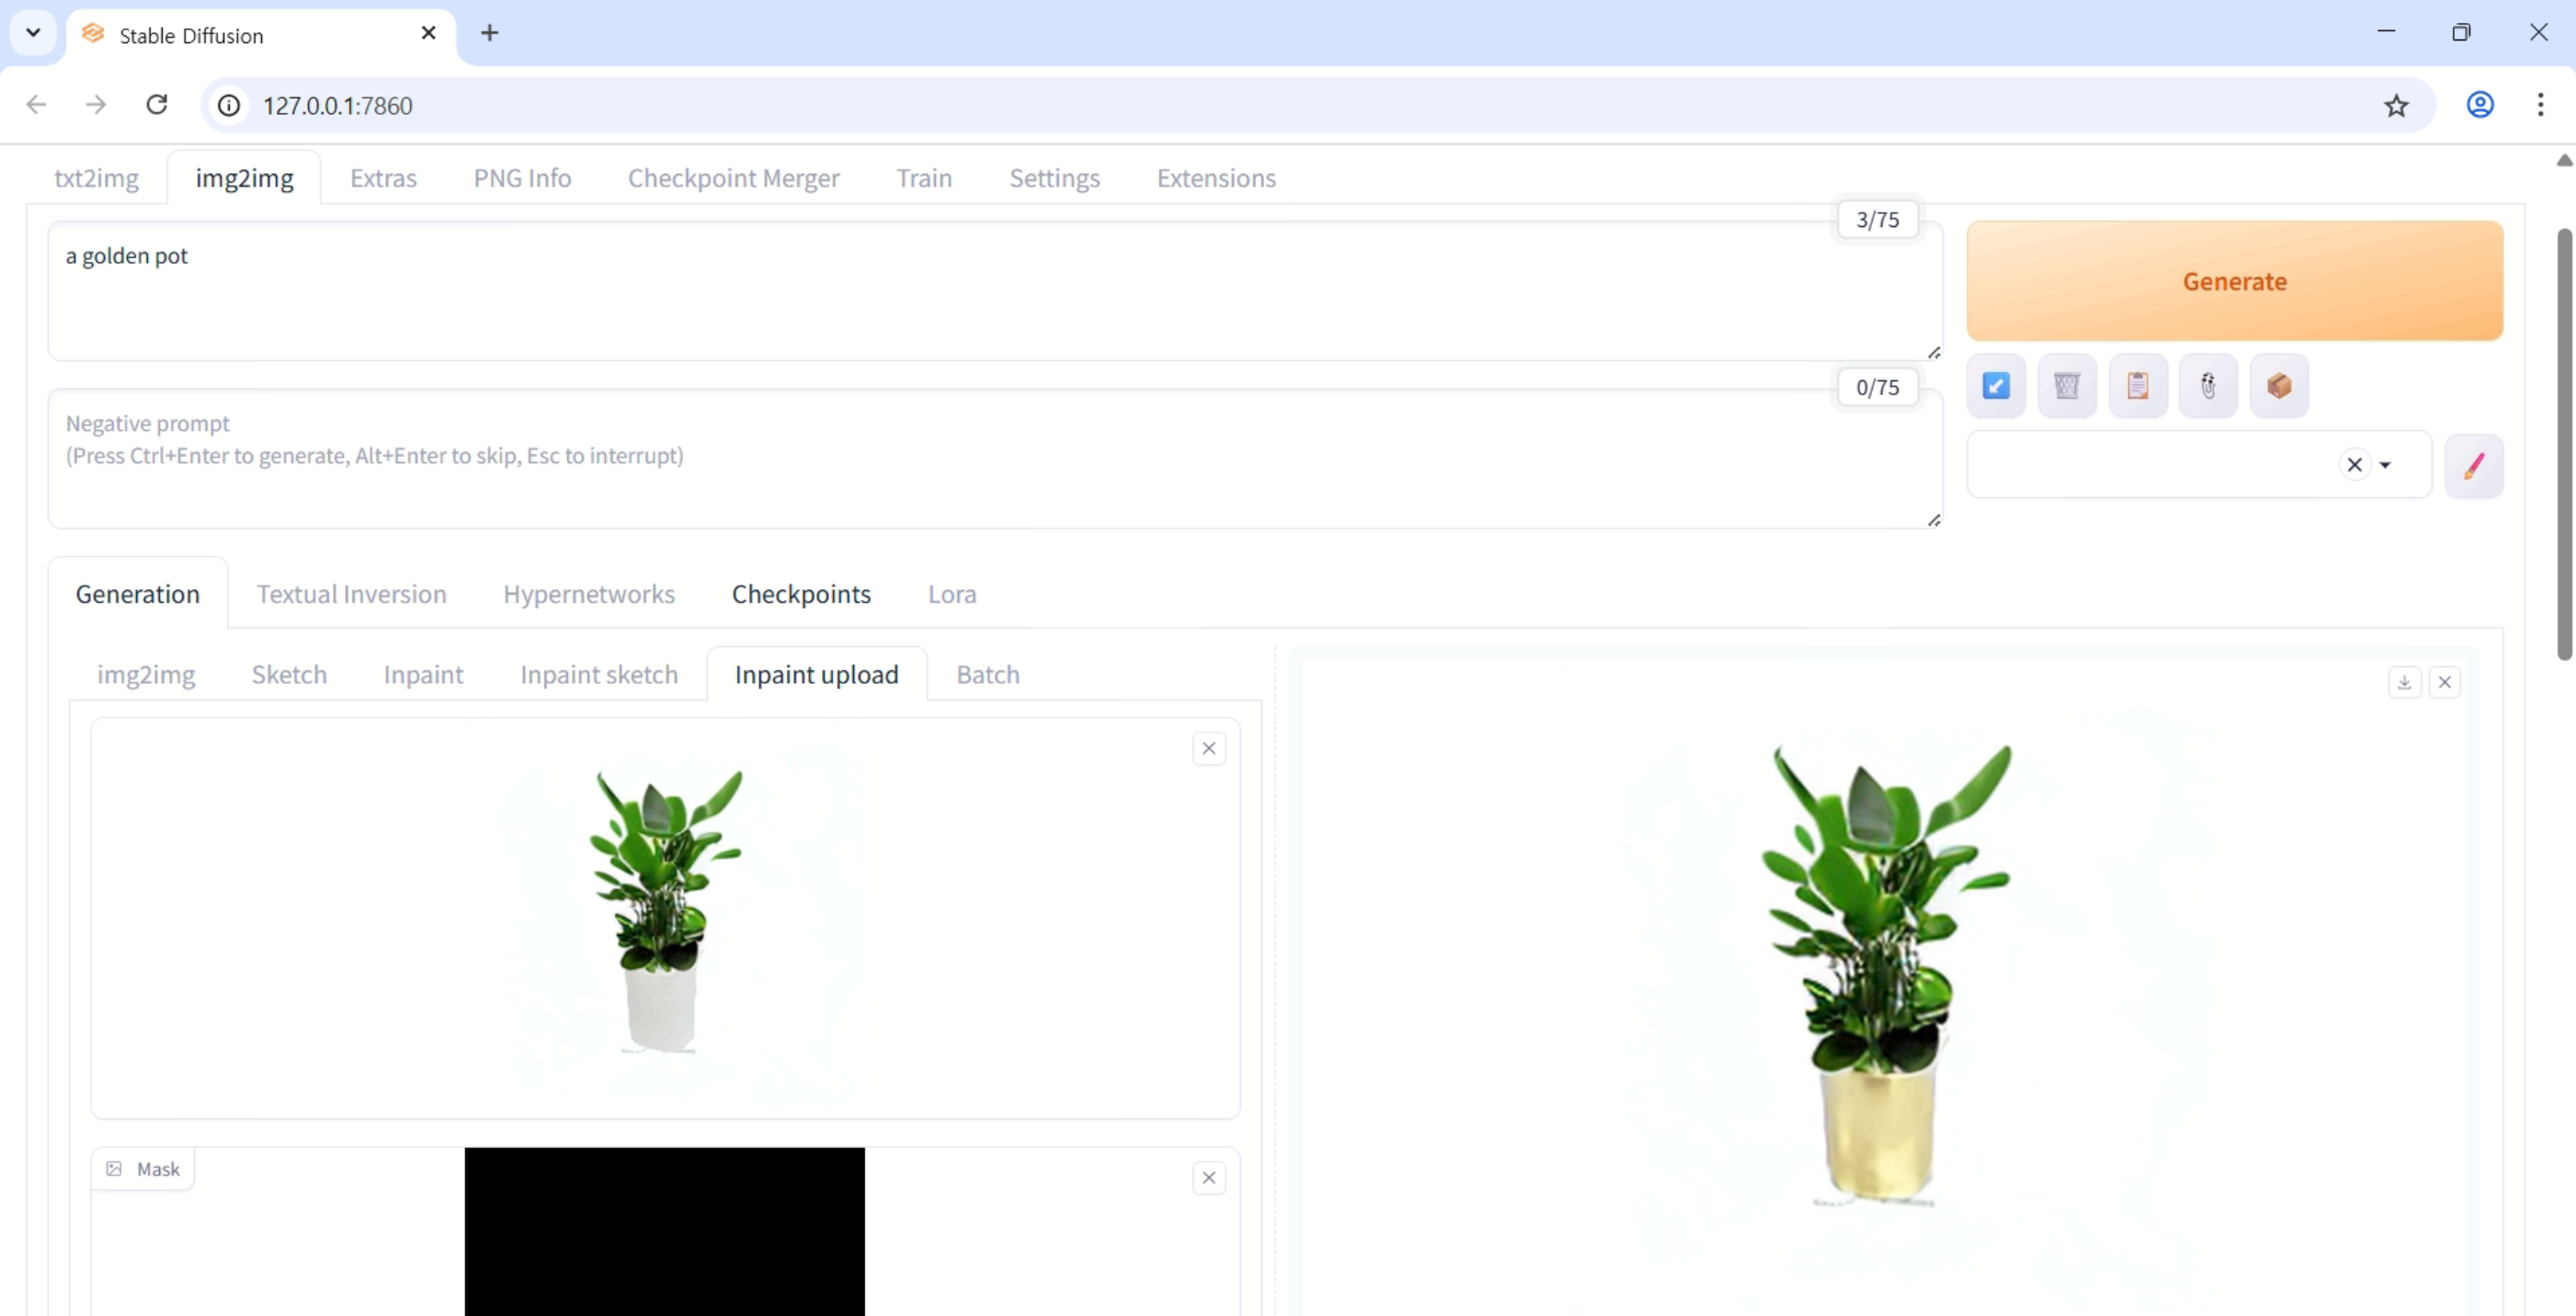 ▲ 이미지와 텍스트 조합을 통해 특정 부위에 원하는 텍스처가 반영된 것을 검증할 수 있다.
 ▲ 생성 로그는 터미널에서 확인 가능하다.
4. CLI 기반 ControlNet-Inpaint 스크립트 구현
WebUI는 실험에는 적합하지만, 반복 실험과 파이프라인 통합에는 비효율적이다.
따라서 CLI 방식으로 ControlNet-Inpaint를 실행할 수 있는 스크립트를 별도로 구현했다.
환경 설정
- OS: Ubuntu 22.04
- Python: 3.10
- GPU: RTX Titan
- Cuda: 11.8
- Pytorch: 2.1.0
# conda 환경 생성
conda create -n controlnet python=3.10 -y
conda activate controlnet

# PyTorch 2.1.0 + CUDA 11.8
conda install pytorch==2.1.0 torchvision==0.16.0 torchaudio==2.1.0 pytorch-cuda=11.8 -c pytorch -c nvidia

pip install --upgrade diffusers transformers accelerate safetensors \
             pillow opencv-python tqdm

pip install xformers==0.0.25 triton==2.2.0
프로젝트 구조
controlnet-inpaint-cli/
├── assets/
│   ├── init.png          # 원본 이미지
│   └── mask.png          # 마스크 이미지, 흰색 수정
├── outputs/
│   └── result.png        # 결과물 저장 폴더
├── controlnet_inpaint_cli.py
└── README.md
스크립트
controlnet_inpaint_cli.py
#!/usr/bin/env python

import argparse, torch
from diffusers import ControlNetModel, StableDiffusionControlNetInpaintPipeline
from diffusers.utils import load_image

# 내부 고정 파라미터
NUM_STEPS      = 40      # 샘플링 횟수
GUIDANCE_SCALE = 7.5     # CFG
COND_SCALE     = 1.0     # ControlNet 영향력
BASE_MODEL     = "runwayml/stable-diffusion-v1-5"
CN_MODEL       = "lllyasviel/control_v11p_sd15_inpaint"

def parse_args():
    p = argparse.ArgumentParser()
    p.add_argument("--prompt", required=True, help="텍스트 프롬프트")
    p.add_argument("--image",  required=True, help="원본 이미지 경로")
    p.add_argument("--mask",   required=True, help="마스크 이미지 경로")
    p.add_argument("--out",    required=True, help="결과 이미지 경로")
    return p.parse_args()

def main():
    args   = parse_args()
    device = "cuda" if torch.cuda.is_available() else "cpu"
    dtype  = torch.float16 if device == "cuda" else torch.float32

    # 1) 모델 로드
    controlnet = ControlNetModel.from_pretrained(CN_MODEL, torch_dtype=dtype)
    pipe = StableDiffusionControlNetInpaintPipeline.from_pretrained(
        BASE_MODEL, controlnet=controlnet, safety_checker=None, torch_dtype=dtype
    ).to(device)
    pipe.enable_model_cpu_offload()
    try: pipe.enable_xformers_memory_efficient_attention()
    except: pass

    # 2) 이미지 로드
    init_img = load_image(args.image).convert("RGB")
    mask_img = load_image(args.mask).convert("L")

    # 3) 추론
    result = pipe(
        prompt=args.prompt,
        image=init_img,
        mask_image=mask_img,
        num_inference_steps=NUM_STEPS,
        guidance_scale=GUIDANCE_SCALE,
        controlnet_conditioning_scale=COND_SCALE,
    ).images[0]

    result.save(args.out)
    print(f"Saved → {args.out}")

if __name__ == "__main__":
main()ControlNetModel+StableDiffusionControlNetInpaintPipeline조합.pipe.enable_model_cpu_offload()→ 8 GB VRAM에서도 동작.--cond-scale (0 ~ 2)로 ControlNet 영향력 조정.
실행방법
# conda 환경 활성화 후 프로젝트 루트에서
python controlnet_inpaint_cli.py \
  --prompt "a chair with white chair legs" \
  --image  assets/init.png \
  --mask   assets/mask.png \
  --out    outputs/tiger_inpaint.png \
WebUI로 ControlNet-Inpaint의 성능을 검증하고, 스크립트로 구현해보며 우리 연구에 적용 가능한 형태로 만들었다. 이 결과를 바탕으로 연구의 2D Texture Editing 파트를 구현할 수 있었다!