목록
목록의 두 가지 유형
- List
- MutableList
List
val numbers: List<Int> = listOf(1, 2, 3, 4, 5, 6)
//혹은(원소의 형태로 타입을 추측할 수 있는 경우.)
val numbers = listOf(1, 2, 3, 4, 5, 6)
println("List: $numbers")
코틀린에서 리스트를 작성하는 방법
//각기 다르게 출력됨. 원본은 안변하기 때문에..
println("Reversed list: ${colors.reversed()}")
println("List: $colors")
List는 읽기 전용으로, 초기화가 완료되면 수정할 수 없다. 그러나 sorted() 및 reversed()와 같은 작업을 적용할 수 있다.
MutableList
val entrees = mutableListOf<String>()
println("Add noodles: ${entrees.add("noodles")}")
println("Entrees: $entrees")mutableListOf()를 사용하여 만들 수 있고, add로 원소를 추가할 수 있다. println 안에 넣은 이유는 출력돼는 true/false를 확인해서 add가 성공했는지 실패했는지 알기 위해서.
val moreItems = listOf("ravioli", "lasagna", "fettuccine")
println("Add list: ${entrees.addAll(moreItems)}")addAll로 여러개 원소를 한꺼번에 추가할 수 있다.
println("Remove spaghetti: ${entrees.remove("spaghetti")}")
println("Remove first element: ${entrees.removeAt(0)}")
entrees.clear()
//true가 출력됨
println("Empty? ${entrees.isEmpty()}")remove로 특정 원소를 지울 수 있다. removeAt으로 특정 인덱스의 원소를 지울 수 있다. 전체 목록을 삭제하려면 clear을 사용한다. isEmpty를 사용하여 목록이 비었는지 확인할 수 있다.
코틀린에서의 반복문
val guestsPerFamily = listOf(2, 4, 1, 3)

while (index < guestsPerFamily.size) {
    totalGuests += guestsPerFamily[index]
    index++
}

 val names = listOf("Jessica", "Henry", "Alicia", "Jose")
 for (name in names) {
    println(name)
}
인자로 목록 전달
class Vegetables(val toppings: List<String>) : Item("Vegetables", 5) {
//toString-return을 안하면 객체만들어서 냅다 출력할때 이상해서.
override fun toString(): String {
       return name
   }
}
fun main() {
...
Vegetables(listOf("Cabbage", "Sprouts", "Onion"))
...
}이렇게 하는 것보다..
class Vegetables(vararg val toppings: String) : Item("Vegetables", 5) {
...
fun main() {
...
val vegetables = Vegetables("Cabbage", "Sprouts", "Onion")
...
}이렇게 vararg 수정자를 사용하여 동일한 유형의 가변적인 인수 수를 함수나 생성자에 전달하는게 더 효과적임.
RecyclerView
RecyclerView는 화면에서 스크롤된 뷰를 재사용,재활용하여 목록이 큰 경우에도 효율적으로 작동하도록 한다. RecyclerView 동작은 처리 시간을 크게 단축하고 목록이 더 원활하게 스크롤되도록 도와준다.
class Datasource {
    fun loadAffirmations():List<Affirmation>{
        //Affirmation 객체를 원소로 가지는 리스트를 반환
        return listOf<Affirmation>(
            Affirmation(R.string.affirmation1),
            Affirmation(R.string.affirmation2),
            Affirmation(R.string.affirmation3),
            Affirmation(R.string.affirmation4),
            Affirmation(R.string.affirmation5),
            Affirmation(R.string.affirmation6),
            Affirmation(R.string.affirmation7),
            Affirmation(R.string.affirmation8),
            Affirmation(R.string.affirmation9),
            Affirmation(R.string.affirmation10)
        )
    }
}
예제에서는 affirmation 객체 리스트를 반환하는 함수를 가지고, affirmation 목록이 표시되는 RecyclerView를 만들 것이다.

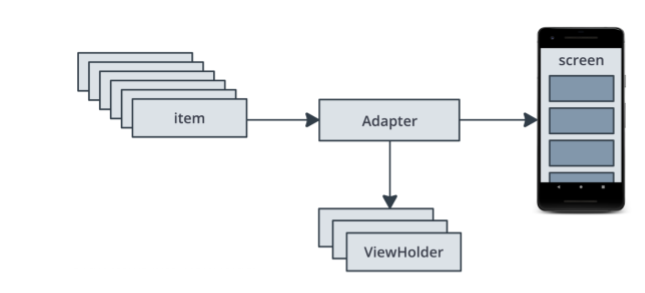
-
item : 표시할 목록의 단일 데이터 항목. 앞으로 다룰 예제에서는 Affirmation 클래스 객체 하나를 나타낸다. 항목 하나의 xml 정의해주기(ex: item_list.xml)
-
Adapter :RecyclerView에서 표시할 수 있도록 데이터를 가져와 준비한다. (데이터를 뷰로 전환)
-
ViewHolder : RecyclerView가 아이템을 보여줄때 사용/재사용 하기 위해 쓰는 A pool of views.
-
RecyclerView : 화면에 표시되는 view. xml에서 만들 수 있음.
Adapter
loadAffirmations 함수에서 반환된 목록에서 Affirmation 인스턴스를 가져와 목록 항목 뷰로 전환하는 어댑터가 필요.
ViewHolder
RecyclerView는 item view 와 직접 소통하지 않음. 대신 ViewHolders와 소통한다.
class ItemAdapter (private val context: Context, private val dataset: List<Affirmation>)
    : RecyclerView.Adapter<ItemAdapter.ItemViewHolder>()
{

    // 각 data item에 대한 view reference 제공
    // 복잡한 data items 이라면 아이템 하나에 view 여러개가 있을 수도. 지금은 텍스트 하나로 구성된 아이템이지만 텍스트+이미지로 구성된 아이템이라면 이미지뷰도 찾아줘야겠지..이 경우 onBindViewHolder도 수정해야.
    //뷰홀더에서 모든 data item에 대한 접근 제공
    // 각 data item은 여기서 Affirmation 객체이다.
    class ItemViewHolder(private val view: View) : RecyclerView.ViewHolder(view) {
        val textView: TextView = view.findViewById(R.id.item_title)
    }

    override fun onCreateViewHolder(parent: ViewGroup, viewType: Int): ItemViewHolder {
        // create a new view
        //item.xml 레이아웃으로 이루어진 형태로 만든다
        val adapterLayout = LayoutInflater.from(parent.context)
            .inflate(R.layout.list_item, parent, false)

        return ItemViewHolder(adapterLayout)
    }

    //뷰의 컨텐츠를 대체. 레이아웃 매니저에 의해 호출됨
    override fun onBindViewHolder(holder: ItemViewHolder, position: Int) {
        val item = dataset[position] //position 변수가 현재 항목을 나타냄.
        holder.textView.text =  context.resources.getString(item.stringResourceId)
    }

    //데이터셋의 사이즈 반환
    override fun getItemCount(): Int {
        return dataset.size
    }
}
어댑터의 코드. viewholder은 중첩 클래스로 구현.
class MainActivity : AppCompatActivity() {
    override fun onCreate(savedInstanceState: Bundle?) {
        super.onCreate(savedInstanceState)
        setContentView(R.layout.activity_main)

        //데이터는 Datasource 에 있는 loadAffirmation이라는 손수 만든 함수 호출해서 가져오자.
        val myDataset = Datasource().loadAffirmations()
        //recyclerView라는 변수를 만들고 findViewById()를 사용하여
        // 레이아웃 내에서 RecyclerView 참조를 찾는다.
        val recyclerView = findViewById<RecyclerView>(R.id.recycler_view)
        //아까 만든 어댑터의 인스턴스를 만든다. ItemAdapter(this, myDataset)
        //이 어댑터를 선언한 recyclerView의 어댑터로 설정한다.
        recyclerView.adapter = ItemAdapter(this, myDataset)

        //recyclerView의 레이아웃 크기가 고정되어 있을때
        // 즉 컨텐츠가 변경되도 레이아웃 크기가 안바뀔때이 설정을 트루로 놓을 수 있다.
        recyclerView.setHasFixedSize(true)
    }
}
RecyclerView를 mainActivity에 구현했으므로, 이제 MainActivity.kt를 수정하자. (구현한 어댑터를 사용하도록 RecyclerView에 알려야 함.)


