예제로 손글씨 숫자 인식 모델 개발
모델 개발
- 모델을 직접 개발하기로 결정했다면 선택한 모델을 먼저 개발해야 함
- 이해를 돕고 모델의 훈련 시간을 단축하기 위해 가급적 손으로 쓴 숫자 이미지의 모음인 MNIST(Modified National Institute of Standards and Technology database) 데이터를 활용
- 전이 학습과 사전 학습 모델 이용 방법은 MNIST 데이터를 활용하기 어렵기 때문에 Imagenet 데이터로 훈련시킨 모델을 활용
1. 모델 직접 개발
- MNIST 데이터셋을 이용하여 손글씨 분류 모델 만들기
- 직접 설계한 간단한 다층 퍼셉트론(Multi-Layer Perceptron, MLP)과 합성곱 신경망(Convolutional Neural Network, CNN)을 구현하고, 텐서플로에서 제공하는 ResNet 아키텍처를 이용한 모델을 구현
- 텐서플로 2.0부터는 공식 문서와 튜토리얼에서 케라스를 사용
- 케라스는 파이썬으로 구현된 고수준 딥러닝 API
- 저수준 API로 텐서플로, 테아노(Theano), CNTK 중 하나를 선택할 수 있지만, 여기서는 텐서플로에 포함된 케라스를 이용하기 때문에 저수준 API로 텐서플로를 사용
- 케라스는 인터페이스가 직관적이고 모듈화가 잘 되어 있어 여러 모듈을 조합하여 모델을 쉽게 만들 수 있음
- 또한, 즉시 실행 모드를 지원하므로 기존 텐서플로 1.x의 그래프 모드보다 훨씬 간편하고 직관적으로 모델을 만들 수 있음
1-1. 데이터셋 준비
- 손글씨 분류 모델을 학습시키기 위한 MNIST 데이터
- 텐서플로 프레임워크에서 다운로드 가능
- 총 7만 개의 28 x 28 손글씨 이미지와 레이블이 제공되는데 6만 개는 학습 데이터로, 1만 개는 검증 데이터로 사용
i) MINST 데이터셋 불러오기
import tensorflow as tf

mnist = tf.keras.datasets.mnist
(x_train, y_train) , (x_test, y_test) = mnist.load_data()
- 다운로드가 완료되면 아래 경로에
mnist.npz데이터가 생성됨C:\Users\사용자명.keras\datasets
- 변수에 다음 데이터가 할당됨
- x_train : 28 x 28 크기의 이미지 6만 개로 구성된 학습 데이터
- y_train : 값이 0~9인 레이블 6만 개로 구성된 학습 데이터
- x_test : 28 x 28 크기의 이미지 1만 개로 구성된 검증 데이터
- y_test : 값이 0~9인 레이블 1만 개로 구성된 검증 데이터
ii) 입력 데이터 정규화(nomalization)
x_train, x_test = x_train / 255.0, x_test / 255.0-
여기서 만들 모델의 입력 데이터는 28 x 28 이미지이고, 각 픽셀 값의 범위는 0~255
-
정규화는 이 입력 데이터를 0~1 범위로 변환
(대상 값 - 입력 값의 최솟값) / (입력 값의 최댓값 - 입력 값의 최솟값)
-
입력 값의 범위가 0~255이므로 입력 값의 최솟값은 0, 최댓값은 255
-
따라서, 위의 식에 대입하면 정규화 공식이 다음과 같이 도출
대상 값 / 255
-
입력 데이터의 정규화는 실제 모델의 성능에 영향을 미침
| 정규화 여부 | 예측 정확도 |
|---|---|
| 정규화를 한 경우 | 97.68% |
| 정규화를 하지 않은 경우 | 92.99% |
1-2. 모델 설계 및 학습
- 데이터셋을 준비했으면 딥러닝 모델을 설계해야 함
- 가장 단순한 인공 신경망인 다층 퍼셉트론 모델을 구현할 것임
- 다층 퍼셉트론은 입력층(input layer), 은닉층(hidden layer), 출력층(output layer)로 구성되어 있음
- 각 층 간에 모든 노드가 서로 연결되어 있기 때문에 다층 퍼셉트론을 완전 연결 신경망(Fully Connected Neural Network, FCNN)이라고도 부름
- 모델에서 사용하는 입력 데이터는 28 x 28 크기의 이미지이고, 레이블은 숫자 0~9
- 따라서 모델의 출력은 크기가 10인 리스트 형태
👉 첫 번째 값은 입력 데이터가 0인 확률, 두 번째 값은 입력 데이터가 1일 확률, 열 번째 값은 입력 데이터가 9일 확률을 나타냄 - 손글씨 분류는 다중 클래스 분류 문제이므로 출력층의 활성화 함수로 softmax를 사용
- 은닉층의 개수는 임의로 128개로 설정했으며, 입력층의 활성화 함수로 Relu를 사용
👉 입력층은 28 x 28 = 784이고, 각 픽셀 값이 입력 값이 되므로 x1 ~ x784의 총 784개의 노드로 나타낼 수 있음
👉 또한, 은닉층은 a1~a128의 128개의 노드로 구성되고 출력층은 y1~y9의 9개의 노드로 구성
i) 다중 퍼셉트론 모델 생성
mlp_model = tf.keras.models.Sequential([
    tf.keras.layers.Flatten(input_shape=(28, 28)),
    tf.keras.layers.Dense(128, activation='relu'),
    tf.keras.layers.Dense(10, activation='softmax')
])tf.keras.models.Sequential클래스를 이용했는데,Sequential클래스는 모델 및 모델 내 모든 레이어에 입력 텐서와 출력 텐서가 하나씩만 있을 때 사용하며, 각 레이어를 순차적으로 쌓아서 모델을 만듦- 위 모델은 Flatten 레이어 1개와 Dense 레이어 2개로 구성
Flatten레이어는 28 x 28 크기의 2차원 입력을 784개의 1차원 배열로 바꿔줌- 다음
Dense레이어는 128개의 뉴런으로 이루어진 은닉층 - 마지막
Dense레이어는 10개의 클래스에 대응되도록 10개의 뉴런으로 이루어진 출력층 - 모델 생성이 완료되면 모델을 컴파일하기 위해 옵티마이저(optimizer), 손실 함수(loss function), 평가 지표(metric)를 인자로 전달하고
compile()함수를 호출 - 옵티마이저는
adam, 손실 함수는sparse_categorical_crossentropy, 평가 지표는accuracy를 사용
ii) 다중 퍼셉트론 모델 컴파일
mlp_model.compile(optimizer='adam',
                 loss='sparse_categorical_crossentropy',
                 metrics=['accuracy'])
iii) 모델의 구조 확인
mlp_model.summary()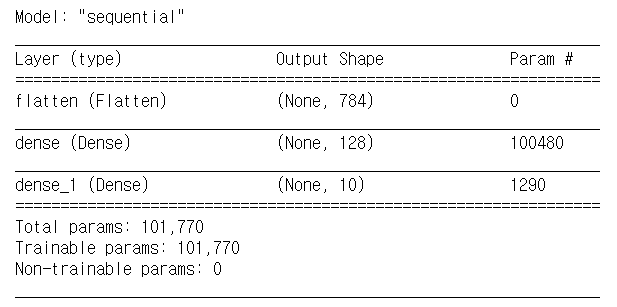
summary()함수를 호출하면 레이어의 구성과 레이어별 출력 형태, 파라미터 수를 보여줌- 다층 퍼셉트론 모델은 Dense 레이어를 사용하기 때문에 파라미터가 많음
- 첫 번째 Dense 레이어는 입력 784개, 편향 1개가 128개의 출력과 완전 연결되어 있으므로 파라미터가 785 x 128 = 100,480개
- 두 번째 Dense 레이어는 입력 128개, 편향 1개, 출력 10개이므로 파라미터가 1,290개
- 그러므로 총 파라미터는 100,480 + 1,290 = 101,770개
iv) mlp_model 학습
- 모델 설계가 끝났으면 다음과 같이
fit()함수를 호출하여 학습 시작 - 학습 데이터와 레이블을 각각 전달하고 epochs를 5로 설정
mlp_model.fit(x_train, y_train, epochs=5)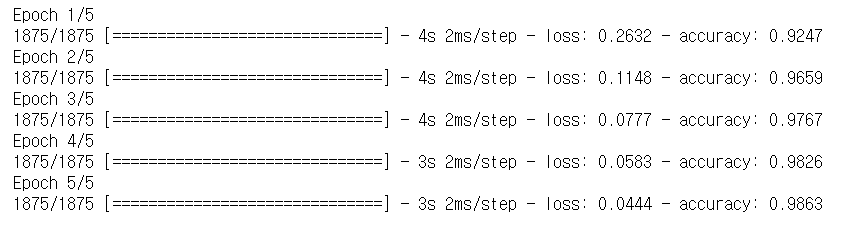
epochs를 5로 설정했으므로 다섯 번 반복해 학습하면서 점점 loss가 줄어들고 accuracy가 증가하는 것을 볼 수 있음
1-3. 모델 정확도 평가
i) mlp_model 학습 결과 평가
- 학습이 완료되면
evaluate()함수를 호출하여 테스트 데이터를 가지고 모델의 정확도를 확인 verbose는 2로 설정
mlp_model.evaluate(x_test, y_test, verbose=2)
- 학습 결과 정확도는 97.7%, loss 값은 0.075
- 손글씨 분류는 비교적 쉬운 문제이므로 간단한 다층 퍼셉트론 함수로도 높은 정확도를 얻을 수 있음
1-4. Functional API와 Model 클래스 상속을 통한 모델 개발
- 케라스는 앞선 방법처럼
tf.keras.models.Sequential클래스를 이용하는 방법 말고도,Functional API를 이용하거나tf.keras.Model클래스를 상속하여 모델을 개발할 수 있음 Functional API의 경우Sequential클래스보다 더 자유롭게 모델을 만들 수 있음- 모델이나 레이어의 다중 입력 또는 다중 출력을 구현할 수 있고 잔차 연결(residual connection), 다중 분기(multi-branch) 등 비선형 토폴로지(non-linear topology) 모델을 구현할 수도 있음
Functional API를 이용한 케라스 모델 생성
inputs = tf.keras.Input(shape=(28,28))

x = tf.keras.layers.Flatten()(inputs)
x = tf.keras.layers.Dense(128, activation='relu')(x)
outputs = tf.keras.layers.Dense(10, activation='softmax')(x)

mlp_model = tf.keras.Model(inputs=inputs, outputs=outputs)
Model 클래스 상속을 통한 케라스 모델 생성
class MLP_Model(tf.keras.Model):
    def __init__(self):
        super(MLP_Model, self).__init__()
        self.flatten = tf.keras.layers.Flatten()
        self.dense = tf.keras.layers.Dense(128, activation='relu')
        self.softmax = tf.keras.layers.Dense(10, activation='softmax')

    def call(self, inputs):
        x = self.flatten(inputs)
        x = self.dense(x)
        return self.softmax(x)

mlp_model = MLP_Model()- 성능에 차이는 없음
1-5. 합성곱 신경망
- 다층 퍼셉트론 모델의 평가 결과는 97.7%로 매우 높은 수준이지만, 합성곱 신경망을 이용하면 이미지 분류 모델의 정확도를 더욱 향상시킬 수 있음
- 합성곱 신경망은 합성곱 연산을 적용하여 지역성(locality)에 기반한 특징(feature)을 학습함
- 필터 반복 적용으로 가중치가 공유되어 완전 연결 네트워크에 비해 파라미터가 훨씬 적음
- 합성곱 신경망은 계층 간에 완전 연결되지 않음
- 인접 노드 간에 가중치를 공유함
- 다중 퍼셉트론의 입력 데이터는 '높이, 너비'의 2차원 텐서로 28 x 28 형태이지만, 합성곱 신경망은 입력 이미지로 '높이, 너비, 채널'의 3차원 텐서를 사용
- MNIST 데이터는 1채널 이미지
x_train_4d = x_train.reshape(-1, 28, 28, 1)
x_test_4d = x_test.reshape(-1, 28, 28, 1)

cnn_model = tf.keras.models.Sequential([
    tf.keras.layers.Conv2D(32, (3, 3), activation='relu', input_shape=(28, 28, 1)),
    tf.keras.layers.MaxPooling2D((2,2)),
    tf.keras.layers.Conv2D(64, (3, 3), activation='relu'),
    tf.keras.layers.MaxPooling2D((2,2)),
    tf.keras.layers.Conv2D(64, (3, 3), activation='relu'),
    tf.keras.layers.Flatten(),
    tf.keras.layers.Dense(64, activation='relu'),
    tf.keras.layers.Dense(10, activation='softmax')
])

cnn_model.compile(optimizer='adam',
                 loss='sparse_categorical_crossentropy',
                 metrics=['accuracy'])
cnn_model.summary()
cnn_model.fit(x_train_4d, y_train, epochs=5)
cnn_model.evaluate(x_test_4d, y_test, verbose=2)
- 높은 정확도를 보임
1-6. 케라스 애플리케이션 모델
- 다중 퍼셉트론과 합성곱 신경망은 비교적 간단한 모델이므로 구현이 어렵지 않았지만, ResNet, MobileNet,EfficientNet 등 최근 많이 사용되고 있는 모델은 훨씬 깊고 복잡한 구조를 가지고 있음
- 텐서플로는 이러한 모델을 직접 구현하지 않아도 편리하게 이용할 수 있도록 케라스 애플리케이션 모듈에서 몇 가지 모델을 제공하는데, 그 중에서 ResNet 모델을 이용하여 MNIST 데이터로 훈련시킨 손글씨 분류를 구현하는 방법을 알아보자
- 인공 신경망은 네트워크의 깊이가 깊어질수록 더 복잡한 문제를 해결할 수 있지만 깊이가 지나치게 깊으면 기울기 소실(vanishing gradient) 문제가 발생하고, 성능이 급격하게 떨어짐
- ResNet은 잔차 학습(residual learning)을 이용하여 이를 개선한 모델로, 잔차 블록(residual block)을 여러 층 쌓은 구조
- 잔차 블록은 입력을 그대로 출력으로 연결하는 숏컷 연결(shortcut connection)을 가지고 있음
- 이 숏컷 연결 덕분에 네트워크가 깊어도 신호가 소실되지 않고 네트워크 전체에 영향을 줄 수 있음
ResNet을 이용한 손글씨 분류 모델 구현
x_train_4d = x_train.reshape(-1, 28, 28, 1)
x_test_4d = x_test.reshape(-1, 28, 28, 1)

resized_x_train = tf.image.resize(x_train_4d, [32, 32])
resized_x_test = tf.image.resize(x_test_4d, [32, 32])

resnet_model = tf.keras.applications.ResNet50V2(
    input_shape=(32, 32, 1),
    classes=10,
    weights=None
)
# resnet_model.summary()
resnet_model.compile(optimizer='adam',
                     loss='sparse_categorical_crossentropy',
                     metrics=['accuracy'])
resnet_model.fit(resized_x_train, y_train, epochs=5)
resnet_model.evaluate(resized_x_test, y_test, verbose=2)
- ResNet이 지원하는 최소 이미지 크기가 32 x 32이므로
tf.image.resize()함수를 이용하여 이미지 크기를 28 x 28에서 32 x 32로 확대 - 모델을 생성하기 위해
tf.keras.applications.ResNet50V2클래스에 입력 데이터의 형태(input_shape), 분류할 클래스 수(classes), 초기 가중치(weights)를 파라미터로 전달 - 나머지 컴파일, 학습, 평가 코드는 앞의 모델과 동일
2. 사전 학습 모델 이용
- 사전 학습 모델은 이미 학습이 완료된 모델로,
tflite파일 또는 텐서플로 모델로 제공됨 tflite파일은 모델 개발의 최종 산출물이므로 바로 안드로이드 스튜디오에 배포하여 앱을 개발하면 됨- 그러나 텐서플로 모델은
tflite파일로 변환하는 과정을 거쳐야 함 - 사전 학습 모델도 케라스 애플리케이션 모델을 사용함
- 모델을 직접 개발할 때는 케라스 애플리케이션에서 초기 가중치 없는 모델을 얻어 직접 학습시켰지만, 사전 학습 모델은 특정 데이터로 이미 훈련된 가중치를 가진 모델을 사용함
- 여기서는
ImageNet데이터로 학습된MobileNet V2를 사용할 것임 - MobileNet은 기존 합성곱 신경망의 합성곱 연산을 깊이 분할 합성곱(depthwise separable convolution) 연산으로 변경하여 기존 합성곱 신경망 모델 대비 계산량을 낮춘 모델로 약 8~9배의 높은 효율을 보임
tf.keras.applications.MobileNetV2클래스를 호출하여 MobileNet V2 모델 생성 가능- 직접 학습하지 않기 때문에 학습 데이터가 필요 없지만 테스트 데이터가 있어야 모델이 잘 동작하는지 확인 가능
- But, ImageNet 데이터는 용량이 매우 크기 때문에 ImageNet 데이터 대신 임의의 이미지 5개를 사용ㅎ여 모델이 이 이미지를 잘 분류하는지 테스트해보겠음
2-1. 테스트 데이터 준비
테스트 데이터 로드
pip install image- 파이썬 커맨드 창에서 가상 환경을 활성화한 뒤 위 명령어로 image 라이브러리 설치
from PIL import Image
import os
import numpy as np

data_dir = "./images/"
files = os.listdir(data_dir)

images = []
for file in files:
  path = os.path.join(data_dir, file)
images.append(np.array(Image.open(path)))PIL(Python Imaging Library)의Image.open()함수와numpy의np.array()함수를 이용하여 이미지를 array 형태로 불러옴
2-2. 데이터 전처리
- 테스트 데이터를 모델에 입력하기 전에 전처리
import tensorflow as tf

resized_images = np.array(np.zeros((len(images), 224, 224, 3)))
for i in range(len(images)):
    resized_images[i] = tf.image.resize(images[i], [224, 224])

preprocessed_images = tf.keras.applications.mobilenet_v2.preprocess_input(resized_images)- MobileNet V2의 기본 입력 텐서 형태는 (224, 224, 3)이므로 이미지 형태를 (224, 224, 3)으로 변환
np.array()함수와np.zeros()함수를 이용하여 0으로 초기화된 array를 만들고,tf.image.resize()함수로 이미지 크기를 변환하여 array에 담기- 다음으로 mobilenet_v2 모듈에 포함된
preprocess_input()함수를 적용하여 입력 값을 전처리
2-3. 모델 생성 및 추론
- 모델을 생성하고 이를 이용하여 모델의 분류 결과를 확인
모델 생성 및 추론
mobilenet_imagenet_model = tf.keras.applications.MobileNetV2(weights="imagenet")

y_pred = mobilenet_imagenet_model.predict(preprocessed_images)
topK = 1
y_pred_top = tf.keras.applications.mobilenet_v2.decode_predictions(y_pred, top=topK)tf.keras.applications.MobileNetV2클래스를 통해 모델을 불러올 수 있음- 파라미터로
weights를 "imagenet"으로 지정하면 ImageNet 데이터로 학습된 모델을 얻을 수 있음 - "imagenet"이 아니더라도 weights가 저장된 path를 지정하면 해당 weights 값이 적용된 모델을 얻을 수 있음
- 그런 다음,
predict()함수로 테스트 데이터를 모델에 입력하고 예측 결과를y_pred에 담았음 y_pred는 5개의 이미지가 1,000개의 클래스에 각각 속할 확률이 얼마인지를 담고 있으므로 형태가 (5, 1000)임- 결과 값 해석을 위해 mobilenet_v2 모듈에 포함된
decode_predictions()함수를 적용함 - top 인자로
topK인 1을 주었기 때문에 확률이 가장 높은 클래스 1개만 반환
👉 topK가 3이면 상위 3개의 클래스를, 5이면 상위 5개의 클래스를 뽑음
추론 결과 확인
pip install matplotlib- 입력 이미지 및 모델이 분류한 가장 가능성 높은 클래스와 그 확률을 보여주는 코드
from matplotlib import pyplot as plt
import numpy as np

for i in range(len(images)):
    plt.imshow(images[i])
    plt.show()

    for k in range(topK):
        print(f'{y_pred_top[i][k][1]} ({round(y_pred_top[i][k][2] * 100 , 1)}%)')
3. 전이 학습
- 학습된 모델을 원하는 데이터로 다시 학습시키는 방법
- 사전 학습 모델 이용과 마찬가지로 이미 학습이 완료된 모델을 활용하지만 그대로 활용하지 않고, 원하는 데이터로 다시 학습시킴
- 기반 모델로 ImageNet 데이터를 학습한 MobileNet V2를 사용
- 이 모델을 개와 고양이 이미지로 학습시켜 개와 고양이 이미지를 구분하는 모델을 얻을 것임
3-1. TFDS 라이브러리 설치
pip install tensorflow-datasets3-2. 개와 고양이 이미지 데이터 불러오기
import tensorflow_datasets as tfds
tfds.disable_progress_bar()

raw_train, raw_test = tfds.load(
    'cats_vs_dogs',
    split=['train[:80%]', 'train[20%:]'],
    as_supervised=True
)- 데이터를 다운로드하는 과정에서 많은 로그가 출력되므로
tfds.disable_progress_bar()함수를 호출하여 로그를 출력하지 않도록 설정 tfds.load()함수를 이용하여 데이터를 받아raw_train,raw_test변수에 데이터를 저장load()함수의 첫 번째 인자로 데이터명을 전달하고, 두 번째 인자로split속성을 이용하여 데이터의 80%를 raw_train에, 20%를 raw_test에 할당- 마지막
as_supervised값은 데이터의 형태를 결정
👉True로 설정하면 (input, label) 형태의 튜플 자료형을 반환하고,
False로 설정하면 데이터별 고유한 dictionary 형태로 반환
3-3. 개와 고양이 이미지 데이터 전처리
import numpy as np
import tensorflow as tf
from tensorflow.image import ResizeMethod

def preprocess(image, label):
    out_image = tf.image.resize(image, [224, 224], method=ResizeMethod.BICUBIC)
    out_image = tf.keras.applications.mobilenet_v2.preprocess_input(out_image)

    return out_image, label

batch_size = 32
train_batch = raw_train.map(preprocess).batch(batch_size)
test_batch = raw_test.map(preprocess).batch(batch_size)- 실질적인 전처리가 이루어지는
preprocess()함수를 작성하고,raw_train과raw_test데이터에 각각 preprocess() 함수를 적용하여 결과 값으로 배칠르 만듦 - 케라스 애플리케이션은 입력 이미지의 크기가 96, 128, 160, 192, 224인 MobileNet 모델만 지원하기 때문에
preprocess()함수 안에서 바이큐빅 보간법을 이용하여 입력 이미지의 크기를 224 x 224로 변환 - 또한,
mobilenet_v2모듈에서 제공하는preprocess_input()함수를 이용하여 크기가 변환된 이미지 데이터를 한 번 더 전처리
3-4. 사전 학습된 MobileNet 모델 로드
mobilenet_base = tf.keras.applications.MobileNetV2(
    input_shape=(224, 224, 3),
    weights="imagenet",
include_top=False)tf.keras.applications.MobileNetV2클래스를 통해 모델을 생성하고 파라미터로 입력 데이터의 크기와 weights, include_top 지정- weights는 "imagenet"으로 설정하여 ImageNet 데이터로 학습된 모델을 얻음
- include_top을
False로 설정하면 모델의 마지막 풀링 레이어와 Dense 레이어를 제외한 모델을 얻을 수 있음
👉 마지막 레이어를 제외하는 이유는 모델의 출력 결과가 문제에 의존적이기 때문
3-5. 사전 학습된 MobileNet 모델 훈련 및 평가
mobilenet_base.trainable=False

mobilenet_model = tf.keras.Sequential([
    mobilenet_base,
    tf.keras.layers.GlobalAveragePooling2D(),
    tf.keras.layers.Dense(1)
])

mobilenet_model.compile(optimizer='adam',
              loss='binary_crossentropy',
              metrics=['accuracy'])

mobilenet_model.fit(train_batch, epochs=5)
mobilenet_model.evaluate(test_batch, verbose=2)- 마지막 레이어를 제거한 MobileNet 모델인 mobilenet_base를 모델에 추가한 후, 제거된 레이어와 같은 역할을 해줄 풀링 레이어와 Dense 레이어를 추가
- 모델의 목적은 개와 고양이 이미지를 구분하는 것이므로 Dense 레이어는 노드가 1개면 충분
- 또한, 이미 학습이 완료된 mobilenet_base의 가중치가 더 이상 학습되지 않도록 막기 위해 mobilenet_base.trainable 값을 False로 설정
- 일반적으로 전이 학습은 이미 학습된 가중치가 더 이상 학습되지 않도록 동결시키고 훈련을 진행
- 나중에 성능 향상을 위해 모델을 다시 학습 가능하도록 되돌리고 학습률(learning rate)를 낮추어 전체를 다시 한번 학습하며 미세 튜닝을 할 수 있음
- 개와 고양이 이미지를 분류하는 문제는 이진 분류이므로 손실 함수도 binary_crossentropy로 바꿔야 함
- 나머지 컴파일, 학습, 훈련 코드는 기존 모델과 동일
4. 텐서플로 허브
- 텐서플로 허브도 케라스 애플리케이션 모듈처럼 학습된 모델을 제공
4-1. 텐서플로 허브에서 모델 선택
- https://tfhub.dev
Problem domains에서Image를 선택Architecture에서MobileNet V2를 선택
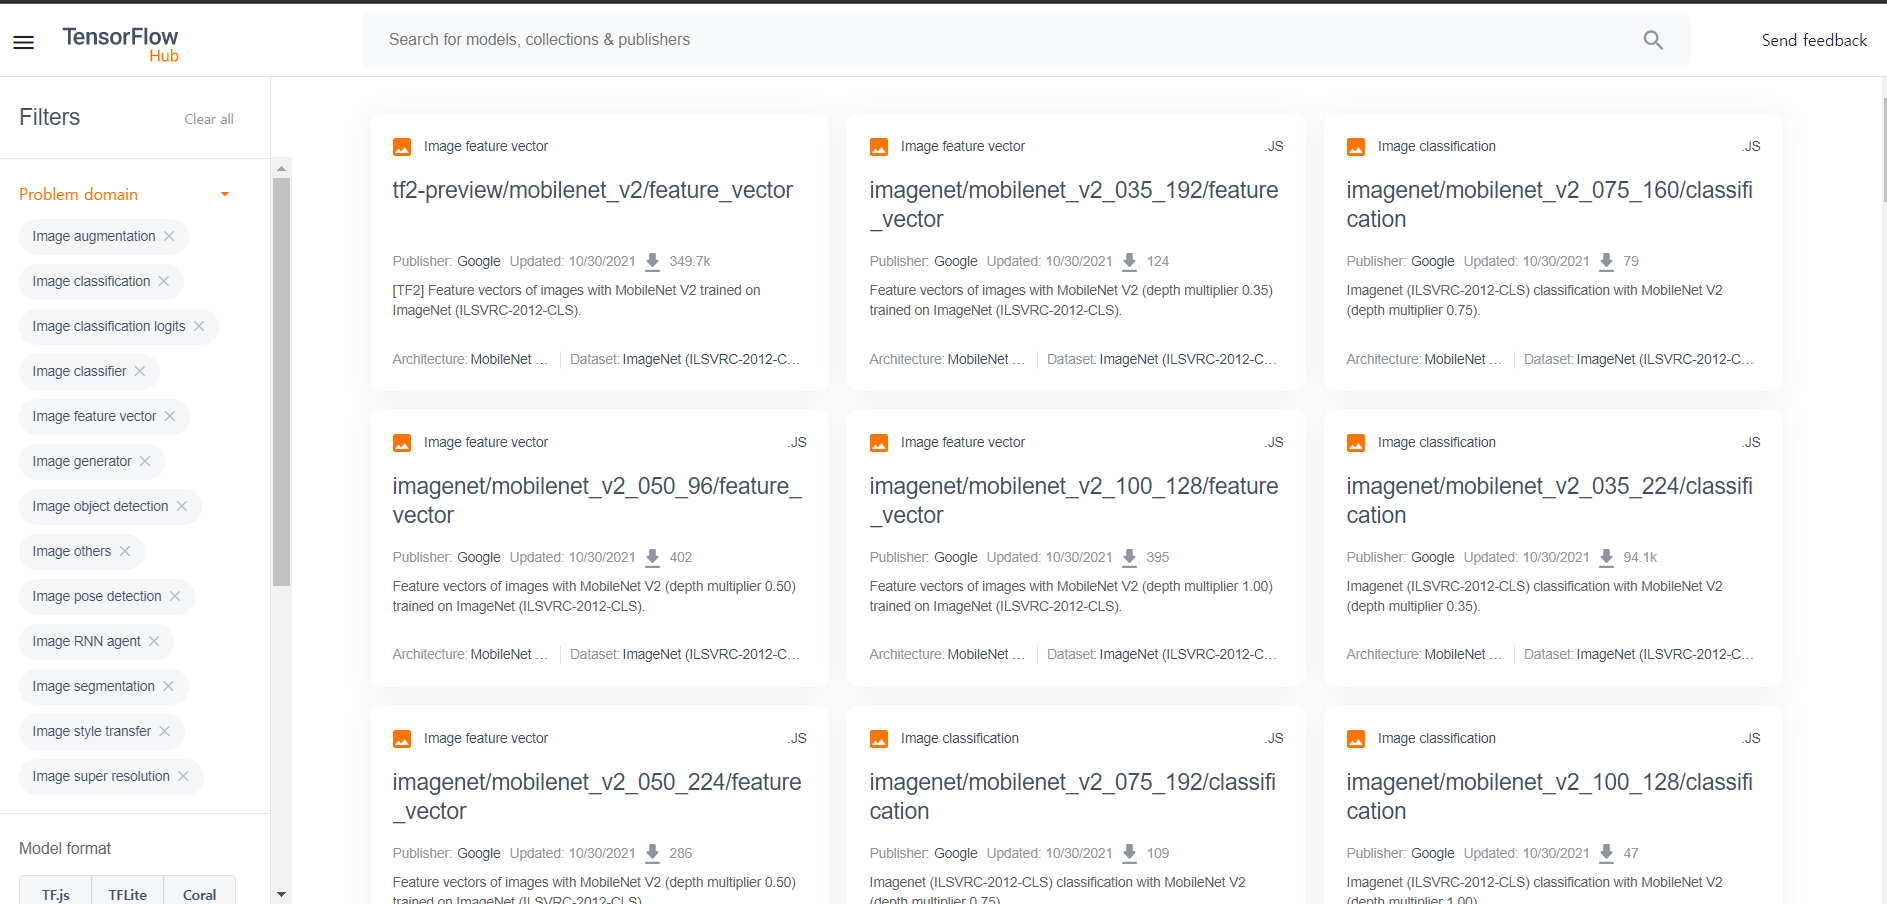
MobileNet은 깊이 분할 합성곱 연산에 사용하는depth multiplier값을 지정할 수 있으며, 이 값을 통해 각 레이어의 채널 수 변경 가능depth multiplier값이 작을수록 모델의 속도가 빠르지만 정확도는 떨어짐
- 여기서는
depth multiplier가 1.00이고 입력 이미지의 크기가 224 x 224인 모델을 선택 mobilenet_v2_100_224입력
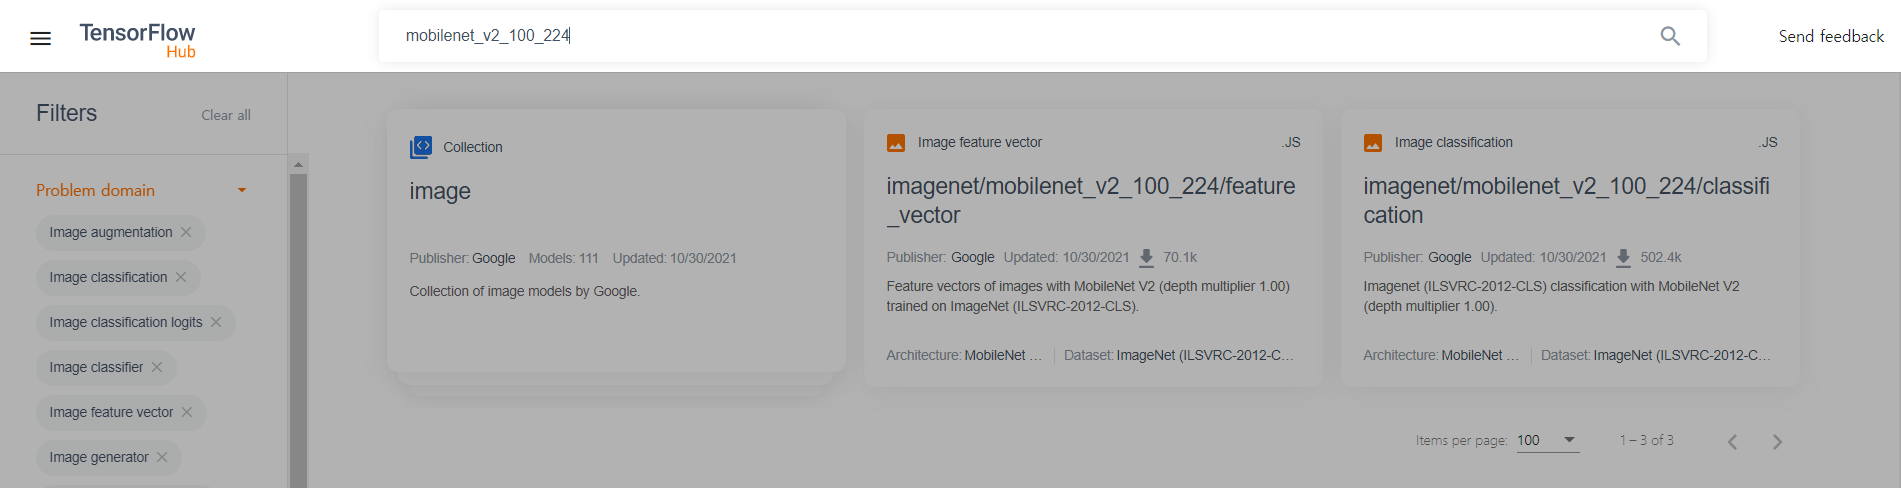
feature_vector는 전이 학습이 가능하도록 마지막 레이어를 제거한 모델classification은 바로 분류가 가능한 전체 모델- 이 중
feature_vector선택The input images are expected to have color values in the range [0,1], following the common image input conventions. For this model, the size of the input images is fixed to height x width = 224 x 224 pixels.
Copy URL
4-2. 데이터셋 준비
i) 개와 고양이 이미지 데이터 불러오기
import tensorflow_datasets as tfds
tfds.disable_progress_bar()

raw_train, raw_test = tfds.load(
    'cats_vs_dogs',
    split=['train[:80%]', 'train[20%:]'],
    as_supervised=True
)
ii) 개와 고양이 이미지 데이터 전처리
import numpy as np
import tensorflow as tf

def preprocess(image, label):
    out_image = tf.image.resize(image/255, [224, 224])
    return out_image, label

batch_size = 32
train_batch = raw_train.map(preprocess).batch(batch_size)
test_batch = raw_test.map(preprocess).batch(batch_size)- 텐서플로 허브는 케라스 애플리케이션처럼 전처리 함수를 제공하지 않음
👉 모델에서 요구하는 스펙에 맞게 직접 데이터를 전처리해야 함 - 모델 설명 페이지를 보면 데이터의 범위가 [0, 1]인데, 우리가 사용할 이미지의 각 픽셀 값 범위는 [0, 255]
👉 입력 이미지를 255로 나누어 [0, 1] 범위로 맞추고,tf.image.resize()함수를 이용하여 이미지 크기를 244 x 244로 변환 - 학습 데이터와 테스트 데이터 모두 전처리 및 배치 처리 적용함
4-3. 모델 생성 및 평가
- tensorflow-hub 모듈을 이용하여 모델 생성
pip install tensorflow-hubi) 텐서플로 허브 모델 생성
import tensorflow_hub as hub

url = "https://tfhub.dev/google/imagenet/mobilenet_v2_100_224/feature_vector/5"

hub_model_transfer = tf.keras.Sequential([
    hub.KerasLayer(url, input_shape=(224, 224, 3), trainable=False),
    tf.keras.layers.Dense(1)
])tf.keras.Sequential클래스를 이용하여 모델을 만들고,hub.KerasLayer클래스에 URL과 입력 값의 형태를 전달- 텐서플로 허브에서 제공한 레이어는 추가로 학습하지 않을 것이므로
trainable값을False로 설정 - 모델의 끝에 개와 고양이 이미지를 구분하는 이진 분류에 맞게 노드가 하나인 Dense 레이어를 추가
- 코드를 처음 실행하면 텐서플로 허브 서버에서 MobileNet 모델이 다운로드됨
iii) 텐서플로 허브 모델 컴파일 및 학습
hub_model_transfer.compile(optimizer='adam',
              loss='binary_crossentropy',
              metrics=['accuracy'])

hub_model_transfer.fit(train_batch, epochs=5)
iv) 텐서플로 허브 모델 추론 결과 평가
hub_model_transfer.evaluate(test_batch, verbose=2)💡 출처
텐서플로 라이트를 활용한 안드로이드 딥러닝, 임태규, 한빛미디어