GameplayTag 시스템은 계층식으로 분류된 라벨을 붙여서 조건 검사, 분류, 필터링 등을 쉽게 할 수 있도록 고안된 기능이다.
FGameplayTag와 FGameplayTagContainer 타입을 통해 코드와 블프 양쪽 모두에서 효율적으로 활용할 수 있다.
우선 GameplayTag를 프로젝트에 추가해보자.

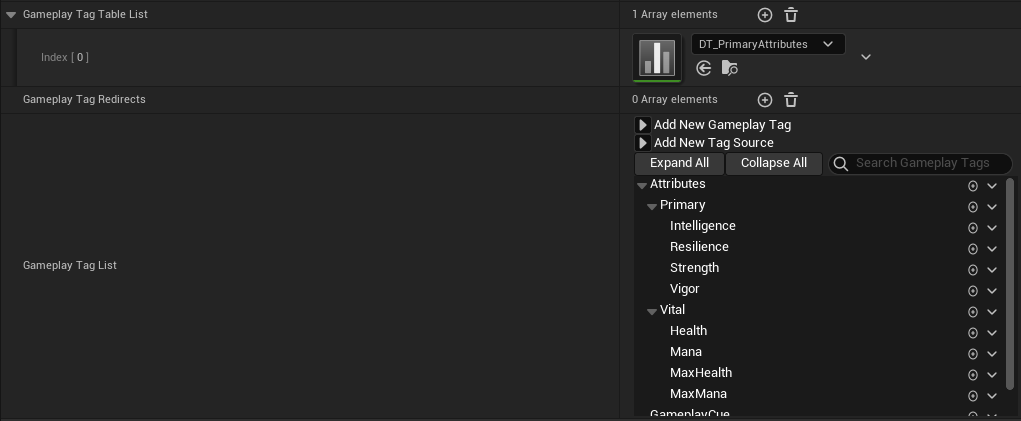
GameplayTag를 추가하는 방법은 2가지가 있다.
Row Type이 GameplayTagTableRow인 DataTable에 직접 작성해 프로젝트 세팅의 GameplayTags 탭에 DataTable을 추가하는 방법, 그리고 그 밑에 Gameplay Tag List에서 직접 추가하는 방법이다.
일단 무슨 방법을 쓰던 차이는 없다. 혼용해도 무방하다.
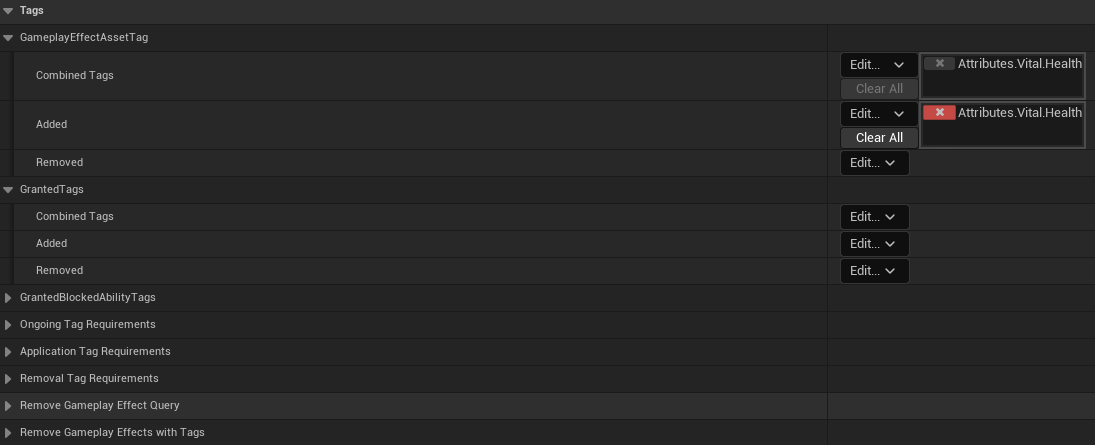
GameplayEffect에 Tag를 추가하는 탭인데, GameplayEffectAssetTag는 해당 이펙트를 설명하는 태그다.
이걸 보고 이 에셋이 Attributes.Vital.Health와 관련된 에셋이란 걸 바로 알 수 있다.
void UAuraAbilitySystemComponent::AbilityActorInfoSet()
{
	OnGameplayEffectAppliedDelegateToSelf.AddUObject(this, &ThisClass::EffectApplied);
}

void UAuraAbilitySystemComponent::EffectApplied(
		UAbilitySystemComponent* AbilitySystemComponent,
        const FGameplayEffectSpec& EffectSpec,
        FActiveGameplayEffectHandle ActiveEffectHandle)
{
	FGameplayTagContainer TagContainer;
	EffectSpec.GetAllAssetTags(TagContainer);
	for (const FGameplayTag& Tag : TagContainer)
	{
		const FString Msg = FString::Printf(TEXT("GE Tag: %s"), *Tag.ToString());
		GEngine->AddOnScreenDebugMessage(-1, 8.f, FColor::Blue, Msg);
	}
}
AbilitySystemComponent는 OnGameplayEffectAppliedDelegateToSelf라는 델리게이트를 갖고 있는데, 말 그대로 ApplyGameplayEffectSpecToSelf가 호출될 때 함께 호출되는 델리게이트다.
이 델리게이트를 통해 Effect가 Apply될 때 호출할 함수를 쉽게 붙여줄 수 있다.
우선 간단하게 GetAllAssetTags를 통해 GameplayEffectAssetTags를 모두 가져오고, 그 이름을 하나씩 출력해주는 로직을 작성했다.
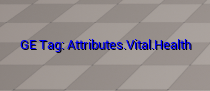
캐릭터가 월드에 배치된 포션에 Overlap되자 성공적으로 해당 태그를 추적한 모습이다.
그 외 다른 태그(Granted, GrantedBlockedAbility 등등)들은 또 천천히 포스트하겠다.
///////////////추가
GameplayTag를 추가하는 방법이 하나 더 있다.
위 2가지 방법은 코드에서 태그를 추적할 수 없어서 말 그대로 텍스트 비교로 수행해야 한다.
오탈자에 상당히 취약한 방식이다.
따라서 싱글톤으로 선언되어 Gameplay Tag를 전역적으로 관리하는 매니저를 선언하는 편이 좋다.
// AuraGameplayTags.h
struct FAuraGameplayTags
{
	static const FAuraGameplayTags& Get() { return GameplayTags; }
	static void InitializeNativeGameplayTags();

	FGameplayTag Attributes_Vital_Health;
	FGameplayTag Attributes_Vital_Mana;

    ...

private:
	static FAuraGameplayTags GameplayTags;
};

// AuraGameplayTags.cpp
FAuraGameplayTags FAuraGameplayTags::GameplayTags;

void FAuraGameplayTags::InitializeNativeGameplayTags()
{
	GameplayTags.Attributes_Vital_Health = UGameplayTagsManager::Get().AddNativeGameplayTag(
		FName("Attributes.Vital.Health")), FString("Value needed for survival");
	GameplayTags.Attributes_Vital_Mana = UGameplayTagsManager::Get().AddNativeGameplayTag(
		FName("Attributes.Vital.Mana")), FString("Value required to use the skills");

    ...
}
InitializeNativeGameplayTags는 에셋매니저에서 호출해주면 된다.
에셋매니저는 런타임뿐 말고도 에디터 환경에서도 동작하기 때문에 Project Settings에서도 태그를 확인할 수 있다.
또한 코드상으로 태그를 추가했기 때문에 앞으로 이 태그매니저를 활용하면 태그 비교 시 오탈자로 인해 버그가 발생하는 일은 없을 거다.