1. typescript
(1). CRA typescript
npx create-react-app (파일명) --template typescript
(2). 추가 패키지 (근데 요즘은 CRA에서 기본설치되는듯??)
기본적으로 리액트에서 TypeScript를 사용하기 위해서는 아래 패키지가 필요합니다.
#npm
npm install typescript @types/node @types/react @types/react-dom @types/jest#yarn
yarn add typescript @types/node @types/react @types/react-dom @types/jest
(3) 다음으로는 tsconfig.json파일을 수정해주자
tsconfig.json 파일이 없으면 yarn start나 npm run start 명령어로 시작하면 자동적으로 만들어낸다.
{
  "compilerOptions": {
    "target": "es6",
    "lib": [
      "dom",
      "dom.iterable",
      "esnext"
    ],
    "baseUrl": "./src",
    "allowJs": true,
    "skipLibCheck": true,
    "esModuleInterop": true,
    "allowSyntheticDefaultImports": true,
    "strict": true,
    "forceConsistentCasingInFileNames": true,
    "noFallthroughCasesInSwitch": true,
    "module": "esnext",
    "moduleResolution": "node",
    "resolveJsonModule": true,
    "isolatedModules": true,
    "noEmit": true,
    "jsx": "react-jsx"
  },
  "include": [
    "src"
  ],
}
저는 target을 es6 로 바꿔주고 "baseUrl": "./src",를 추가해주었습니다
2. eslint
(1).설치
npm i -D eslint
(2). 설정
$npx eslint --init
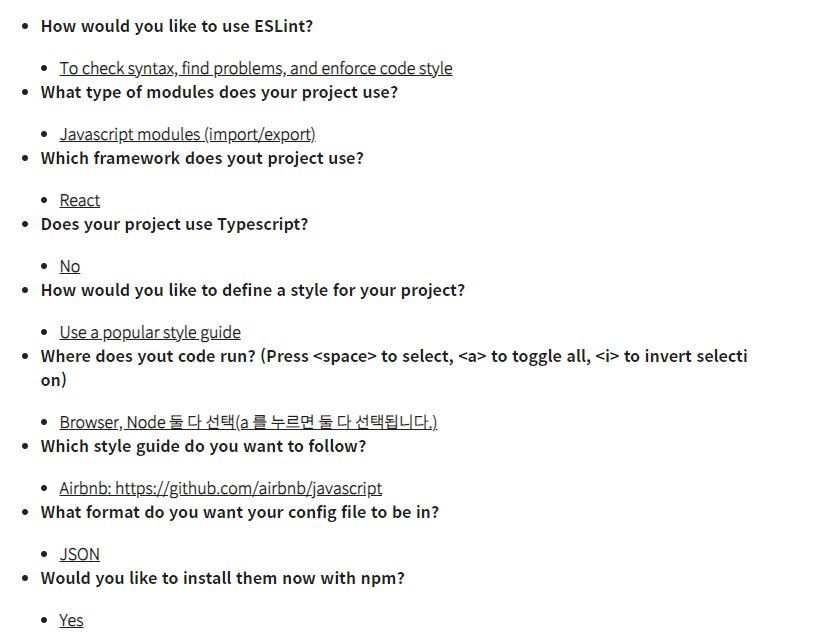
[1].설정과정은 다음과 같다
[2].이것 말고도 이렇게 하나하나 설치하는 방법도 있다
(3). 잠깐!! ESLint 설정 옵션 알아보기
- env
사전 정의된 전역 변수 사용을 정의합니다.
옵션들에 대한 설명은 여기에서 확인해주세요.
- parser
ESLint는 구문 분석을 위해 기본적으로 Espree 파서를 사용합니다.
@typescript-eslint/parser는 Typescript의 구문 분석을 합니다.
- plugin
원하는 규칙 집합을 확장해주는 역할을 합니다.
플러그인 만으로는 규칙이 적용되지 않습니다.
ES6에서 제공되는 import를 추가
- extends
추가한 플러그인에서 사용할 규칙을 설정합니다.
- globals
선언되지 않은 전역변수를 사용하는 경우 ESLin 경고가 발생하지 않도록 사용자 전역 변수를 추가할 수 있습니다.
- parserOptions
ESLint 사용을 위해 지원하려는 JavaScript 언어 옵션을 지정할 수 있습니다.
ecmaVersion: 사용할 ECMAScript 버전을 설정
sourceType: parser의 export 형태를 설정
ecmaFeatures: ECMAScript의 언어 확장 기능을 설정(jsx)
- rules
ESLin에는 프로젝트에서 사용하는 규칙을 수정할 수 있습니다.
- settings
ESLint 구성 파일에 설정 개체를 추가할 수 있으며, 실행될 모든 규칙에 제공됩니다.
설정 방법에 따라서 .eslintrc 존재유무가 달라서 에러가 생겼을 수도 있고 없을 수도 있다
에러처리는 prettier까지 설치후 ㄱㄱ
3. prettier
(1). 설치
npm i -D prettier
(2). 프로젝트 루트 폴더에. prettierrc 파일 생성 후 코드 넣기

{
  "singleQuote": true,
  "semi": true,
  "useTabs": false,
  "tabWidth": 2,
  "trailingComma": "all",
  "printWidth": 80,
  "arrowParens": "always",
  "orderedImports": true,
  "bracketSpacing": true,
  "jsxBracketSameLine": false
}
4. eslint + prettier
둘이 충돌이슈가 있으므로 별도로 방지하는 것을 깔아줘야한다
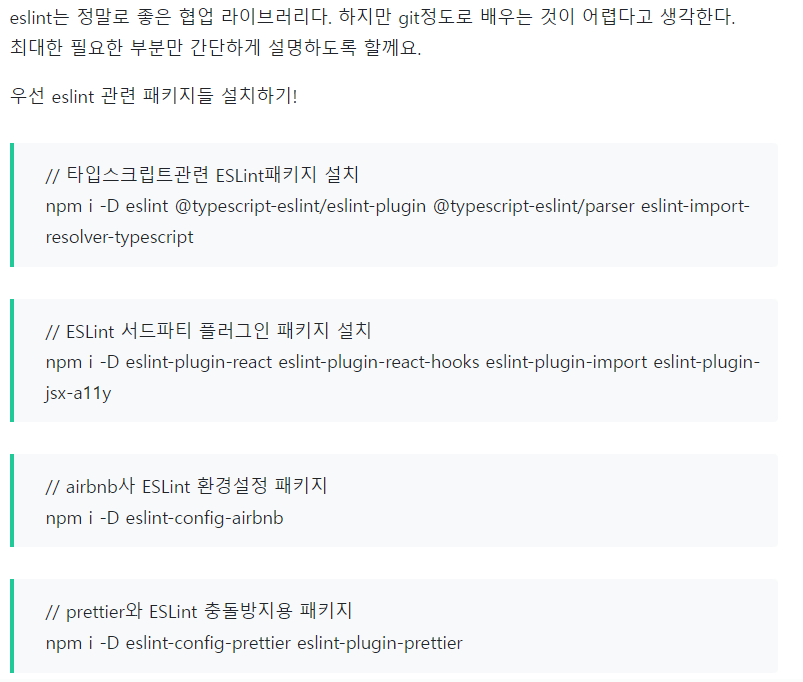
npm i -D eslint-config-prettier eslint-plugin-prettier
5. ESLint 설정파일 조작
js파일일 경우
module.exports = {
  parser: '@typescript-eslint/parser',
  plugins: ['@typescript-eslint', 'prettier'],
  extends: [
    'airbnb', // or airbnb-base
    'plugin:react/recommended',
    'plugin:jsx-a11y/recommended', // 설치 한경우
    'plugin:import/errors', // 설치한 경우
    'plugin:import/warnings', // 설치한 경우
    'plugin:@typescript-eslint/recommended',
    'plugin:prettier/recommended',
  ],
  rules: {
    'linebreak-style': 0,
    'import/prefer-default-export': 0,
    'import/extensions': 0,
    'no-use-before-define': 0,
    'import/no-unresolved': 0,
    'react/react-in-jsx-scope': 0,
    'import/no-extraneous-dependencies': 0, // 테스트 또는 개발환경을 구성하는 파일에서는 devDependency 사용을 허용
    'no-shadow': 0,
    'react/prop-types': 0,
    'react/jsx-filename-extension': [
      2,
      { extensions: ['.js', '.jsx', '.ts', '.tsx'] },
    ],
    'jsx-a11y/no-noninteractive-element-interactions': 0,
    '@typescript-eslint/explicit-module-boundary-types': 0,
  },
  settings: {
    'import/resolver': {
      node: {
        extensions: ['.js', '.jsx', '.ts', '.tsx'],
      },
    },
  },
};
json파일일 경우
{
 "env": {
   "browser": true,
   "es6": true,
   "node": true
 },
 "parser": "@typescript-eslint/parser",
 "plugins": ["@typescript-eslint", "import"],
 "extends": [
   "airbnb",
   "airbnb/hooks",
   "plugin:@typescript-eslint/recommended",
   "plugin:prettier/recommended",
   "plugin:import/errors",
   "plugin:import/warnings"
 ],
 "parserOptions": {
   "ecmaVersion": 2020,
   "sourceType": "module",
   "ecmaFeatures": {
     "jsx": true
   }
 },
 "rules": {
   "linebreak-style": 0,
   "import/no-dynamic-require": 0,
   "import/no-unresolved": 0,
   "import/prefer-default-export": 0,
   "global-require": 0,
   "import/no-extraneous-dependencies": 0,
   "jsx-quotes": ["error", "prefer-single"],
   "react/jsx-props-no-spreading": 0,
   "react/forbid-prop-types": 0,
   "react/jsx-filename-extension": [
     2,
     { "extensions": [".js", ".jsx", ".ts", ".tsx"] }
   ],
   "import/extensions": 0,
   "no-use-before-define": 0,
   "@typescript-eslint/no-empty-interface": 0,
   "@typescript-eslint/no-explicit-any": 0,
   "@typescript-eslint/no-var-requires": 0,
   "no-shadow": "off",
   "react/prop-types": 0,
   "no-empty-pattern": 0,
   "no-alert": 0,
   "react-hooks/exhaustive-deps": 0
 },
 "settings": {
   "import/parsers": {
     "@typescript-eslint/parser": [".ts", ".tsx"]
   },
   "import/resolver": {
     "typescript": "./tsconfig.json"
   }
 }
}
6. 자동 포맷기능도 가능
7. 허스키 + lint-staged
(1). 허스키 설치
npm i -D husky
(2). 허스키 설정 추가
//package.json
"scripts": {
...
"prepare": "husky install",
..
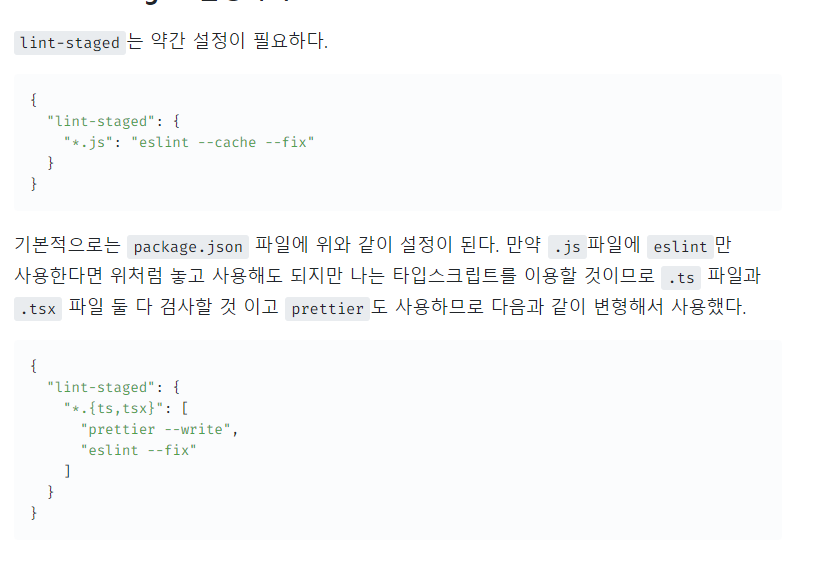
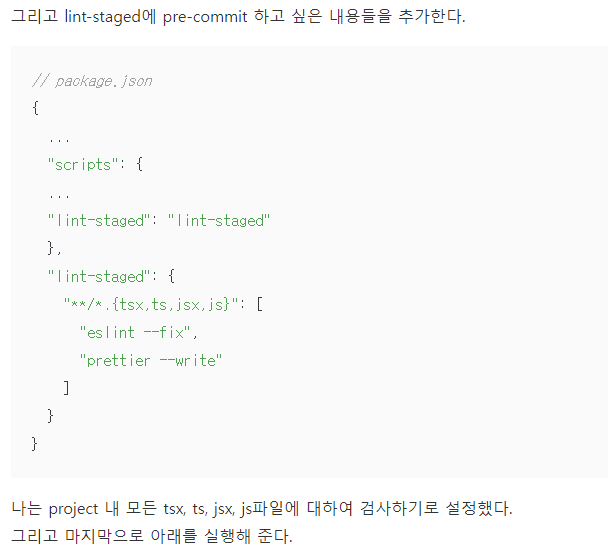
}(3). lint-staged 설치
npm i -D lint-staged
(4). lint-staged 설정 추가
{
  ...
	"scripts": {
    	...
        "lint-staged": "lint-staged"
    },
  	"lint-staged": {
      "src/**/*.{js,jsx,ts,tsx}": [
        "eslint --fix",
        "prettier --write"
      ]
    }
}
추가설명
(5). 실행
npm install 필요할 수도 있다
npx husky add .husky/pre-commit "npm run lin-staged" or "npx lint-staged" or "yarn lint-staged"

이렇게 .husky폴더 생성
함께보면 좋은 블로그 ㅎㅎ
https://velog.io/@junghyeonsu/React-create-react-app-Typescript-%EC%B4%88%EA%B8%B0-%EC%84%B8%ED%8C%85-%EC%99%84%EB%B2%BD-%EC%A0%95%EB%A6%AC
https://velog.io/@do_dadu/ESLint%EB%A5%BC-%EC%82%AC%EC%9A%A9%ED%95%B4%EB%B3%B4%EC%9E%90