공부한 내용
JS 8. 배열
Array Declaration
const arr1 = new Array();
const arr2 = [1,2];
Index position
배열은 인덱스를 전달하게 되면 그 인덱스에 해당하는 값을 받아올 수 있음
const fruits = ['🍎', '🍌'];
console.log(fruits); // (2) ["🍎", "🍌"]
console.log(fruits.length); // 2
console.log(fruits[0]); // 🍎
console.log(fruits[1]); // 🍌
console.log(fruits[2]); // undefined
console.log(fruits[fruits.length - 1]); 🍌
[fruits.length - 1]배열의 마지막 값
Looping
// a. for
for (let i = 0; i < fruits.length; i++) {
  console.log(fruits[i]);
}

// b. for of
for (let fruit of fruits) {
  console.log(fruit);
}

// c. forEach, 콜백 함수를 받아옴
fruits.forEach((fruit) => console.log(fruit));
Add, delete, copy
push 배열 끝에 아이템 추가
fruits.push('🍓'.'🍑');
console.log(fruits);
// (4) ["🍎", "🍌", "🍓", "🍑"]
pop 배열 끝에 아이템 삭제
fruits.pop(); // 🍑 삭제
fruits.pop(); // 🍓 삭제
console.log(fruits);
// (2) ["🍎", "🍌"]
unshift 배열 맨 앞에 아이템 추가
fruits.unshift('🍓', '🍋');
console.log(fruits);
// (4) ["🍓", "🍋", "🍎", "🍌"]
shift 배열 맨 앞에 아이템 제거
fruits.shift(); // 🍓 삭제
fruits.shift(); // 🍋 삭제
console.log(fruits);
// (2) ["🍎", "🍌"]
unshift와 shift가 pop, push 보다 느린 이유
pop, push는 빈 공간에 데이터를 추가하고 삭제하기 때문에 기존에 들어 있던 데이터들은 움직이지 않음
- unshif는 데이터를 맨 앞에 넣기 위해선 먼저 기존에 있던 데이터들을 필요한 공간만큼 뒤로 밀어서 공간을 비워둔 상태로 새로운 데이터를 집어 넣음
- shift는 첫 번째 아이템을 지우고 두 번째 있는 아이템을 앞으로 당기는 일을 반복한다.
→ 배열의 전체의 데이터가 움직이기 때문에 배열이 길면 길수록 느려짐
splice 지정한 인덱스 삭제
- 지우려는 갯수를 지정하지 않으면 지정한 인덱스부터 전부 삭제 된다.
fruits.push('🍓', '🍑', '🍋');
console.log(fruits);
// (5) ["🍎", "🍌", "🍓", "🍑", "🍋"]

fruits.splice(1, 1);
console.log(fruits);
// (4) ["🍎", "🍓", "🍑", "🍋"]

fruits.splice(1,1, '🍈', '🍉'); // 🍓 삭제
console.log(fruits);
// (5) ["🍎", "🍈", "🍉", "🍑", "🍋"]
concat 배열 합체
const fruits2 = ['🍐', '🥥'];
const newFruits = fruits.concat(fruits2);
console.log(newFruits);
//(7) ["🍎", "🍈", "🍉", "🍑", "🍋", "🍐", "🥥"]
Searching
indexof 인덱스의 몇번째에 위치하는지 알려줌
console.log(fruits.indexOf('🍎')); // 0
console.log(fruits.indexOf('🍉')); // 2
console.log(fruits.indexOf('🥕')); // -1(false)
includes 배열의 값의 유무를 참 거짓으로 리턴함
console.log(fruits.includes('🍉')); // true
console.log(fruits.includes('🥕')); // false
lastIndexOf 배열 마지막에 있는 값 출력
fruits.push('🍎');
console.log(fruits);
// (6) ["🍎", "🍈", "🍉", "🍑", "🍋", "🍎"]

console.log(fruits.indexOf('🍎')); // 0
console.log(fruits.lastIndexOf('🍎')); // 5
JS 9. 배열 API 연습
1. 주어진 배열을 문자열으로 만들어라
const fruits = ['apple', 'banana', 'orange'];내가 생각한 답: toString
const fruits = ['apple', 'banana', 'orange'];
console.log(fruits.toString());
// apple,banana,orange
정답: join
const fruits = ['apple', 'banana', 'orange'];
const result = fruits.join(',');
console.log(result);
toString과 join의 차이점
- toString 지정된 배열 및 그 요소를 나타내는 문자열을
,로 연결해서 반환함 (구분자 선택 불가능) - join 요소 사이에 구분자를 넣을 수 있음 (디폴트값
,)
toString이 틀린 답은 아니지만 join이 좀 더 활용성이 높아보인다.
2. 주어진 문자열을 배열로 만들어라
const fruits = '🍎, 🥝, 🍌, 🍒';내가 생각한 답: split()
const fruits = '🍎, 🥝, 🍌, 🍒';
const fruitsArray = fruits.split();
console.log(fruitsArray);
정답: split() 이지만...
const fruits = '🍎, 🥝, 🍌, 🍒';
const result = result.split(',');
console.log(result);
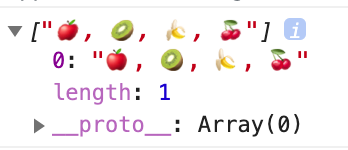
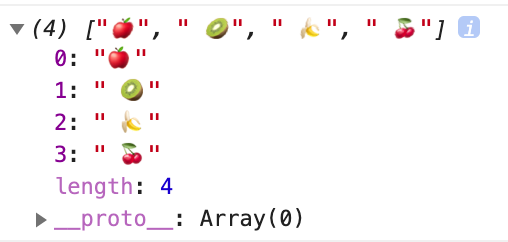
틀린 이유
구분자를 넣지 않음! 필수적으로 들어가야 함
- 구분자를 넣지 않으면 문자열 전체가 한 곳에 들어감

- 구분자를 넣었을 때

3. 주어진 배열을 [5, 4, 3, 2, 1 ] 순서로 바꾸어라
const array = [1, 2, 3, 4, 5];내가 생각한 답: reverse()
const array = [1, 2, 3, 4, 5];
const reversed = array.reverse();
console.log('reversed:', reversed);
정답: reverse()
const array = [1, 2, 3, 4, 5];
const result = array.reverse();
console.log(result);
틀리지는 않았지만 레퍼런스 보고 따라한 티가 난다... 굳이 안적어도 되는 것까지 적음
4. 앞에 두 요소가 없는 '새로운' 배열을 만들어라
const array = [1, 2, 3, 4, 5];내가 생각한 답: splice()
const array = [1, 2, 3, 4, 5];
const removed = array.splice(2,3);
console.log(removed); // (3) [3, 4, 5]
정답: slice()
배열의 특정한 부분을 리턴함
const array = [1, 2, 3, 4, 5];
const removed = array.slice(2,5);
console.log(removed); // (3) [3, 4, 5]
console.log(array); // (5) [1, 2, 3, 4, 5]
틀린 이유
const array = [1, 2, 3, 4, 5];
const removed = array.splice(2,3);
console.log(removed); // (3) [3, 4, 5]
console.log(array); // (2) [1, 2]
array 자체를 변형하는게 아니라 새로운 배열을 만들어야 함
보기
class Student {
  constructor(name, age, enrolled, score) {
    this.name = name;
    this.age = age;
    this.enrolled = enrolled;
    this.score = score;
  }
}
const students = [
  new Student('A', 29, true, 45),
  new Student('B', 28, false, 80),
  new Student('C', 30, true, 90),
  new Student('D', 40, false, 66),
  new Student('E', 18, true, 88),
];
5. 점수가 90인 학생을 찾아라
내가 찾은 답: find()
function found(student) {
	return student.score === 90;
  }
}
const result = students.find(found);
console.log(result);

// Student {name: "C", age: 30, enrolled: true, score: 90}
정답: find()
const result = students.find((student) => student.score === 90);
console.log(result);

// Student {name: "C", age: 30, enrolled: true, score: 90}
어떻게 결과값은 찾았는데 코드가 너무 길다. 누가 봐도 mdn 참고한 코드...
6. 수업에 등록한 학생들만 배열하기
내가 찾은 답: filter()
const result = students.filter(student => student.enrolled === true);
console.log(result);

// (3) [Student, Student, Student]
	// 0: Student {name: "A", age: 29, enrolled: true, score: 45}
	// 1: Student {name: "C", age: 30, enrolled: true, score: 90}
	// 2: Student {name: "E", age: 18, enrolled: true, score: 88}
	// length: 3
	// __proto__: Array(0)
정답: filter()
const result = students.filter((student) => students.enrolled);
console.log(result);
함수가 왜 괄호 안에 안 넣어도 돌아 가는 거지..?
7. 학생들의 점수만 들어있는 새로운 배열 만들기
내가 찾은 답: map()
const result = students.map((student) => student.score);
console.log(result);

// (5) [45, 80, 90, 66, 88]
정답: map()
const result = students.map((student) => student.score);
console.log(result);
한문제 풀고 정답 체크 하는 방식으로 하니까 뭔가 컨닝한 느낌이 든다. 확실히 코드는 좀 더 간단해졌지만 삽질하는 맛이 없어진 기분...
8. 50점 이하의 점수를 가진 학생이 있는지 확인하기
내가 생각한 답: includes
const result = students.includes((student) => student.score < 50);
console.log(result);
// 결과는 false...
정답:
some() 배열에서 하나라도 조건에 충족되는 것이 있는지 검사할 때
const result = students.some((student) => student.score < 50);
console.log(result);
every() 배열에 있는 모든 요소들이 조건을 충족할 때
const result = !students.every((student) => student.score >= 50);
console.log(result);
some이 조금 더 간단함
9. 학생들의 평균 점수 구하기
내가 생각한 답: reduce
하지만 코드를 만들지 못했다...
정답: reduce
배열에 있는 모든 요소들의 값을 누적할 때 쓰임
콜백: 배열에 있는 모든 요소가 호출 됨 → 리턴되는 값은 누적된 결과값을 전달
const result = students.reduce((pre, cur) => {
  console.log(pre);
  console.log(cur);
  return pre + cur.score;
}, 0);
console.log(result / students.length);

// 간략하게
const result = students.reduce((pre, cur) => pre + cur.score, 0);
console.log(result / students.length);pre리턴한 값이 다음에 호출 될 때pre로 전달됨cur배열의 값을 순차적으로cur에 전달됨
레퍼런스 보고 이해할 수 있는 게 중요한 것 같다..
10. 학생들의 모든 점수를 문자열로 변환하라
내가 생각한 답: map toString
const scores = students.map((student) => student.score);
const result = scores.toString();
console.log(result);
정답: map join
const result = students
	.map((student) => student.score)
	// .filter((score) => score >= 50)
	.join();
console.log(result);map이나 join은 서로 배열 자체를 리턴하기 때문에 api를 섞어서 호출할 수 있음
11. 학생들의 점수를 오름차순으로 정렬
내가 생각한 답: map join sort
const result = students
  .map((student) => student.score)
  .join()
  .sort(...);
console.log(result);
10번 문제에서 만든 코드를 재사용하는거 까진 알았는데 저 join을 어떻게 활용 해야 될지 몰라서 결국...
정답: map sort join
const result = students
  .map((student) => student.score)
  .sort((a, b) => a - b )
  .join();
console.log(result);
예제에 필요한 함수는 어떻게든 검색해서 찾아내는데 레퍼런스 활용을 정말 못하는 것 같다... 레퍼런스 읽는 법 부터 다시 공부해야지...
