Overview
무료 도메인 등록을 마친 지난 날..
이제 본격적인 https 세팅을 시작해볼 것이다.
Let's Encrypt 라는 비영리 기관을 통해 무료로 SSL 인증서를 발급받을 수 있다. 인증서 발급을 위해 Certbot을 사용해보자.
1. certbot 설치하기
sudo snap install certbot --classic
Certbot 설치는 공식 홈페이지 권장 방법인 snap을 통해 설치한다.
certbot certonly --manual --preferred-challenges dns-01 --server https://acme-v02.api.letsencrypt.org/directory -d {도메인} -d *.{도메인}
- Certbot 인증서 요청
- 요청한 도메인 소유자 확인
- 인증서 발급
우리는 2번에서 dns 방법으로 요청 도메인의 소유자를 인증하고자 한다.
dns - dns 레코드에 특정 값을 작성하여 도메인 소유자 확인
Saving debug log to /var/log/letsencrypt/letsencrypt.log
Enter email address (used for urgent renewal and security notices)
 (Enter 'c' to cancel): {이메일 입력}

- - - - - - - - - - - - - - - - - - - - - - - - - - - - - - - - - - - - - - - -
Please read the Terms of Service at
https://letsencrypt.org/documents/LE-SA-v1.3-September-21-2022.pdf. You must
agree in order to register with the ACME server. Do you agree?
- - - - - - - - - - - - - - - - - - - - - - - - - - - - - - - - - - - - - - - -
(Y)es/(N)o: Y

- - - - - - - - - - - - - - - - - - - - - - - - - - - - - - - - - - - - - - - -
Would you be willing, once your first certificate is successfully issued, to
share your email address with the Electronic Frontier Foundation, a founding
partner of the Let's Encrypt project and the non-profit organization that
develops Certbot? We'd like to send you email about our work encrypting the web,
EFF news, campaigns, and ways to support digital freedom.
- - - - - - - - - - - - - - - - - - - - - - - - - - - - - - - - - - - - - - - -
(Y)es/(N)o: Y
Account registered.
Requesting a certificate for mytamra.ga and *.mytamra.ga

- - - - - - - - - - - - - - - - - - - - - - - - - - - - - - - - - - - - - - - -
Please deploy a DNS TXT record under the name:

_acme-challenge.{당신의 도메인}.

with the following value:

BCAPvx9hSb_gso0xrYT_pmuPxVLxS-dDFzi_Fq027rg

- - - - - - - - - - - - - - - - - - - - - - - - - - - - - - - - - - - - - - - -
Press Enter to Continue
터미널에서 위와 같은 메시지를 확인할 수 있다.
여기서 바로 엔터를 입력하지 말고 읽어보면 DNS TXT 레코드를 생성하라는 안내가 나온다.
❌ 나는 이 부분을 자세히 읽지 않고 엔터를 누르고 넘어갔더니 바로 종료가 되길래
이 짓을 무한 반복하다가 일시적으로 인증서를 받을 수 없는 상태까지 갔었다. 주의하자..
DNS 레코드는 DNS상에서 도메인에 관한 설정을 하기 위해 사용되는 일련의 문자들을 뜻한다.
TXT 레코드란 텍스트 레코드의 줄임말로, 임의의 문자열로 구성된 값이다. 소유한 도메인에 TXT 레코드를 추가하여 유효한 도메인인지를 판단하는 과정을 거치게 된다.
_acme-challenge.{당신의 도메인} 라는 이름으로 BCAPv~ 라는 값을 입력해주면 된다.
이를 위해 AWS Route53 메뉴로 이동하여 레코드 생성을 한다.
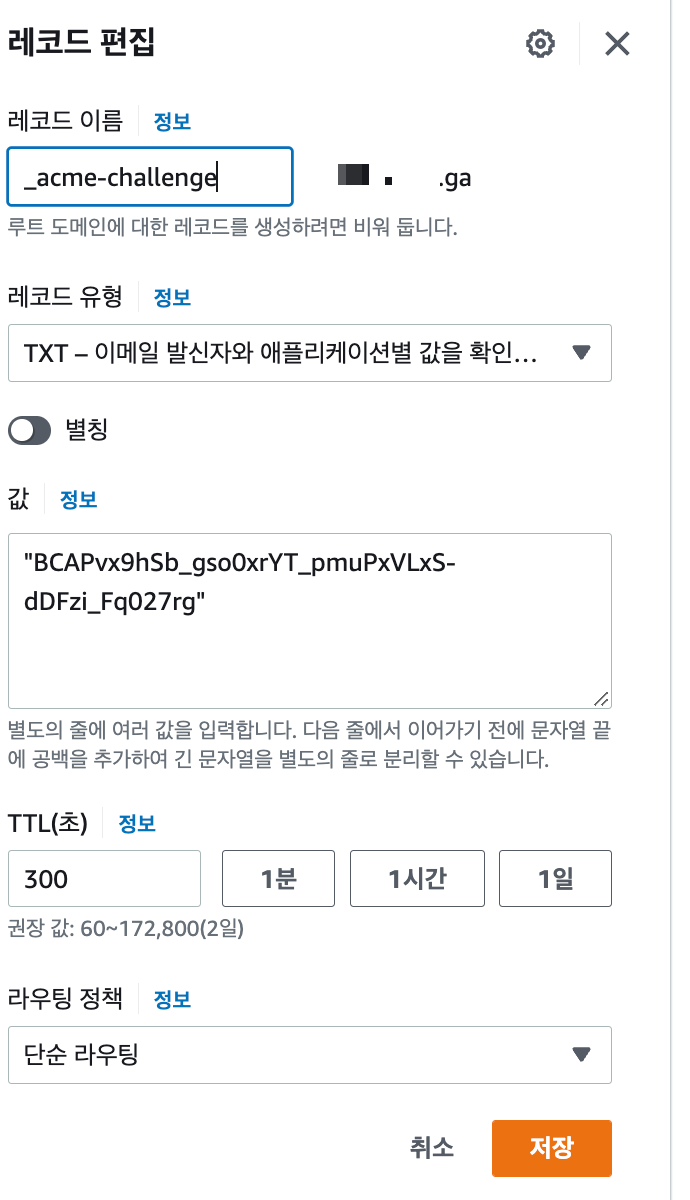
유형 부분은 TXT로 변경해준 뒤 이름에는 _acme-challenge를 넣어주고, 값에는 콘솔창에 나와있는 문자를 넣어준다.
실제 레코드가 적용되는데는 몇 분이 걸리기 때문에 조금 기다려준 뒤에 콘솔로 돌아가 엔터를 눌러준다.
다른 터미널 창을 키고 아래 명령어를 통해 적용이 되었는지 확인이 가능하다.
nslookup -q=TXT _acme-challenge.{your domain}
- - - - - - - - - - - - - - - - - - - - - - - - - - - - - - - - - - - - - - - -
Please deploy a DNS TXT record under the name:

_acme-challenge.{당신의 도메인}.

with the following value:

YsMHssZUsQDydyHtdUhV4R5gxK1hfFr7HqzAqJtbENE

(This must be set up in addition to the previous challenges; do not remove,
replace, or undo the previous challenge tasks yet. Note that you might be
asked to create multiple distinct TXT records with the same name. This is
permitted by DNS standards.)

Before continuing, verify the TXT record has been deployed. Depending on the DNS
provider, this may take some time, from a few seconds to multiple minutes. You can
check if it has finished deploying with aid of online tools, such as the Google
Admin Toolbox: https://toolbox.googleapps.com/apps/dig/#TXT/_acme-challenge.mytamra.ga.
Look for one or more bolded line(s) below the line ';ANSWER'. It should show the
value(s) you've just added.

- - - - - - - - - - - - - - - - - - - - - - - - - - - - - - - - - - - - - - - -
인증 과정이 업데이트가 되어 한번 더 레코드 생성을 해야 한다. 필자는 이때 똑같은 이름의 레코드를 하나 더 생성하는 것으로 착각했는데 아까 생성한 레코드에서 값만 추가해주면 된다.
같은 이름의 레코드 생성은 불가능하다.
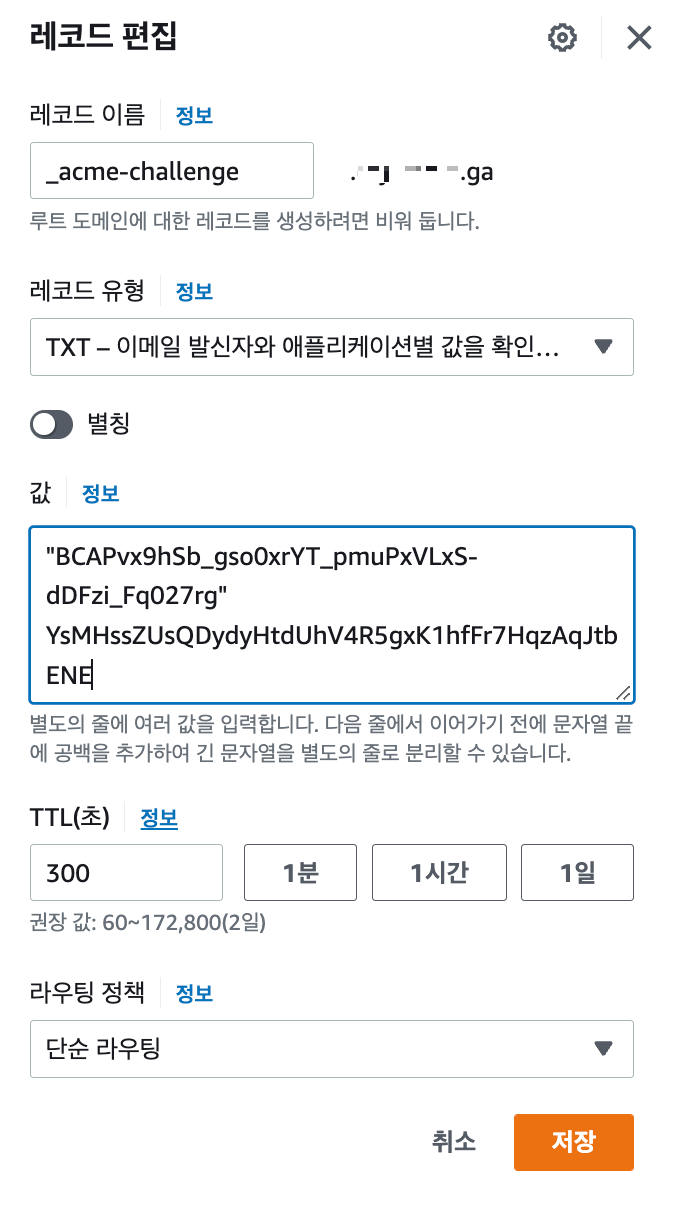
별도의 줄에 입력하면 여러개의 값을 입력할 수 있다. 값을 하나 더 추가해주고 저장을 누른 뒤 몇분 뒤에 콘솔로 돌아가 엔터키를 누르자.
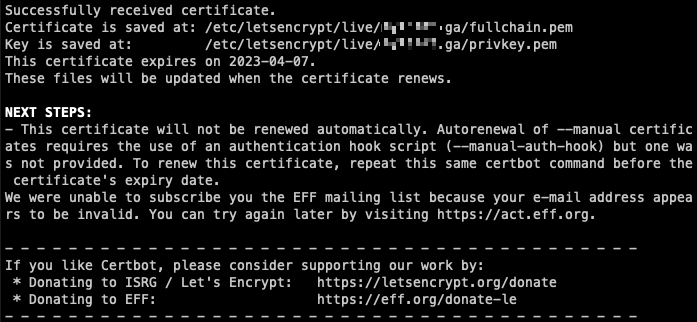
성공적으로 인증서를 발급받았다.
어디에 인증서가 저장되었는지는 Certificate is saved at 에서 확인할 수 있고, 그에 대한 key는 Key is saved at 에 저장되어 있다.
/etc/letsencrypt/live/{당신의 도메인}/ 내부에 위치한다.
letsencrypt를 이용해 발급받은 인증서는 3개월마다 갱신을 해주어야 한다. 자동 갱신 설정도 있으니 참고하자.
이제 발급받은 인증서를 활용해 nginx reverse proxy 설정을 해보자.
참고
https://www.vompressor.com/tls1/
https://note.redgoose.me/article/2825/
https://jybaek.tistory.com/821