
한 웹페이지 안에서 여러 개의 페이지를 보여주는 'routing'기능에 대해서 알아보자.
Routing이란
라우팅이란 쉽게말해, 한 웹페이지 내에서 다른 경로에 따라 다른 화면을 보여주는 것을 말한다. 아쉽게도 리액트라이브러리 자체에는 이런 기능이 내장되어있지 않기때문에 'third-party Library'(제작사에서 만든것이 아니라 다른 업체에서 만든 해당 툴 지원 라이브러리)인 react-router가 필요하다.
react-router 설치하기
npm install react-router-dom --saverouter를 사용하기 위해서는 react-router-dom이 필요한데, react-router만 설치해도 종속에 의해 react-router-dom이 설치된다.이때 주의할 점은 프로젝트 파일내에서 설치해야한다는 것이다!
routes component
import React from 'react';
import {
  BrowserRouter as Router,
  Switch,
  Route,
} from 'react-router-dom';

import Login from './pages/Login/Login';
import Signup from './pages/Signup/Signup';
import Main from './pages/Main/Main';

class Routes extends React.Component {
  render() {
    return (
      <Router>
        <Switch>
          <Route exact path="/" component={Login} />
		  <Route exact path="/signup" component={Signup} />
          <Route exact path="/main" component={Main} />
        </Switch>
      </Router>
    )
  }
}

export default Routes;
react-router-dom에서 Router(브라우저 라우터는 이름이 길어서 as Router라는 이름으로 가져왔다.),Swicth,Route 컴포넌트들을 가져온다.
Router component: 라우팅을 담당하는 역할을 한다.
Switch component: A경로라면 A화면을 보여주고, B경로라면 B화면을 보여주는 역할을 한다.
Route component: 라우트 컴포넌트에는 기본적으로 'path'와 'component' 두가지 props가 들어가있다.
path의 경우 exact를 써주지않으면, '/'가 경로에 공통으로 포함되기때문에 원하는 기능화면뿐만아니라 '/'포함된 화면이 나온다.
ReactDOM.render(<Routes></Routes>, document.getElementById('root'));최종적인 목표는 웹화면에 우리가 넣은 컴포넌트들을 보이게 하는 것이다. 이전 과정인 라우트 컴포넌트를 만들어준 것은 단순히 우리가 구현하고자하는 모든 컴포넌트를 라우트컴포넌츠에 포함시켜줘서 최상위컴포넌트를 만든 것 뿐이다. 최종목표를 위해서는 라우트를 파일 중 가장 최상위인 'index.html'의 'id root'에 연결해줘야한다.
route로 이동하는 방법
1.Link component
import React from 'react';
import { Link } from 'react-router-dom';
class Login extends React.Component {
render() {
return (
  <div>
    <Link to="/signup">회원가입</Link>
  </div>
)
}
}
export default Login;
라우터는 페이지로 만들고싶은 것들을 경로를 임의로 만들어 작업해준다. 가상의 페이지주소이기때문에 사용자가 주소로 접속할 경우 에러가 난다. 가상의 주소로 넘어갈 수 있도록 앵커 태그들이 필요한데,link가 이 역할을 해준다.
*a태그와 link태그
-보통 a태그를 사용할 경우에는 에러가 나는데, 앞에서 말했듯이 리액트 라우터는 실제 페이지가 존재하는 것이 아니기 때문에 브라우저에서 제공하는 a태그는 라우터가 인식하지 못한다. 그렇기 때문에 리액트 라우터에서 제공하는 link태그를 사용한다.
-외부사이트로 이동하는 경우에는 <a>, 프로젝트 내에서 페이지 전환하는 경우에는 <link>
2.withRouter HOC
link는 단순한 이동을 원할 때 사용한다면, 'withRouter HOC'는 추가적으로 처리하고 싶은 로직이 있을 때 사용해준다.
import React from 'react';
import { withRouter } from 'react-router-dom';

class Login extends React.Component {

  goToSignup() {
    this.props.history.push('/signup');
  }

  render() {
    return (
      <div>
        <div
          class="btn signup-btn"
          onClick={this.goToSignup.bind(this)}
        >
          회원가입
        </div>
      </div>
    )
  }
}

export default withRouter(Login);
props에 루트정보(history)를 받으려면 export하는 class에 withRouter로 감싸줘야 한다.이것을 줄여서 HOC라고 한다.
scss
css를 효율적으로 작성할 수 있게 도와주는 업그레이된 표현이라고 생각하면 된다.
scss의 장점
- 코드중복을 줄인다.
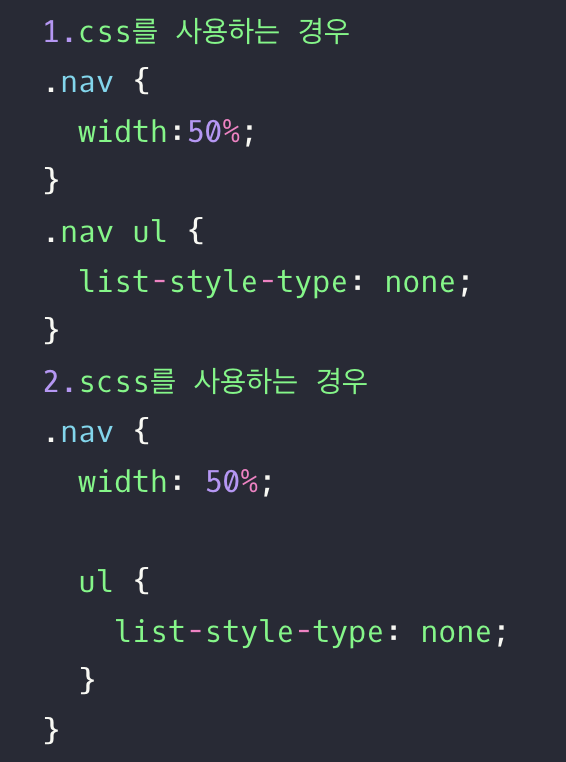
- 변수사용이 가능하기때문에 유지보수가 쉽다.
$theme-color: #FAFAFA;
$border-style: solid;

.login-container {
	color: $theme-color;
    style: $border-style;
}

a {
	color: red;
    &:hover {
    	border-bottom: $border-style 1px;
    }
}
-함수와 연산자를 사용할 수 있다.
@mixin flex-center {
	display: flex;
	justify-content: center;
  align-items: center
}

login-container {
  @include flex-center;
	button {
	  width: 200px;
		height: 100px;
		background-color: $theme-color;
		&:hover {
			background-color: red;
			cursor: pointer;
		}
}