MSA의 개념 정도는 알아볼 겸 정리하고자 한다.
MSA(Microservices Architecture)
소프트웨어 개발 방식 중 하나로, 큰 애플리케이션을 독립적으로 배포, 운영할 수 있는 작은 서비스들로 나누어 개발하는 접근 방식이다.
각 서비스는 독립적이기 때문에, 한 서비스가 업데이트되거나 오류가 발생해도 전체 시스템에 영향을 미치지 않는다.
- 장점
- 독립성: 각 서비스는 독립적으로 개발, 배포, 확장될 수 있어서 전체 시스템의 유연성이 증가한다.
- 기술 다양성: 다양한 프로그래밍 언어, 데이터 저장 기술을 사용할 수 있어서 각 서비스의 요구사항에 가장 적합한 기술을 선택할 수 있다.
- 안정성: 하나의 서비스에 문제가 발생해도 시스템 전체에 영향을 미치지 않아 시스템의 전체적인 안정성이 증가한다.
- 확장성: 트래픽이 많은 서비스만 독립적으로 확장할 수 있어 리소스 사용이 효율적이다.
- 단점
- 복잡성 증가: 서비스 간 통신, 데이터 관리 등 추가적인 복잡성이 발생한다.
- 운영 어려움: 다수의 독립적 서비스를 모니터링, 로깅, 디버깅하는 것이 전통적인 모놀리식 아키텍처보다 복잡할 수 있다.
구성 요소
- Eureka-Client(Service): 실제 서비스별 로직이 실행되는 서비스
- Eureka-Server: 서비스들의 정보를 관리하고 라우팅 하는 Eureka Server
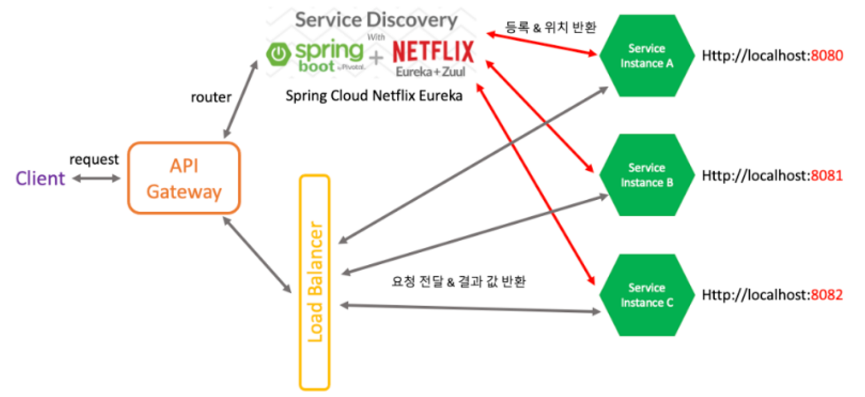
gateway는 단일 진입점이자 라우팅 기능을 담당- Eureka는
Service Discovery(Registry)역할을 한다. Load Balancer는 서비스 이름으로 호출하고 health check 역할을 한다.
API Gateway 서비스
사용자나 외부 시스템으로부터 요청을 단일화하여 처리할 수 있도록 해주는 서비스이다.
단일 진입점이 있어야 엔드포인트의 변화에 대해서도 클라이언트 사이드에서 고민할 것이 줄어들며 모든 요청을 일괄적으로 처리된다.
API Gateway 서비스 장점
- 인증 및 권한 부여
- 인증 및 권한 부여의 단일 작업 => 사용자의 신원을 확인하고(인증) 해당 사용자가 특정 리소스에 접근할 수 있는 권한이 있는지 확인(권한 부여)하는 작업을 단일 위치에서 처리하며 이는 보안 강화를 위해 중요
인증 에러 : 401 (아이디, 비밀번호를 잘못 입력해서 에러나는 경우 401)
인가 에러 : 403 (권한이 없는데 요청하는 경우에는 403)
- 서비스 검색 통합
- 마이크로 서비스의 검색 통합 => 마이크로서비스 아키텍처에서 각 서비스의 위치(IP 및 포트 등)를 자동으로 발견하고 연결해 주는 기능으로 이는 서비스 인스턴스가 동적으로 변경될 때 유용
- 응답 캐싱
- API 게이트웨이 또는 프록시 서버가 자주 요청되는 응답을 캐싱하여 서버 부하를 줄이고 응답 시간을 개선하는 기능
- 정책, 회로 차단기 및 QoS 다시 시도
- 회로 차단기 : 특정 서비스가 오류를 자주 발생시킬 때, 잠시 요청을 차단하여 전체 시스템의 안정성을 유지하는 메커니즘
- QoS 다시 시도 : 서비스 요청이 실패할 경우 일정 횟수만큼 자동으로 재시도하는 기능을 제공.
- 속도 제한
- 특정 기간 동안 특정 사용자나 클라이언트가 요청할 수 있는 최대 요청 수를 제한하여 서비스 남용을 방지하는 기능
- 부하분산
- 들어오는 요청을 여러 서비스 인스턴스에 분배하여 시스템의 성능과 안정성을 유지하는 기능
- 로깅, 추적
- 각 요청과 응답에 대한 로그를 기록하고, 여러 서비스 간의 요청 흐름을 추적하여 문제를 디버깅하고 성능을 모니터링하는 데 사용
- 헤더, 쿼리 문자열 및 청구 변환
- 클라이언트로부터 받은 요청의 헤더나 쿼리 문자열을 다른 서비스에서 요구하는 형식으로 변환하거나, 특정 데이터 처리를 수행하는 기능
- IP허용 목록에 추가
- 특정 IP 주소만이 서비스에 접근할 수 있도록 허용 목록(화이트리스트)에 추가하는 보안 기능으로 이를 통해 허용되지 않은 IP의 접근을 차단 가능
서버 실행 방법
applcation.yml의server.port=포트번호지정해주기- Tomcat쪽 Edit Configuration에 새로운 Configuration 추가하고 VMOption 추가해서
-Dserver.port=포트번호- (project 경로의 터미널에서(jar로 필드 후 실행))
java -jar "-Dserver.port=포트번호" .\build\libs\user-service-0.0.1-SNAPSHOT.jar
3가지 방법이 있는데, 일단 기본적으로 열어둘 서버 1개와
msa를 실행하는 서버 1개부터 해볼 것이다.
기본적으로 열어둘 서버
build.gradle에 의존성 추가
dependencies {
    implementation 'org.springframework.cloud:spring-cloud-starter-netflix-eureka-server'
    testImplementation 'org.springframework.boot:spring-boot-starter-test'
    testRuntimeOnly 'org.junit.platform:junit-platform-launcher'
}
application.yml
server:
  port: 8761
eureka:
  client:
    # 유레카 서버는 유레카 서버에 저장할 필요 X
    register-with-eureka: false

    # 유레카 서버는 다른 msa가 등록되는걸 확인하기 위해 갱신할 필요 X
    fetch-registry: false
기본 Application에도 @EnableEurekaServer 어노테이션 추가
@SpringBootApplication
@EnableEurekaServer
public class JehunApplication {

    public static void main(String[] args) {
        SpringApplication.run(Chap0101EurekaServerLectureSourceApplication.class, args);
    }

}
이렇게 하고 인텔리제이에서는 gradle 쪽에서 build를 찾아볼 수 있다.

해당하는 build를 더블클릭하면

build의 libs 속에 .jar 파일이 있는데 명령 프롬프트에서 이것을 실행할 것이다.
cd {.jar 파일의 주소} 로 이동한 뒤, java -jar .\ + tab키를 누르면 jar 파일이 열린다. 엔터를 눌러 실행을 해두고 끄지 말자
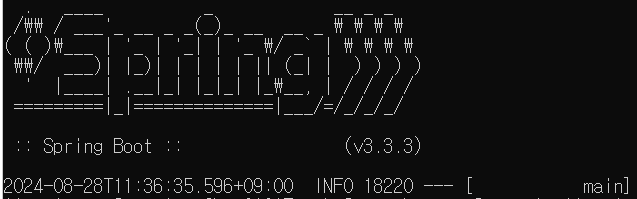
명령 프롬프트에서 실행 시 화면
끄는 방법은 ctrl + c
실행해둔 채로 다음 예제들을 해볼 것이다.
1. 서버 1개 열어두기
새로운 프로젝트를 만들자. client 역할을 할 것이다.
이 서버는 client 역할을 위해 build.gradle이 다르다.
build.gradle
    implementation 'org.springframework.boot:spring-boot-starter-web'
    implementation 'org.springframework.cloud:spring-cloud-starter-netflix-eureka-client'
    developmentOnly 'org.springframework.boot:spring-boot-devtools'
    testImplementation 'org.springframework.boot:spring-boot-starter-test'
    testRuntimeOnly 'org.junit.platform:junit-platform-launcher'
application.yml 파일
server:
port: 8001
spring:
application:
name: eureka-client
eureka:
client:
register-with-eureka: true
fetch-registry: true
service-url:
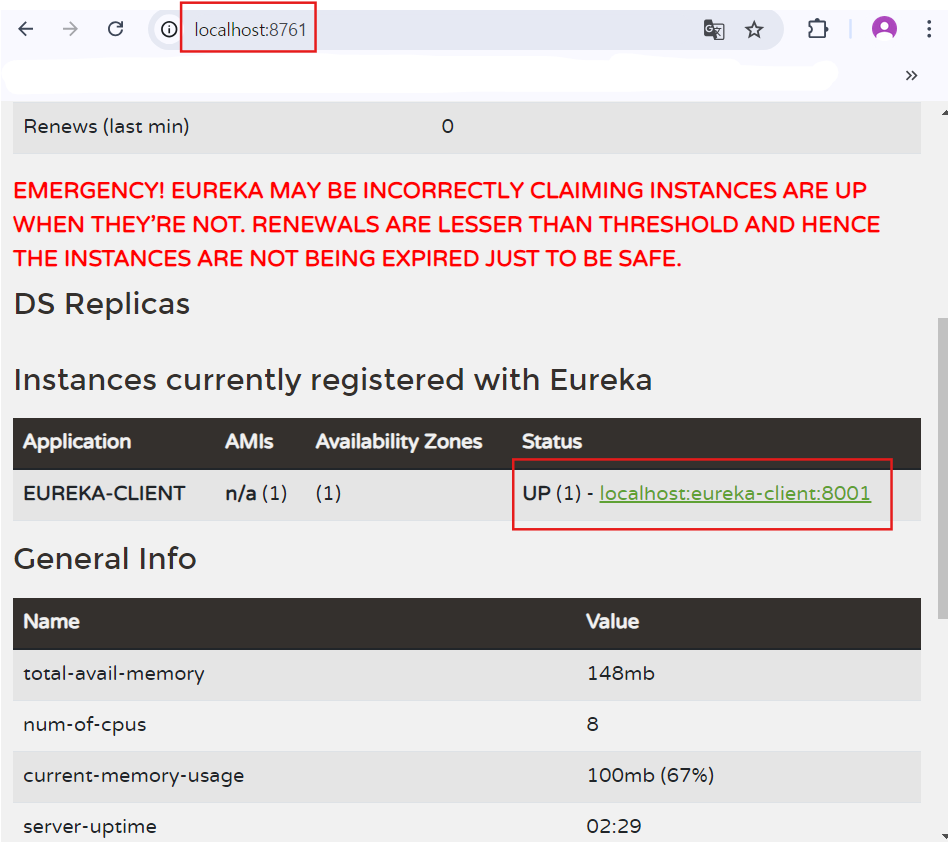
defaultZone: http://localhost:8761/eureka이전에 세팅해둔 http://localhost:8761/eureka 서버를 defaultZone으로 해두고 8001 포트를 갖는 서버를 열어볼 것이다.
fetch-registry: true-> 약 30초마다 갱신한다는 의미이다.
application에는 @EnableDiscoveryClient 어노테이션이 필요하다.
application
@SpringBootApplication
@EnableDiscoveryClient
public class OnlyOneClientApplication {

    public static void main(String[] args) {
        SpringApplication.run(Chap0102EurekaClientLectureSourceApplication.class, args);
    }

}
HelloController
@RestController
public class HelloController {

    @GetMapping("/hello")
    public String hello() {
        return "Hello!";
    }
}
한 번 실행해보면?
링크 클릭 후 hello 입력 시 화면
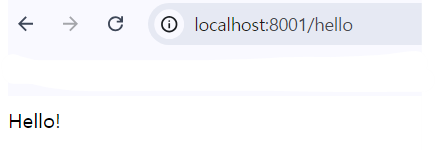
서버를 2개 띄워둔 채로 확인해 간단한 msa를 활용해보았다.
2. 포트번호가 다른 client 서버 2개 실행하기
이번에도 새로운 프로젝트를 만들고 Application과 Controller를 보자.
Application
@SpringBootApplication
@EnableDiscoveryClient
public class FirstClientApplication {

    public static void main(String[] args) {
        SpringApplication.run(Chap0201FirstServiceLectureSourceApplication.class, args);
    }

}
Controller
@RestController
@Slf4j
@RequestMapping("/first-service")
public class FirstServiceController {

    private Environment environment;

    @Autowired
    public FirstServiceController(Environment environment) {
        this.environment = environment;
    }


    @GetMapping("/health")
    public String healthCheck() {
        /* 설명. Gateway의 로드밸런싱을 통해 RoundRobin 방식으로 실행될 마이크로 서비스의 포트번호 확인 */
        return "OK. 포트는 " + environment.getProperty("local.server.port");
    }

    @GetMapping("message")
    public String message(@RequestHeader("first-request") String header) {
        log.info("넘어온 헤더 값: {}", header);
        return "First Service Message";
    }
}
이번엔 application.yml 을 설정하자.
application.yml
server:
  port: 0


spring:
  application:
    name: 1st-service

eureka:
  instance:
    # 랜덤한 인스턴스 아이디 생성 (server.port를 0으로 바꾼 이후)
    instance-id: ${spring.application.name}:${spring.application.instance_id:${random.value}}
  client:
    register-with-eureka: true
    fetch-registry: true
    service-url:
      defaultZone: http://localhost:8761/eureka
1번째 것을 Run 하자.
그리고 2번째 포트번호를 가진 것을 이용하기 위해 인텔리제이에서 Application을 선택할 수 있는데 사진을 보자.
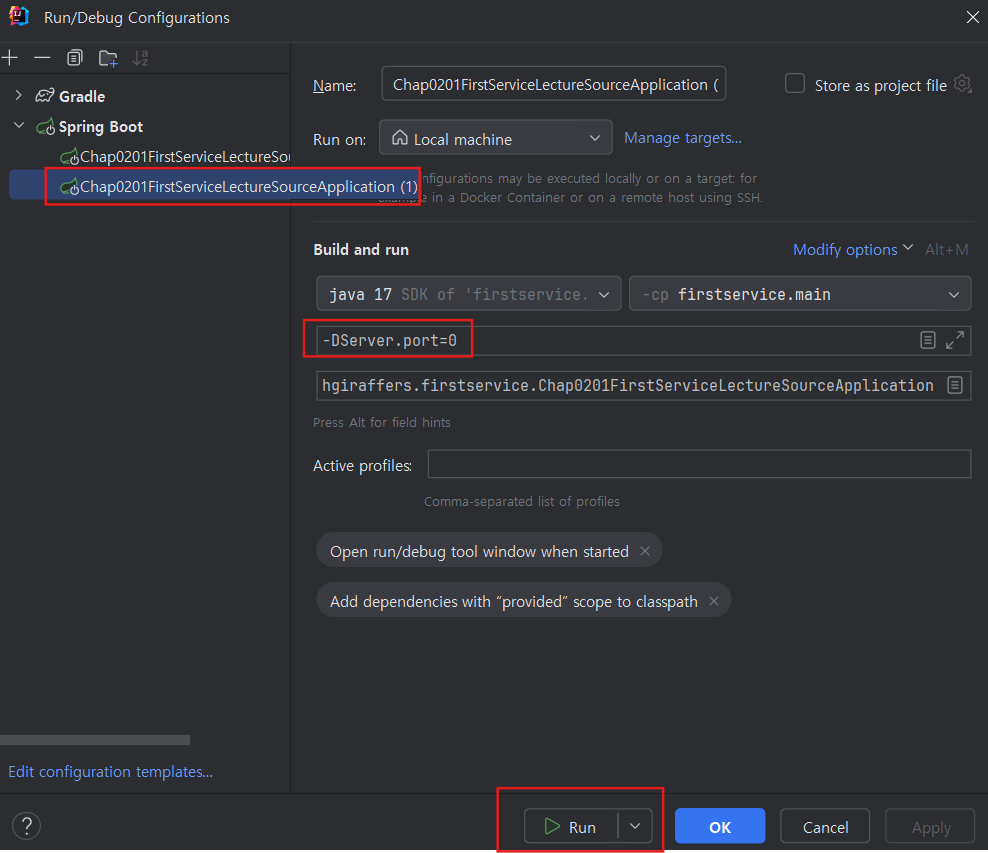
Modify Option -> Add VM Options -> -DServer.port=0 입력한 뒤 Run
실행을 한 뒤
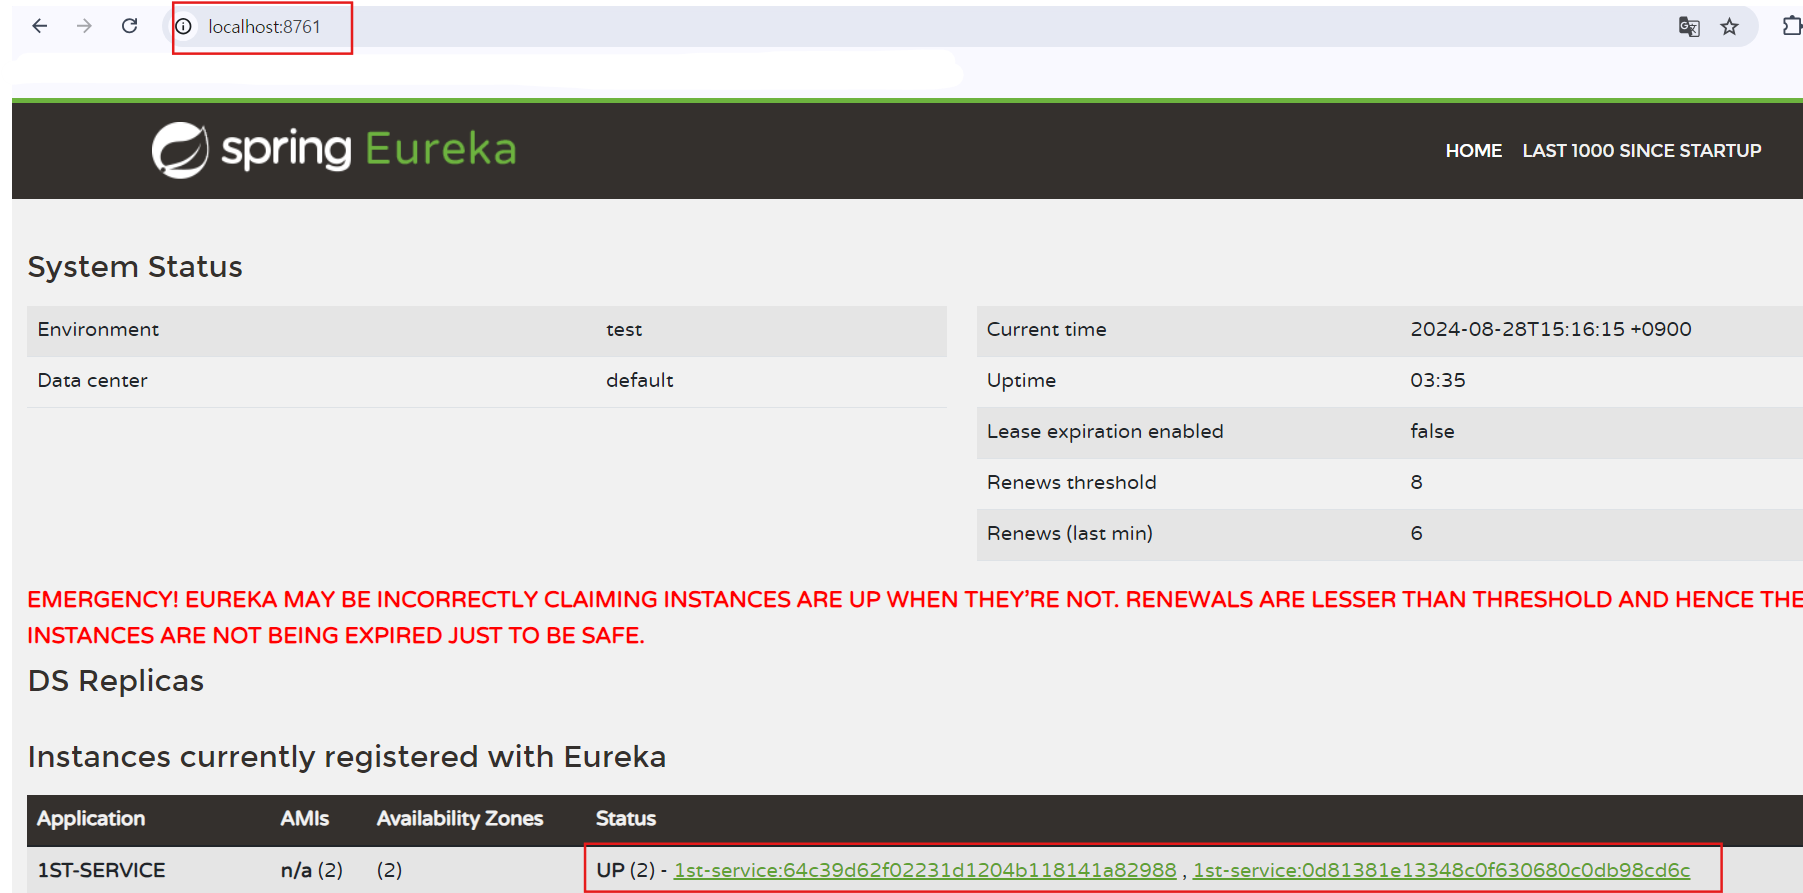
2개의 서버가 뜨는 것을 볼 수 있고, 링크를 눌러보면 랜덤값으로 된 포트번호를 볼 수 있다.
내가 눌렀을 때의 화면이다. (매번 바뀌니 같지 않아도 상관없다.)
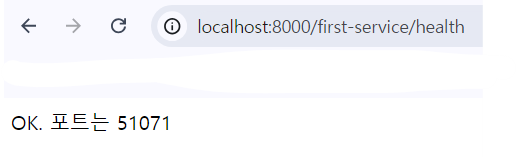
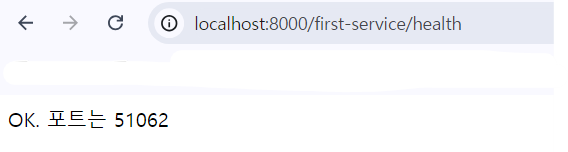
51071 포트번호를 가지고 localhost:51071/health 를 하면 아래와 같이 나온다.
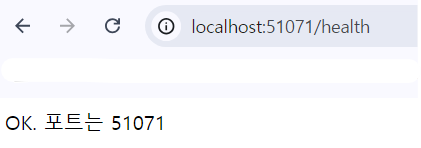
또 다른 링크에서도 다른 포트번호로 뜨는데 그것을 같은 형태로 링크에 넣으면 위와 같은 형태로 보일 것이다.
postman에서도 RequestHeader에 값을 담아서 보내면 그것 또한 출력되는 것을 볼 수 있을 것이다.
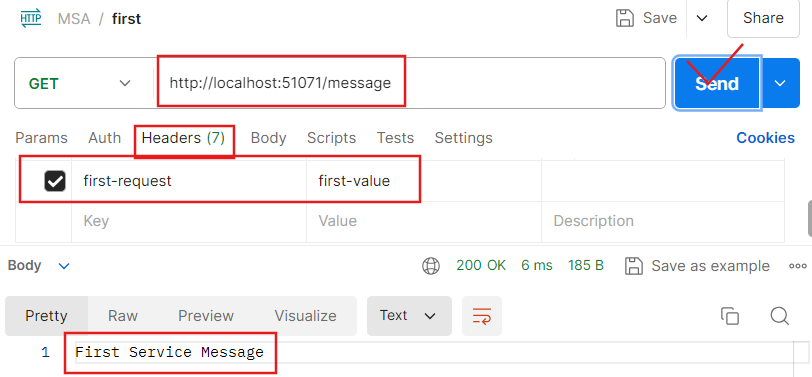
출력된 문장

게이트웨이 만들기
원래는 second 까지 first와 별 차이 없게 하나를 더 만들고 진행하려고 했다.
하지만 같은 방식의 코드를 2개를 적는건 너무 길어질 것 같아서 생략하고, 게이트웨이에 대해 다뤄보겠다.
first처럼 생긴 second 프로젝트가 있을 때, 즉 msa에서 인입점이 여러 개가 될 때
위와 같이 2개인 경우도 있지만 많이 늘어나는 경우에는 하나씩 다루기 굉장히 어려운데, 그것을 게이트웨이가 어느 정도 해결해준다.
하나의 인입점으로 만들어준다고 생각하면 편하다.
새로운 프로젝트에
build.gradle
dependencies {
    implementation 'org.springframework.cloud:spring-cloud-starter-gateway'
    implementation 'org.springframework.cloud:spring-cloud-starter-netflix-eureka-client'
    compileOnly 'org.projectlombok:lombok'
    annotationProcessor 'org.projectlombok:lombok'
    testImplementation 'org.springframework.boot:spring-boot-starter-test'
    testImplementation 'io.projectreactor:reactor-test'
    testRuntimeOnly 'org.junit.platform:junit-platform-launcher'
}
application.yml
server:
  port: 8000

eureka:
  client:
    register-with-eureka: true
    fetch-registry: true
    server-url:
      defaultZone: http://localhost:8761/eureka
spring:
  application:
    name: gateway-server

  cloud:
    gateway:
      routes:
        - id: 1st-service
          #조건문 충족 시 이동할 uri
          # uri: http://localhost:{포트번호}/ -> 이전까지 사용했던 방식 : 포트번호에는 새로 킬 때마다 확인해서 넣어줘야 한다..
          #위의 과정이 귀찮기 때문에 아래처럼 하면 된다.

          uri: lb://1ST-SERVICE

          # 위의 방식대로 하면 마음대로 스케일 아웃을 할 수 있다. 로드밸런서가 알아서 switching 해주기 때문이다.

          predicates: #게이트 웨이로 요청이 아래와 같은 패턴으로 온다면 (즉, 조건문)
            - Path=/first-service/**

          # first Controller에 있는 RequestMapping을 없애고 싶을 때 사용.
          # 이후 라우팅 될 마이크로 서비스에 /first-service 라는 경로는 제외하고 이후 경로에 대한 요청 진행용 필터이다.
          filters:
            - RewritePath=/first-service/(?<segment>.*), /$\{segment}

            - AddRequestHeader=first-request, first-request-header
            - AddResponseHeader=first-response, first-response-header
yml에 filters 부분 덕분에
FirstController에 있는@RequestMapping어노테이션은 지워도 된다.
그럼 이제 게이트웨이도 추가가 된다.

이제 8000 포트번호에서 first-service에 대해 다룰 수 있게 된다.
서버를 2개 띄워둔 상태인데 위에 주석에 달린 것처럼
uri: lb://1ST-SERVICE를 통해 스케일 아웃이 돼 로드 밸런서가 2개의 서버를 자동으로 switching 될 것이다.
- AddRequestHeader=first-request, first-request-header
- AddResponseHeader=first-response, first-response-header
message도 위와 같이 자동으로 RequestHeader와 ResponseHeader에 추가해주기 때문에 아무것도 헤더에 넣지 않고 해도 잘 될 것이다..
이것으로 간단한 MSA에 다뤄보았고, 추후에 더 실력을 높여서 다루게 된다면 자세하게 정리를 해보겠다.