K8s Auto Scaling
Metrics Server- Kubernetes 에 내장된 확장 파이프라인을 위한 컨테이너 지표(CPU/메모리 사용량) 수집 서버
- Kubelet 의 지표를 수집하고 노출하여 API Server 에 전달
- HPA, VPA 같은 자동 확장 사용 목적 (모니터링 솔루션 X)
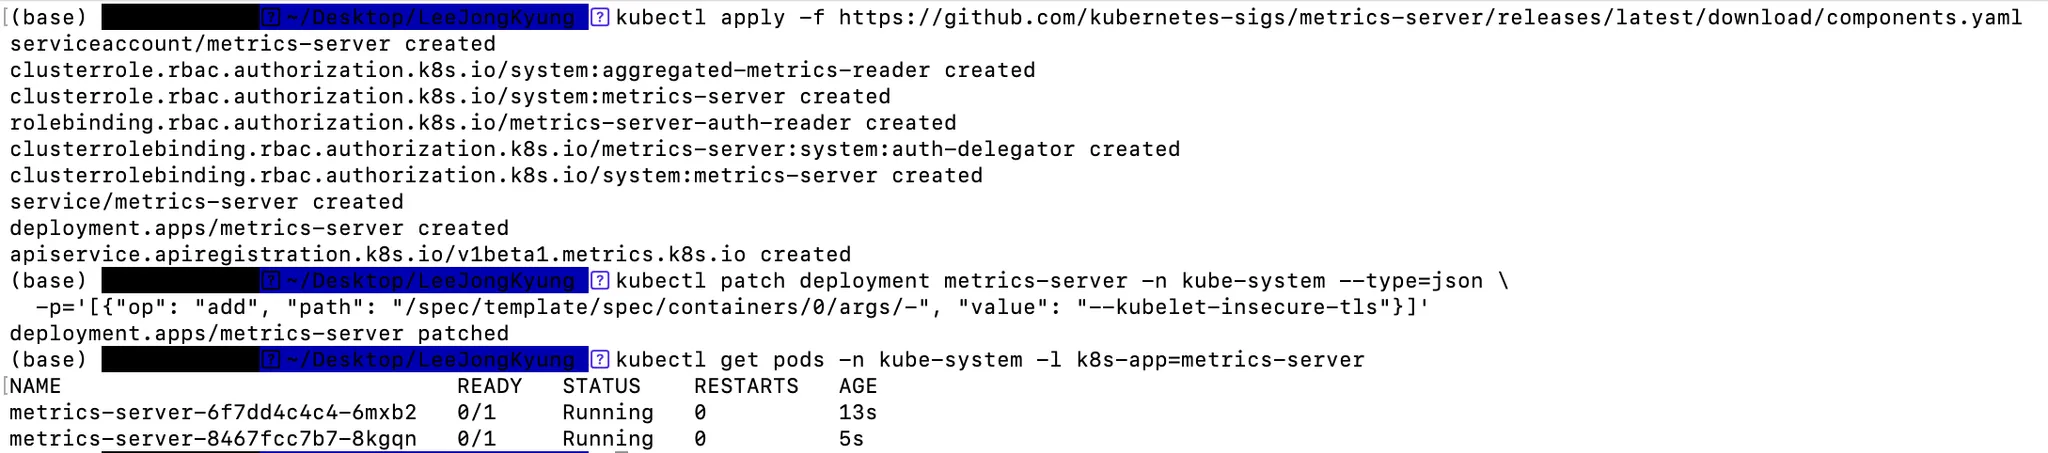
# Metrics Server 설치
kubectl apply -f https://github.com/kubernetes-sigs/metrics-server/releases/latest/download/components.yaml
# Metrics Server SSL 무시
kubectl patch deployment metrics-server -n kube-system --type=json \
-p='[{"op": "add", "path": "/spec/template/spec/containers/0/args/-", "value": "--kubelet-insecure-tls"}]'
# Metrics Server 배포 확인
kubectl get pods -n kube-system -l k8s-app=metrics-server
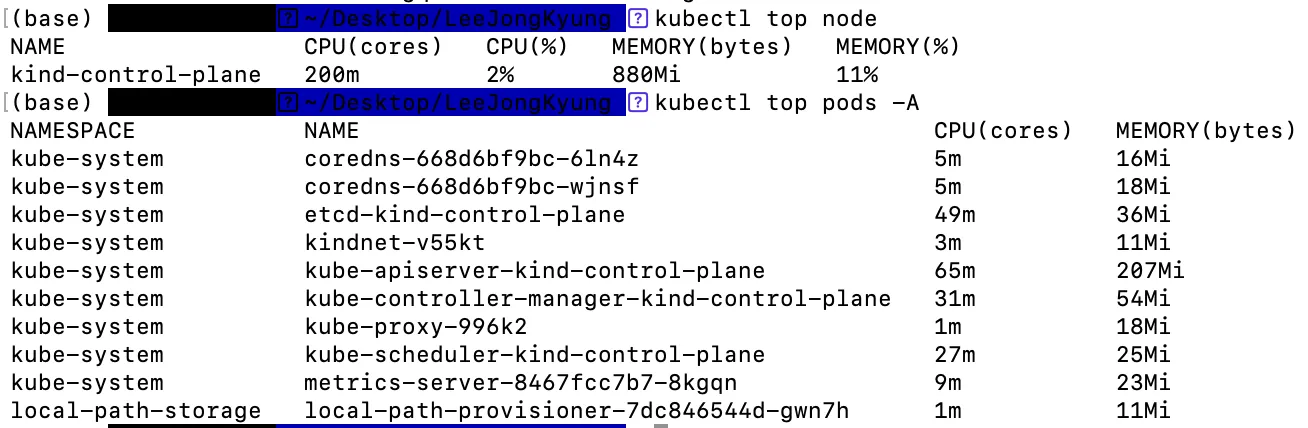
# 쿠버네티스 리소스 자원 사용량 확인
kubectl top node
kubectl top pods -A
# CPU, Memory 내림차순
kubectl top pods -A --sort-by=cpu
kubectl top pods -A --sort-by=memory- Metrics Server 설치
- 쿠버네티스 리소스 자원 사용량 확인
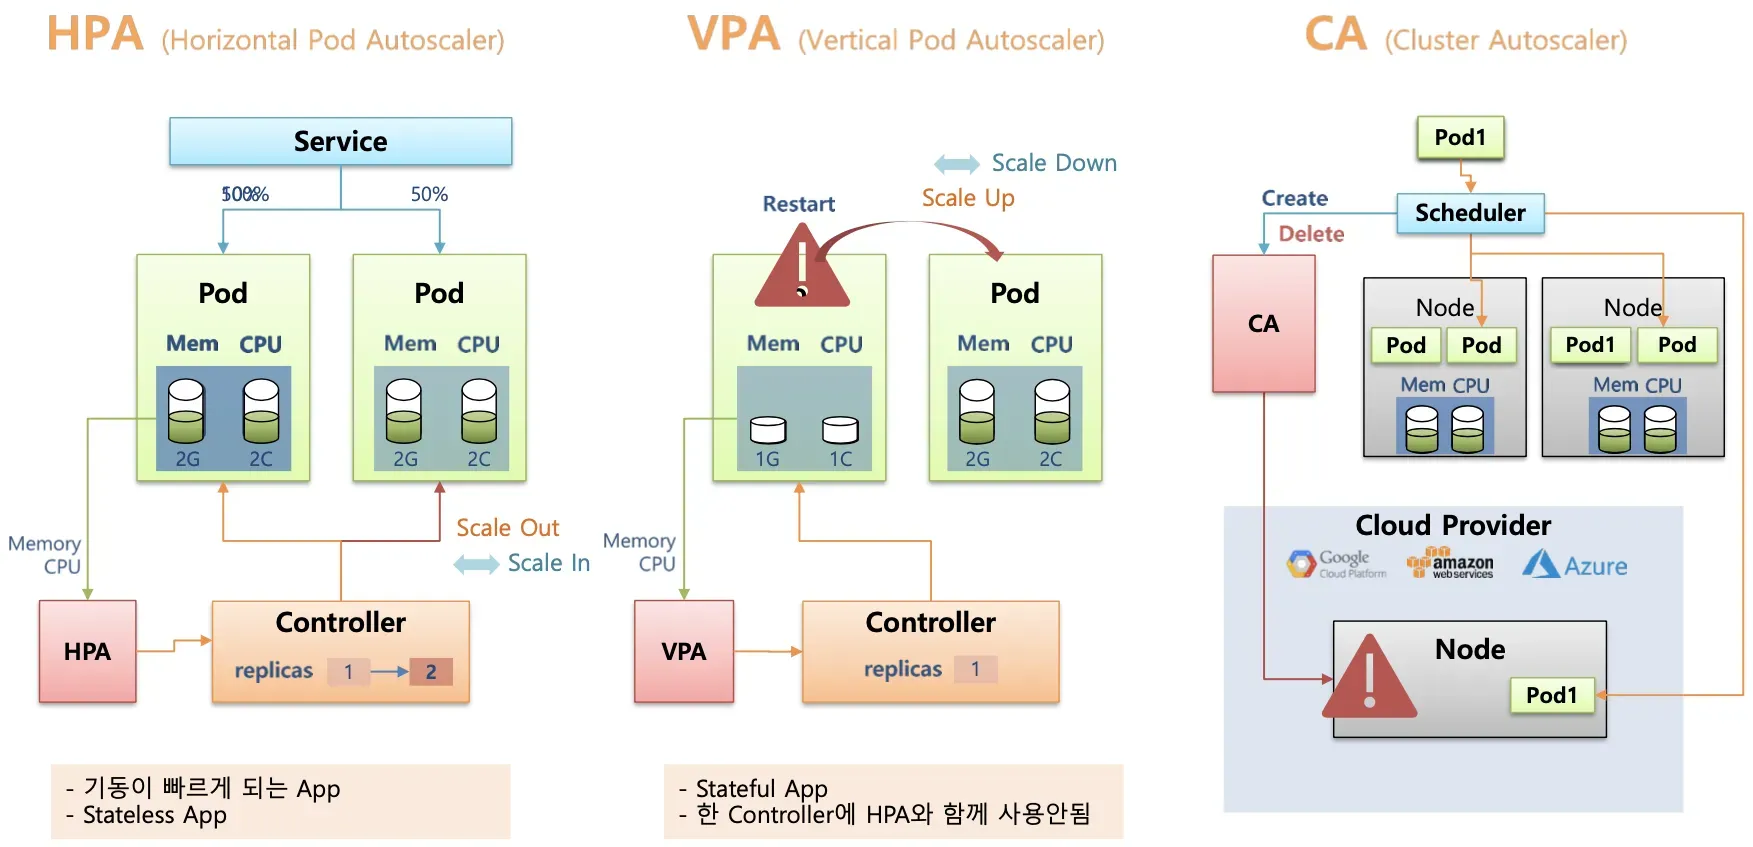
HPA (Horizontal Pod Autoscaling)
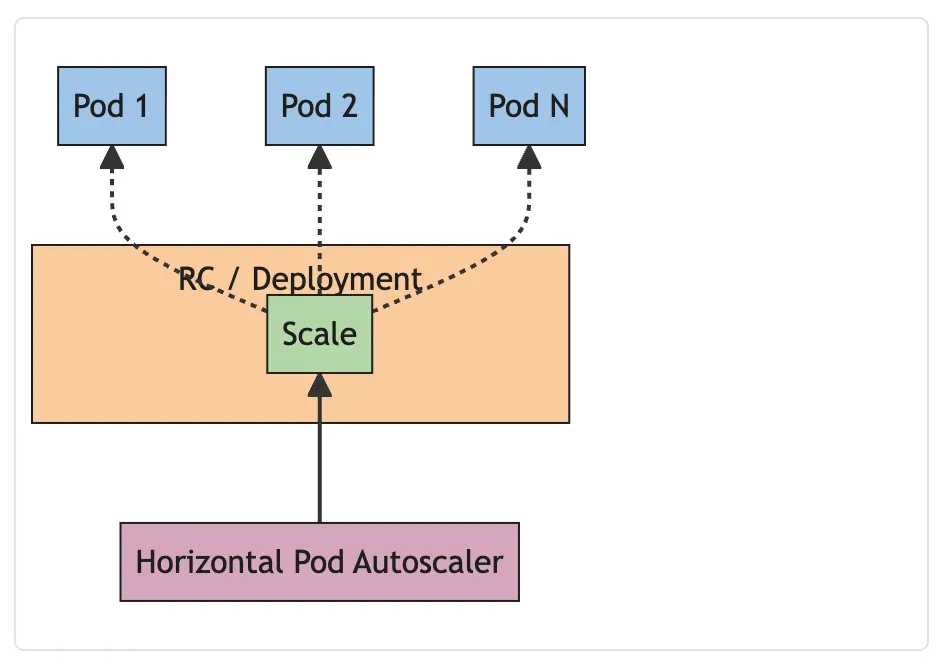
- 역할
- 어플리케이션의 부하(Load)에 따라 Pod의 수를 늘리거나 줄이는 ‘수평 확장(Scale-Out/In)’
- 동작 원리
- Metrics API(CPU, Memory 사용률 또는 사용자 정의 지표)를 주기적으로 조회
- 실제 사용량이 목표값(
targetCPUUtilizationPercentage등)을 넘으면 Pod 수를 늘리고, 밑돌면 줄임 - 컨트롤러가
Deployment(혹은ReplicaSet)의replicas필드를 조정
- 장단점
- 장점: 짧은 처리량 급증 대응, 애플리케이션 가용성 유지
- 단점: 시작하는 새 Pod가 준비되기까지 약간의 지연(콜드 스타트)이 발생
- 예시 YAML
apiVersion: autoscaling/v2
kind: HorizontalPodAutoscaler
metadata:
  name: hpa-sample
spec:
  scaleTargetRef:          # Scale 타겟 지정
    apiVersion: apps/v1
    kind: Deployment
    name: my-app           # Deployment 이름
  minReplicas: 2           # 최소 Pod
  maxReplicas: 10          # 최대 Pod
  metrics:                 # Scale 기준 지표 설정
    - type: Resource
      resource:
        name: cpu
        target:
          type: Utilization
          averageUtilization: 50  # CPU 사용률 50% 기준
    - type: Resource
      resource:
        name: memory
        target:
          type: Utilization
averageUtilization: 70 # 메모리 사용률 70% 기준- HPA 구성
cat << EOF >> hpa-nginx.yaml
apiVersion: apps/v1
kind: Deployment
metadata:
name: hpa-nginx
spec:
replicas: 1
selector:
matchLabels:
app: hpa-nginx
template:
metadata:
labels:
app: hpa-nginx
spec:
containers:
- name: hpa-nginx
image: nginx
resources:
requests:
cpu: 50m
limits:
cpu: 100m
ports:
- containerPort: 80
---
apiVersion: v1
kind: Service
metadata:
name: hpa-nginx
labels:
app: hpa-nginx
spec:
ports:
- port: 80
selector:
app: hpa-nginx
EOF
# hpa-nginx.yaml 파일 확인
cat hpa-nginx.yaml
# Deployment 배포
kubectl apply -f hpa-nginx.yaml
kubectl get deploy,pod
# HPA 생성
kubectl autoscale deployment hpa-nginx --cpu-percent=50 --min=1 --max=10
# HPA 확인
kubectl get hpa
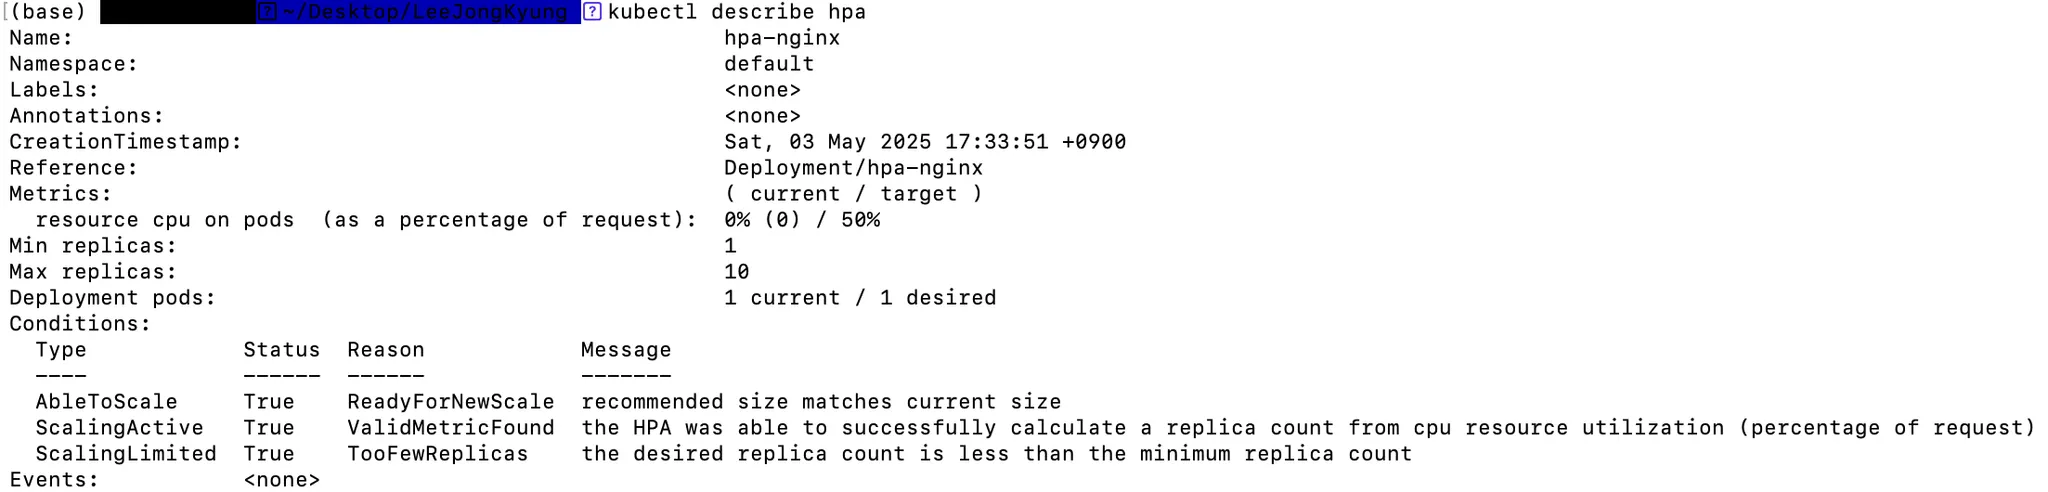
# HPA 상세 정보 확인
kubectl describe hpa-
HPA 생성

-
HPA 확인

-
HPA 상세 정보
VPA (Vertical Pod Autoscaling)
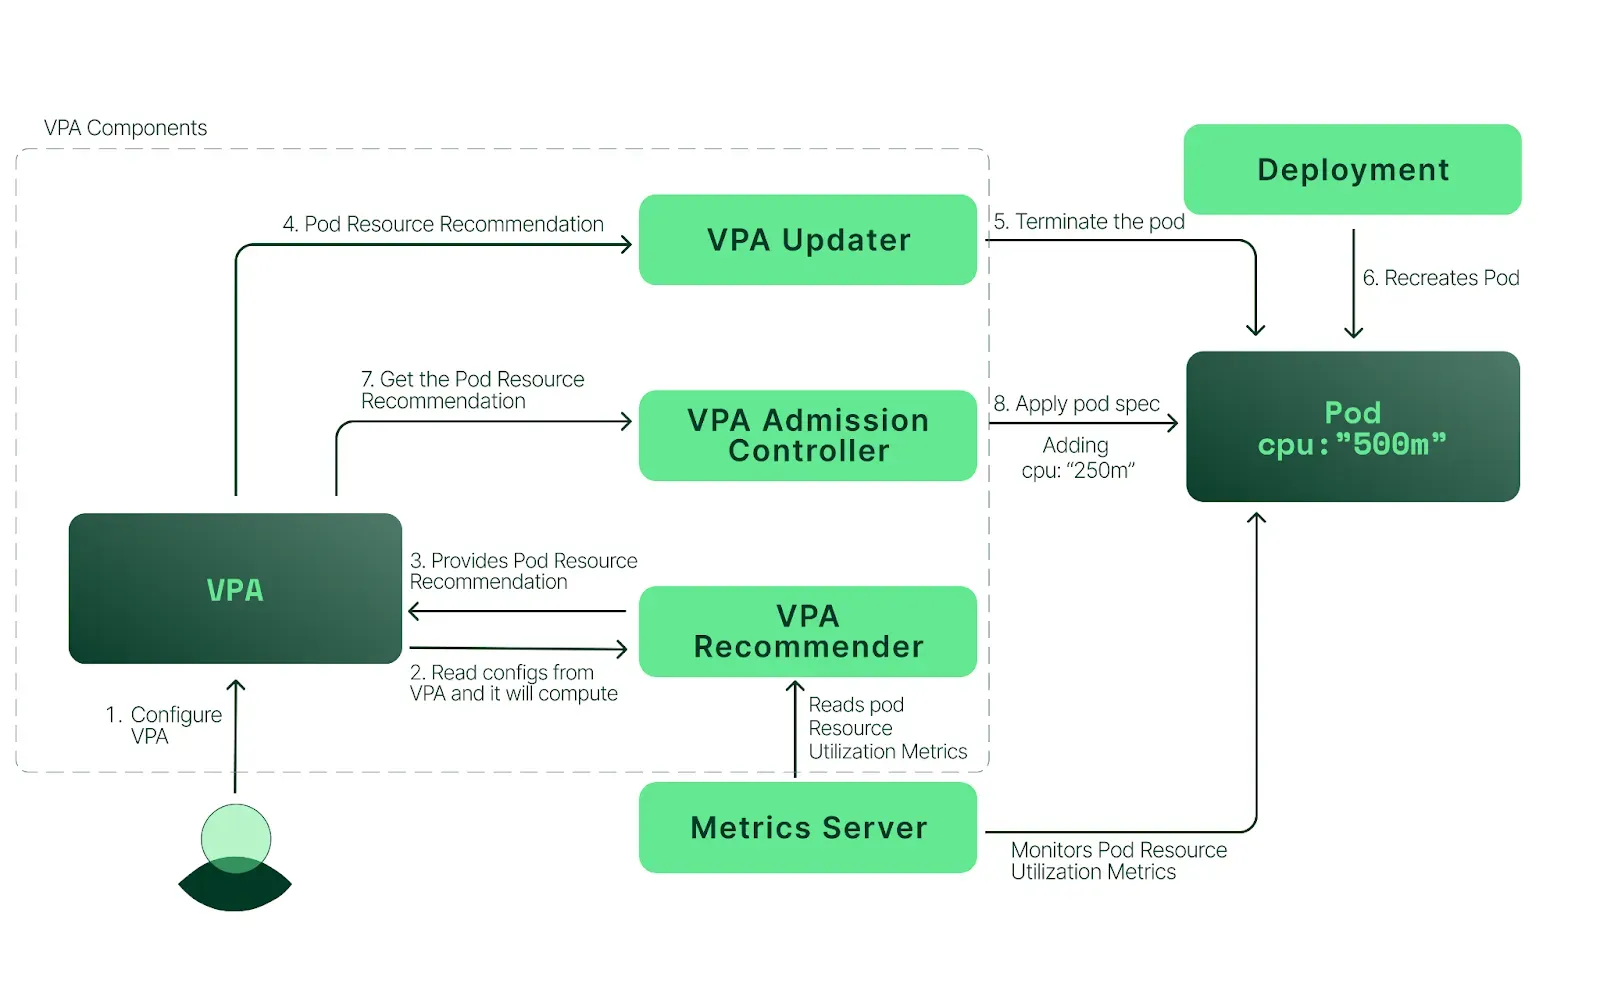
- 역할
- Pod의 CPU/메모리 요청량(request)과 제한(limit)을 자동으로 조정하는 ‘수직 확장(Scale-Up/Down)’
- 동작 원리
- 각 Pod의 실제 사용량을 관측(Recommendation)
- 수직 확장이 필요하다고 판단되면 새 리소스 요청량을 제안
UpdatePolicy에 따라 Pod 재생성(RollingUpdate)
- 장단점
- 장점: 메모리 누수나 CPU 버스트처럼 단일 Pod 리소스 한계 문제 해소
- 단점: 요청량 조정 시 Pod 재시작이 필요 → 가끔 가동 중단(짧은 서비스 지연)
- 주의사항
- 하나의 Deployment에 HPA, VPA를 동시에 사용할 수 없음
- 예시 YAML
apiVersion: autoscaling.k8s.io/v1
kind: VerticalPodAutoscaler
metadata:
  name: my-app-vpa
spec:
  targetRef:                   # Scale 대상
    apiVersion: apps/v1
    kind: Deployment
    name: my-app               # Deployment 명칭
  updatePolicy:
    updateMode: "Auto"         # VPA Recommender 에 의해 자동 조정 활성화
  resourcePolicy:
    containerPolicies:
      - containerName: my-app-container # Container 명칭 "*" 사용 가능
        minAllowed:            # 컨테이너가 할당받을 수 있는 최소 리소스
          cpu: "200m"
          memory: "512Mi"
        maxAllowed:            # 컨테이너가 할당받을 수 있는 최대 리소스
          cpu: "2"
memory: "2Gi"- VPA 테스트
# EKS Workshop 소스 사용
git clone https://github.com/kubernetes/autoscaler.git

# VPA 배포
cd autoscaler/vertical-pod-autoscaler/
./hack/vpa-up.sh

# VPA Controller 확인
kubectl get pods -n kube-system | grep vpa

# VPA 제거
./hack/vpa-down.sh- VPA Controller 확인

CA (Cluster Autoscaler)
- 역할
- 클라우드 제공자(IaaS)의 인스턴스(노드)를 자동으로 추가/삭제하여 클러스터 전체 용량을 조절
- 동작 원리
- 스케줄러가 Pod를 어디에도 배치할 수 없을 때 → 부족한 리소스를 감지
- 신규 노드를 프로비저닝 요청 → 워커 노드 풀에 추가
- 사용량이 줄어 더 이상 필요한 노드가 없으면 → 노드 종료 및 축소
- 장단점
- 장점: 클러스터 전체 비용 최적화, 워크로드 급증 대응
- 단점: 신규 노드 프로비저닝 시간(수십 초~수 분)
- 설정 포인트
- 최소/최대 노드 수(
minSize,maxSize) - Scale-Down Delay: 빈 노드를 곧바로 삭제하지 않고 대기 (
-scale-down-delay-after-add)
- 최소/최대 노드 수(
어플리케이션 변수 관리
ConfigMap
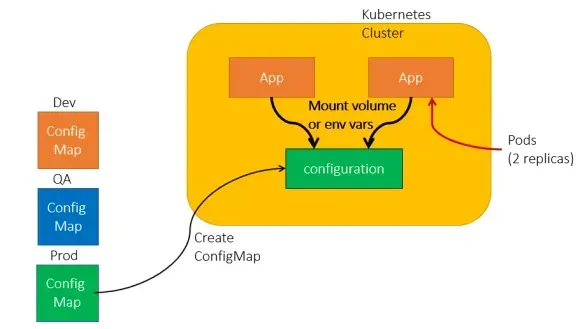
-
목적
- Kubernetes 애플리케이션의 구성 파일이나 환경 설정을 설정값을 key–value 쌍 형태로 저장 및 관리
-
특징
- 애플리케이션의 설정 정보를 외부에서 관리하고 Pod 와 컨테이너에서 참조
- Base64 인코딩 없이 평문으로 저장
- 크기 제한: 최대 1MiB
- Versioning 지원은 별도 없음(수정 시 새 리비전으로 교체)
-
주요 사용 용도
- 애플리케이션 설정 관리
- 애플리케이션 구성 정보 (DB URL, 변수 등)을 ConfigMap 에 저장하여 Pod 환경 변수나 파일로 사용
- 애플리케이션 환경에 맞는 설정 값 변경
- 애플리케이션을 재빌드 하지 않고 설정 값 변경
- DEV, STG, PRD 배포 환경에 따라 각각 다른 파일 구성으로 관리 목적
- 애플리케이션 설정 관리
-
기본 구성
apiVersion: v1 kind: ConfigMap metadata: name: my-app-config data: LOG_LEVEL: "debug" API_ENDPOINT: "https://api.example.com" -
Pod에 주입 방법
- 환경변수로 주입
위의 yaml 파일을 통해 배포하면 다음과 같이 DBNAME의 변수에 mydatabase가 적용되어 있음을 확인할 수 있습니다.apiVersion: v1 kind: ConfigMap metadata: name: mysql data: DBNAME: mydatabase --- apiVersion: v1 kind: Pod metadata: name: nginx-configmap spec: containers: - image: nginx name: nginx-configmap # 컨테이너에서 사용할 변수 Key 값 env: - name: DB valueFrom: configMapKeyRef: name: mysql # 사용할 ConfigMap의 이름 key: DBNAME # ConfigMap 내의 키 -> 값: value1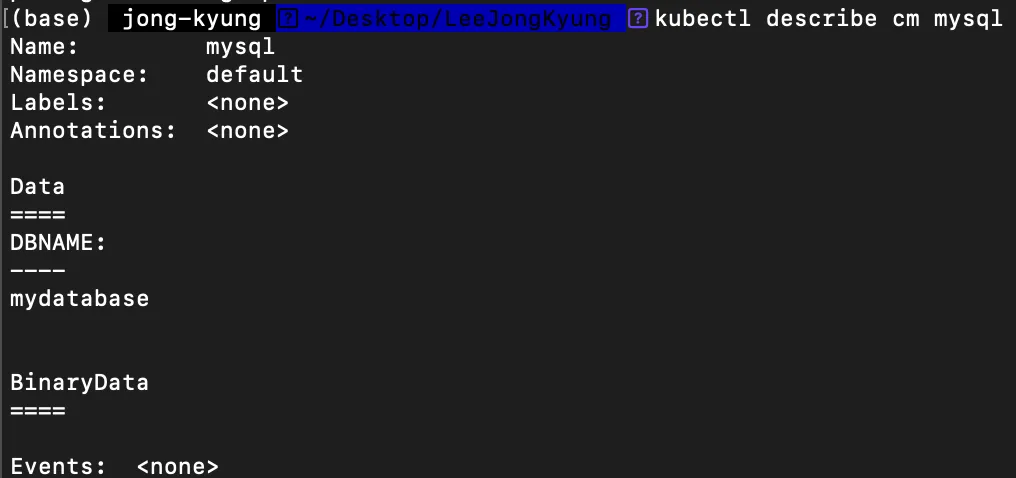
- 볼륨으로 마운트
# config-deploy.yaml
apiVersion: apps/v1
kind: Deployment
metadata:
  name: nginx-configmap-deploy        # Deployment 리소스 이름
spec:
  replicas: 2                         # 생성할 Pod 개수
  selector:
    matchLabels:
      app: nginx-configmap            # Pod 선택용 레이블 셀렉터
  template:
    metadata:
      labels:
        app: nginx-configmap          # Pod 템플릿에 붙일 레이블
    spec:
      containers:
      - name: nginx                   # 컨테이너 이름
        image: nginx                  # 사용할 컨테이너 이미지
        ports:
        - containerPort: 80           # 컨테이너 내 열어줄 포트
        volumeMounts:
        - name: config-volume         # 아래 volumes.name 과 매칭
          mountPath: /etc/nginx/nginx.conf  # 컨테이너 내부에 마운트할 경로
          subPath: nginx.conf          # 볼륨 내 nginx.conf 파일만 마운트
      volumes:
      - name: config-volume           # 컨테이너에 마운트할 볼륨 식별자
        configMap:
          name: nginx-config           # 참조할 ConfigMap 이름

---
apiVersion: v1
kind: Service
metadata:
  name: nginx-service                # Service 리소스 이름
spec:
  type: NodePort                      # 외부 접근을 위한 NodePort 방식
  selector:
    app: nginx-configmap              # 서비스가 트래픽을 전달할 Pod 레이블
  ports:
    - protocol: TCP
      port: 80                        # 서비스 포트
      targetPort: 80                  # Pod 컨테이너 포트
      nodePort: 31001                 # 클러스터 노드의 고정 노드포트
위 두 Yaml 파일을 배포한 후 확인해보면 다음과 같이 볼륨 마운트가 되어있음을 확인할 수 있습니다.# configmap.yaml apiVersion: v1 kind: ConfigMap metadata: name: nginx-config # ConfigMap 리소스 이름 data: nginx.conf: | # 키가 곧 파일명이 되고, 아래 내용이 파일 내용으로 매핑 events {} http { server { listen 80; location / { return 200 'Hello from nginx configmap!'; } } }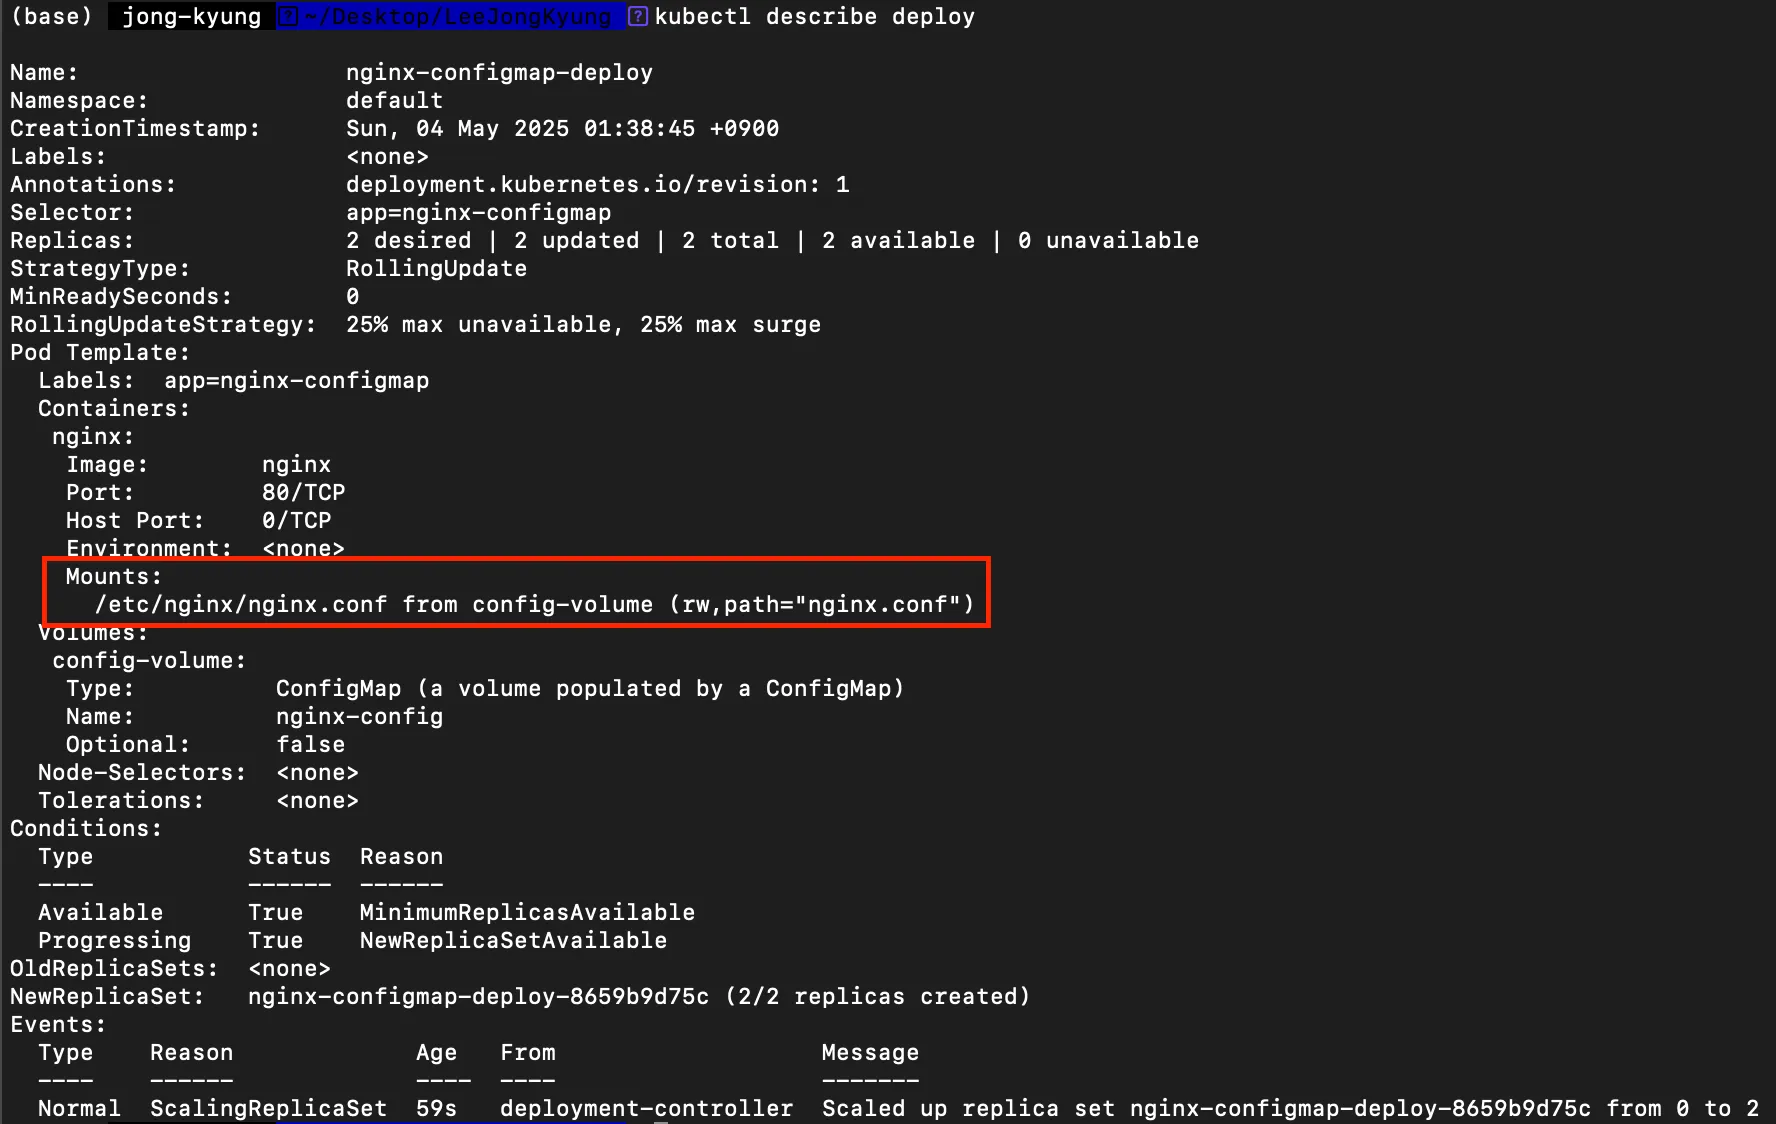
- 환경변수로 주입
Secret
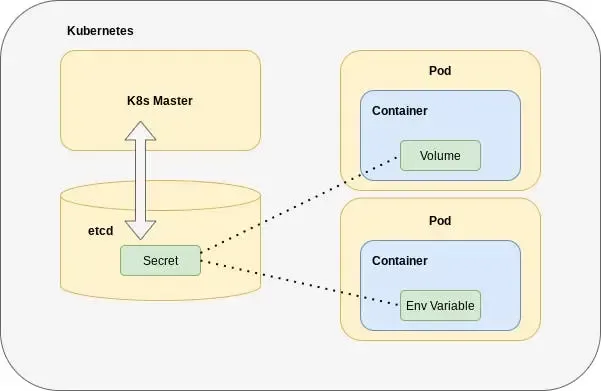
- 목적
- 비밀번호, 토큰, 인증서 등 민감 정보(sensitive data)를 저장
- ConfigMap과 동일한 방식으로 주입 가능
- 특징
- 기본 저장 시 Base64 인코딩
- etcd에 암호화 옵션(Etcd Encryption at Rest) 설정 가능
- 크기 제한: 최대 1MiB
- Role-Based Access Control(RBAC)으로 접근 제어 가능
- 기본 구성
apiVersion: v1 kind: Secret metadata: name: my-secret type: Opaque data: username: bXl1c2Vy # base64로 인코딩된 값 password: bXlwYXNzd29yZA== # base64로 인코딩된 값apiVersion: v1 kind: Pod metadata: name: my-app spec: containers: - name: my-container image: my-image env: - name: DB_USER # Container 에서 사용할 변수명 valueFrom: secretKeyRef: name: my-secret # 사용할 Secret의 이름 key: username # Secret 내의 키 - name: DB_PASSWORD valueFrom: secretKeyRef: name: my-secret # 사용할 Secret의 이름 key: password # Secret 내의 키 - Pod 에 주입 방법
- 환경변수로 주입
env: - name: DB_PASSWORD valueFrom: secretKeyRef: name: my-app-secret key: DB_PASSWORD - 볼륨으로 마운트
volumes:
  - name: secret-volume
    secret:
      secretName: my-app-secret
containers:
  - name: app
    image: my-app:latest
    volumeMounts:
      - name: secret-volume
        mountPath: /etc/secret
        readOnly: true
- 환경변수로 주입
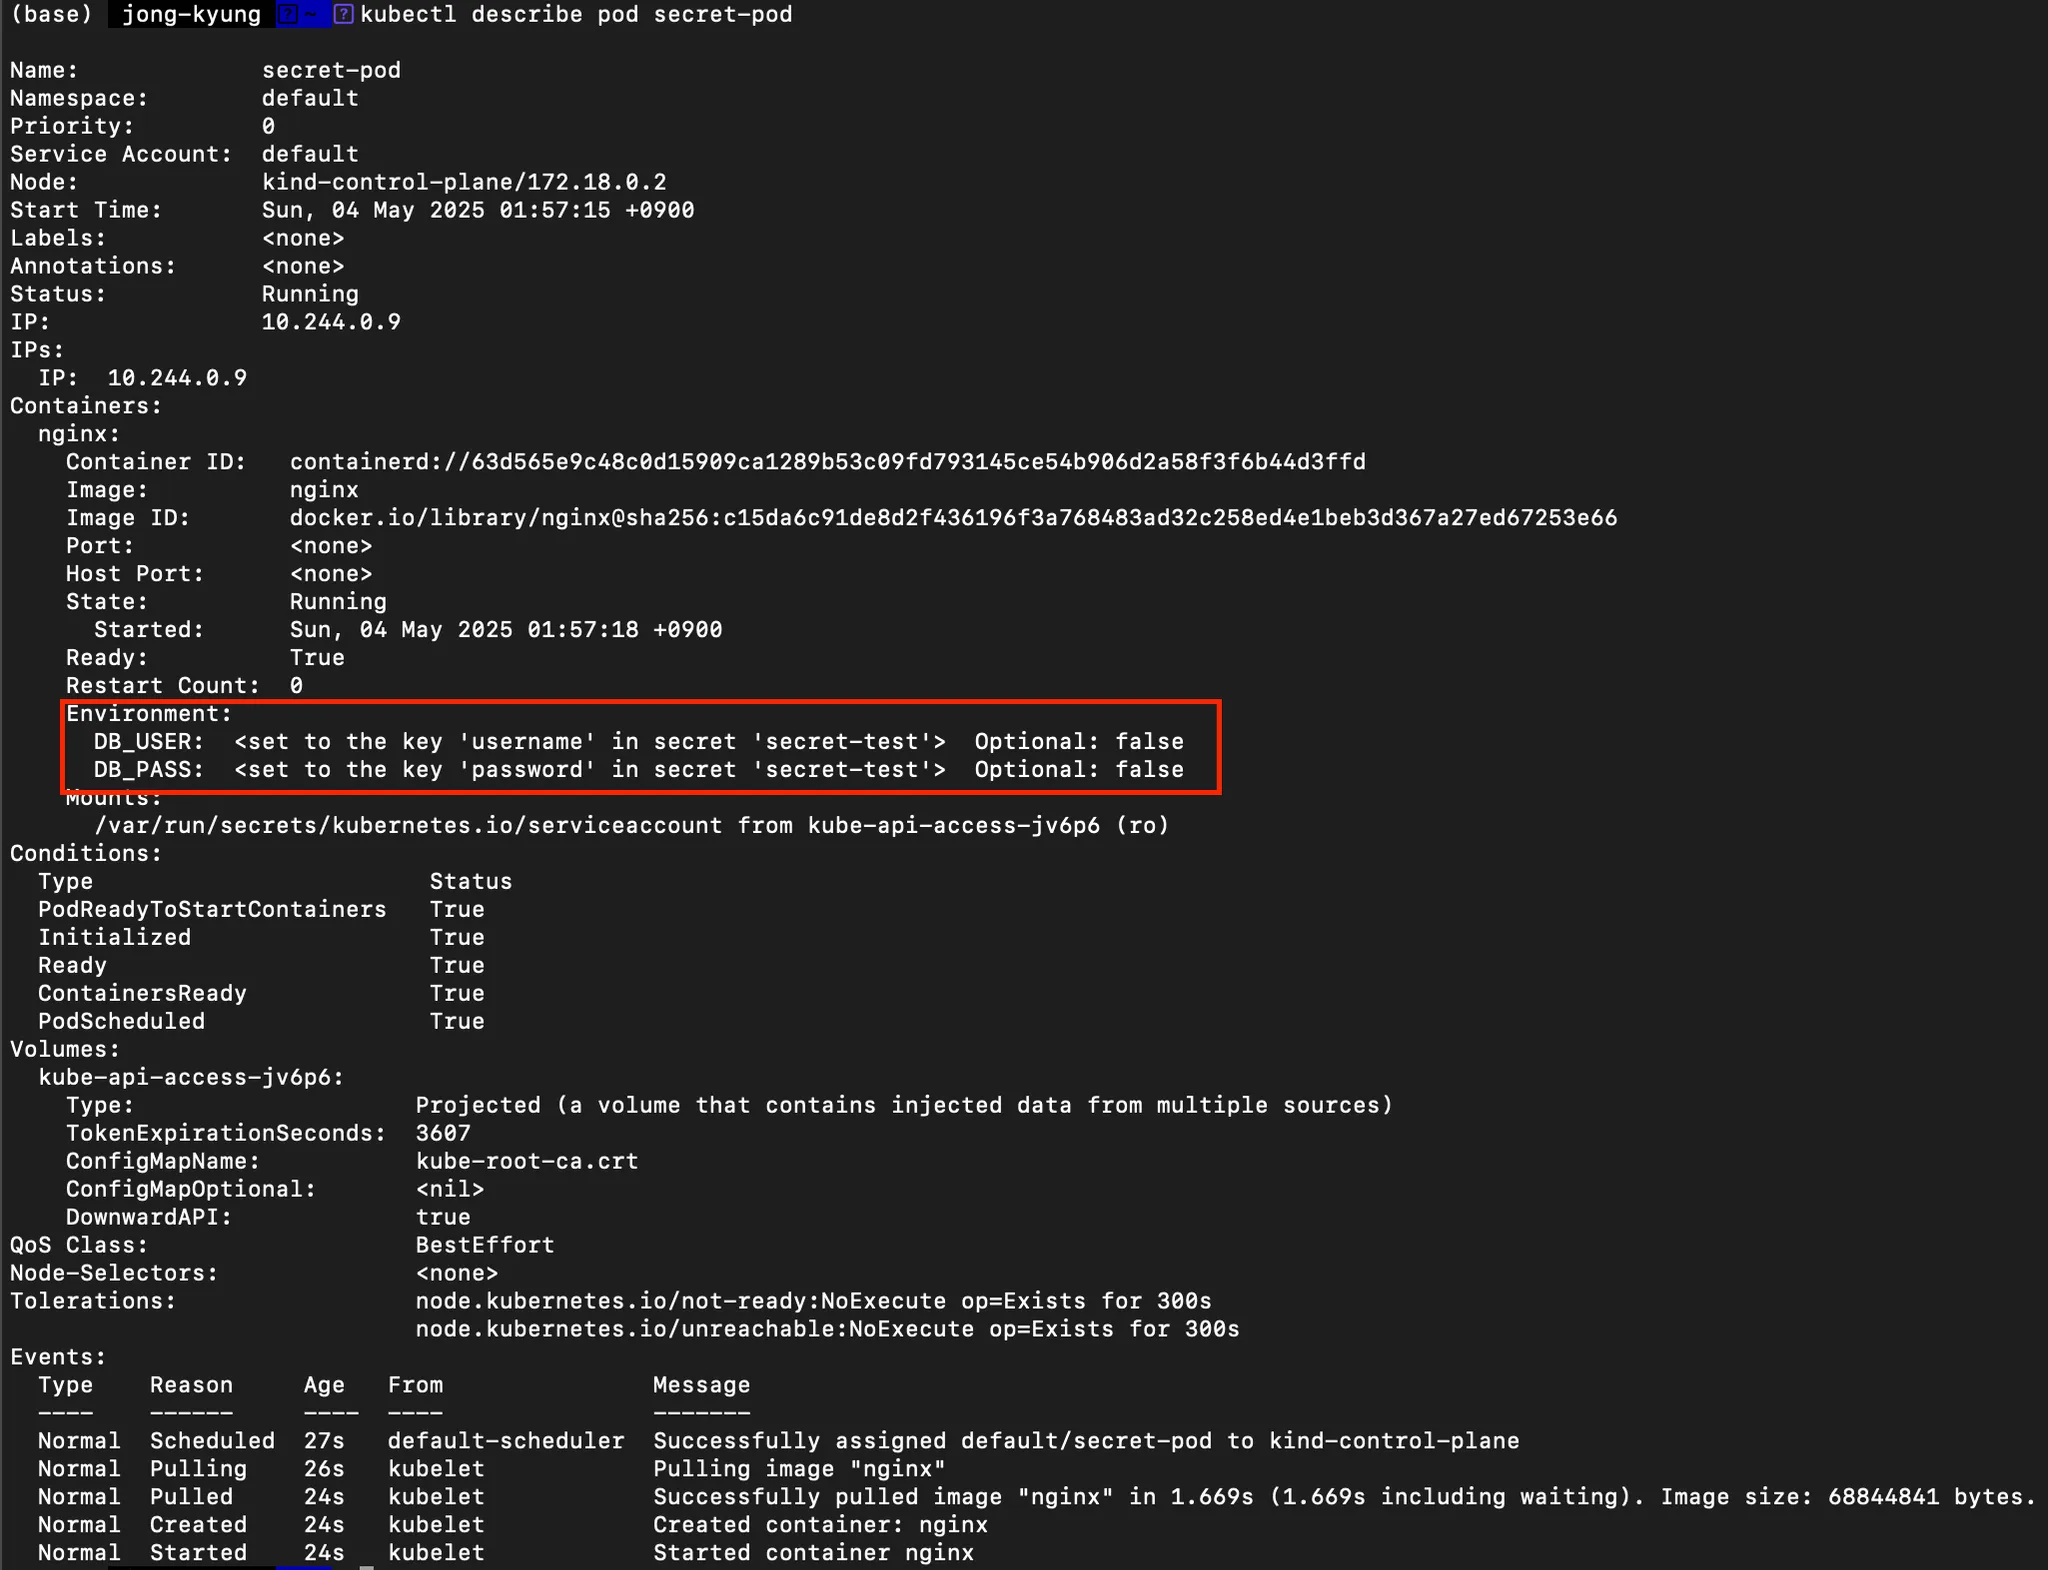
- 사용 예제
# secret.yaml
apiVersion: v1
kind: Secret
metadata:
  name: secret-test          # Secret 이름
type: Opaque                 # 일반 문자열 타입
data:
  # Base64 인코딩된 값
  username: YWRtaW4=
  password: cGFzc3dvcmQ=
# secretPod.yaml apiVersion: v1 kind: Pod metadata: name: secret-pod # Pod 이름 spec: containers: - name: nginx # 컨테이너 이름 image: nginx # 사용할 이미지 env: - name: DB_USER valueFrom: secretKeyRef: name: secret-test # 참조할 Secret 이름 key: username # Secret 데이터 키 - name: DB_PASS valueFrom: secretKeyRef: name: secret-test # 참조할 Secret 이름 key: password # Secret 데이터 키-
위 yaml 파일을 배포하면 다음과 같이 secret이 적용된 것을 확인할 수 있습니다.
-
ConfigMap vs Secret
| 항목 | ConfigMap | Secret |
|---|---|---|
| 저장 데이터 | 평문(plain text) | Base64 인코딩 (etcd 암호화 옵션 가능) |
| 용도 | 비민감 설정값 | 비밀번호, 토큰, 인증서 등 민감 정보 |
| 접근 제어 | 네임스페이스 단위 RBAC 가능 | 네임스페이스 단위 RBAC + 암호화 가능 |
| 생성 커맨드 | kubectl create configmap | kubectl create secret |
| 크기 제한 | 최대 1MiB | 최대 1MiB |
K8s Network
Service
- 외부와 접하는 단일 엔드포인트
- 서비스 뒷단의 애플리케이션으로 외부 트래픽을 전송
ClusterIP
- 역할: 클러스터 내부에서만 접근 가능한 가상 IP 제공
- 특징
- 외부 노드에서 직접 접근 불가, 즉 클러스터 내부에서만 ClusterIP 로 접근 가능
- 클러스터 내부 서비스 간 통신(ex. 마이크로서비스 호출)에 사용
- 서비스 타입을 지정하지 않을 경우 기본값
- 예시
# cluster-pod.yaml
apiVersion: v1
kind: Pod
metadata:
  name: cluster-pod-1
  labels:
    app: cluster-pod
spec:
  containers:
    - name: container
      image: traefik/whoami
---
apiVersion: v1
kind: Pod
metadata:
  name: cluster-pod-2
  labels:
    app: cluster-pod
spec:
  containers:
    - name: container
      image: traefik/whoami
# netshoot-pod.yaml apiVersion: v1 kind: Pod metadata: name: netshoot-pod spec: containers: - name: netshoot-pod image: nicolaka/netshoot command: ["tail"] args: ["-f", "/dev/null"]
위 yaml을 배포한 후 파드 대역, SVC 대역을 확인하면 다음과 같습니다.# cluster-svc.yaml apiVersion: v1 kind: Service metadata: name: cluster-svc spec: type: ClusterIP selector: app: cluster-pod ports: - name: cluster port: 8080 targetPort: 80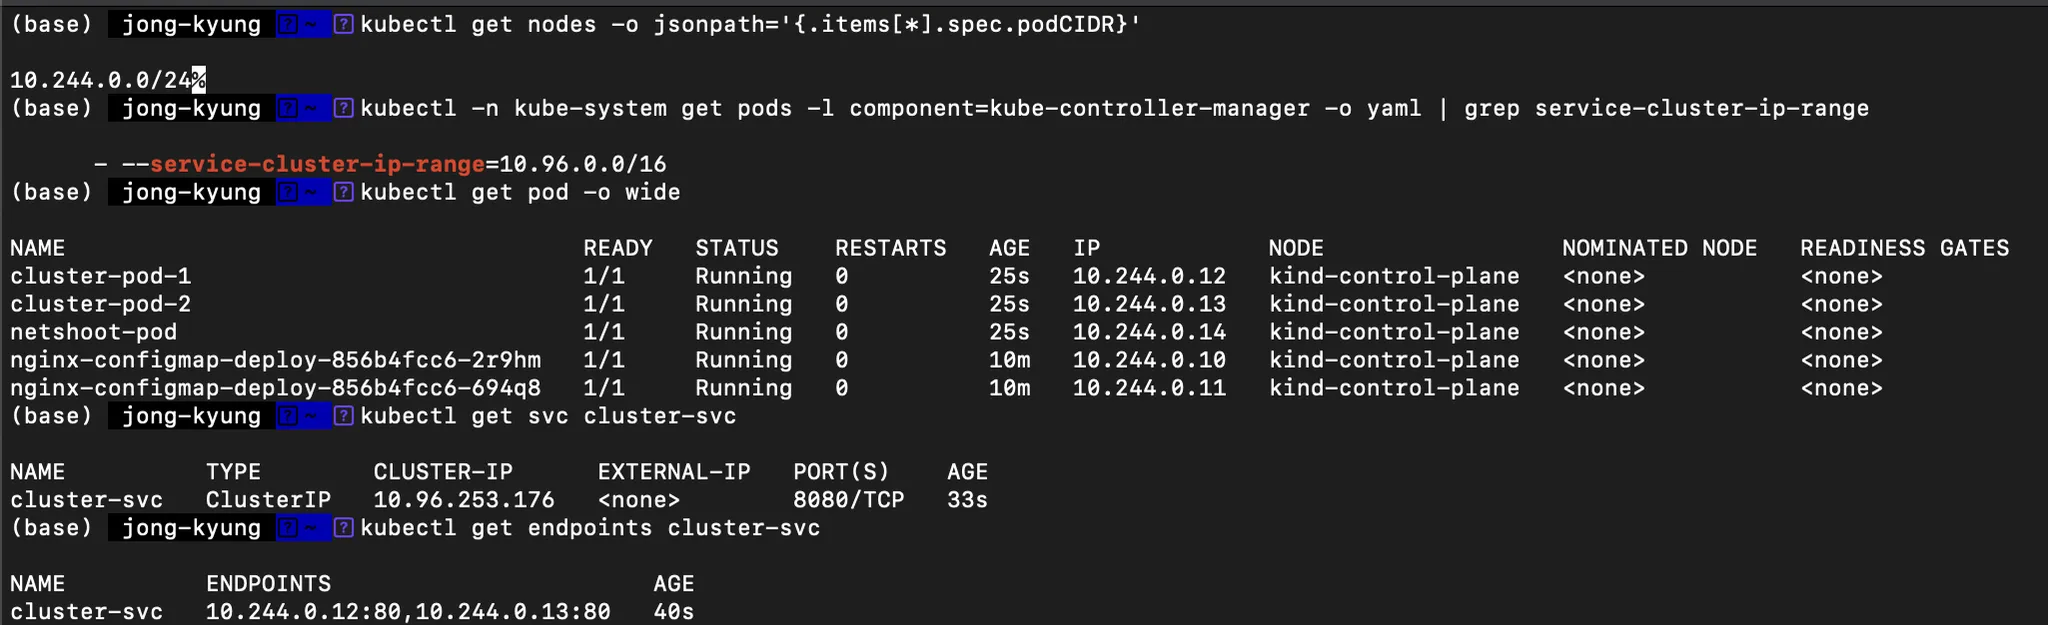
NodePort
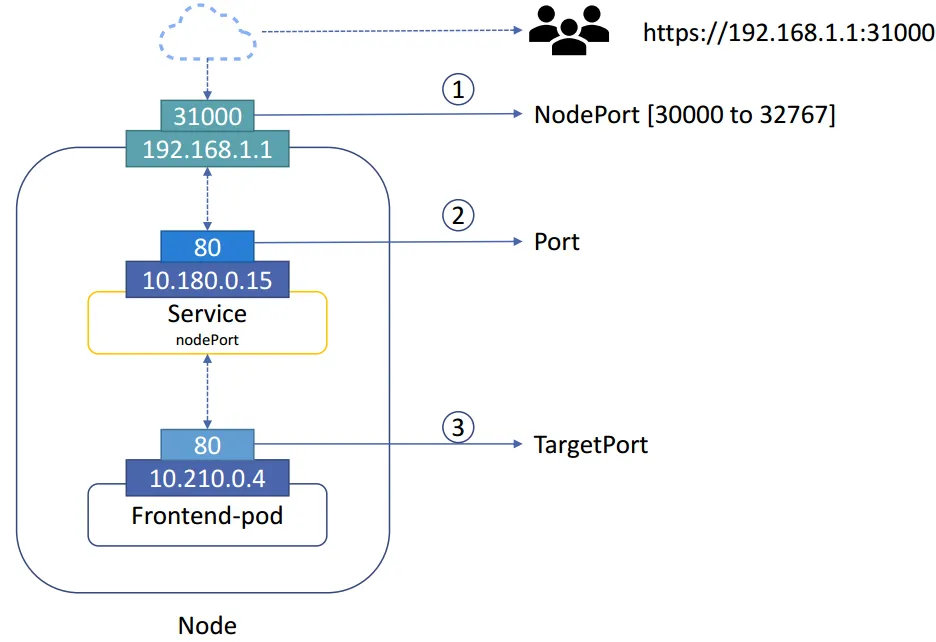
- 역할: 각 워커 노드의 고정 포트(30000–32767)로 Service 노출
- 특징
NodeIP:NodePort로 외부(클러스터 외부)에서 접근 가능- 클러스터 외부에서 노드(Host) 의 IP:Port 를 통해 접근 가능
- 클라우드 LB 없이도 간단한 외부 노출 가능
- 예시
# nodeport-pod.yaml
apiVersion: apps/v1
kind: Deployment
metadata:
  name: nodeport-deploy
spec:
  replicas: 2
  selector:
    matchLabels:
      app: nodeport-deploy
  template:
    metadata:
      labels:
        app: nodeport-deploy
    spec:
      containers:
      - name: container
        image: traefik/whoami
위 yaml을 배포하면 아래와 같이 엔드포인트를 확인할 수 있습니다.# nodeport-svc.yaml apiVersion: v1 kind: Service metadata: name: nodeport-svc spec: type: NodePort selector: app: nodeport-deploy ports: - name: nodeport-svc port: 80 # 서비스 포트 (클러스터 내부 사용) targetPort: 80 # 실제 컨테이너 포트 nodePort: 31002 # 외부에서 접근할 포트
Ingress

-
역할
- 클러스터 외부에서 퍼블릭 포트로 들어오는 트래픽을 모든 노드에 걸쳐 자동으로 분산·라우팅(Routing Mesh)
- 클러스터 외부에서 내부 서비스로 트래픽을 라우팅 하는 방법을 제공
-
특징
- 실제로 가장 많이 사용되는 방식
- Ingress 를 사용하기 위해서는 Ingress Controller 가 필요
- 클러스터 내부 서비스 (ClusterIP, NodePort, LoadBalancer) 를 외부로 노출 (HTTP / HTTPS) - Web Proxy 역할
- 호스트 기반 라우팅
-
호스트 이름 (도메인)을 기반으로 트래픽 라우팅 가능
-
api.example.com/www.example.com을 각각 다른 Service 리소스와 연결rules: - host: foo.example.com http: … - host: bar.example.com http: …
-
- 경로 기반 라우팅
-
요청 경로 기반으로 트래픽 라우팅 가능
-
/service1,/service2경로를 각각 다른 Service 리소스와 연결- path: /api pathType: Prefix backend: { serviceName: api-svc, servicePort: 80 } - path: /web pathType: Prefix backend: { serviceName: web-svc, servicePort: 80 }
-
- 투명 로드밸런싱
- 클라이언트는 어느 노드로 들어가도 동일하게 서비스 이용
- TLS 설정
-
TLS 인증서를 활용하여 HTTPS 구성 가능
 tls:
  - hosts:
    - example.com
    secretName: example-tls-secret
-
- 위 예시에서
web서비스는ingress네트워크를 통해 클러스터 내 모든 노드의 80번 포트를 리스닝하고, 요청이 들어오면 실제 실행 중인 컨테이너로 자동 라우팅됩니다.
-
예시
apiVersion: networking.k8s.io/v1 kind: Ingress metadata: name: example-ingress annotations: kubernetes.io/ingress.class: "nginx" nginx.ingress.kubernetes.io/rewrite-target: /$1 spec: tls: - hosts: - example.com secretName: example-tls-secret rules: - host: example.com http: paths: - path: /foo(/|$)(.*) pathType: ImplementationSpecific backend: service: name: foo-service port: number: 80 - path: /bar(/|$)(.*) pathType: ImplementationSpecific backend: service: name: bar-service port: number: 80 -
사용 예제
-
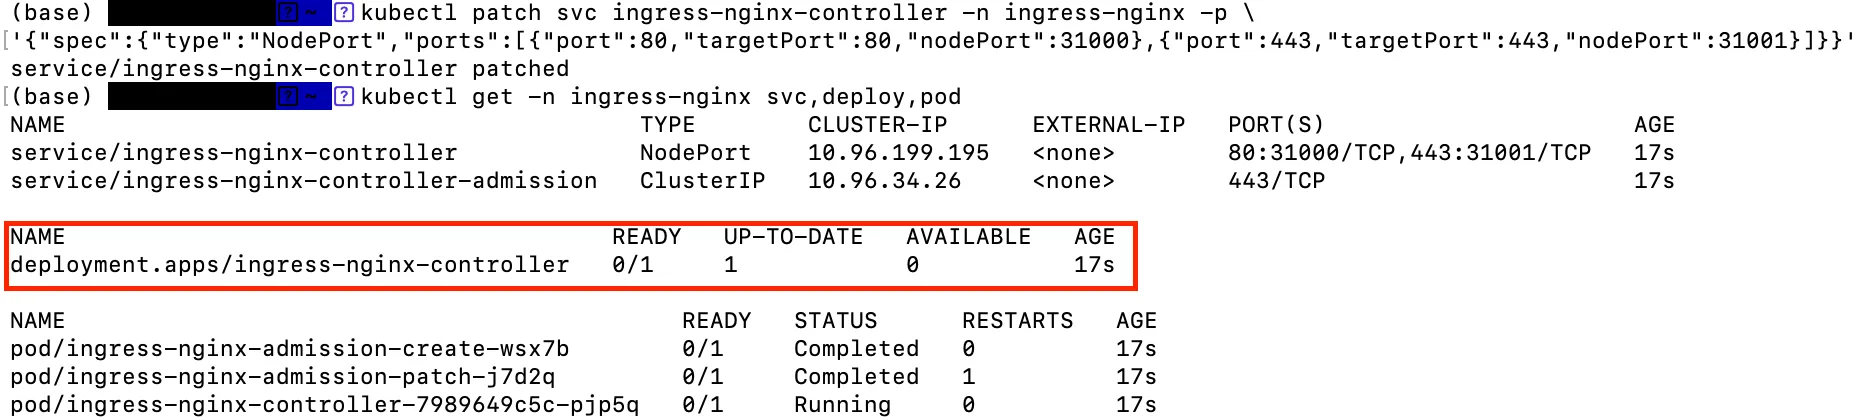
Nginx Ingress Controller 설치
# Nginx Ingress Controller 설치
kubectl apply -f https://raw.githubusercontent.com/kubernetes/ingress-nginx/main/deploy/static/provider/cloud/deploy.yaml

# Service 타입 변경
kubectl patch svc ingress-nginx-controller -n ingress-nginx -p \
'{"spec":{"type":"NodePort","ports":[{"port":80,"targetPort":80,"nodePort":31000},{"port":443,"targetPort":443,"nodePort":31001}]}}'
위 명령어를 통해 배포를 진행하면 다음과 같이 설치된 Ingress Controller를 확인할 수 있다.
-
서비스 생성
apiVersion: v1 kind: Service metadata: name: growth-service spec: selector: app: growth ports: - protocol: TCP port: 80 targetPort: 80 --- apiVersion: apps/v1 kind: Deployment metadata: name: growth-deployment spec: replicas: 1 selector: matchLabels: app: growth template: metadata: labels: app: growth spec: containers: - name: nginx image: nginx ports: - containerPort: 80 volumeMounts: - name: growth-html mountPath: /usr/share/nginx/html volumes: - name: growth-html configMap: name: growth-html --- apiVersion: v1 kind: ConfigMap metadata: name: growth-html data: index.html: | <html> <body> <h1>hello growth</h1> </body> </html>apiVersion: v1 kind: Service metadata: name: log-service spec: selector: app: log ports: - protocol: TCP port: 80 targetPort: 80 --- apiVersion: apps/v1 kind: Deployment metadata: name: log-deployment spec: replicas: 1 selector: matchLabels: app: log template: metadata: labels: app: log spec: containers: - name: nginx image: nginx ports: - containerPort: 80 volumeMounts: - name: log-html mountPath: /usr/share/nginx/html volumes: - name: log-html configMap: name: log-html --- apiVersion: v1 kind: ConfigMap metadata: name: log-html data: index.html: | <html> <body> <h1>hello log</h1> </body> </html> -
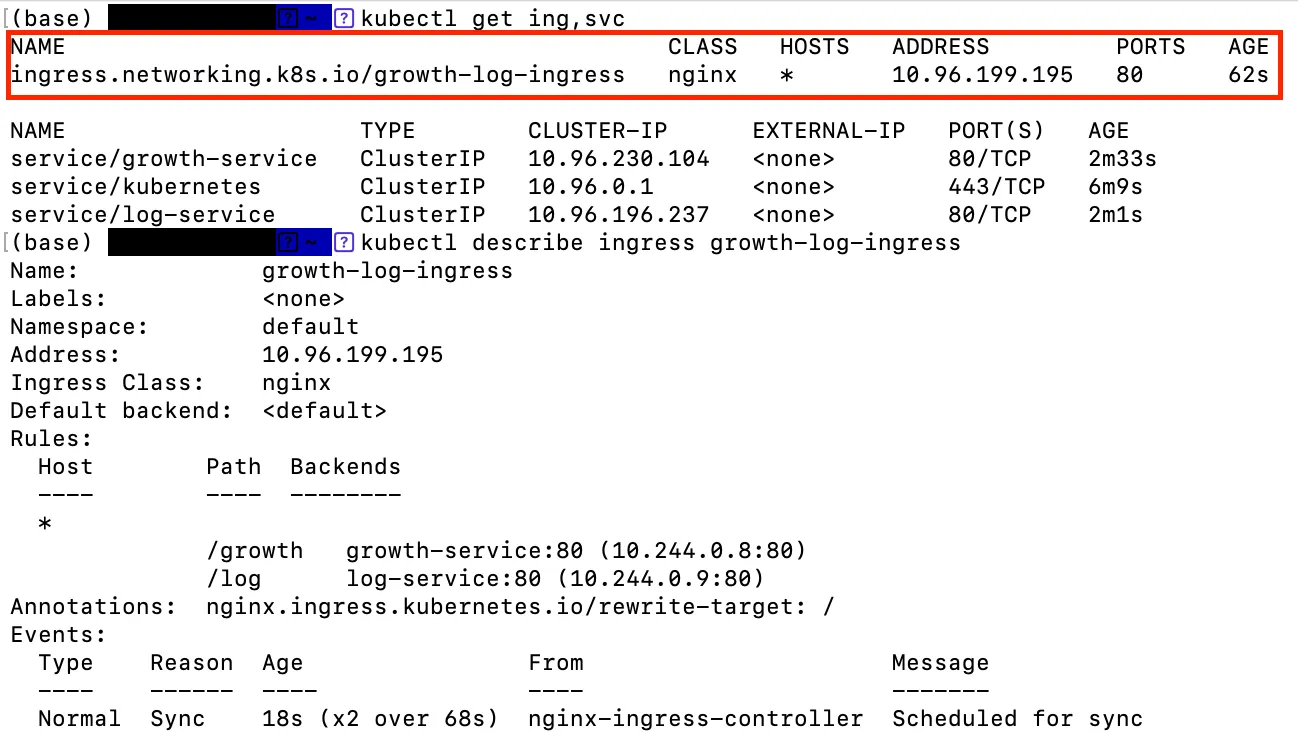
Ingress 배포
apiVersion: networking.k8s.io/v1
kind: Ingress
metadata:
  name: growth-log-ingress
  annotations:
    nginx.ingress.kubernetes.io/rewrite-target: / # /growth, /log 요청을 서비스로 전달할 때 접두사 제거. ex) /growth -> growth-service '/'
spec:
  ingressClassName: nginx
  rules:
  - http:
      paths:
      - path: /growth
        pathType: Prefix
        backend:
          service:
            name: growth-service
            port:
              number: 80
      - path: /log
        pathType: Prefix
        backend:
          service:
            name: log-service
            port:
              number: 80
위 yaml까지 배포한 후 확인해보면 ingress가 배포됨을 다음과 같이 확인할 수 있다.
-
K8s Storage
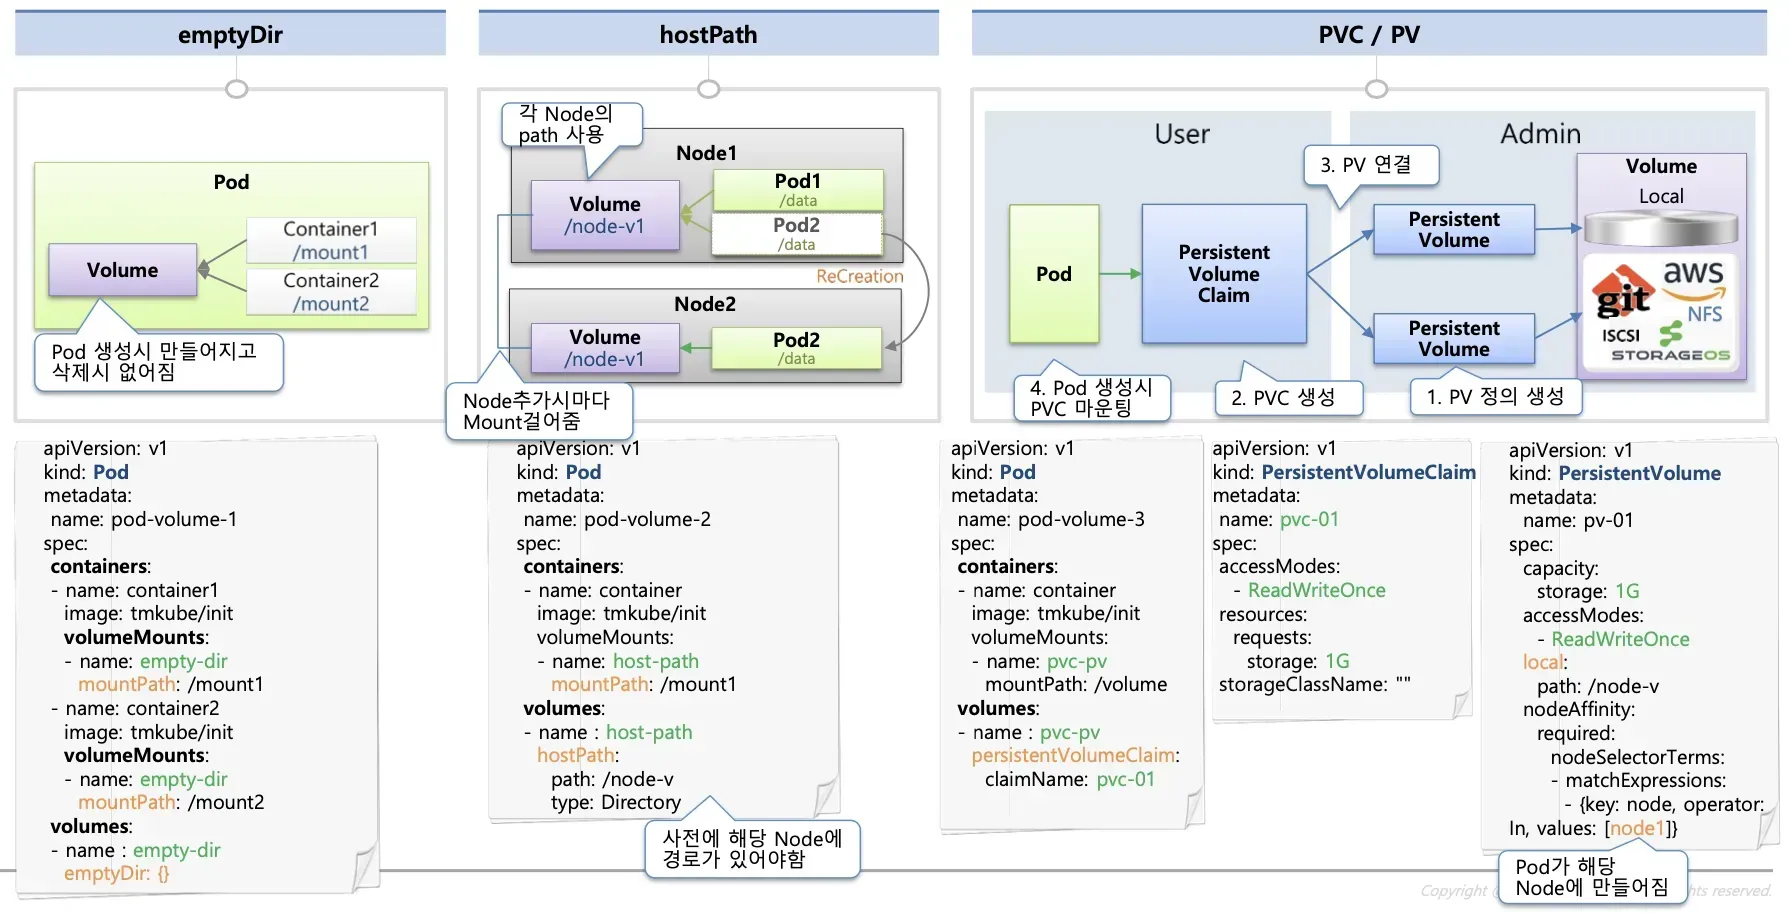
emptyDir
- 정의
- Pod이 노드에 스케줄링될 때 생성되고, 해당 Pod이 삭제되면 함께 사라지는 임시 디렉터리입니다.
- 특징
- 수명: Pod 생명 주기에 종속 (Pod 삭제 시 데이터 소멸)
- 저장 매체: 기본은 노드 로컬 디스크(
emptyDir.medium: ""),medium: "Memory"로 설정하면 tmpfs(메모리)에도 마운트 가능 - 용도: 컨테이너 간 일시적 파일 공유, 캐시 저장, 임시 작업 디렉터리 등
hostPath
- 정의
- 호스트 노드의 특정 파일 또는 디렉터리를 그대로 Pod 안으로 마운트하는 방식입니다.
- 특징
- 수명: Pod와 무관하게 호스트에 남아 있으며, 다른 Pod에서도 재사용 가능
- 포터블성: 노드마다 경로 구조가 달라질 수 있어 클러스터 간 이식성(Portability)이 낮음
- 용도: 호스트 로그 수집, 노드별 커스텀 설정 읽기, 디버깅용 쉘 접근 등
Persistent Volume (PV)
- 정의
- 클러스터 관리자가 미리 프로비저닝하거나, 동적 프로비저닝(StorageClass)으로 생성되는 클러스터 전체의 공유 영구 스토리지 리소스입니다.
- 핵심 개념
- PersistentVolume (PV): 물리적 스토리지(예: NFS, GCE PD, AWS EBS 등)에 대한 클러스터 레벨 추상
- PersistentVolumeClaim (PVC): 사용자가 필요 용량·접근 모드·StorageClass를 선언하면, PVC에 바인딩되어 PV를 할당받음

잘 하고 싶어요