
들어가며
병렬 프로그래밍과 Concurrent 라이브러리를 공부하기 앞서, 자바에서 Thread의 Scheduling과 Synchronization(다음 게시글이 될 것이다)을 다루는 법을 공부하려 한다. OS 복습은 덤.
Multi-threading
개념
Multi-threading은 한 Process 내에서 여러 Thread가 동시에 작업하는 것이다. CPU core 하나당 하나의 작업을 수행할 수 있기 때문에 Thread가 모두 '실제로 동시에' 실행되는 것은 아니고, 코어의 개수까지만 동시에 작업이 처리된다. Core가 굉장히 짧은 시간 동안 다수의 작업을 번갈아 수행하여 '마치 동시에 실행되는 것처럼' 보인다.
장점
- CPU 사용률 향상
- 자원을 효율적으로 사용
ex. IO 작업과 CPU 작업을 동시에 수행한다. - 사용자에 대한 응답성 향상
ex. 서버 프로그램은 사용자의 요청마다 Thread가 하나씩 생성된다. Single thread라면 매번 Process를 생성해야 하는데, 비용(시간, 메모리 공간)이 더 많이 든다.
단점
- Synchronization(동기화) 문제
- Deadlock(교착상태)
: 두 Thread가 서로가 필요한 자원을 점유한 상태에서 상대편의 자원을 기다리느라 진행이 멈춰 있는 상태
같은 자원을 사용하는(CPU만을 사용하는) 상황에서 Single core라면 context switching 비용과 자원 대기 시간 때문에 multi-thread로 얻을 이점이 없다.
Thread 구현
Thread 클래스 상속 받기
다중 상속이 불가하다.
class CustomThread extends Thread {
	public void run() { /* 구현 내용 */ }
}
아래와 같이 사용한다.
Thread customThread = new CustomThread();Runnable 인터페이스 구현하기
재사용성이 좋다.
class CustomThread implements Runnable {
	public void run() { /* 구현 내용 */ }
}
아래와 같이 사용한다.
Runnable r = new CustomThread();
Thread actualThread = new Thread(r);
Thread 실행
start()
actualThread.start();새로운 Thread가 작업을 실행할 때 필요한 Call stack을 생성하고 run()을 호출한다.
run()
actualThread.run();그저 메서드를 호출할 뿐 Thread를 실행하는 것이 아니다. Call stack이 생성되지 않는다.
한 Thread의 예외는 다른 Thread의 실행에 영향을 주지 않는다.
아래처럼 고의로 예외를 발생시키는 Thread를 만들자.
    static class CustomThread extends Thread {
        public void run() {
            throwException();
        }

        public void throwException() {
            try {
                throw new Exception();
            } catch (Exception e) {
                e.printStackTrace();
            }
        }
    }
해당 Thread를 main 메서드(즉, main thread)가 실행한다.
public class Application {
    public static void main(String[] args) {
        Thread customThread = new CustomThread();
        customThread.start();
    }
호출 스택의 첫 번째 메서드는 run이다. main 메서드는 종료되었다.
아래와 같이 run을 실행한다면?
public class Application {
    public static void main(String[] args) {
        Thread customThread = new CustomThread();
        customThread.run();
    }
main thread만이 실행되었다. 따라서 main 메서드가 호출 스택에 포함된다.
Thread 우선순위
Thread는 priority 멤버변수를 가진다. 특정 Thread가 더 많은 작업시간을 갖게 할 수 있다.
 Thread가 가질 수 있는 우선순위는 1부터 10까지의 정수다.
public class Application {
    public static void main(String[] args) {
        Thread customThread1 = new CustomThread(); // customThread1 우선순위 5
        Thread customThread2 = new CustomThread();
        customThread2.setPriority(8); // customThread2 우선순위 8
        customThread.start();
    }
Thread의 우선순위는 Thread를 생성한 Thread로부터 전달 받는다. main thread의 우선순위는 5이다.
멀티코어에서는 Thread의 우선순위에 따른 차이가 거의 없다. OS의 Scheduling 정책과 JVM 구현에 좌우된다.
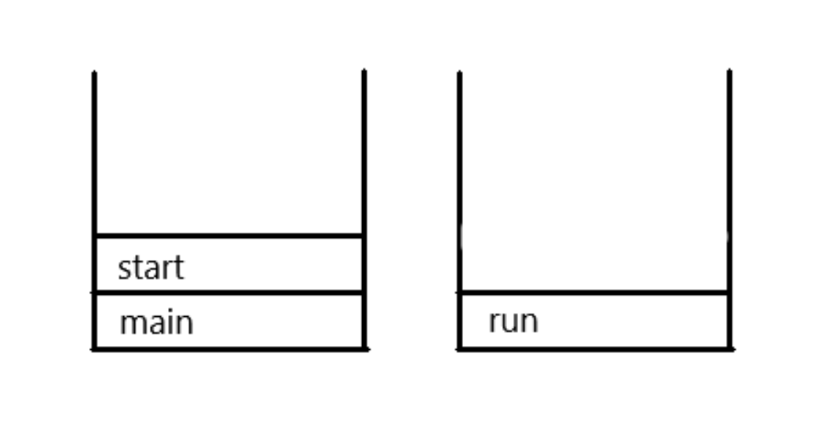
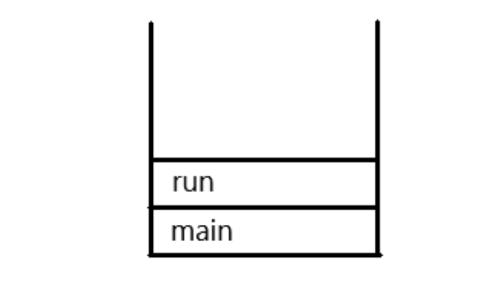
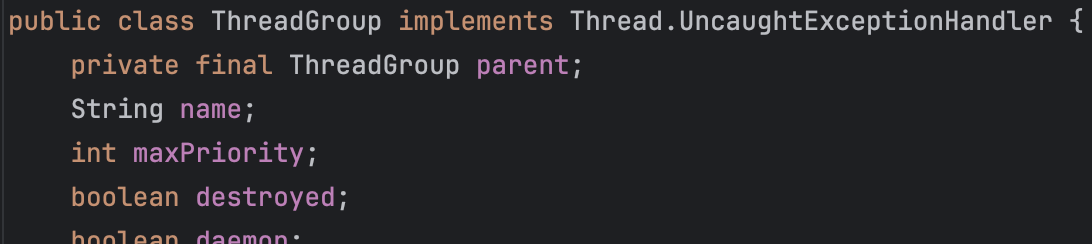
ThreadGroup
서로 관련된 Thread들을 그룹으로 다룬다. 자신이 속한 Thread 그룹이나 하위 Thread 그룹은 변경할 수 있지만 다른 Thread 그룹의 Thread를 변경할 수 없다. 모든 Thread는 반드시 Thread 그룹에 포함되어 있어야 한다. 기본적으로 자신을 생성한 Thread와 같은 그룹에 속한다.
 JVM은 자바 어플리케이션이 시행되면 main과 system thread 그룹을 만들고 JVM 운영에 필요한 Thread들을 생성해서 이 그룹에 포함시킨다. 예를들어, main thread는 main thread group에 속하고 GC를 수행하는 Filnalizer thread는 system thread group에 속한다.
Daemon Thread
Daemon Thread는 다른 일반 Thread(Daemon이 아닌)의 작업을 돕는 보조적인 역할을 수행하는 Thread이다. 일반 Thread가 종료되면 Daemon Thread는 강제적으로 자동 종료된다. Daemon Thread의 예로는 가비지 컬렉터, 워드프로세서의 자동저장, 화면자동갱신 등이 있다.
Daemon Thread는 무한루프와 조건문을 이용해 실행 후 대기하다 특정 조건이 만족되면 작업을 수행하고 다시 대기하도록 작성한다.
public class ThreadExample implements Runnable {
static boolean canAutoSave = true;
public static void main(String[] args) {
Thread thread = new Thread(new ThreadExample());
thread.setDaemon(true);
thread.start();
for (int i = 0; i < 10; i++) {
try {
Thread.sleep(1000); // 1초마다
} catch (InterruptedException e) {
}
System.out.println(i);
if (i == 5) {
canAutoSave = true;
}
}
}
@Override
public void run() {
while (true) {
try {
Thread.sleep(3 * 1000); // 3초마다
} catch (InterruptedException e) {
}
if (canAutoSave) {
autoSave();
}
}
}
public void autoSave() {
System.out.println("자동저장되었습니다.");
}
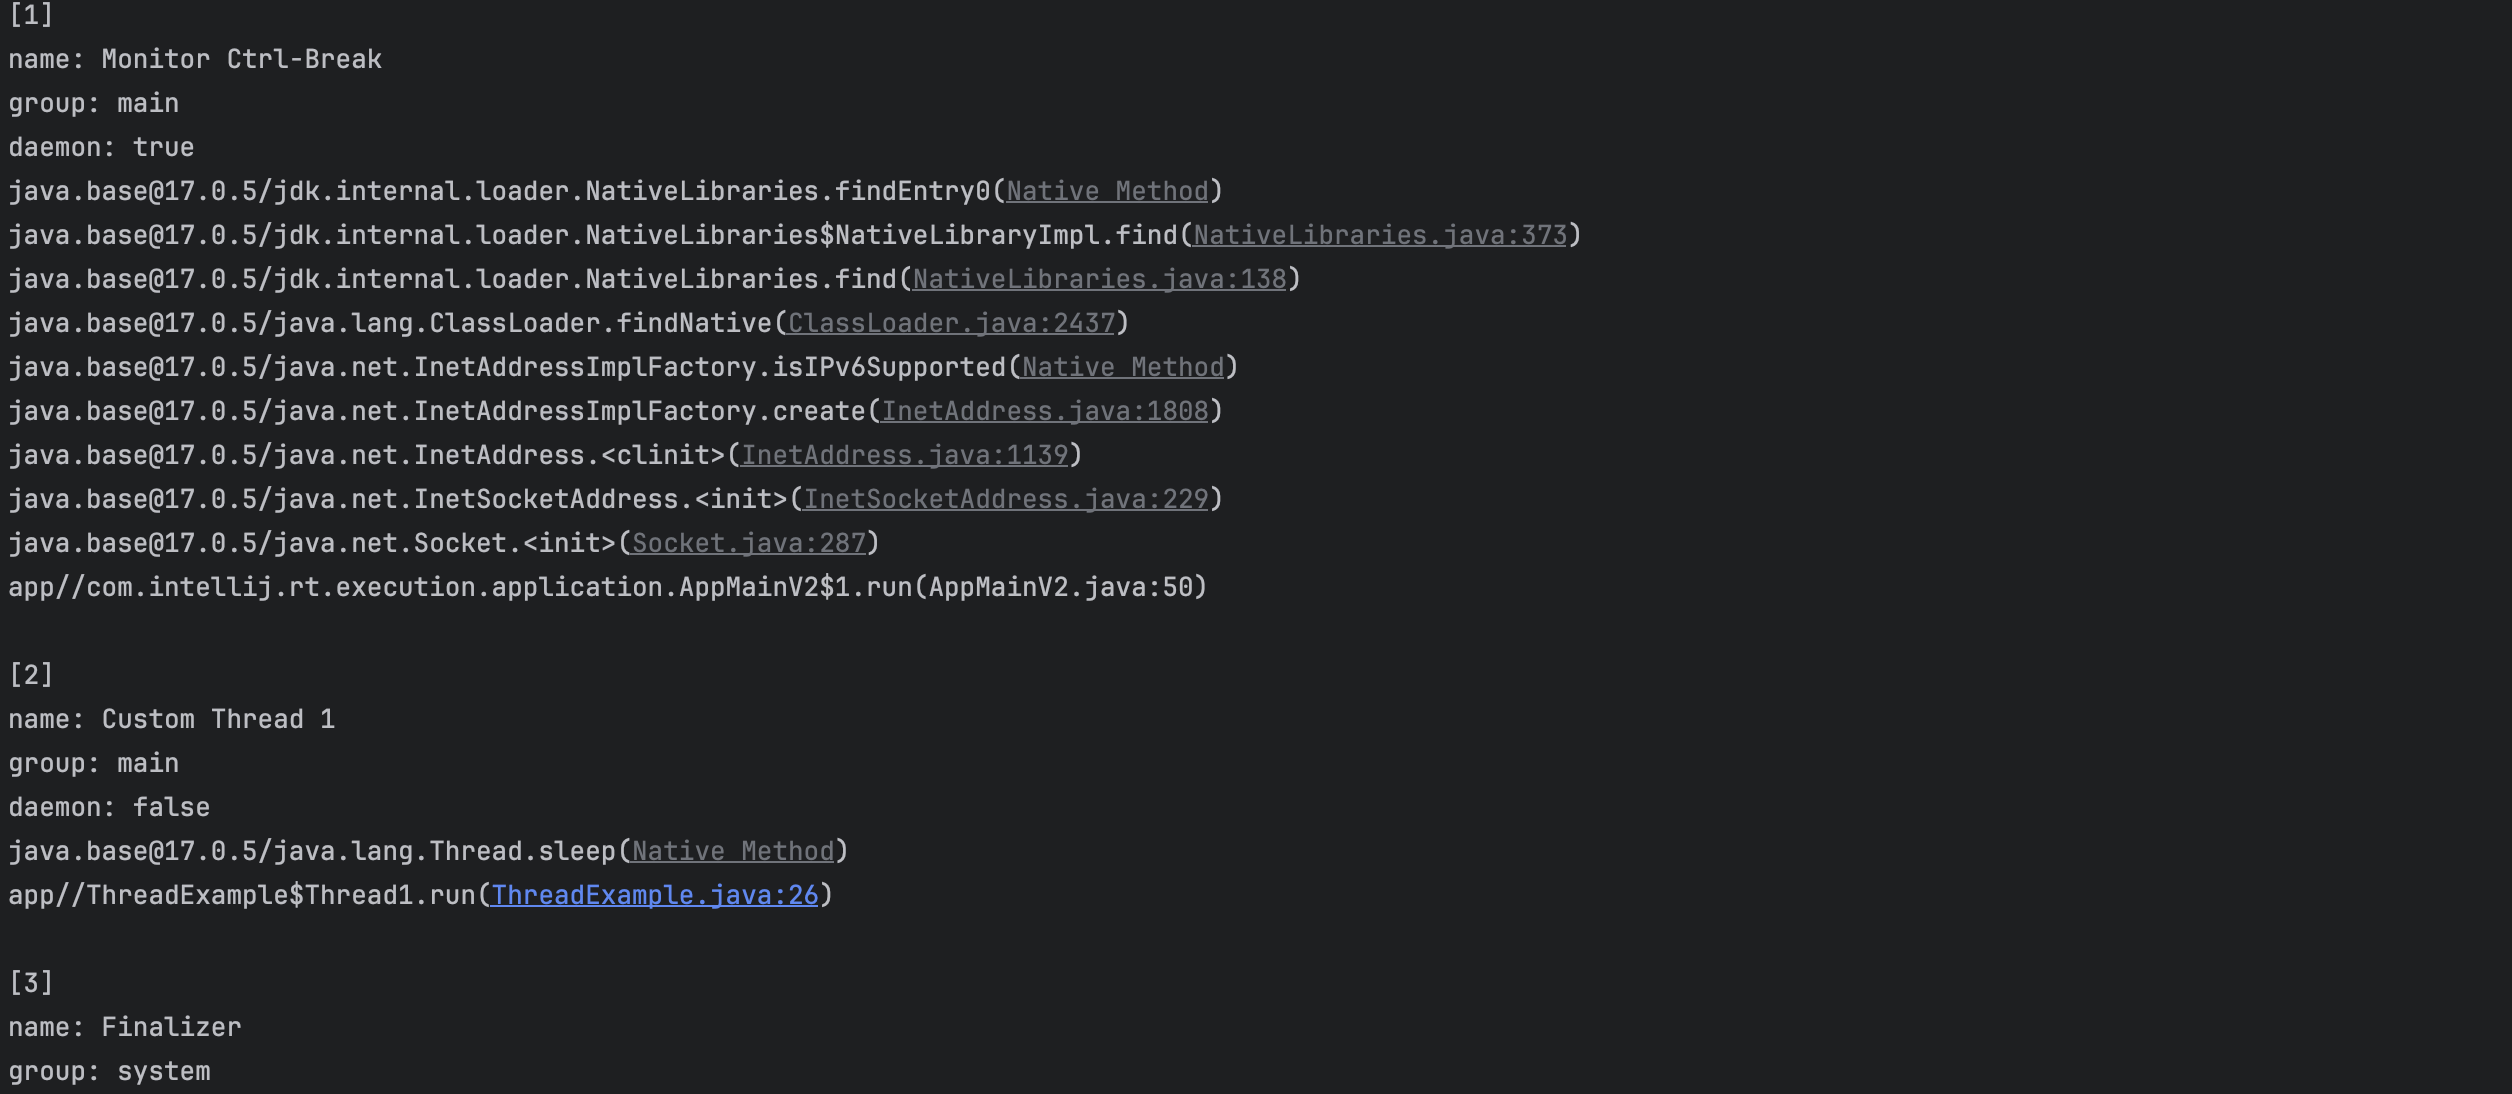
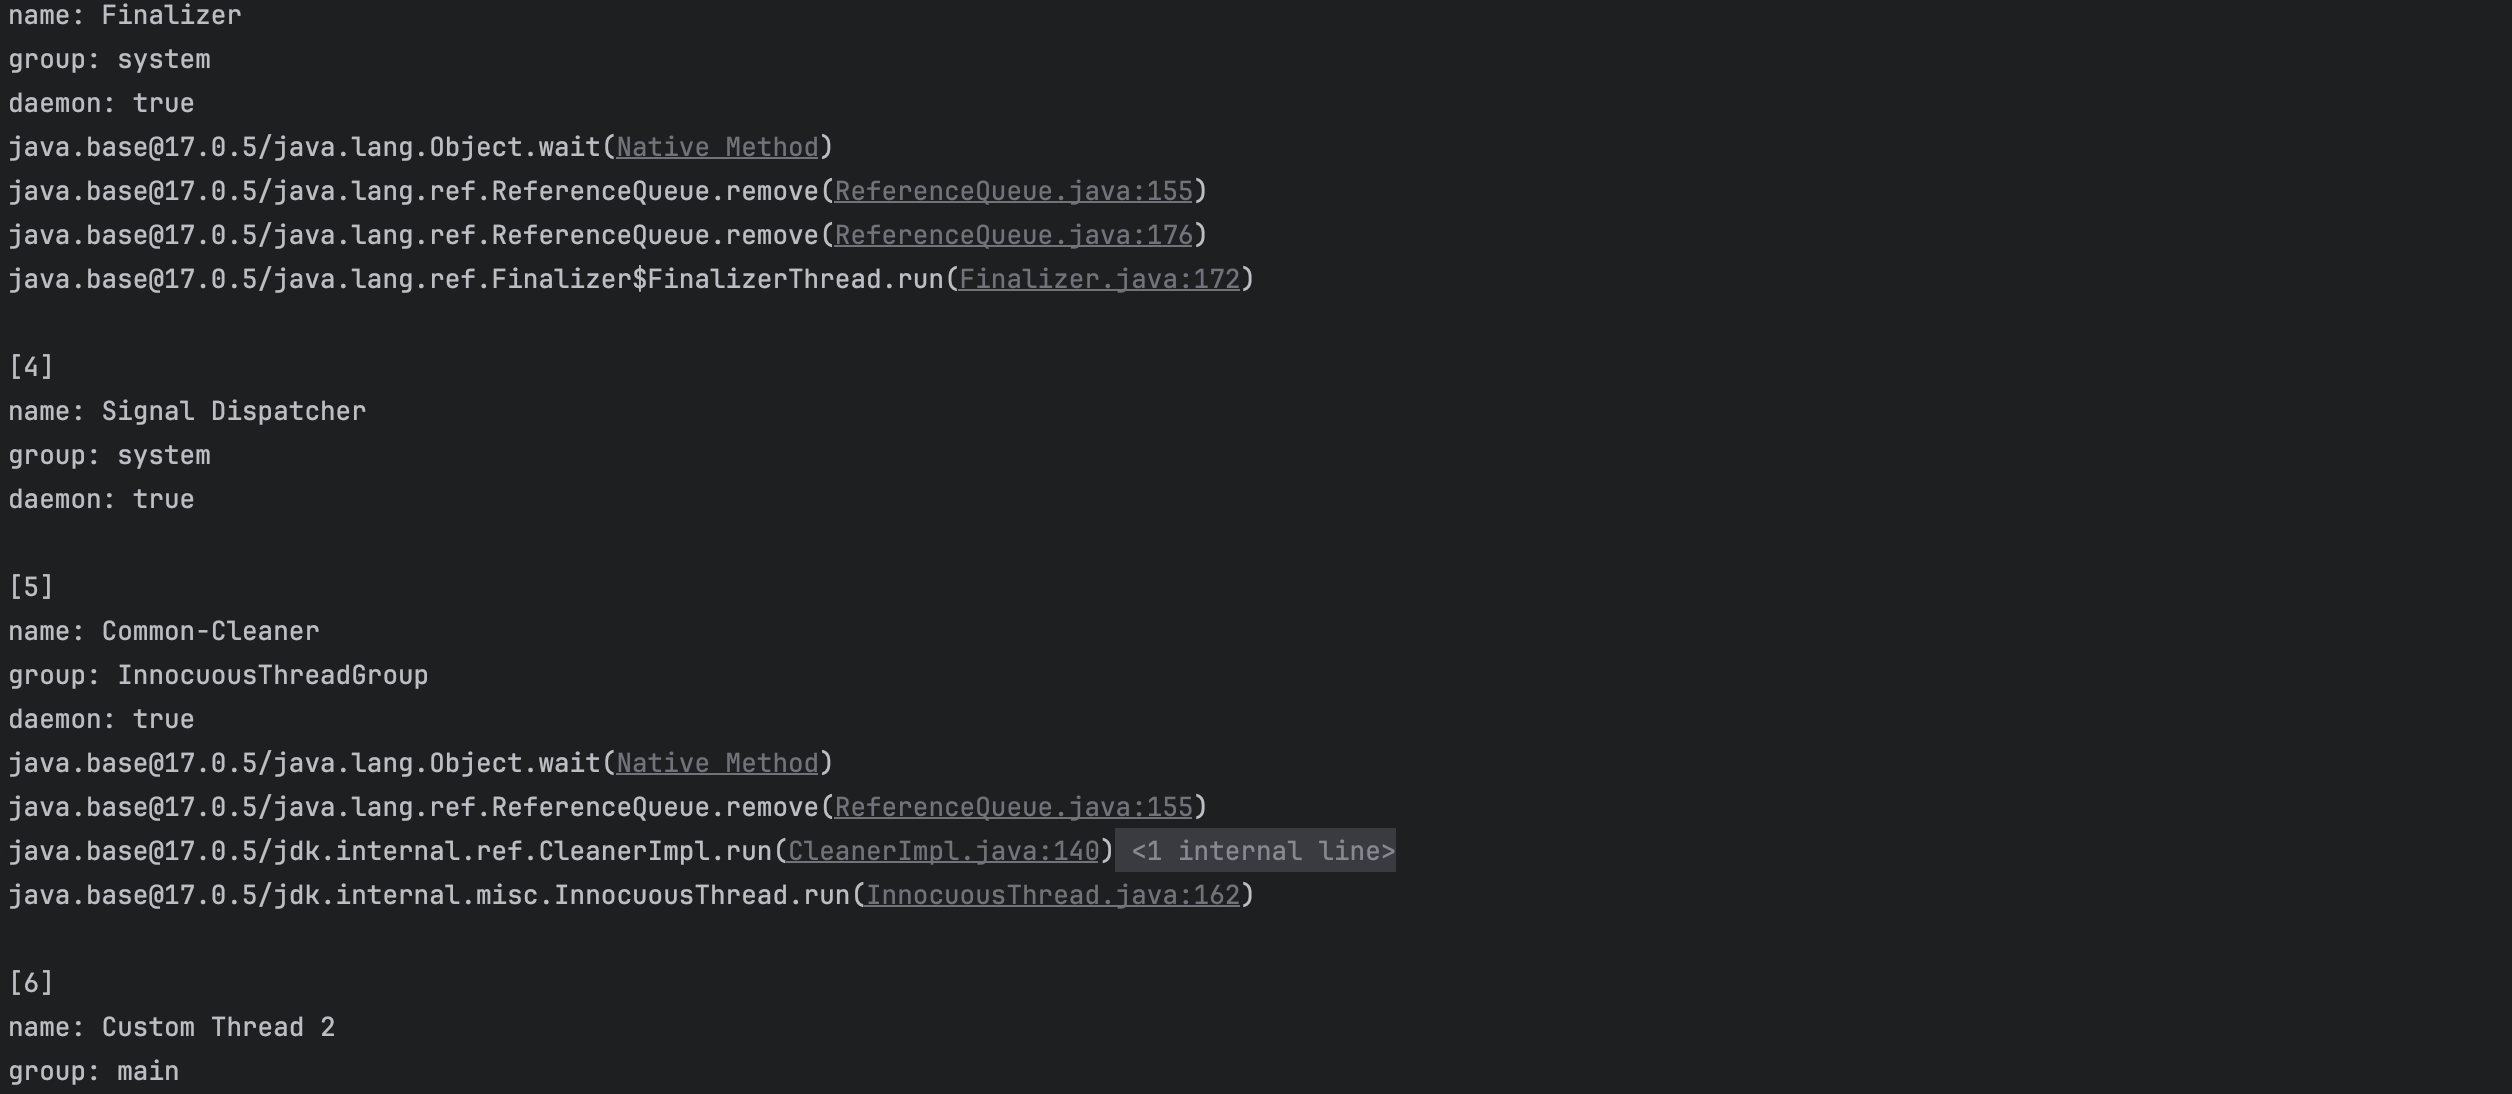
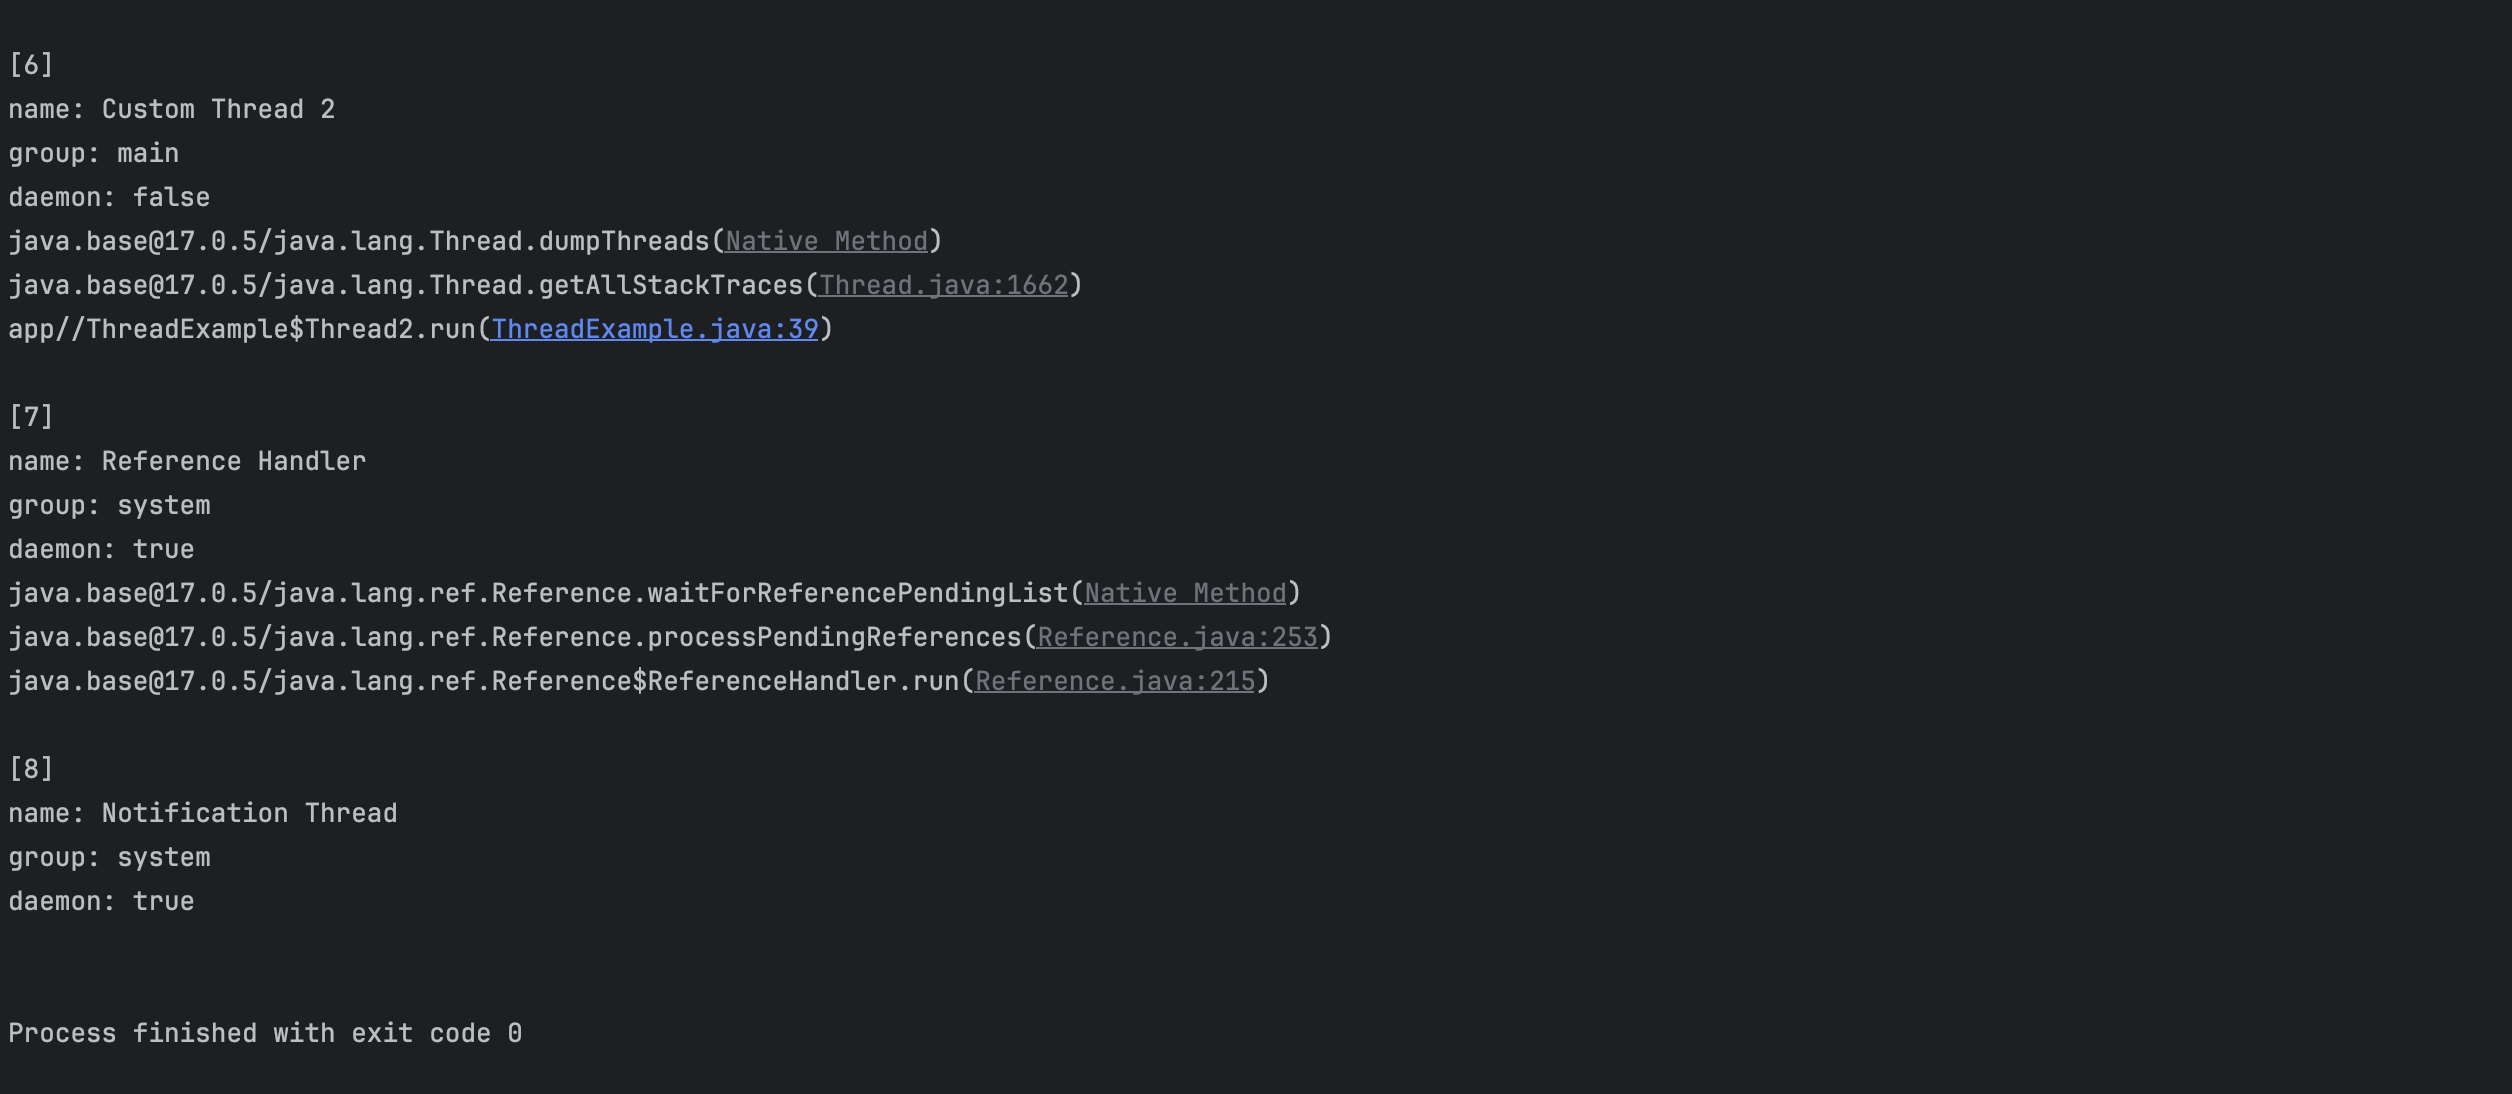
}실행 중 혹은 대기상태인 모든 Thread의 호출 스택을 출력해보자.
public class ThreadExample {
    public static void main(String[] args) {
        Thread thread1 = new Thread1("Custom Thread 1");
        Thread thread2 = new Thread2("Custom Thread 2");
        thread1.start();
        thread2.start();
    }

    static class Thread1 extends Thread {
        public Thread1(String name) {
            super(name);
        }

        @Override
        public void run() {
            try {
                Thread.sleep(5 * 1000);
            } catch (InterruptedException e) {
            }
        }
    }

    static class Thread2 extends Thread {
        public Thread2(String name) {
            super(name);
        }

        @Override
        public void run() {
            Map<Thread, StackTraceElement[]> map = getAllStackTraces();
            Iterator it = map.keySet().iterator();

            int index = 0;
            while (it.hasNext()) {
                Object obj = it.next();
                Thread t = (Thread) obj;
                StackTraceElement[] stackTraceElements = map.get(t);
                out.println("[" + ++index + "]");
                out.println("name: " + t.getName());
                if (t.getThreadGroup() != null) { // 가끔 종료 중인 main 메서드가 존재하여 추가
                    out.println("group: " + t.getThreadGroup().getName());
                }
                out.println("daemon: " + t.isDaemon());
                for (StackTraceElement element : stackTraceElements) {
                    out.println(element);
                }
                out.println();
            }
        }
    }
}
프로그램을 실행하면 JVM은 가비지컬렉션, 이벤트처리, 그래픽처리와 같이 프로그램이 실행될 때 필요한 보조작업을 수행하는 Damon Thread들을 자동으로 생성해서 실행시킨다. system thread group 혹은 main thread group에 속한다.
Thread의 상태
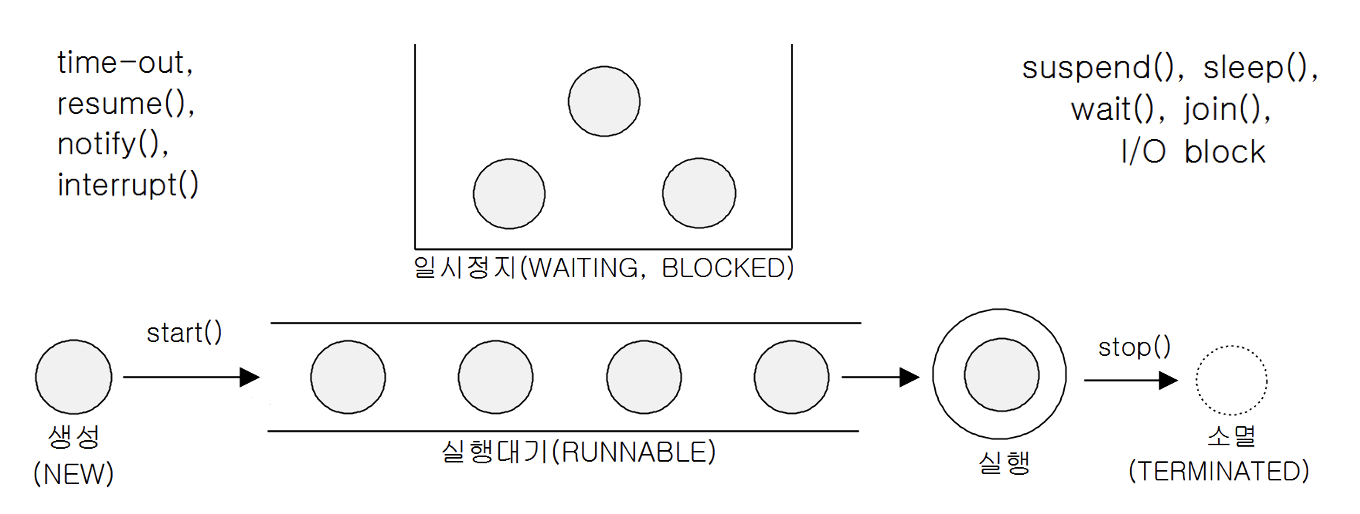
| 상태 | 설명 |
|---|---|
| New | Thread가 생성되고 아직 start()가 호출되지 않은 상태 |
| Runnable | 실행중 또는 실행 가능한 상태 |
| Blcked | 동기화 블럭에 의해 일시정지된 상태(lock이 풀릴 때까지 기다리는 상태) |
| WAITING, TIMED_WAITING | Thread의 작업이 종료되지 않았지만 실행가능하지 않은 일시정지 상태. TIMED_WAITING은 일시정지시간이 지정된 경우이다. |
| Terminated | Thread의 작업이 종료된 상태 |
Thread의 실행제어
sleep()
- 지정된 시간동안 현재 실행 중인 Thread를 멈춘다.
- 즉, main 메서드에서
sleep()을 호출하면 main thread가 정지된다.
public static native void sleep(long millis) throws InterruptedException;
public static void sleep(long millis, int nanos) throws InterruptedException;- 지정된 시간이 다 되거나
interrupt()가 호출되면(InterruptedException발생) 실행 대기(Runnable) 상태가 된다.
interrupt() & interrupted()
interrupt()는 Thread의 작업을 취소한다. 강제 종료는 아니다.interrupted()는interrupt()가 호출되었는지 알려준다.
public class ThreadExample {
    public static void main(String[] args) {
        Thread thread1 = new Thread1();
        thread1.start();
        String input = JOptionPane.showInputDialog("입력하세요.");
        out.println("입력 값: " + input);
        thread1.interrupt();
        out.println("isInterrupted(): " + thread1.isInterrupted());

    }

    static class Thread1 extends Thread {
        @Override
        public void run() {
            int i = 10;
            while (i != 0 && !isInterrupted()) {
                out.println(i--);
                for (long x = 0; x < 2500000000L; x++) ;
            }
            out.println("카운트가 종료되었습니다.");
        }
    }
}
위 코드에서 for문 대신 sleep()을 사용하려면 아래처럼 InterruptedException를 처리해서 다시 interrupt()를 걸어야 한다. false로 자동 초기화되기 때문이다.
try {
    Thread.sleep(1000);
} catch (InterruptedException e) {
    interrupt();
}suspend(), stop()
- Deadlock을 일으키기 쉽게 작성되어 있어 모두 deprecated되었다.
- 아래처럼 직접 구현해야 한다.
    static class Thread1 implements Runnable {
        private boolean suspended = false;
        private boolean stopped = false;

        @Override
        public void run() {
            while (!stopped) {
                if (!suspended) {
                    /* Thread가 수행할 코드 */
                    try {
                        Thread.sleep(1000);
                    } catch (InterruptedException e) {
                    }
                }
            }
        }

        public void suspend() {
            suspended = true;
        }

        public void resume() {
            suspended = false;
        }

        public void stop() {
            stopped = true;
        }
    }
yield()
- 남은 실행 시간을 특정 Thread에게 양보하고 자신은 실행 대기한다.
- 아래처럼
yield()와interrupt()를 적절히 사용해 응답성과 효율성을 높일 수 있다.
    static class Thread1 implements Runnable {
        private boolean suspended = false;
        private boolean stopped = false;

        private final Thread th;

        public Thread1(String name) {
            this.th = new Thread(this, name);
        }

        @Override
        public void run() {
            while (!stopped) {
                if (!suspended) {
                    /* Thread가 수행할 코드 */
                    try {
                        Thread.sleep(1000);
                    } catch (InterruptedException e) {
                    }
                } else {
                    Thread.yield();
                }
            }
        }

        public void start() {
            th.start();
        }

        public void suspend() {
            suspended = true;
            th.interrupt();
        }

        public void resume() {
            suspended = false;
        }

        public void stop() {
            stopped = true;
            th.interrupt();
        }
}Thread.yield();를 추가하여 일시 정지상태일 때 의미 없이 while문을 반복하는 busy-waiting 상태에서 벗어나 다른 Thread에게 실행시간을 양보한다.th.interrupt();를 추가하여stop()혹은suspend()가 호출되었을 때 정지 상태라면 정지 상태에서 벗어난다.
join()
- 지정된 시간 동안 특정 Thread가 작업하는 것을 기다린다.
    public static void main(String[] args) {
        Thread thread1 = new CustomThread();
        thread1.start();
        long startTime = System.currentTimeMillis();
        try {
            thread1.join();
        } catch (InterruptedException e) {
        }
        out.println("소요시간: " + (System.currentTimeMillis() - startTime));
}- 위 예시에서는 main thread가 CustomThread를 기다린다.
출처
[1] 자바의 정석 3판