멍청하게 한 3일은 날려먹은 detection 파트입니다.
bbox가 수천개씩 이상한곳에 그려지더라고요 정신 나갈뻔했습니다.
우선 이번에도 데이터셋을 만드는것 부터 시작할까요
import os
import random
import math
from PIL import Image, ImageDraw
import shutil

# ------------------------------------------------
# 0. 기본 설정
# ------------------------------------------------

# 생성할 도형 정보: (도형_이름, 꼭짓점_개수, 클래스_인덱스)
SHAPES = [
    ("triangle", 3, 0),
    ("rectangle", 4, 1),
    ("pentagon", 5, 2),
    ("hexagon", 6, 3),
    ("heptagon", 7, 4),
    ("octagon", 8, 5)
]

NUM_IMAGES_PER_SHAPE = 100   # 각 도형별 생성할 이미지 수
IMG_SIZE = (1280, 960)        # 배경 이미지 크기
SHAPE_SIZE = 200              # 도형의 한 변(실제는 반지름 기반)
OUTPUT_ROOT = "/home/joongwon00/ratelsoft/2025/datasets/polygon"
TRAIN_RATIO = 0.8            # train:val = 8:2

# ------------------------------------------------
# 1. 디렉토리 구조 생성
# ------------------------------------------------
def make_dir(path):
    if not os.path.exists(path):
        os.makedirs(path)

# 상위 폴더 구조 (train, val)
train_dir = os.path.join(OUTPUT_ROOT, "train")
val_dir = os.path.join(OUTPUT_ROOT, "val")

# 각각 images, labels 폴더 생성
train_images_dir = os.path.join(train_dir, "images")
train_labels_dir = os.path.join(train_dir, "labels")
val_images_dir = os.path.join(val_dir, "images")
val_labels_dir = os.path.join(val_dir, "labels")

for d in [train_images_dir, train_labels_dir, val_images_dir, val_labels_dir]:
    make_dir(d)

# 도형별 하위 폴더 생성
for shape_name, _, _ in SHAPES:
    make_dir(os.path.join(train_images_dir, shape_name))
    make_dir(os.path.join(train_labels_dir, shape_name))
    make_dir(os.path.join(val_images_dir, shape_name))
    make_dir(os.path.join(val_labels_dir, shape_name))

# ------------------------------------------------
# 2. 정N각형 좌표 생성 함수
# ------------------------------------------------
def generate_polygon_coordinates(center_x, center_y, radius, num_sides):
    """
    정N각형을 그리기 위한 (x, y) 꼭짓점 좌표 리스트를 반환
    중심점 (center_x, center_y), 외접원 반지름(radius)
    """
    coords = []
    for i in range(num_sides):
        angle = 2 * math.pi * i / num_sides  # 0 ~ 2π
        x = center_x + radius * math.cos(angle)
        y = center_y + radius * math.sin(angle)
        coords.append((x, y))
    return coords

# ------------------------------------------------
# 3. 이미지 및 라벨 생성
# ------------------------------------------------
for shape_name, num_sides, class_idx in SHAPES:
    for i in range(NUM_IMAGES_PER_SHAPE):
        # 배경 이미지 (224x224)
        img = Image.new("RGB", IMG_SIZE, color=(255, 255, 255))
        draw = ImageDraw.Draw(img)

        # 랜덤 색상 지정
        color = (random.randint(0, 255),
                 random.randint(0, 255),
                 random.randint(0, 255))

        # 도형의 랜덤 위치를 위해 중심점 생성
        # 도형이 이미지 밖으로 나가지 않도록 margin 고려
        margin = SHAPE_SIZE // 2 + 1
        center_x = random.randint(margin, IMG_SIZE[0] - margin)
        center_y = random.randint(margin, IMG_SIZE[1] - margin)

        # 정N각형 좌표 생성
        radius = SHAPE_SIZE / 2
        polygon_coords = generate_polygon_coordinates(center_x, center_y, radius, num_sides)

        # 도형 그리기
        draw.polygon(polygon_coords, fill=color)

        # ----------------------------
        # 3-1. 바운딩 박스 계산 (YOLO 형식)
        # ----------------------------
        x_coords = [p[0] for p in polygon_coords]
        y_coords = [p[1] for p in polygon_coords]
        x_min, x_max = min(x_coords), max(x_coords)
        y_min, y_max = min(y_coords), max(y_coords)

        # YOLO 포맷: class, x_center, y_center, width, height (정규화)
        bbox_width = (x_max - x_min) / IMG_SIZE[0]
        bbox_height = (y_max - y_min) / IMG_SIZE[1]
        bbox_center_x = (x_min + x_max) / 2.0 / IMG_SIZE[0]
        bbox_center_y = (y_min + y_max) / 2.0 / IMG_SIZE[1]

        # ----------------------------
        # 3-2. train/val 분리
        # ----------------------------
        split = "train" if i < NUM_IMAGES_PER_SHAPE * TRAIN_RATIO else "val"

        # 저장 경로 지정
        if split == "train":
            img_dir = os.path.join(train_images_dir, shape_name)
            label_dir = os.path.join(train_labels_dir, shape_name)
        else:
            img_dir = os.path.join(val_images_dir, shape_name)
            label_dir = os.path.join(val_labels_dir, shape_name)

        base_filename = f"{shape_name}_{i:04d}"   # 예: triangle_0000
        img_path = os.path.join(img_dir, base_filename + ".jpg")
        label_path = os.path.join(label_dir, base_filename + ".txt")

        # 이미지 저장
        img.save(img_path)

        # 라벨(.txt) 저장
        with open(label_path, "w") as f:
            # class_idx x_center y_center w h
            f.write(f"{class_idx} {bbox_center_x:.6f} {bbox_center_y:.6f} "
                    f"{bbox_width:.6f} {bbox_height:.6f}\n")

print("이미지 및 라벨 생성이 완료되었습니다.")


이제 훈련을 시켜봅시다.
from ultralytics import YOLO

# 1) YOLO 모델 로드 (예: yolo11n.pt 혹은 yolov8n.pt 등)
model = YOLO('yolo11n.pt')  # 또는 yolov8n.pt, yolov8s.pt 등

# 2) 학습 (train)
model.train(
    data='/home/joongwon00/ratelsoft/2025/datasets/polygon/polygon_data.yaml',
    epochs=30,                # 예시 에폭 수
    imgsz=640,        # 이미지 크기
    batch=8,                  # GPU/CPU 사양에 맞추어 조절
    name='yolo_polygon_exp',  # 결과 폴더명 (runs/detect/yolo_polygon_exp)
    device='0'                # GPU 지정 (예: '0'은 첫 번째 GPU)
)

# 3) 검증 (val)
results = model.val()  # or model.val(data="...")

# 4) 예측 (추론)
pred = model.predict(
    source='/home/joongwon00/ratelsoft/2025/datasets/polygon/val/images/triangle/triangle_0081.jpg',
    conf=0.25  # confidence threshold 예시
)
이미지 및 라벨 생성이 완료되었습니다.
New https://pypi.org/project/ultralytics/8.3.61 available 😃 Update with 'pip install -U ultralytics'
Ultralytics 8.3.59 🚀 Python-3.11.9 torch-2.5.1 CUDA:0 (NVIDIA GeForce RTX 4070 Laptop GPU, 8188MiB)
engine/trainer: task=detect, mode=train, model=yolo11n.pt, data=/home/joongwon00/ratelsoft/2025/datasets/polygon/polygon_data.yaml, epochs=30, time=None, patience=100, batch=8, imgsz=640, save=True, save_period=-1, cache=False, device=0, workers=8, project=None, name=yolo_polygon_exp3, exist_ok=False, pretrained=True, optimizer=auto, verbose=True, seed=0, deterministic=True, single_cls=False, rect=False, cos_lr=False, close_mosaic=10, resume=False, amp=True, fraction=1.0, profile=False, freeze=None, multi_scale=False, overlap_mask=True, mask_ratio=4, dropout=0.0, val=True, split=val, save_json=False, save_hybrid=False, conf=None, iou=0.7, max_det=300, half=False, dnn=False, plots=True, source=None, vid_stride=1, stream_buffer=False, visualize=False, augment=False, agnostic_nms=False, classes=None, retina_masks=False, embed=None, show=False, save_frames=False, save_txt=False, save_conf=False, save_crop=False, show_labels=True, show_conf=True, show_boxes=True, line_width=None, format=torchscript, keras=False, optimize=False, int8=False, dynamic=False, simplify=True, opset=None, workspace=None, nms=False, lr0=0.01, lrf=0.01, momentum=0.937, weight_decay=0.0005, warmup_epochs=3.0, warmup_momentum=0.8, warmup_bias_lr=0.1, box=7.5, cls=0.5, dfl=1.5, pose=12.0, kobj=1.0, nbs=64, hsv_h=0.015, hsv_s=0.7, hsv_v=0.4, degrees=0.0, translate=0.1, scale=0.5, shear=0.0, perspective=0.0, flipud=0.0, fliplr=0.5, bgr=0.0, mosaic=1.0, mixup=0.0, copy_paste=0.0, copy_paste_mode=flip, auto_augment=randaugment, erasing=0.4, crop_fraction=1.0, cfg=None, tracker=botsort.yaml, save_dir=runs/detect/yolo_polygon_exp3
Overriding model.yaml nc=80 with nc=6
from n params module arguments
0 -1 1 464 ultralytics.nn.modules.conv.Conv [3, 16, 3, 2]
1 -1 1 4672 ultralytics.nn.modules.conv.Conv [16, 32, 3, 2]
2 -1 1 6640 ultralytics.nn.modules.block.C3k2 [32, 64, 1, False, 0.25]
3 -1 1 36992 ultralytics.nn.modules.conv.Conv [64, 64, 3, 2]
4 -1 1 26080 ultralytics.nn.modules.block.C3k2 [64, 128, 1, False, 0.25]
5 -1 1 147712 ultralytics.nn.modules.conv.Conv [128, 128, 3, 2]
6 -1 1 87040 ultralytics.nn.modules.block.C3k2 [128, 128, 1, True]
7 -1 1 295424 ultralytics.nn.modules.conv.Conv [128, 256, 3, 2]
8 -1 1 346112 ultralytics.nn.modules.block.C3k2 [256, 256, 1, True]
9 -1 1 164608 ultralytics.nn.modules.block.SPPF [256, 256, 5]
10 -1 1 249728 ultralytics.nn.modules.block.C2PSA [256, 256, 1]
11 -1 1 0 torch.nn.modules.upsampling.Upsample [None, 2, 'nearest']
12 [-1, 6] 1 0 ultralytics.nn.modules.conv.Concat [1]
13 -1 1 111296 ultralytics.nn.modules.block.C3k2 [384, 128, 1, False]
14 -1 1 0 torch.nn.modules.upsampling.Upsample [None, 2, 'nearest']
15 [-1, 4] 1 0 ultralytics.nn.modules.conv.Concat [1]
16 -1 1 32096 ultralytics.nn.modules.block.C3k2 [256, 64, 1, False]
17 -1 1 36992 ultralytics.nn.modules.conv.Conv [64, 64, 3, 2]
18 [-1, 13] 1 0 ultralytics.nn.modules.conv.Concat [1]
...
Transferred 448/499 items from pretrained weights
Freezing layer 'model.23.dfl.conv.weight'
AMP: running Automatic Mixed Precision (AMP) checks...
AMP: checks passed ✅
Output is truncated. View as a scrollable element or open in a text editor. Adjust cell output settings...
train: Scanning /home/joongwon00/ratelsoft/2025/datasets/polygon/train/labels/heptagon... 480 images, 2 backgrounds, 0 corrupt: 100%|██████████| 482/482 [00:00<00:00, 1071.08it/s]
train: New cache created: /home/joongwon00/ratelsoft/2025/datasets/polygon/train/labels/heptagon.cache
val: Scanning /home/joongwon00/ratelsoft/2025/datasets/polygon/val/labels/heptagon.cache... 120 images, 0 backgrounds, 0 corrupt: 100%|██████████| 120/120 [00:00<?, ?it/s]
Plotting labels to runs/detect/yolo_polygon_exp3/labels.jpg...
optimizer: 'optimizer=auto' found, ignoring 'lr0=0.01' and 'momentum=0.937' and determining best 'optimizer', 'lr0' and 'momentum' automatically...
optimizer: AdamW(lr=0.001, momentum=0.9) with parameter groups 81 weight(decay=0.0), 88 weight(decay=0.0005), 87 bias(decay=0.0)
Image sizes 640 train, 640 val
Using 8 dataloader workers
Logging results to runs/detect/yolo_polygon_exp3
Starting training for 30 epochs...
Epoch GPU_mem box_loss cls_loss dfl_loss Instances Size
1/30 1.25G 0.7777 3.579 0.9626 4 640: 100%|██████████| 61/61 [00:07<00:00, 8.28it/s]
Class Images Instances Box(P R mAP50 mAP50-95): 100%|██████████| 8/8 [00:00<00:00, 9.99it/s]
all 120 120 0.00823 1 0.342 0.297
Epoch GPU_mem box_loss cls_loss dfl_loss Instances Size
2/30 1.28G 0.5393 2.562 0.8789 2 640: 100%|██████████| 61/61 [00:06<00:00, 9.79it/s]
Class Images Instances Box(P R mAP50 mAP50-95): 100%|██████████| 8/8 [00:00<00:00, 10.31it/s]
all 120 120 0.657 0.587 0.686 0.646
.
.
.
Epoch GPU_mem box_loss cls_loss dfl_loss Instances Size
30/30 1.28G 0.1154 0.3866 0.7707 1 640: 100%|██████████| 61/61 [00:07<00:00, 8.50it/s]
Class Images Instances Box(P R mAP50 mAP50-95): 100%|██████████| 8/8 [00:00<00:00, 9.64it/s]
all 120 120 0.997 1 0.995 0.995
30 epochs completed in 0.072 hours.
Optimizer stripped from runs/detect/yolo_polygon_exp3/weights/last.pt, 5.5MB
Optimizer stripped from runs/detect/yolo_polygon_exp3/weights/best.pt, 5.5MB
Validating runs/detect/yolo_polygon_exp3/weights/best.pt...
Ultralytics 8.3.59 🚀 Python-3.11.9 torch-2.5.1 CUDA:0 (NVIDIA GeForce RTX 4070 Laptop GPU, 8188MiB)
YOLO11n summary (fused): 238 layers, 2,583,322 parameters, 0 gradients, 6.3 GFLOPs
Class Images Instances Box(P R mAP50 mAP50-95): 100%|██████████| 8/8 [00:01<00:00, 6.14it/s]
all 120 120 0.997 1 0.995 0.995
triangle 20 20 0.998 1 0.995 0.995
rectangle 20 20 0.997 1 0.995 0.995
pentagon 20 20 0.997 1 0.995 0.995
hexagon 20 20 0.997 1 0.995 0.995
heptagon 20 20 0.997 1 0.995 0.995
octagon 20 20 0.997 1 0.995 0.995
Speed: 0.5ms preprocess, 2.0ms inference, 0.0ms loss, 1.3ms postprocess per image
Results saved to runs/detect/yolo_polygon_exp3
Ultralytics 8.3.59 🚀 Python-3.11.9 torch-2.5.1 CUDA:0 (NVIDIA GeForce RTX 4070 Laptop GPU, 8188MiB)
YOLO11n summary (fused): 238 layers, 2,583,322 parameters, 0 gradients, 6.3 GFLOPs
val: Scanning /home/joongwon00/ratelsoft/2025/datasets/polygon/val/labels/heptagon.cache... 120 images, 0 backgrounds, 0 corrupt: 100%|██████████| 120/120 [00:00<?, ?it/s]
Class Images Instances Box(P R mAP50 mAP50-95): 100%|██████████| 15/15 [00:02<00:00, 7.45it/s]
all 120 120 0.997 1 0.995 0.995
triangle 20 20 0.998 1 0.995 0.995
rectangle 20 20 0.997 1 0.995 0.995
pentagon 20 20 0.997 1 0.995 0.995
hexagon 20 20 0.997 1 0.995 0.995
heptagon 20 20 0.997 1 0.995 0.995
octagon 20 20 0.997 1 0.995 0.995
Speed: 1.1ms preprocess, 6.8ms inference, 0.0ms loss, 2.0ms postprocess per image
Results saved to runs/detect/yolo_polygon_exp32
image 1/1 /home/joongwon00/ratelsoft/2025/datasets/polygon/val/images/triangle/triangle_0081.jpg: 480x640 1 triangle, 56.0ms
Speed: 2.9ms preprocess, 56.0ms inference, 2.1ms postprocess per image at shape (1, 3, 480, 640)
잘 찾는걸 볼 수 있습니다.
onnx 변환은 똑같이 진행하면 됩니다.
yolo export model=/home/joongwon00/ratelsoft/2025/runs/detection/my_custom_train5/weights/best.pt format=onnx자 이제 구조를 뜯어봅시다.
import onnxruntime as ort

session = ort.InferenceSession("/home/joongwon00/ratelsoft/2025/Yolov11-ONNX-Object-Detection/models/best_detect.onnx")
outputs_info = session.get_outputs()
print("Number of outputs:", len(outputs_info))
for i, out_info in enumerate(outputs_info):
    print(f"Output {i}: name={out_info.name}, shape={out_info.shape}, type={out_info.type}")

# 또한 실제 run() 결과로 shape 확인
import numpy as np
dummy_input = np.random.rand(1, 3, 1280, 1280).astype(np.float32)
pred_results = session.run(None, {"images": dummy_input})  # 또는 {"data": dummy_input}, etc.
print("len(pred_results) =", len(pred_results))
for i, arr in enumerate(pred_results):
    print(f"pred_results[{i}] shape=", arr.shape)
Number of outputs: 1
Output 0: name=output0, shape=[1, 10, 33600], type=tensor(float)
len(pred_results) = 1
pred_results[0] shape= (1, 10, 33600)shape이 각각 1, 10, 33600 으로 나오는데
1은 batch size(한 번에 입력하는 이미지 수) 이고
10은 각각 cx, cy, w, h,class입니다.
33600은 총 anchor box 수일텐데 왜 33600이 나왔는지 잘 모르겠습니다.
detection 진행하기
제일 편한 방법은 yolo에서 그대로 가져다 쓰는겁니다.
from ultralytics import YOLO
import matplotlib.pyplot as plt
import cv2
import requests
import numpy as np
# YOLO11 모델 로드
model = YOLO("/home/joongwon00/ratelsoft/2025/yolocodes/runs/detect/yolo_polygon_exp2/weights/best.pt")
# # 모델을 ONNX 형식으로 내보내기
model.export(format="onnx") # 'yolo11n.onnx' 생성
# 내보낸 ONNX 모델 로드
onnx_model = YOLO("/home/joongwon00/ratelsoft/2025/yolocodes/runs/detect/yolo_polygon_exp2/weights/best.onnx")
# Run inference
image_path = "/home/joongwon00/ratelsoft/2025/datasets/polygon/train/images/heptagon/heptagon_0078.jpg"
# Load the image
image = cv2.imread(image_path)
image = cv2.cvtColor(image, cv2.COLOR_BGR2RGB) # Convert to RGB
# Resize the image to the model's expected input size (640x640)
# input_size = (1280, 1280)
# resized_image = cv2.resize(image, input_size)
# Run inference on the resized image
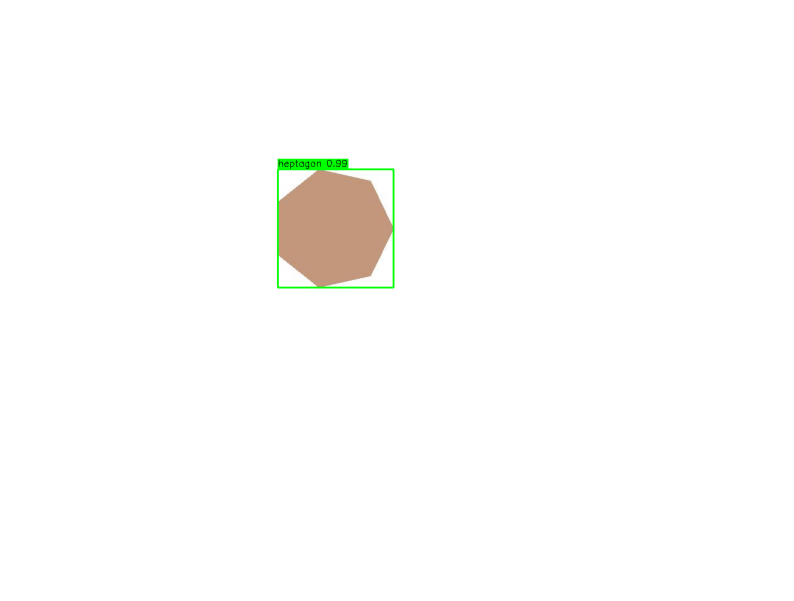
results = onnx_model(image, imgsz=1280)
# Extract predictions from results
for result in results:
boxes = result.boxes
names = result.names
for box in boxes:
x1, y1, x2, y2 = map(int, box.xyxy[0]) # Bounding box coordinates
conf = box.conf[0] # Confidence score
cls = int(box.cls[0]) # Class ID
label = f"{names[cls]} {conf:.2f}" # Class label with confidence
# Draw the bounding box and label
cv2.rectangle(image, (x1, y1), (x2, y2), (0, 255, 0), 2)
(text_width, text_height), _ = cv2.getTextSize(label, cv2.FONT_HERSHEY_SIMPLEX, 0.5, 1)
cv2.rectangle(image, (x1, y1 - text_height - 5), (x1 + text_width, y1), (0, 255, 0), -1)
cv2.putText(image, label, (x1, y1 - 5), cv2.FONT_HERSHEY_SIMPLEX, 0.5, (0, 0, 0), 1)
# Display the resized image with predictions
plt.figure(figsize=(10, 10))
plt.imshow(image)
plt.axis("off")
plt.show()
그 다음 yolo에 있는 기능을 안쓰고 onnx의 InferenceSession를 사용해봤습니다.
코드는 다음과 같습니다.
import cv2
import numpy as np
import onnxruntime as ort
import matplotlib.pyplot as plt

# --- Configuration ---
# Path to the ONNX model
onnx_model_path = "/home/joongwon00/ratelsoft/2025/yolocodes/runs/detect/yolo_polygon_exp2/weights/best.onnx"

# Path to the input image
image_path = "/home/joongwon00/ratelsoft/2025/datasets/polygon/train/images/heptagon/heptagon_0078.jpg"

# Input size expected by the model
input_size = (1280, 1280)

# Confidence and NMS thresholds
conf_threshold = 0.25
nms_threshold = 0.45

# Class names (update this list based on your model's classes)
class_names = ["1", "2", "3", "4", "5","6"]  # Example classes

# --- Load the ONNX model ---
session = ort.InferenceSession(onnx_model_path)

# Get model input details
input_name = session.get_inputs()[0].name
input_shape = session.get_inputs()[0].shape
# Typically, [batch, channels, height, width]

# --- Preprocess the Image ---
# Load the image
image = cv2.imread(image_path)
if image is None:
    raise FileNotFoundError(f"Image not found at path: {image_path}")
image_rgb = cv2.cvtColor(image, cv2.COLOR_BGR2RGB)

# Resize the image
resized_image = cv2.resize(image_rgb, input_size)

# Normalize the image (assuming the model expects [0,1] range)
normalized_image = resized_image.astype(np.float32) / 255.0

# Transpose to CHW format
transposed_image = np.transpose(normalized_image, (2, 0, 1))

# Add batch dimension
input_tensor = np.expand_dims(transposed_image, axis=0)

# --- Run Inference ---
outputs = session.run(None, {input_name: input_tensor})

# --- Post-process the Outputs ---
# Verify the output shape
print(f"Model output shape: {outputs[0].shape}")  # Expected: (1, 10, 33600)

# Reshape the output
# Assuming the output shape is (1, 10, 33600)
predictions = outputs[0].reshape(-1, 10)  # Shape: (33600, 10)

# Extract bounding boxes, objectness scores, and class scores
boxes = predictions[:, :4]  # [x_center, y_center, width, height]
objectness = predictions[:, 4]
class_scores = predictions[:, 5:]

# Verify class_scores shape
print(f"class_scores shape: {class_scores.shape}")  # Expected: (33600, 5)

# Calculate class IDs and confidence scores
cls_ids = np.argmax(class_scores, axis=1)  # Shape: (33600,)
confidences = objectness * class_scores[np.arange(len(class_scores)), cls_ids]  # Shape: (33600,)

# Debugging: Check the range of cls_ids
print(f"cls_ids range: {cls_ids.min()} to {cls_ids.max()}")

# Perform Non-Maximum Suppression
def non_max_suppression(boxes, confidences, cls_ids, conf_threshold, nms_threshold):
    """
    Perform Non-Maximum Suppression and return filtered boxes, confidences, and class IDs.
    """
    mask = confidences >= conf_threshold
    boxes = boxes[mask]
    confidences = confidences[mask]
    cls_ids = cls_ids[mask]

    if len(boxes) == 0:
        return [], [], []

    # Convert boxes from [x_center, y_center, w, h] to [x1, y1, x2, y2]
    boxes_xyxy = np.copy(boxes)
    boxes_xyxy[:, 0] = boxes[:, 0] - boxes[:, 2] / 2  # x1
    boxes_xyxy[:, 1] = boxes[:, 1] - boxes[:, 3] / 2  # y1
    boxes_xyxy[:, 2] = boxes[:, 0] + boxes[:, 2] / 2  # x2
    boxes_xyxy[:, 3] = boxes[:, 1] + boxes[:, 3] / 2  # y2

    # Convert to list of lists for OpenCV
    boxes_list = boxes_xyxy.tolist()
    confidences_list = confidences.tolist()

    # Perform NMS with positional arguments
    indices = cv2.dnn.NMSBoxes(
        boxes_list,
        confidences_list,
        conf_threshold,
        nms_threshold
    )

    if len(indices) > 0:
        indices = indices.flatten()
        return boxes_xyxy[indices], confidences[indices], cls_ids[indices]
    else:
        return [], [], []

filtered_boxes, filtered_confidences, filtered_cls_ids = non_max_suppression(
    boxes, confidences, cls_ids, conf_threshold, nms_threshold
)

# --- Draw Bounding Boxes and Labels ---
for box, conf, cls_id in zip(filtered_boxes, filtered_confidences, filtered_cls_ids):
    x1, y1, x2, y2 = box
    x1 = int(max(x1, 0))
    y1 = int(max(y1, 0))
    x2 = int(min(x2, image.shape[1]))
    y2 = int(min(y2, image.shape[0]))
    conf = float(conf)
    cls_id = int(cls_id)

    # Debugging: Print cls_id and class_names length
    if cls_id >= len(class_names):
        print(f"Warning: cls_id {cls_id} exceeds class_names length {len(class_names)}")
        label = f"Unknown {conf:.2f}"
    else:
        label = f"{class_names[cls_id]} {conf:.2f}"

    # Draw the bounding box
    cv2.rectangle(image, (x1, y1), (x2, y2), (0, 255, 0), 2)

    # Calculate text size
    (text_width, text_height), baseline = cv2.getTextSize(label, cv2.FONT_HERSHEY_SIMPLEX, 0.5, 1)

    # Draw the label background
    cv2.rectangle(image, (x1, y1 - text_height - 5), (x1 + text_width, y1), (0, 255, 0), -1)

    # Put the label text above the bounding box
    cv2.putText(image, label, (x1, y1 - 5), cv2.FONT_HERSHEY_SIMPLEX, 0.5, (0, 0, 0), 1)

# --- Display the Result ---
plt.figure(figsize=(10, 10))
plt.imshow(cv2.cvtColor(image, cv2.COLOR_BGR2RGB))
plt.axis("off")
plt.show()
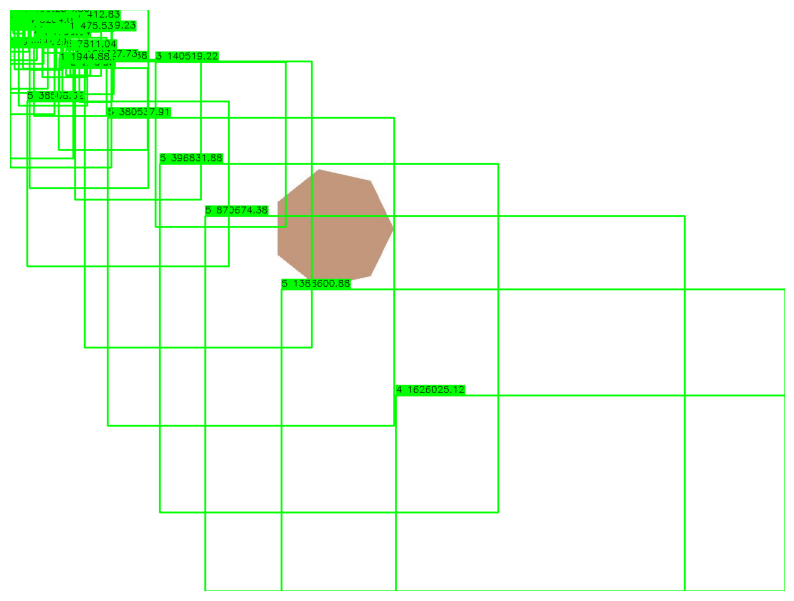
개판이 나버렸습니다.
다시 해봅시다.
import onnxruntime as ort
import numpy as np
import cv2
import matplotlib.pyplot as plt

# ONNX 모델 경로
onnx_model_path = "/home/joongwon00/ratelsoft/2025/yolocodes/runs/detect/yolo_polygon_exp2/weights/best.onnx"
ort_session = ort.InferenceSession(onnx_model_path)

# 클래스 이름 (메타데이터 기준)
class_names = {0: 'triangle', 1: 'rectangle', 2: 'pentagon', 3: 'hexagon', 4: 'heptagon', 5: 'octagon'}

# 입력 이미지 로드
image_path = "/home/joongwon00/ratelsoft/2025/datasets/polygon/train/images/heptagon/heptagon_0078.jpg"
orig_image = cv2.imread(image_path)
orig_image = cv2.cvtColor(orig_image, cv2.COLOR_BGR2RGB)  # BGR → RGB 변환 (모델에 따라 다름)
orig_height, orig_width = orig_image.shape[:2]

# 입력 이미지 전처리
input_size = (1280, 1280)
resized_image = cv2.resize(orig_image, input_size)
input_tensor = resized_image.astype(np.float32) / 255.0  # [0,1] 정규화
input_tensor = np.transpose(input_tensor, (2, 0, 1))[None, ...]  # CHW + 배치 차원

# 추론 실행
outputs = ort_session.run(None, {"images": input_tensor})[0]  # Shape: (1, 10, 33600)
predictions = outputs[0].transpose(1, 0)  # Shape: (33600, 10)
for o in predictions:
    if max(o[4:] > 0.5):
        print(o)
# --- 후처리 로직 ---
conf_threshold = 0.25  # 신뢰도 임계값 낮춤
detections = []

for pred in predictions:
    cx, cy, w, h,*cls_scores = pred  # cx, cy, w, h: 입력 이미지(1280x1280) 기준 좌표
    cls_id = np.argmax(cls_scores)
    confidence = cls_scores[cls_id]  # 최종 신뢰도 = objectness × class_score

    if confidence > conf_threshold:
        # 좌표 변환: 1280x1280 → 원본 이미지 크기
        x1 = int((cx - w/2) * (orig_width / input_size[0]))
        y1 = int((cy - h/2) * (orig_height / input_size[1]))
        x2 = int((cx + w/2) * (orig_width / input_size[0]))
        y2 = int((cy + h/2) * (orig_height / input_size[1]))

        # 좌표가 이미지 경계를 벗어나지 않도록 클램핑
        x1 = max(0, min(x1, orig_width))
        y1 = max(0, min(y1, orig_height))
        x2 = max(0, min(x2, orig_width))
        y2 = max(0, min(y2, orig_height))

        if cls_id in class_names:
            detections.append((x1, y1, x2, y2, confidence, class_names[cls_id]))

# --- 바운딩 박스 그리기 ---
for (x1, y1, x2, y2, conf, cls_name) in detections:
    cv2.rectangle(orig_image, (x1, y1), (x2, y2), (0, 255, 0), 2)
    label = f"{cls_name} {conf:.2f}"
    cv2.putText(orig_image, label, (x1, y1-10), cv2.FONT_HERSHEY_SIMPLEX, 0.6, (0,255,0), 2)

# 결과 표시
plt.figure(figsize=(12, 8))
plt.imshow(orig_image)
plt.axis("off")
plt.show()
우선 yolov11에는 obj라는게 없더라고요 예전엔 4+1+@였는데 이젠 그냥 4+class id인거랑, 텐서 입력구조때문에 gpt가 계속 오류가 나서 transpose로 변경 후 다시 진행 해봤습니다
[     537.89      482.06      191.46      258.42   0.0004274  4.9412e-05    0.003287  0.00090149     0.85896    0.001792]
[     537.42      481.18      189.49      256.68   5.284e-05   1.204e-05  0.00025162  0.00016558     0.85115   0.0023634]
[     537.84      482.37      190.77      259.22  0.00024542  1.6153e-05  0.00041917  0.00062969     0.72614   0.0042618]
[     537.88       481.9       191.5      258.58  0.00026572  3.3677e-06   0.0026374  6.5506e-05     0.92412  0.00040352]
[     537.92      481.94      190.99      258.08   0.0001145  2.7716e-06  8.4013e-05   0.0017005     0.95384   0.0041201]
[     538.05      481.97      189.78      258.06   5.582e-05  2.6822e-07  6.4343e-05    0.001168     0.97141    0.016641]
[      537.6      482.41      191.21      259.02  9.5844e-05  3.8445e-06  0.00091901   0.0011865     0.97527    0.046635]
[     538.18      482.36      190.64      257.77  3.8683e-05  7.4506e-07  0.00021708   0.0012949     0.99072   0.0092978]
[      538.1      482.43      190.03         258  1.8001e-05  2.3842e-07  2.4855e-05  0.00080571     0.96394    0.012234]
[     537.87      482.58      191.28      258.81  1.8001e-05  1.3411e-06   0.0011902   0.0011603     0.98325    0.070124]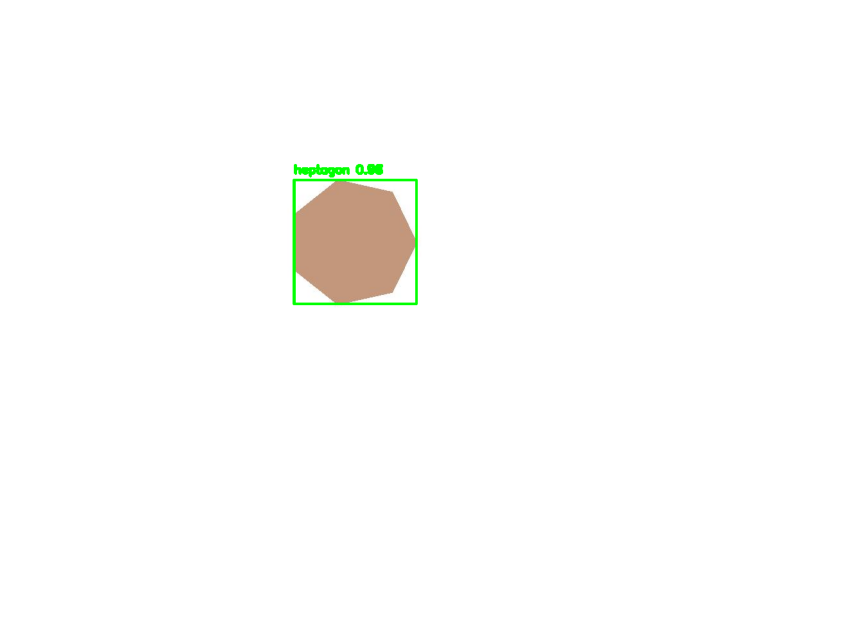
잘 된 것을 확인할 수 있습니다.
박스가 몇개 겹쳤는데 이건 nms 사용하면 됩니다.

학과 꼴찌 공대 호소인