1. Creating & Nesting Components
1-1. Components
A component is a piece of the UI (user interface) that has its own logic and appearance. A component can be as small as a button, or as large as an entire page.
React apps are basically made out of components and they are JS functions which return markup
example
function MyButton() {
	return (
    	<button>It's a Button!</button>
    );
}
1-2. Nesting Components
export default function MyApp() {
	return (
    	<div>
        	<h1>Welcome to my app</h1>
            <MyButton />
        </div>
    );
}
1-3. Result
On your App.js,
function MyButton() {
	return (
    	<button>It's a Button!</button>
    );
}


export default function MyApp() {
	return (
    	<div>
        	<h1>Welcome to my app</h1>
            <MyButton />
        </div>
    );
}
and ctrl + s or simply just save that .js file.
Then,

1-4. Export Default
export default function {func name} will specify the main component to render at index.js file.
component's name ({func name}) must starts with a capital letter
like<MyButton />unlike HTML tags
2. Writing Markup with JSX
It's optional to use JSX, the markup syntax
<div>...</div>
However, most React projects use JSX for its convenience.
3. Adding Styles (CSS)
CSS in React is className and works the same as the HTML class attribute.
<img className = "avatar" />


/* In your CSS */
.avatar {
	border-radius: 50%;
}
4. Displaying Data
Curly braces {} let javascript to be embedded into markup and display it to the user.
const user = {
	name: 'Michael Jordan',
    imageUrl: 'https://cdn.britannica.com/09/188709-050-03BF34CB/Michael-Jordan.jpg',
	imageSize: 90,
};

export default function Profile() {
	return (
    	<>
        	<h1>{user.name}</h1>
            <img
            	className = "avatar"
                src = {user.imageUrl}
                alt = {'Photo of ' + user.name}
                style = {{
                	width: user.imageSize,
                    height: user.imageSize
                }}
            />
        </>
    );
}
5. Conditional Rendering
There is no special syntax for writing conditions in React. Instead, you'll use the same techniques as you use when writing regular Javascript code.
let content;

if (isLoggedIn) {
	content = <AdminPanel />
} else {
	content = <LoginForm />
}

return (
	<div>
    	{content}
    </div>
);
Or,
return (
  <div>
      <isLoggedIn ? (
          <AdminPanel />
      ) : (
          <LoginForm />
      )}
  </div>
)
Even
return (
	<div>
    	{isLoggedIn && <AdminPanel />}
    </div>
);
is possible.
6. Rendering lists
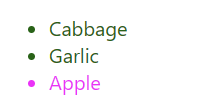
To render lists of components, for loop in Javascript or map() array function can be used.
const products = [
	{ title: 'Cabbage', isFruit: false, id: 1},
    { title: 'Garlic', isFruit: false, id: 2},
    { title: 'Apple', isFruit: true, id: 3},
];


export default function ShoppingList() {
	const listItems = products.map(product =>
    	<li
        	key = {product.id}
            style = {{
            	color: product.isFruit ? 'magenta' : 'darkgreen'
            }}
        >
        	{product.title}
        </li>
    );

    return (
    	<ul>{listItems}</ul>
    );
}
7. Responding to events
You can respond to events by declaring event handler functions inside components.
function MyButton() {
	function handleClick() {
    	alert('Clicked!');
    }

    return (
    	<button onClick = {handleClick}>
        	Click Me
        </button>
    );
}
onClick = {handleClick}has no () at the end. Do not call the event handler function! React will call your event handler when the user clicks the button.
7-1. Updating the screen
To make your component to remember information and display, we can add state to your component by importing useState from React.
import { useState } from 'react';

function MyButton() {
	const [count, setCount] = useState(0);
    // ...
}
In
useState, the current state (count) and the function that lets you update it (setCount) exists. Names can be anything, but for convenience we use[something, setsomething].
useState(0) resets count as 0.
import { useState } from 'react';

export default function MyApp() {
	return (
    	<div>
        	<h1> Counters that update separately</h1>
            <MyButton />
            <MyButton />
        </div>
    );
}

function MyButton() {
	const [count, setCount] = useState(0);

    function handleClick() {
    	setCount(count + 1);
    }

    return (
    	<button onClick = {handleClick}>
        	Clicked {count} times
        </button>
    );
}
7-2. Using Hooks
Functions starting with use are called Hooks. useState is a built-in Hook provided by React.
Hooks are more restrictive than other functions. You can only call Hooks at the thop of your components(or other Hooks).
React hooks needs to be ensured to be called in the same order each time a component renders.
8. Sharing Data between Components
From the example at #7, MyButton components display count differently. To make them update together, move the state upwards to the closest component containing all of MyButton components.
import { useState } from 'react';

export default function MyApp() {
    const [count, setCount] = useState(0);

    const handleClick = () => {
        setCount(prevnum => prevnum + 1);
    }

	return (
    	<div>
        	<h1> Counters that update separately</h1>
            <MyButton count = {count} onClick = {handleClick} />
            <MyButton count = {count} onClick = {handleClick} />
        </div>
    );
}

function MyButton({ count, onClick }) {
    return (
    	<button onClick = {onClick}>
        	Clicked {count} times
        </button>
    );
}