스프링을 사용한다는 이야기는 크게 두가지로 나누어 이야기 할 수 있다.
1. 스프링이 제공하는 IoC 컨테이너를 사용하겠다.
2. 스프링 MVC를 사용하겠다.
일단 먼저 IoC 컨테이너를 연동하는 방법부터 알아보자.
5. 스프링 IoC 컨테이너 연동(Root WebApplicationContext 등록)
- pom.xml에서 의존성 추가
    <dependency>
      <groupId>org.springframework</groupId>
      <artifactId>spring-webmvc</artifactId>
      <version>5.2.3.RELEASE</version>
</dependency>- 직접 구현한 서블릿 리스너 대신 스프링이 제공하는 리스너를 web.xml에 등록
<!DOCTYPE web-app PUBLIC
 "-//Sun Microsystems, Inc.//DTD Web Application 2.3//EN"
 "http://java.sun.com/dtd/web-app_2_3.dtd" >

<web-app>
  <display-name>Archetype Created Web Application</display-name>
  <filter>
    <filter-name>myFilter</filter-name>
    <filter-class>org.example.servlet02.MyFilter</filter-class>
  </filter>
  <filter-mapping>
    <filter-name>myFilter</filter-name>
    <servlet-name>hello</servlet-name>
  </filter-mapping>
  <listener>
    <listener-class>org.springframework.web.context.ContextLoaderListener</listener-class>
  </listener>
  <servlet>
    <servlet-name>hello</servlet-name>
    <servlet-class>org.example.servlet02.HelloServlet</servlet-class>
  </servlet>
  <servlet-mapping>
    <servlet-name>hello</servlet-name>
    <url-pattern>/hello</url-pattern>
  </servlet-mapping>
</web-app>ContextLoaderListener의 역할은 스프링 IoC 컨테이너, ApplicationContext를 생성 후 서블릿 생명주기에 맞춰서 바인딩해주고 서블릿 컨텍스트에 등록해 주는 것이다. 서블릿 컨텍스트란 서블릿들이 공용으로 사용하는 정보를 모아놓는 저장소라고 보면 된다. 그리고 서블릿이 종료되는 시점에 ApplicationContext를 제거해준다. 즉, ApplicationContext가 필요하기 때문에 스프링 설정파일을 만들어야 한다. 기본적으로 xml 파일을 통해 스프링 설정파일을 만들어야 하지만, 여기서는 자바 설정 파일을 통해 스프링 설정 파일을 만든다.
ContextLoaderListener
- 서블릿 리스너 구현체
- ApplicationContext를 만들어 준다.
- ApplicationContext를 서블릿 컨텍스트 라이프사이클에 따라 등록하고 소멸시켜준다. - 서블릿에서 IoC 컨테이너를 ServletContext를 통해 꺼내 사용할 수 있다.
- 자바 설정 파일로 스프링 설정 파일 만들기
@Configuration
@ComponentScan(excludeFilters = @ComponentScan.Filter(Controller.class))
public class AppConfig {
}- 빈 등록
@Service
public class HelloService {

    public String getName(){
        return "spring";
    }
}- web.xml에 ApplicationContext와 자바 설정 파일을 등록한다.
<!DOCTYPE web-app PUBLIC
 "-//Sun Microsystems, Inc.//DTD Web Application 2.3//EN"
 "http://java.sun.com/dtd/web-app_2_3.dtd" >

<web-app>
  <display-name>Archetype Created Web Application</display-name>
  <context-param>
    <param-name>contextClass</param-name>
    <param-value>org.springframework.web.context.support.AnnotationConfigWebApplicationContext</param-value>
  </context-param>
  <context-param>
    <param-name>contextConfigLocation</param-name>
    <param-value>org.example.servlet02.AppConfig</param-value>
  </context-param>
  <filter>
    <filter-name>myFilter</filter-name>
    <filter-class>org.example.servlet02.MyFilter</filter-class>
  </filter>
  <filter-mapping>
    <filter-name>myFilter</filter-name>
    <servlet-name>hello</servlet-name>
  </filter-mapping>
  <listener>
    <listener-class>org.springframework.web.context.ContextLoaderListener</listener-class>
  </listener>
  <servlet>
    <servlet-name>hello</servlet-name>
    <servlet-class>org.example.servlet02.HelloServlet</servlet-class>
  </servlet>
  <servlet-mapping>
    <servlet-name>hello</servlet-name>
    <url-pattern>/hello</url-pattern>
  </servlet-mapping>
</web-app>
참고로, web.xml에서는 위치가 중요하기 때문에 context-param이 filter보다 먼저 작성되어야 한다.
public class ContextLoaderListener extends ContextLoader implements ServletContextListener {

    @Override
	public void contextInitialized(ServletContextEvent event) {
		initWebApplicationContext(event.getServletContext());
	}
}
서블릿 컨텍스트가 초기화 될 시점에 ApplicationContext를 만들어서 서블릿 컨텍스트에 등록한다.
public class ContextLoader {
public WebApplicationContext initWebApplicationContext(ServletContext servletContext) {
		if (servletContext.getAttribute(WebApplicationContext.ROOT_WEB_APPLICATION_CONTEXT_ATTRIBUTE) != null) {
			throw new IllegalStateException(
					"Cannot initialize context because there is already a root application context present - " +
					"check whether you have multiple ContextLoader* definitions in your web.xml!");
		}

		servletContext.log("Initializing Spring root WebApplicationContext");
		Log logger = LogFactory.getLog(ContextLoader.class);
		if (logger.isInfoEnabled()) {
			logger.info("Root WebApplicationContext: initialization started");
		}
		long startTime = System.currentTimeMillis();

		try {
			// Store context in local instance variable, to guarantee that
			// it is available on ServletContext shutdown.
			if (this.context == null) {
				this.context = createWebApplicationContext(servletContext);
			}
			if (this.context instanceof ConfigurableWebApplicationContext) {
				ConfigurableWebApplicationContext cwac = (ConfigurableWebApplicationContext) this.context;
				if (!cwac.isActive()) {
					// The context has not yet been refreshed -> provide services such as
					// setting the parent context, setting the application context id, etc
					if (cwac.getParent() == null) {
						// The context instance was injected without an explicit parent ->
						// determine parent for root web application context, if any.
						ApplicationContext parent = loadParentContext(servletContext);
						cwac.setParent(parent);
					}
					configureAndRefreshWebApplicationContext(cwac, servletContext);
				}
			}
			servletContext.setAttribute(WebApplicationContext.ROOT_WEB_APPLICATION_CONTEXT_ATTRIBUTE, this.context);

			ClassLoader ccl = Thread.currentThread().getContextClassLoader();
			if (ccl == ContextLoader.class.getClassLoader()) {
				currentContext = this.context;
			}
			else if (ccl != null) {
				currentContextPerThread.put(ccl, this.context);
			}

			if (logger.isInfoEnabled()) {
				long elapsedTime = System.currentTimeMillis() - startTime;
				logger.info("Root WebApplicationContext initialized in " + elapsedTime + " ms");
			}

			return this.context;
		}
		catch (RuntimeException | Error ex) {
			logger.error("Context initialization failed", ex);
			servletContext.setAttribute(WebApplicationContext.ROOT_WEB_APPLICATION_CONTEXT_ATTRIBUTE, ex);
			throw ex;
		}
	}
servletContext.setAttribute(WebApplicationContext.ROOT_WEB_APPLICATION_CONTEXT_ATTRIBUTE, this.context);
WebApplicationContext.ROOT_WEB_APPLICATION_CONTEXT_ATTRIBUTE라는 이름으로 서블릿 컨텍스트에 WebApplicationContext를 등록하고 있다.
- ApplicationContext를 꺼내는 방법
public class HelloServlet extends HttpServlet {

    @Override
    public void init() throws ServletException {
        System.out.println("init");
    }

    @Override
    protected void doGet(HttpServletRequest req, HttpServletResponse resp) throws ServletException, IOException {
        System.out.println("doGet");
        ApplicationContext context = (ApplicationContext) getServletContext().getAttribute(WebApplicationContext.ROOT_WEB_APPLICATION_CONTEXT_ATTRIBUTE);
        HelloService helloService = context.getBean(HelloService.class);
        resp.getWriter().println("<html>");
        resp.getWriter().println("<head>");
        resp.getWriter().println("<body>");
        resp.getWriter().println("<h1>Hello, " + helloService.getName() + "</h1>");
        resp.getWriter().println("</body>");
        resp.getWriter().println("</head>");
        resp.getWriter().println("</html>");
    }

    private Object getName() {
        return getServletContext().getAttribute("name");
    }

    @Override
    public void destroy() {
        System.out.println("destroy");
    }
}
서블릿 애플리케이션에 스프링 연동하기
- 서블릿에서 스프링이 제공하는 IoC 컨테이너 활용하는 방법
- 스프링이 제공하는 서블릿 구현체 DispatcherServlet 사용하기
지금까지 서블릿에서 스프링이 제공하는 IoC 컨테이너를 활용하는 법을 보았다. 그러나 요청 하나당 서블릿을 하나씩 만들려고 한다면 web.xml에 계속 서블릿을 등록해주어야 하고 여러 서블릿에서 공통적으로 처리하고 싶은 부분이 있을 수 있다. 따라서 이에 대한 해결방법으로 나온 디자인 패턴이 FrontController 패턴이다. 이 패턴은 모든 요청을 컨트롤러 하나가 받아서 처리하고 해당 요청을 핸들러에게 분배(dispatch)하는 것이다.
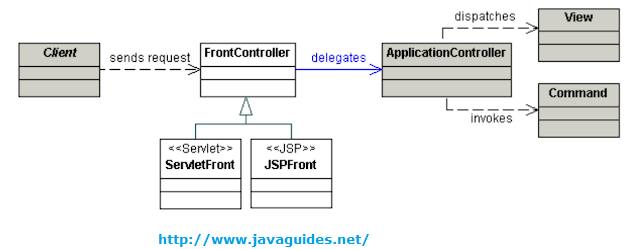
또한, 스프링은 이미 dispatch 해주는 Frontcontroller 역할을 하는 서블릿을 이미 구현해 두었다. 이것이 스프링 MVC의 핵심인 DispatcherServlet이다.
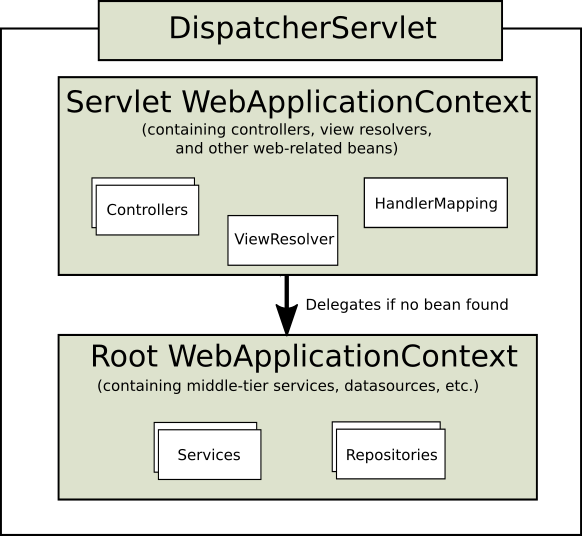
지금까지 Root WebApplicationContext를 등록해보았다. DispatcherServlet는 Root WebApplicationContext를 상속받는 Servlet WebApplicationContext를 자체적으로 하나 더 만든다. 이렇게 일련의 상속관계를 만드는 이유는 DispatcherServlet이 여러개 만들어질 경우 Root WebApplicationContext는 다른 DispatcherServlet들도 공용으로 사용할 수 있어야 하기 때문이다. 그러나 DispatcherServlet이 만드는 Servlet WebApplicationContext는 그 DispatcherServlet 안에서만 사용된다. 그래서, Root WebApplicationContext에는 Web과 관련된 빈은 등록되지 않는다. 그리고, Servlet WebApplicationContext에는 Web과 관련된 빈이 등록된다.
참고
- 인프런 : 스프링 웹 MVC(백기선)
- https://docs.spring.io/spring-framework/docs/current/reference/html/web.html#mvc