서블릿 애플리케이션에 스프링 연동하기
- 서블릿에서 스프링이 제공하는 IoC 컨테이너 활용하는 방법
- 스프링이 제공하는 서블릿 구현체 DispatcherServlet 사용하기

6. 스프링 MVC 연동
DispatcherServlet
- 스프링 MVC의 핵심.
- Front Controller 역할을 한다.
- 핸들러 생성
@RestController
public class HelloController {

    @Autowired
    HelloService helloService;

    @GetMapping("/hello")
    public String hello() {
        return "Hello, " + helloService.getName();
    }
}
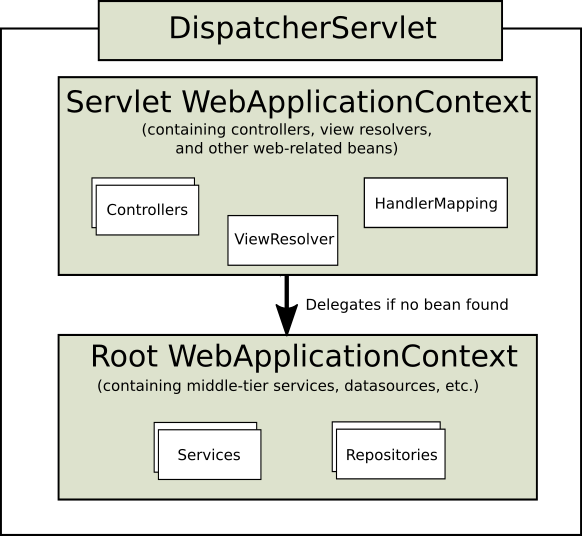
Controller는 DispatcherServlet이 만드는 Servlet WebApplicationContext에 등록되어야 하고, Service는 ContextLoaderListener가 만들어주는 Root WebApplicationContext에 등록되어야 한다. Servlet WebApplicationContext가 Root WebApplicationContext의 자식이기 때문에 Service 객체를 참조할 수 있다.
그렇게 빈을 가려서 등록하기 위해서는 @ComponentScan을 수정해 주어야 한다.
- AppConfig @ComponentScan 수정
@Configuration
@ComponentScan(excludeFilters = @ComponentScan.Filter(Controller.class))
public class AppConfig {
}
컨트롤러는 Root WebApplicationContext에서 빈으로 등록되지 않는다. 서비스만 빈으로 등록된다.
- DispatcherServlet이 만드는 Servlet WebApplicationContext가 사용할 스프링 설정 파일 생성
@Configuration
@ComponentScan(useDefaultFilters = false, includeFilters = @ComponentScan.Filter(Controller.class))
public class WebConfig {
}
컨트롤러만 Servlet WebApplicationContext에서 빈으로 등록된다. 기타 HandlerMapping이나 ViewResolver 같은 것들은 이 안에서 빈으로 등록하면 된다.
- DispatcherServlet 생성과 DispatcherServlet이 생성할 Servlet WebApplicationContext가 사용할 스프링 설정 파일 등록
<!DOCTYPE web-app PUBLIC
 "-//Sun Microsystems, Inc.//DTD Web Application 2.3//EN"
 "http://java.sun.com/dtd/web-app_2_3.dtd" >

<web-app>
  <display-name>Archetype Created Web Application</display-name>
  <context-param>
    <param-name>contextClass</param-name>
    <param-value>org.springframework.web.context.support.AnnotationConfigWebApplicationContext</param-value>
  </context-param>
  <context-param>
    <param-name>contextConfigLocation</param-name>
    <param-value>org.example.servlet02.AppConfig</param-value>
  </context-param>
  <listener>
    <listener-class>org.springframework.web.context.ContextLoaderListener</listener-class>
  </listener>
  <servlet>
    <servlet-name>app</servlet-name>
    <servlet-class>org.springframework.web.servlet.DispatcherServlet</servlet-class>
    <init-param>
      <param-name>contextClass</param-name>
      <param-value>org.springframework.web.context.support.AnnotationConfigWebApplicationContext</param-value>
    </init-param>
    <init-param>
      <param-name>contextConfigLocation</param-name>
      <param-value>org.example.servlet02.WebConfig</param-value>
    </init-param>
  </servlet>
  <servlet-mapping>
    <servlet-name>app</servlet-name>
    <url-pattern>/app/*</url-pattern>
  </servlet-mapping>
</web-app>
그러나 DispatcherServlet을 여러 개 사용하지 않을 경우 ContextLoaderListener와 Root WebApplicationContext를 생성할 필요 없이 DispatcherServlet이 생성하는 Servlet WebApplicationContext를 루트로 사용하여 여기에 빈을 모두 등록해도 된다.
<!DOCTYPE web-app PUBLIC
 "-//Sun Microsystems, Inc.//DTD Web Application 2.3//EN"
 "http://java.sun.com/dtd/web-app_2_3.dtd" >

<web-app>
  <display-name>Archetype Created Web Application</display-name>
  <servlet>
    <servlet-name>app</servlet-name>
    <servlet-class>org.springframework.web.servlet.DispatcherServlet</servlet-class>
    <init-param>
      <param-name>contextClass</param-name>
      <param-value>org.springframework.web.context.support.AnnotationConfigWebApplicationContext</param-value>
    </init-param>
    <init-param>
      <param-name>contextConfigLocation</param-name>
      <param-value>org.example.servlet02.WebConfig</param-value>
    </init-param>
  </servlet>
  <servlet-mapping>
    <servlet-name>app</servlet-name>
    <url-pattern>/app/*</url-pattern>
  </servlet-mapping>
</web-app>
@Configuration
@ComponentScan
public class WebConfig {
}또한 반대로 DispatcherServlet이 생성하는 Servlet WebApplicationContext에 아무런 빈을 등록하지 않고 ContextLoaderListener가 생성하는 Root WebApplicationContext에 모든 빈을 등록해도 되지만 이는 별로 좋은 설정이 아니다.
지금 여기서 본 구조는 스프링 부트와 다르게 서블릿 컨테이너가 먼저 뜨고 서블릿 컨테이너 안에 등록되는 서블릿(웹) 애플리케이션에 ContextLoaderListener와 DispatcherServlet을 등록해 스프링을 연동하는 것이다.(서블릿 컨텍스트 안에 스프링이 들어간 구조)
그러나 스프링 부트에서는 스프링 부트 애플리케이션이 자바 애플리케이션으로 먼저 뜨고 그 안에 톰캣이 내장 서버로 뜨는 것이다. 또한 임베디드 톰캣 안에 DispatcherServlet을 코드로 등록한다.(스프링이라는 자바 애플리케이션 안에 톰캣이 들어간 구조)
참고
