백엔드 개발을 할 때, DTO -> Entity 혹은 Entity -> DTO 등으로 객체간 매핑이 필요한 경우가 많다.
기존에는 Model Mapper를 사용해서 이런 매핑들을 처리했지만, Map Struct를 사용하면 성능적으로 더 나아진다는 말을 듣고 개인 프로젝트에서는 Map Struct를 사용해 보기로 하였다. 관련해서 정리해보자.
MapStruct
Java bean 유형 간의 매핑 구현을 단순화하는 코드 생성기
1. 특징
- 컴파일 시점에 코드를 생성하여 런타임에서 안정성을 보장합니다.
- 다른 매핑 라이브러리보다 속도가 빠릅니다.
- 반복되는 객체 매핑에서 발생할 수 있는 오류를 줄일 수 있으며, 구현 코드를 자동으로 만들어주기 때문에 사용이 쉽습니다.
- Annotation processor를 이용하여 객체 간 매핑을 자동으로 제공합니다.
- 다만, Lombok 라이브러리에 먼저 dependency (의존성) 추가가 되어있어야 합니다. MapStruct는 Lombok의 getter, setter, builder를 이용하여 생성되므로 Lombok 보다 먼저 의존성이 선언된 경우 실행할 수 없습니다. -> Builder를 사용할 경우 순서가 바뀌게 된다.
이외의 내용들(타 Mapper대비 장점, 여기서 다루고 있지 않는 사용법 등)에 대해서는 아래의 네이버 클라우드 참고 사이트에서 자세히 다루고 있으니 참고할 것.
사용 예시
- Springboot 3.3.0 와 MapStruct 1.5.5 final 을 사용함
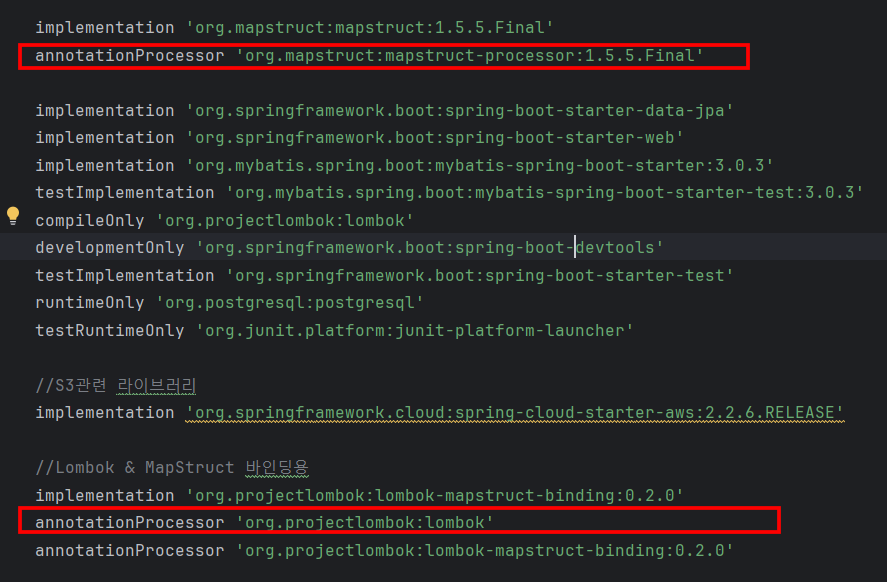
1. build.gradle dependency 추가
Maven Repository 에서 적당한 버전을 찾아서 다운받아 주자.
작성 시점 (24.7.7)에는 1.6.0 Beta2 버전이 최신이다. 다만, 아직 베타 버전이기 때문에 비교적 최신 버전이면서 Usage가 가장 높은 1.5.5 final을 사용해서 진행하였다.

2. Mapper 클래스 생성
package com.t4e1.minihub.common.converter;

import com.t4e1.minihub.command.history.dto.HistoryDTO;
import com.t4e1.minihub.command.history.vo.HistoryReqVO;
import com.t4e1.minihub.command.memo.dto.MemoDTO;
import com.t4e1.minihub.command.memo.vo.MemoReqVO;
import org.mapstruct.Mapper;
import org.mapstruct.Mapping;

@Mapper(componentModel = "spring")
public interface VOMapper {

    VOMapper INSTANCE = org.mapstruct.factory.Mappers.getMapper(VOMapper.class);

    // History Controller Mapper
    @Mapping(target = "id", ignore = true)
    @Mapping(source = "title", target = "title")
    @Mapping(source = "content", target = "content")
    @Mapping(source = "tags", target = "tags")
    @Mapping(source = "pwd", target = "pwd")
    HistoryDTO historyDTO(HistoryReqVO addData);

    @Mapping(target = "id", ignore = true)
    MemoDTO memoDTO(MemoReqVO req);
}
1) @Mapper
@Mapper를 사용해 MapStruct의 Mapper인터페이스임을 알려준다. 동시에 componentModle = "spring"을 달아줘서 Bean 으로 관리할 수 있도록 해준다.
2) INSTANCE
INSTANCE 필드는 해당 클래스가 생성하는 인터페이스(VOMapperImpl)의 구현체를 담고 있다.
MapStruct 는 컴파일 시점에 Mapper 인터페이스를 기반으로 아래와 같이 Impl 클래스를 자동으로 구현해준다.
package com.t4e1.minihub.common.converter;

import com.t4e1.minihub.command.history.dto.HistoryDTO;
import com.t4e1.minihub.command.history.vo.HistoryReqVO;
import com.t4e1.minihub.command.memo.dto.MemoDTO;
import com.t4e1.minihub.command.memo.vo.MemoReqVO;
import java.util.ArrayList;
import java.util.List;
import javax.annotation.processing.Generated;
import org.springframework.stereotype.Component;

@Generated(
    value = "org.mapstruct.ap.MappingProcessor",
    comments = "version: 1.5.5.Final, compiler: IncrementalProcessingEnvironment from gradle-language-java-8.8.jar, environment: Java 17.0.7 (Oracle Corporation)"
)
@Component
public class VOMapperImpl implements VOMapper {

    @Override
    public HistoryDTO historyDTO(HistoryReqVO addData) {
        if ( addData == null ) {
            return null;
        }

        HistoryDTO.HistoryDTOBuilder historyDTO = HistoryDTO.builder();

        historyDTO.title( addData.getTitle() );
        historyDTO.content( addData.getContent() );
        List<String> list = addData.getTags();
        if ( list != null ) {
            historyDTO.tags( new ArrayList<String>( list ) );
        }
        historyDTO.pwd( addData.getPwd() );

        return historyDTO.build();
    }

    @Override
    public MemoDTO memoDTO(MemoReqVO req) {
        if ( req == null ) {
            return null;
        }

        MemoDTO.MemoDTOBuilder memoDTO = MemoDTO.builder();

        memoDTO.title( req.getTitle() );
        memoDTO.content( req.getContent() );
        memoDTO.scheduleId( req.getScheduleId() );

        return memoDTO.build();
    }
}
여기서 생성된 메소드를 사용하여 객체간 매핑을 하게 되는데, 이 메소드를 호출하기 위한 구현체를 불러오는 것이 INSTANCE 이다.
3) @Mapping
매핑할 객체 간의 필드를 연결해준다. 필드명이 같을 경우에는 별도의 Mapping이 필요 없다.
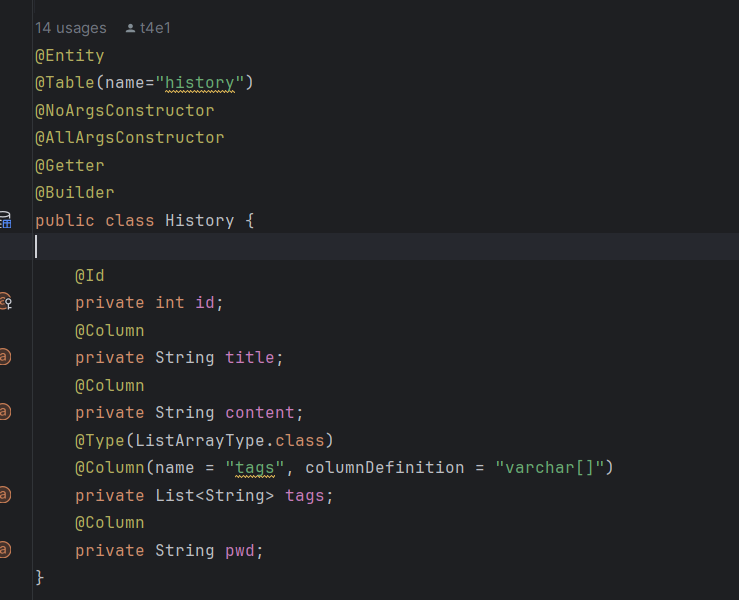
만약, 두 객체의 필드 수가 일치하지 않는 경우에는ignore = true 옵션을 준다.
4) 기타
사용한 어노테이션 이외에도 Config 설정이나 Enum 타입 변환 등 다양한 설정을 적용할 수 있다. 필요할 때는 공식문서나 구글링을 통해서 알아보자.
3. 호출
필요한 클래스에서 Mapper를 주입받아서 사용한다.
VOMapperImpl 이 아니라 VOMapper를 주입받고, INSTANCE를 통해 구현체의 메소드를 사용할 수 있다.
@RestController("HistoryCommandController")
@RequestMapping("/records")
public class HistoryController {
private final HistoryService historyService;
private final S3Service s3Service;
private final VOMapper voMapper;
@Autowired
public HistoryController(HistoryService historyService, S3Service s3Service,
VOMapper voMapper) {
this.historyService = historyService;
this.s3Service = s3Service;
this.voMapper = voMapper;
}
@PostMapping
public ResponseEntity<HistoryResVO> addRecord(@RequestBody HistoryReqVO addData){
HistoryDTO inputData = voMapper.INSTANCE.historyDTO(addData);
if(historyService.addRecord(inputData)){
HistoryResVO response = new HistoryResVO("/records/list", inputData);
return ResponseEntity.status(HttpStatus.CREATED).body(response);
}
return ResponseEntity.status(HttpStatus.INTERNAL_SERVER_ERROR).body(null);
}
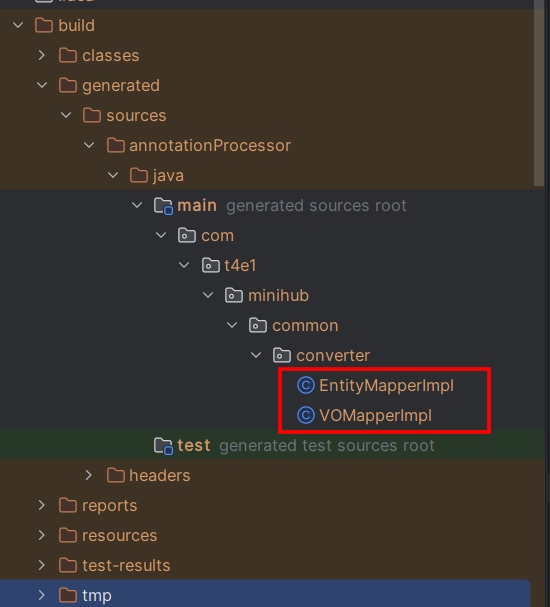
}4. Impl 클래스 생성 확인
테스트 코드를 돌리거나 어플리케이션을 실행하면 build 아래 경로에 자동으로 Impl 클래스가 생성되는 것을 확인할 수 있다.
주의 : build.gradle
Lombok과 MapStruct 를 같이 사용할 경우 build.gradle의 annotationProcessor 순서에 주의하도록 한다.
Lombok과 MapStruct 를 같이 사용할 경우, build.gradle 의 annotationProcessor 순서에 따라 구현체의 생성 방법이 달라진다.
1) @Setter를 사용하는 경우
Entity 나 DTO 에 @Setter를 사용하는 경우 annotationProcessor 순서를 Lombok -> MapStruct 가 되도록 배치한다.
Lombok 에서 Getter, Setter가 생성된 뒤 -> 이를 이용하여 MapStruct가 Impl 클래스를 만든다.
2) @Builder를 사용하는 경우
아래와 같이 Entity 나 DTO 에 @Setter없이 Builder를 사용하는 경우 annotationProcessor 순서를 MapStruct -> Lombok 이 되도록 설정한다.
MapStruct 가 Impl구현체를 만드려 시도하지만 Getter, Setter가 없다.(Lombok보다 먼저 실행되었으므로) -> Lombok이 실행되며 메소드를 만든다. -> MapStruct가 재시도하며 Builder를 가지고 Impl 클래스를 만든다.
끝