
서비스 구조
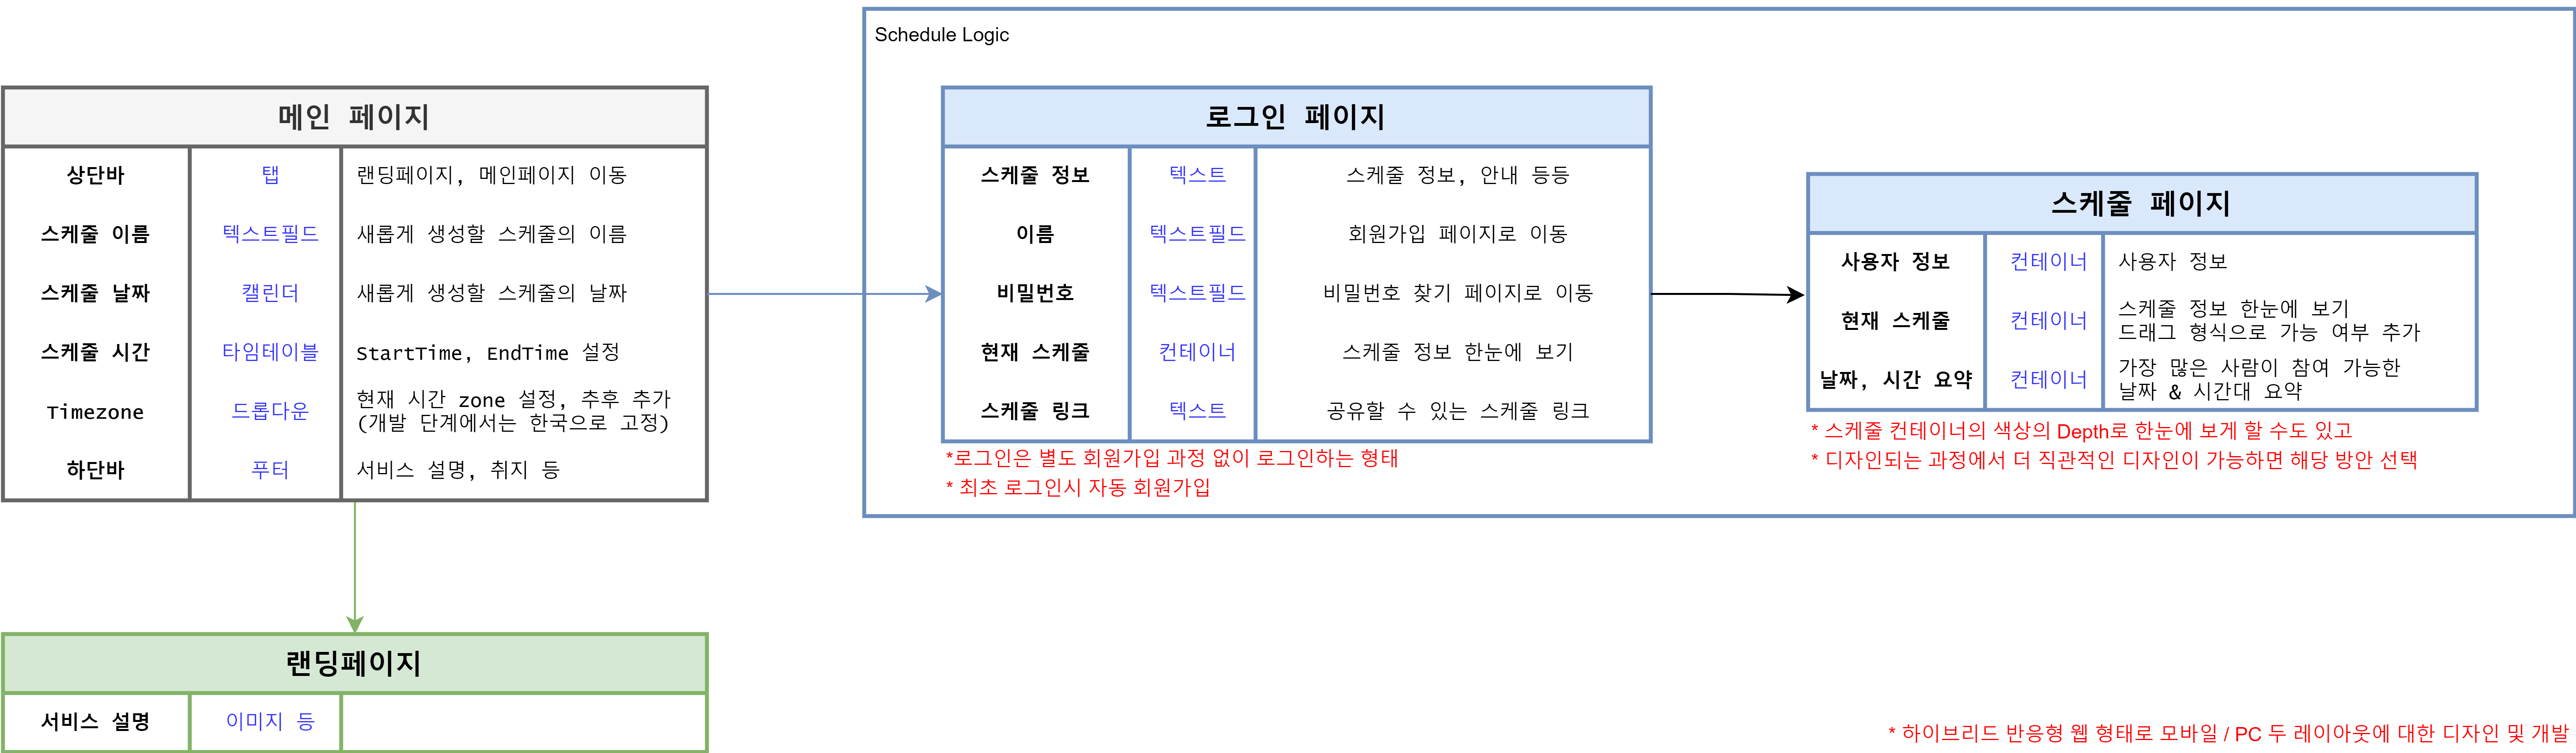 언제볼까? 라는 프로젝트를 시작하기 이전 위와 같이 서비스의 구조를 먼저 정의하게 되었다.
해당 프로젝트는 when2meet를 벤치마킹하여 유사한 기능과 UX를 통해 내수화를 목표로 하고 있다.
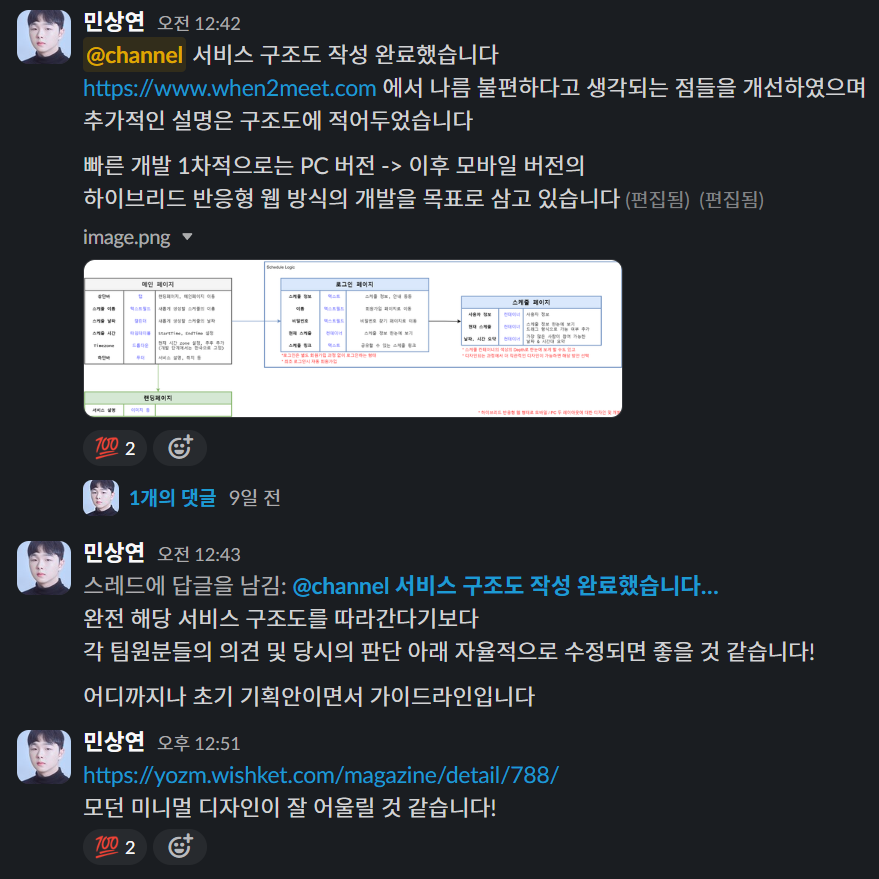 FE 1명, 디자이너 1명으로 팀을 먼저 구성하고 위와 같은 서비스 플로우를 팀원분들께 전달드렸다.
 더 나아가 해당 프로젝트는 개발에 그치지 않고 지금까지의 여러 프로젝트 개발 경험을 바탕으로 상업성, 사용자 접근성을 강화해 실 사용자를 유치하는 것을 목표로 한다.
지금까지의 프로젝트들은 사업화를 목적으로 진행되었기에 비즈니스 모델을 고려하여 개발을 진행해야 하고, 실 사용자를 유치하는 과정과 서비스를 운영하는 과정이 복잡했다.
따라서 배포를 한다고 해도 자금 없이는 사용자 유치가 불가능한 수준이 되어 수익성을 고려하지 않고 인지도가 높은 서비스를 운영해보기 위해 해당 프로젝트를 시작하게 되었다.
서비스 상세 설명
 또한 해당 프로젝트에 대해 개인적으로 애정이 가는 이유는 when2meet이 유행하기 이전 2021년 kotlin을 통해 Android 앱 개발을 연습해보기 위해 동일한 주제로 프로젝트를 진행하고 Google PlayStore에 출시까지 해보았기 때문이다.
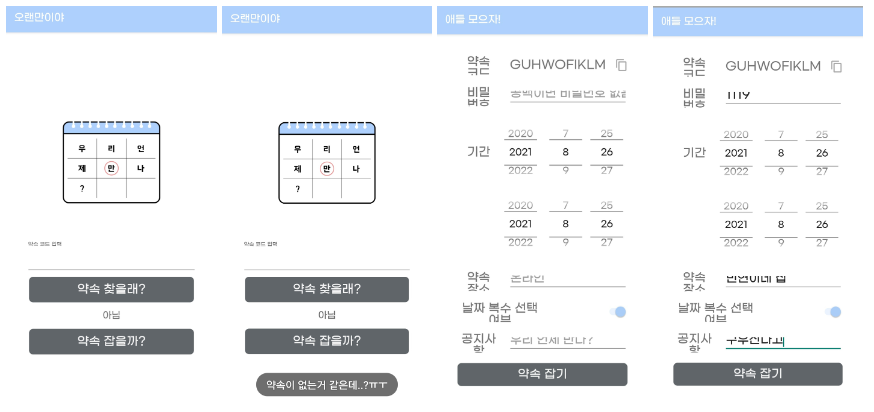 현재는 Play Store에서 개발자 게정 문제로 앱 페이지에 접근할 수 없지만 위와 같이 당시 사용자의 캡쳐본을 찾을 수 있었다.
만약 현 프로젝트 이전에 진행했던 귀여운 프로젝트가 궁금하다면 아래 링크를 통해 접근할 수 있다.
주요 기능 (스케쥴링) 플로우
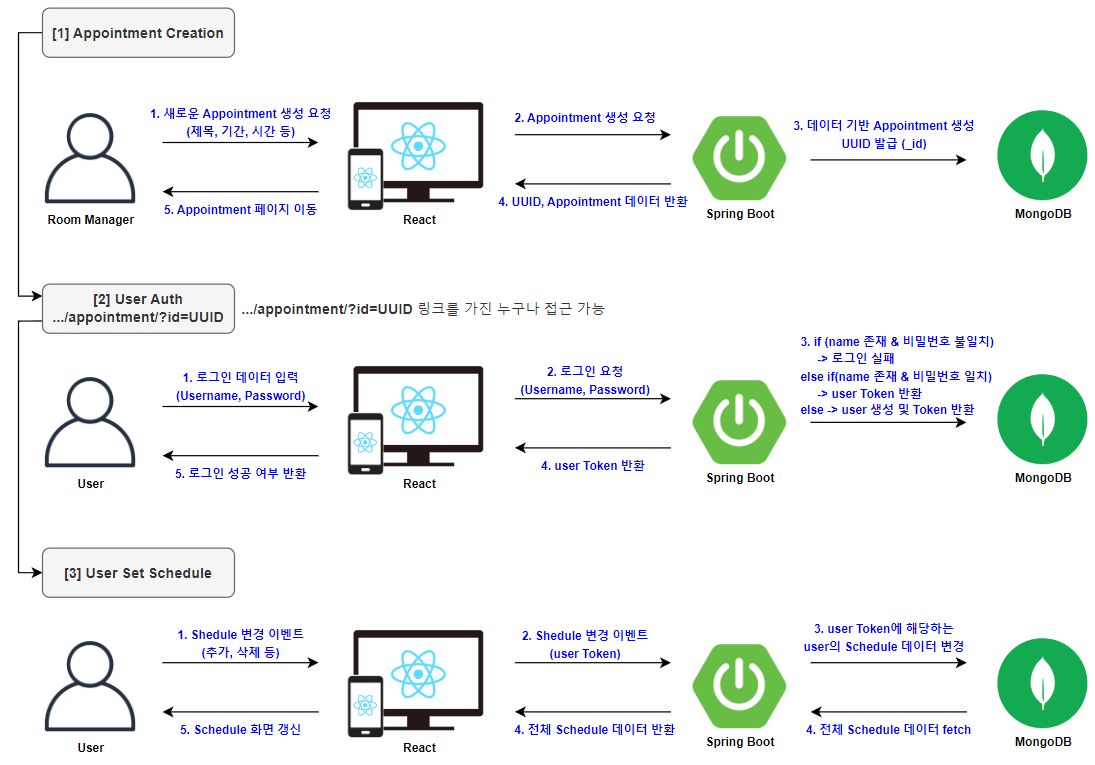 주요 기능이자 현재 when2meet의 유일한 기능 중에 하나인 스케쥴링에 대한 플로우를 위와 같이 작성하였다.
빠른 개발 이후 출시, 즉각적인 기능 추가 및 유지보수가 목표이기 때문에 현 단계에서 생략할 수 있는 많은 부분을 생략하였다.
스케쥴링은 간단하게 3가지의 단계로 나뉘는데, 약속 생성 -> 사용자 Auth -> 사용자 스케쥴 업데이트 단계로 나뉘어 서비스가 구동된다.
ERD
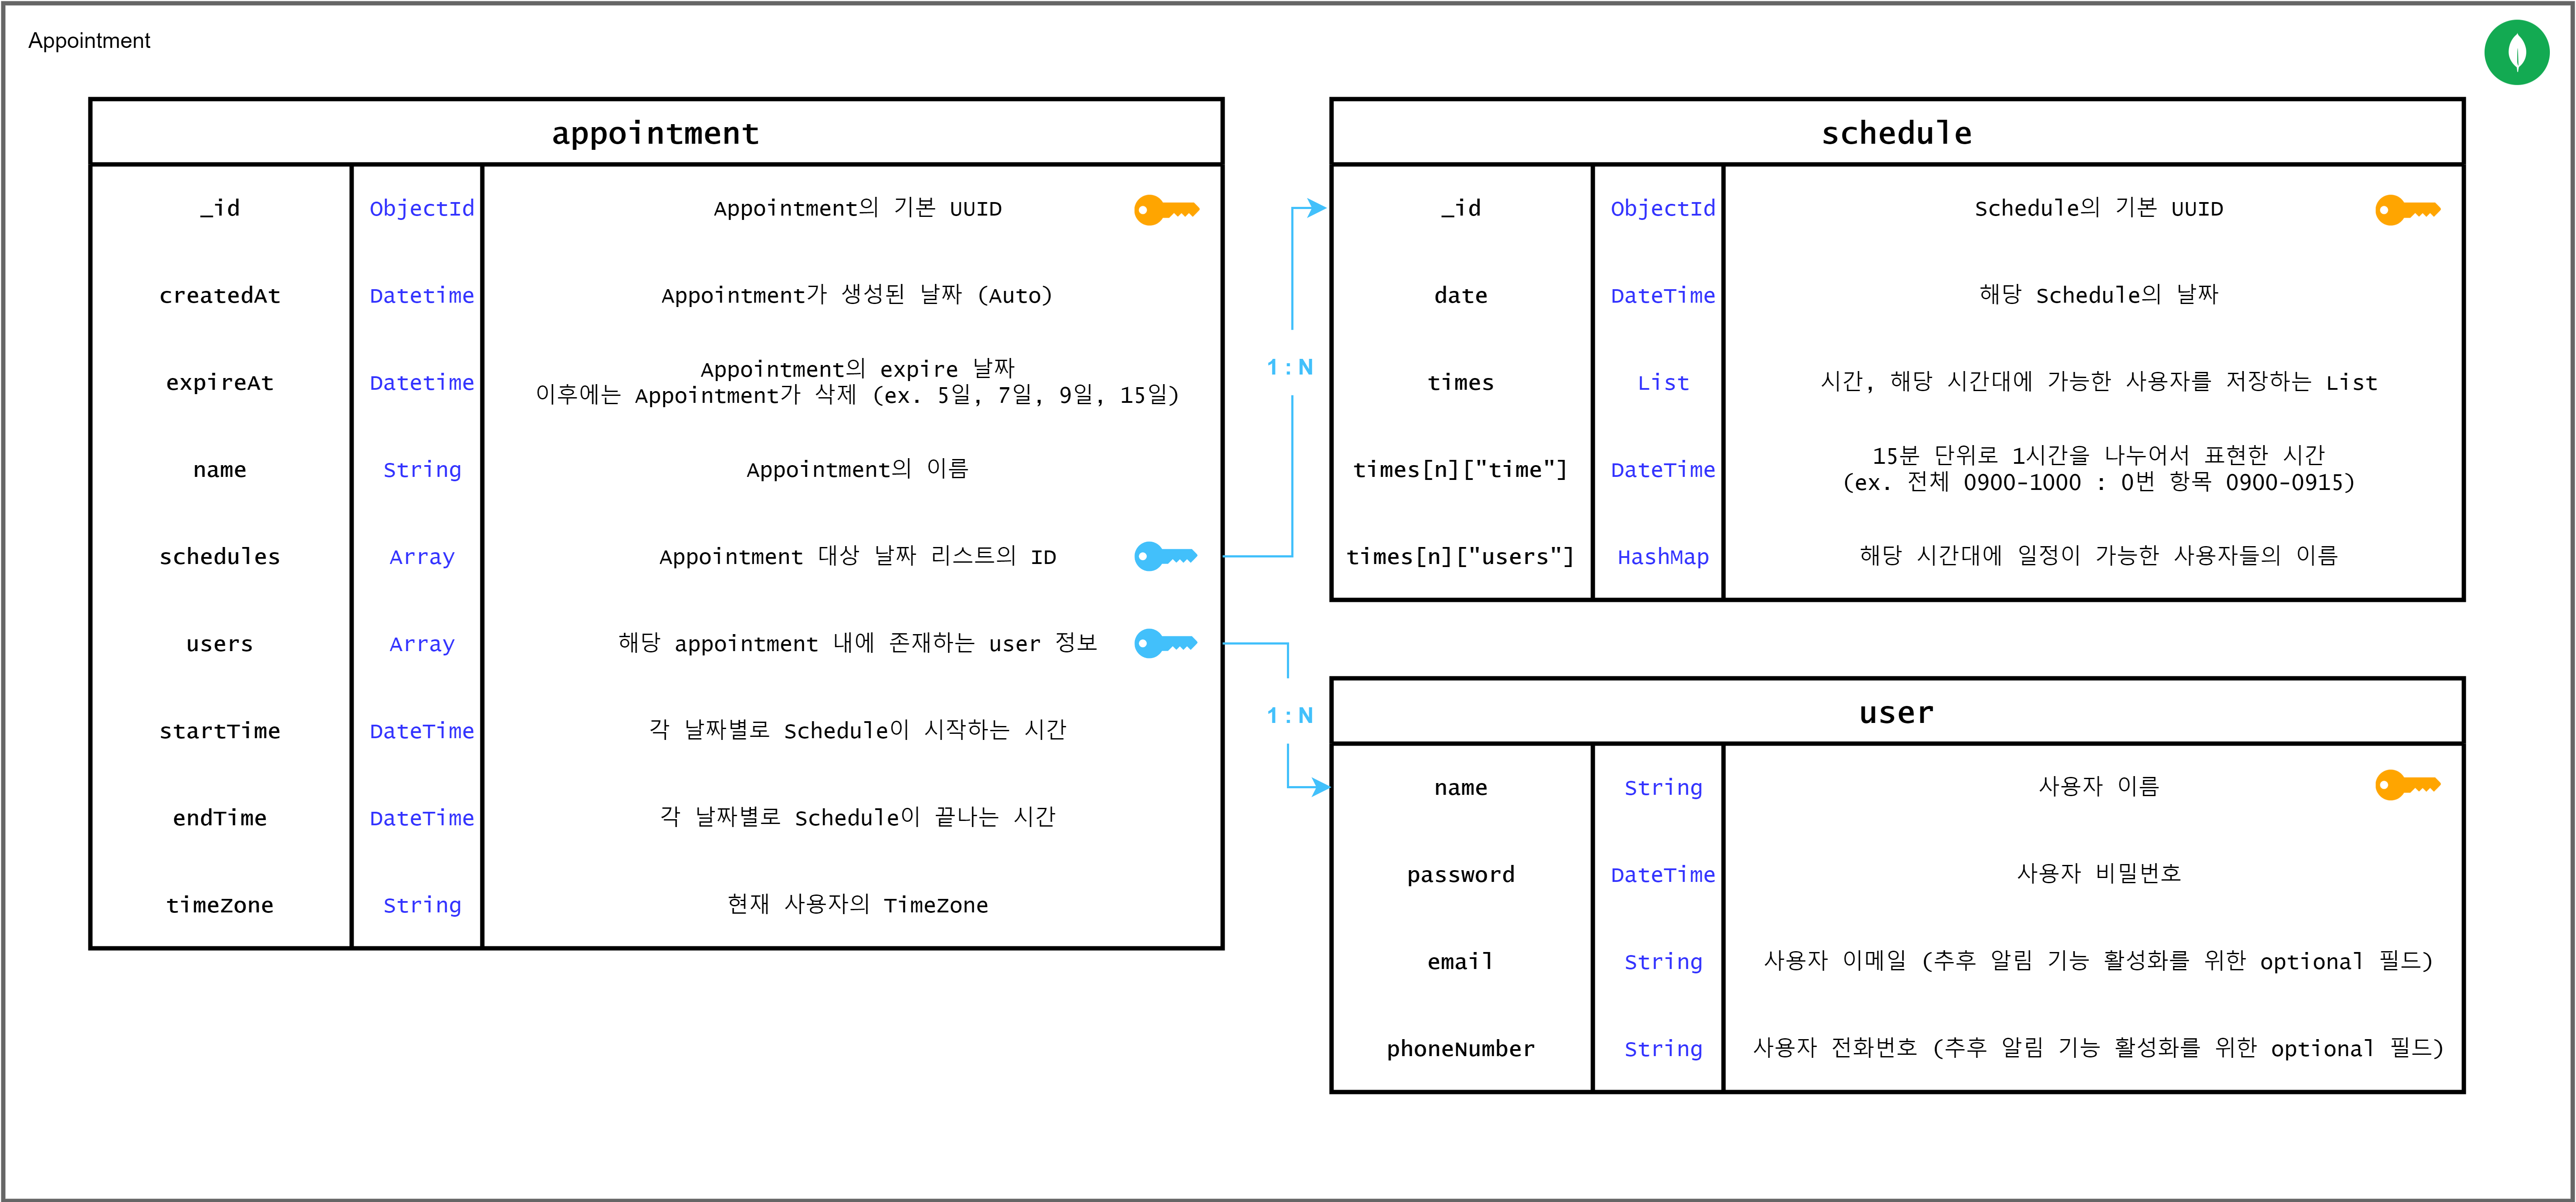 또한 배포 편의성과 확장성을 고려하여 MongoDB를 기반으로 데이터를 구성하도록 하였다.
expireAt은 MongoDB의 TTL을 적용하여 불필요한 데이터를 삭제하게 할 것이며, 각 foreignKey들은 명시적으로만 표시해 둔 것이며 실제 MongoDB 상에서는 List 형태로 저장될 것이다.
API 명세서
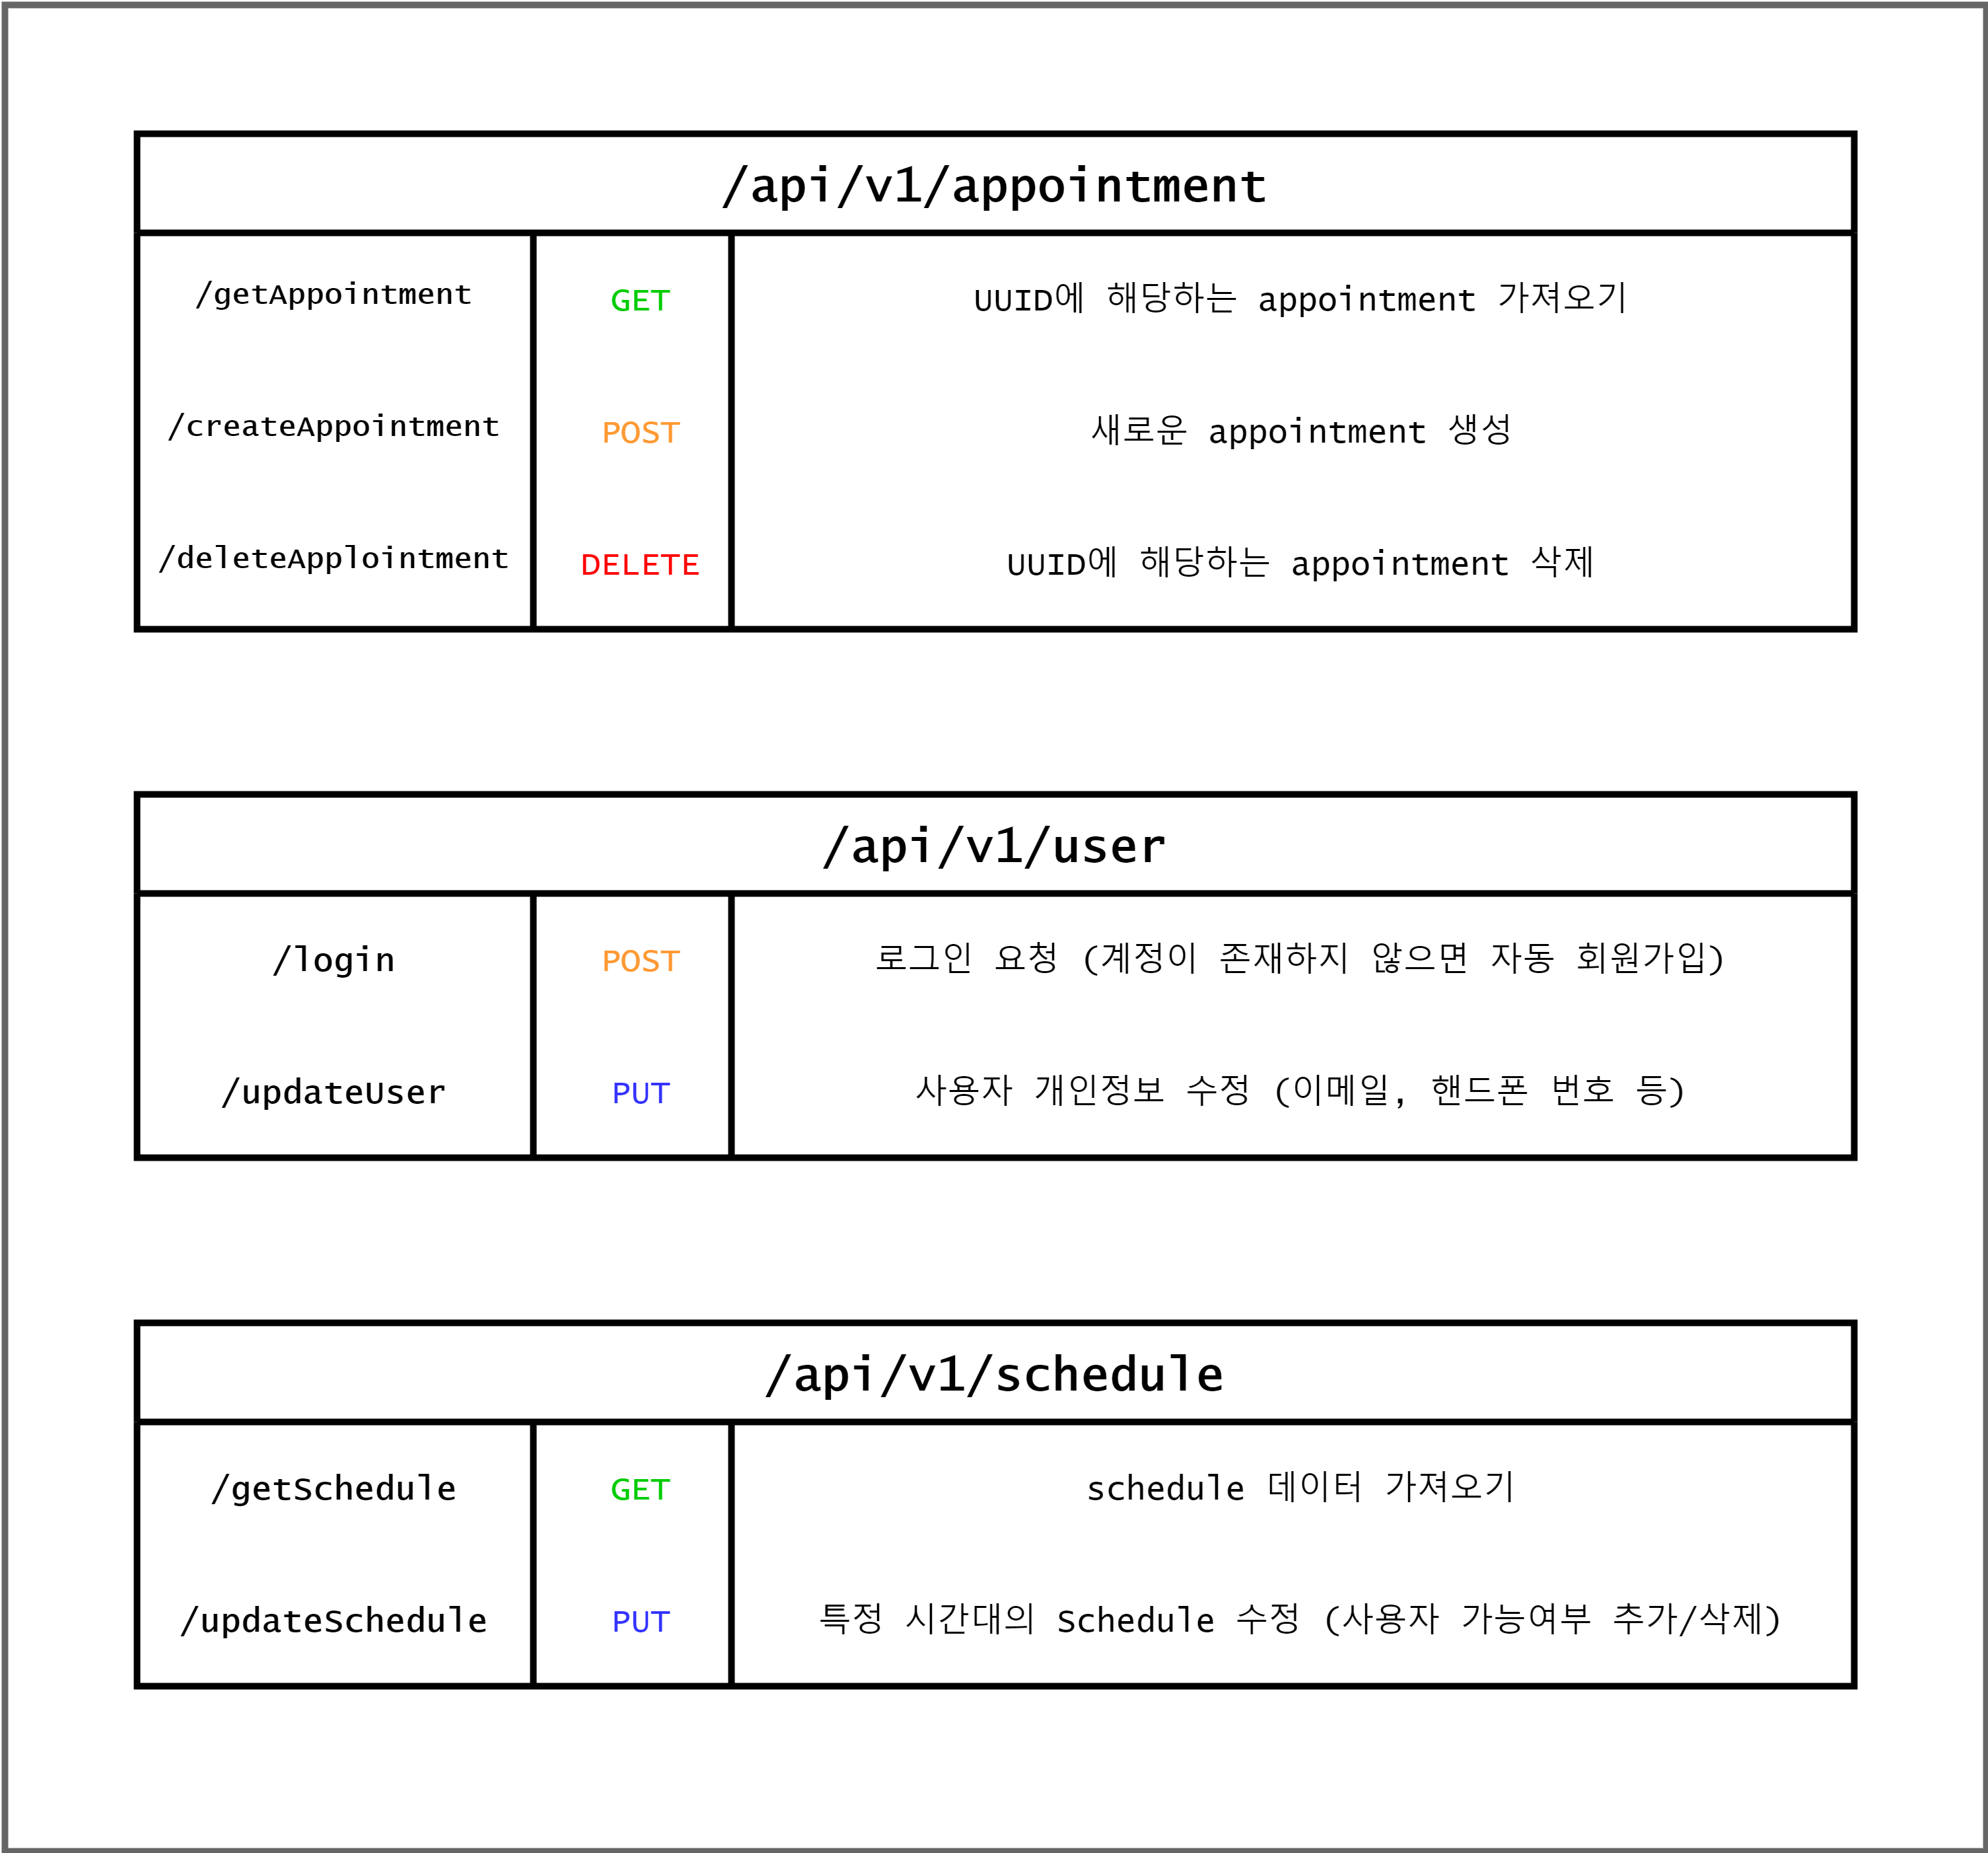 API 명세서도 최대한 간단하게 정의하였으며, Appointment를 기준으로 모든 기능이 동작하기에 같은 Collection 상에서 API들이 동작하게 될 것이다.
Github Docs
CONTRIBUTING.md
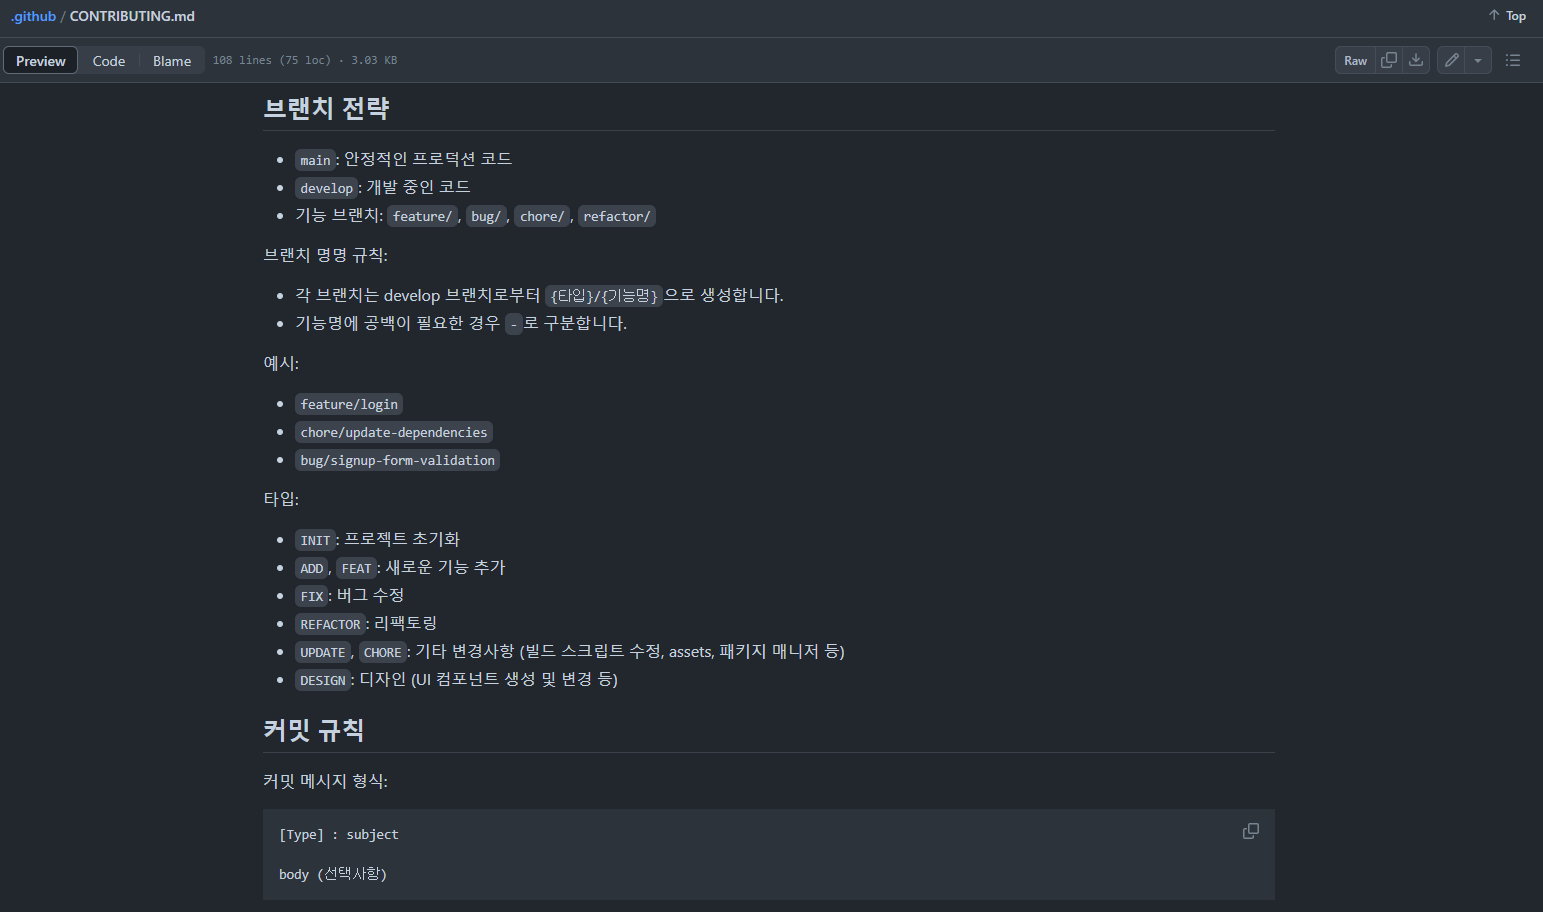 또한 프로젝트 시작 이전에 원활한 협업 및 추후 오픈소스 프로젝트로서의 완성도를 위하여 CONTRIBUTING.md를 위와 같이 작성하였다.
https://github.com/TEAM-WHEN-WILL-WE-MEET/.github/blob/main/CONTRIBUTING.md
pull_request_template.md
## 요약 (Summary)

<!-- 작업한 부분에 대한 간단한 요약을 작성하세요. -->

## 변경 사항 (Changes)

<!-- 기존과 비교했을 때 해당 PR에서 변경된 내용을 작성하세요. -->
<!-- 어떤 부분을 왜 수정했는지 구체적으로 기술하세요. -->

## 리뷰 요구사항

<!-- 해당 PR에서 중점적으로 혹은 꼭 리뷰가 필요한 사항들을 작성하세요. -->
<!-- 체크리스트, 특별한 주의 사항 등 자유 형식으로 기술하세요. -->

## 확인 방법 (선택)

<!-- UI 구현 화면의 스크린샷, 기능 작동 스크린샷 등 작업 결과를 한 눈에 볼 수 있는 자료를 첨부하세요. -->
추가적으로 위와 같이 PR Template를 추가하여 협업시 효율성을 확보하였다.
Spring-BE Configuration
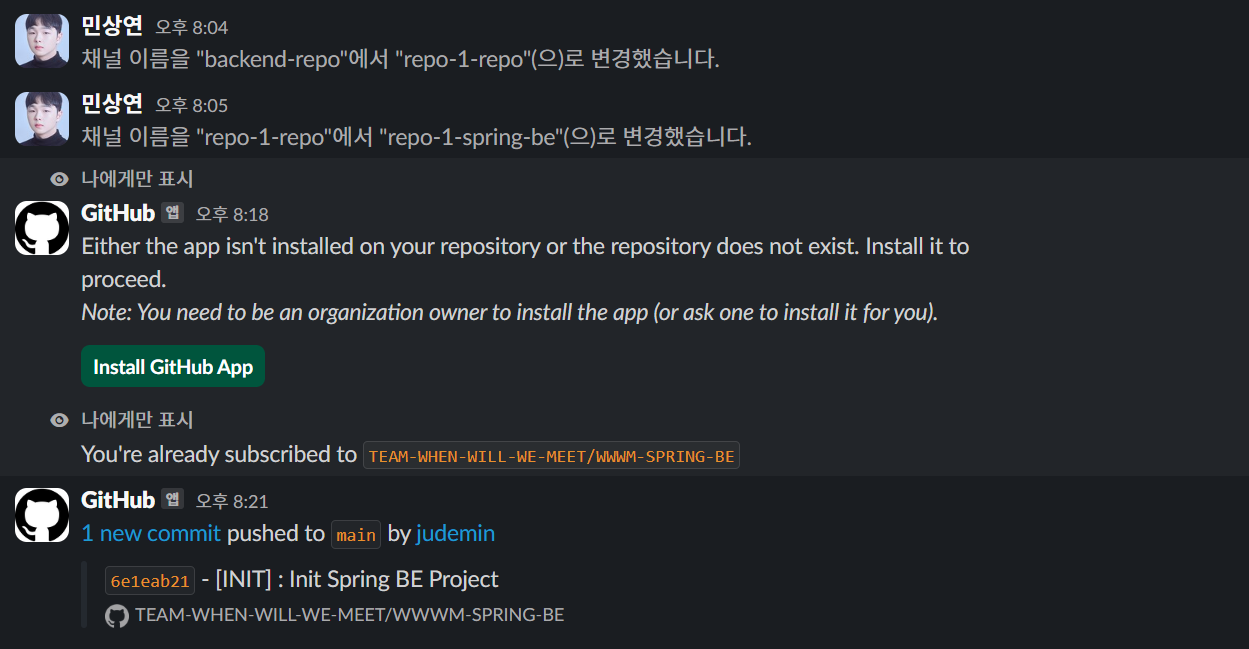 원활한 프로젝트 추적/관리를 위해 만들어져 있는 Slack에 Github App을 설치하였다.
MongoDB Connection
@SpringBootApplication(exclude={DataSourceAutoConfiguration.class})
public class WhenWillWeMeetApplication {

	public static void main(String[] args) {
		SpringApplication.run(WhenWillWeMeetApplication.class, args);
	}

}
우선적으로 현재 Spring-BE에서 기본 JPA Hibernate를 사용하지 않을 것이기 때문에 위와 같이 DataSourceAutoConfiguration를 exclude해준다.
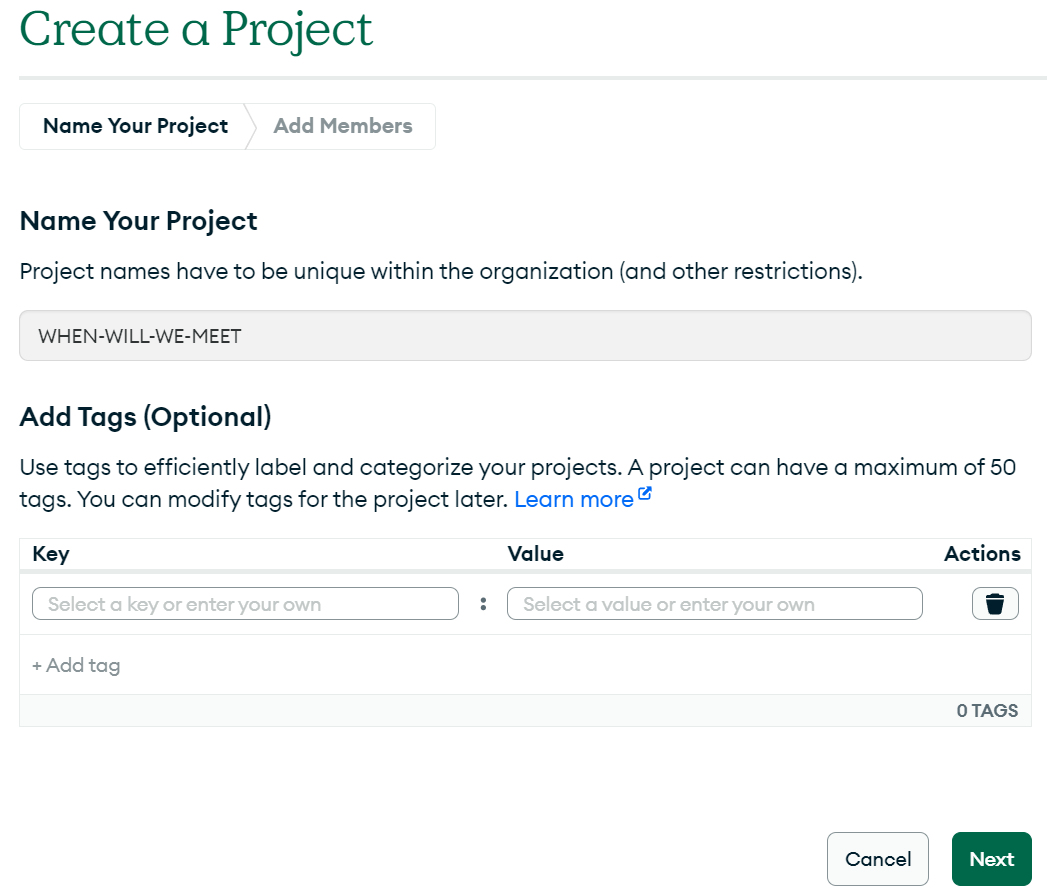 이후 위와 같이 MongoDB 내에서 새로운 프로젝트를 생성하고
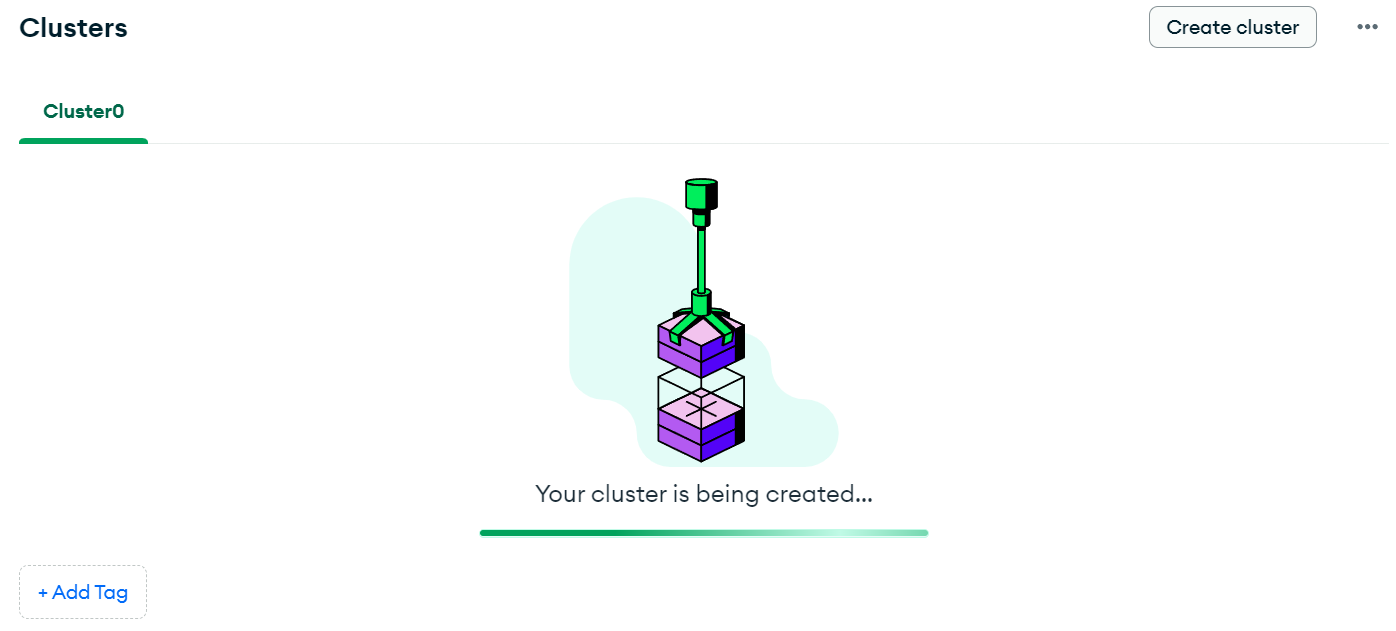
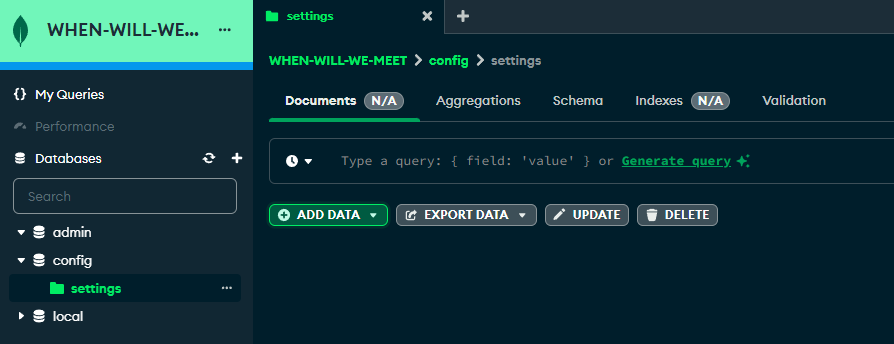 Cluster를 생성해준 후 MongoDB Compass에 연결한다.
/common
Spring Boot 서버의 기본적인 설정을 해주기 위한 Class이다.
/constant/ConstantVariables.java
package org.example.whenwillwemeet.common.constant;

public class ConstantVariables {
    // Appointment 만료 시간 (현재 24h)
    public static final int APPOINTMENT_EXPIRATION_TIME = 24;
}
ConstantVariables class에서는 SystemWide한 상수를 정의한다.
/environment/ConfigUtil.java
import lombok.RequiredArgsConstructor;
import lombok.extern.slf4j.Slf4j;
import org.springframework.context.annotation.Configuration;
import org.springframework.context.annotation.PropertySource;
import org.springframework.core.env.Environment;

@Slf4j
@Configuration
@RequiredArgsConstructor
@PropertySource("classpath:application-private.properties")
public class ConfigUtil {
    private final Environment environment;

    public String getProperty(String key){
        return environment.getProperty(key);
    }
}
ConfigUtil Class는 application-private.properties를 프로젝트 내에서 사용하기 위한 설정을 정의한다.
/security/CommonConfig.java
import org.springframework.context.annotation.Bean;
import org.springframework.context.annotation.Configuration;
import org.springframework.security.crypto.factory.PasswordEncoderFactories;
import org.springframework.security.crypto.password.PasswordEncoder;

@Configuration
public class CommonConfig {
    @Bean
    public PasswordEncoder passwordEncoder(){
        return PasswordEncoderFactories.createDelegatingPasswordEncoder();
    }
}CommonConfig에서는 데이터 보안 강화를 위하여 PasswordEncoder Bean 메소드를 정의한다.
/CommonResponse.java
import lombok.Builder;
import lombok.Getter;
import lombok.Setter;
import org.springframework.http.HttpStatus;

@Getter
@Setter
@Builder
public class CommonResponse {
    private boolean isSuccess;
    HttpStatus status;
    private String msg;
    private Object object;

    public CommonResponse(boolean isSuccess, String msg) {
        this.isSuccess = isSuccess;
        this.msg = msg;
    }

    public CommonResponse(boolean isSuccess, HttpStatus status, String msg) {
        this.isSuccess = isSuccess;
        this.status = status;
        this.msg = msg;
    }

    public CommonResponse(boolean isSuccess, HttpStatus status, String msg, Object object) {
        this.isSuccess = isSuccess;
        this.status = status;
        this.msg = msg;
        this.object = object;
    }
}
CommonResponse Class는 FE로의 Response의 통일성을 확보하여 협업을 용이하게 하기 위하여 사용된다.
/config
/CorsConfig.java
package org.example.whenwillwemeet.security;

import org.springframework.context.annotation.Bean;
import org.springframework.context.annotation.Configuration;
import org.springframework.web.cors.CorsConfiguration;
import org.springframework.web.cors.UrlBasedCorsConfigurationSource;
import org.springframework.web.filter.CorsFilter;
import org.springframework.web.servlet.config.annotation.CorsRegistry;
import org.springframework.web.servlet.config.annotation.WebMvcConfigurer;

import java.util.Arrays;

@Configuration
public class CorsConfig {

    @Bean
    public CorsFilter corsFilter() {
        UrlBasedCorsConfigurationSource source = new UrlBasedCorsConfigurationSource();
        CorsConfiguration config = new CorsConfiguration();
        // 개발 단게에서는 setAllowCredentials(false) 로 설정
        // Setting this property has an impact on how origins, originPatterns, allowedMethods and allowedHeaders are processed
        // Be aware that this option establishes a high level of trust with the configured domains
        // and also increases the surface attack of the web application
        config.setAllowCredentials(false);

        // setAllowCredentials(true)일 경우 "*"로 설정 불가
        config.addAllowedOrigin("*");

        // 동일 출처를 판단하는 기준 중 포트 번호를 명시한 출처는
        // 브라우저의 구현 로직에 따라 동일 출처로 판단하지 않을 수 있기 때문에
        // 포트번호를 생략한 URL을 CORS 설정의 허용 출처에 추가
        // config.setAllowedOrigins(Arrays.asList("http://localhost", "http://localhost:5173"));
        config.addAllowedHeader("*");
        config.addAllowedMethod("*");
        config.setExposedHeaders(Arrays.asList("Authorization", "Content-Type", "Cookie", "Set-Cookie"));

        source.registerCorsConfiguration("/**", config);
        return new CorsFilter(source);
    }

    @Bean
    public WebMvcConfigurer corsConfigurer() {
        return new WebMvcConfigurer() {
            @Override
            public void addCorsMappings(CorsRegistry registry) {
                registry.addMapping("/**")
                        .allowedMethods("GET", "POST", "PUT", "DELETE", "OPTIONS")
                        .allowedHeaders("*")
                        .allowedOrigins("*");
            }
        };
    }
}
CorsConfig Class에서는 CORS 관련 설정에 관한 정보들을 정의하는데 현재 개발 단계에서는 setAllowCredentials(false) 로 설정하여 모든 Origin, Method, Header에 대한 요청을 허용한다.
/SecurityConfig.java
package org.example.whenwillwemeet.security;

import lombok.RequiredArgsConstructor;
import org.springframework.context.annotation.Bean;
import org.springframework.context.annotation.Configuration;
import org.springframework.security.config.Customizer;
import org.springframework.security.config.annotation.web.builders.HttpSecurity;
import org.springframework.security.config.annotation.web.configuration.EnableWebSecurity;
import org.springframework.security.config.annotation.web.configurers.AbstractHttpConfigurer;
import org.springframework.security.web.SecurityFilterChain;

@Configuration
@EnableWebSecurity
@RequiredArgsConstructor
public class SecurityConfig{

    private final CorsConfig corsConfig;
//    private final OAuth2SuccessHandler oAuth2SuccessHandler;
//    private final OAuth2UserService oAuth2UserService;
//    private final HttpCookieOAuth2AuthorizationRequestRepository httpCookieOAuth2AuthorizationRequestRepository;

    @Bean
    public SecurityFilterChain filterChain(HttpSecurity http) throws Exception {

        http
                .csrf(AbstractHttpConfigurer::disable) // 403 에러 범인 csrf 비활성화 -> cookie를 사용하지 않으면 꺼도 된다. (cookie를 사용할 경우 httpOnly(XSS 방어), sameSite(CSRF 방어)로 방어해야 한다.)
                .formLogin(AbstractHttpConfigurer::disable) // 기본 폼 로그인 사용 X

                //.addFilterAfter(jwtFilter, UsernamePasswordAuthenticationFilter.class) jwt 필터 두번 적용으로 삭제.
                .addFilter(corsConfig.corsFilter())
                .authorizeHttpRequests(authorize -> authorize
                        //        .requestMatchers("/**").permitAll()
                        .requestMatchers("/**").permitAll() //security 에서는 별도의 필터를 적용하지 않는다. JWT Filter 에서 필터링 적용.

                )
                .httpBasic(Customizer.withDefaults());

        //OAUth 2.0
//                .oauth2Login(oauth ->
//                        // OAuth2 로그인 성공 이후 사용자 정보를 가져올 때의 설정을 담당
//                        oauth
//                                .userInfoEndpoint(c -> c.userService(oAuth2UserService))
//                                // 로그인 or 회원가입 핸들러
//                                .successHandler(oAuth2SuccessHandler)
//
//                                //커스텀 state 저장 클래스
//                                .authorizationEndpoint(custom ->
//                                        custom.authorizationRequestRepository(httpCookieOAuth2AuthorizationRequestRepository)
//                                )
//                );

        return http.build();
    }
}
이후 SecurityConfig Class를 정의하여 SecurityFilterChain를 통해 Spring Securioty를 정의한다.
또한 추후 서비스가 확장될 경우를 대비하여 OAuth 관련 설정에 대한 내용을 주석처리하고 유지해두었다.
Appoinment API
/data
data 패키지에서는 MongoDB Model, DAO, JPA Repository 등 데이터와 관련된 다양한 Class를 정의해두었다.
/model/AppointmentModel.java
@Data
@Slf4j
@NoArgsConstructor
@AllArgsConstructor
@Document(collection = "appointments")
public class AppointmentModel {
    @Id
    private String id;

    @CreatedDate
    @Indexed(direction = IndexDirection.DESCENDING)
    private LocalDateTime createdAt;
    @Indexed(expireAfterSeconds = 0)
    private LocalDateTime expireAt;

    private String name;

    // @DBRef
    private List<Schedule> schedules;
    // @DBRef
    private List<User> users;

    private LocalDateTime startTime;
    private LocalDateTime endTime;

    private String timeZone;

    // APPOINTMENT_EXPIRATION_TIME static 상수를 통해 ExpireAt 설정
    // TTL 기능을 활성화하기 위해 별도로 MongoDB Collectiond에 TTL Index 추가
    public void initializeTimes() {
        ZoneId appointmentZoneId = ZoneId.of(this.timeZone);
        ZonedDateTime nowInAppointmentZone = ZonedDateTime.now(appointmentZoneId);
        log.info("[AppointmentModel]-[initializeTimes] Now In Appointment TimeZone {}", nowInAppointmentZone);

        this.createdAt = nowInAppointmentZone.toLocalDateTime();
        this.expireAt = nowInAppointmentZone.plusDays(ConstantVariables.APPOINTMENT_EXPIRATION_TIME).toLocalDateTime();

        // UTC를 현재 Appointment의 TimeZone으로 변환
        this.startTime = ZonedDateTime.ofInstant(this.startTime.toInstant(ZoneOffset.UTC), appointmentZoneId).toLocalDateTime();
        this.endTime = ZonedDateTime.ofInstant(this.endTime.toInstant(ZoneOffset.UTC), appointmentZoneId).toLocalDateTime();

        // Schedule의 Date들도 변환
        for (Schedule schedule : this.schedules) {
            schedule.setDate(ZonedDateTime.ofInstant(schedule.getDate().toInstant(ZoneOffset.UTC), appointmentZoneId).toLocalDateTime());
        }
    }
}
우선 가장 중요한 서비스의 중추가 되는 AppointmentModel Class는 위와 같이 정의하였다.
만약 RDB를 사용하거나 별도의 Collection으로 Schedule이나 User를 관리해야할 경우 @DBRef 어노테이션을 통해 Spring Data MongoDB에게 해당 필드가 다른 컬렉션의 문서를 참조한다는 정보를 전달할 수 있다.
하지만 해당 어노테이션은 MongoDB가 참조된 문서를 자동으로 가져오게 되므로, 성능에 영향을 줄 수 있으며 대량의 데이터를 다룰 때는 이 점을 고려하여 @DBRef(lazy = true)를 사용하여 지연 로딩을 구현할 수 있다.
현재는 CASCADE 기능이 없는 MongoDB에서 Collection의 Document를 삭제하면 연관된 데이터들도 삭제하기 위하여 @DBRef를 통해 별도의 Collection으로 나누는 대신 하나의 Collection에 데이터를 저장하였다.
또한 @CreatedDate 어노테이션을 사용하여 문서 생성 시 자동으로 날짜가 설정되도록 하였다.
이때 LocalDateTime.now(ZoneId.of("Asia/Seoul"))을 사용하여 대한민국 시간대로 초기화하고 @Indexed를 추가하여 해당 필드에 인덱스를 생성할 수 있도록 하였다.
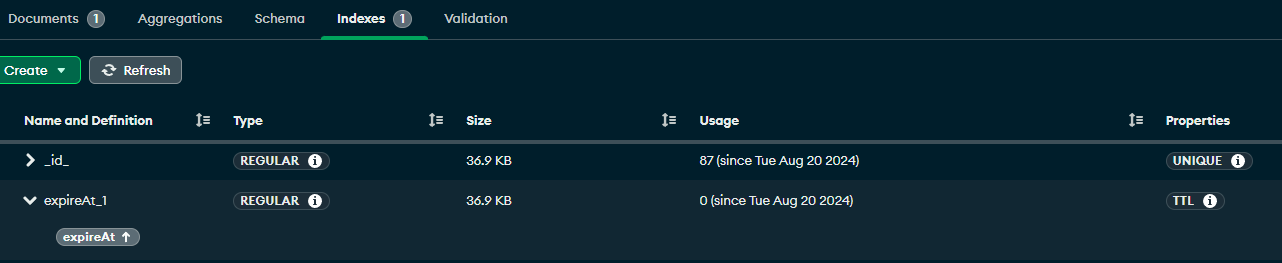
마지막으로 @Indexed(expireAfterSeconds = 0)를 사용하여 TTL 인덱스를 설정하였다.
@EnableMongoAuditing
@SpringBootApplication(exclude={DataSourceAutoConfiguration.class})
public class WhenWillWeMeetApplication {

	public static void main(String[] args) {
		SpringApplication.run(WhenWillWeMeetApplication.class, args);
	}

}
또한 이러한 MongoDB의 기능들을 사용해주기 위해 @EnableMongoAuditing 어노테이션을 추가해주었다.
/model/Schedule.java
package org.example.whenwillwemeet.data.model;

import lombok.Data;
import lombok.NoArgsConstructor;
import lombok.AllArgsConstructor;
import org.springframework.data.annotation.Id;
import org.springframework.data.mongodb.core.mapping.Document;
import java.time.LocalDateTime;
import java.util.List;

@Data
@NoArgsConstructor
@AllArgsConstructor
public class Schedule {
    @Id
    private String id;
    private LocalDateTime date;
    private List<TimeSlot> times;
    private String appointmentId;
}
ERD 정의에 맞게 Schedule Class를 생성해주었으며
/model/TimeSlot.java
package org.example.whenwillwemeet.data.model;

import lombok.AllArgsConstructor;
import lombok.Data;
import lombok.NoArgsConstructor;

import java.time.LocalDateTime;
import java.util.List;
import java.util.Map;

@Data
@NoArgsConstructor
@AllArgsConstructor
public class TimeSlot {
    private LocalDateTime time;
    private List<String> users;
}
마찬가지로 TimeSlot Class를 정의해주었다.
/model/User.java
package org.example.whenwillwemeet.data.model;

import org.springframework.data.annotation.Id;
import lombok.AllArgsConstructor;
import lombok.Data;
import lombok.NoArgsConstructor;
import org.springframework.data.mongodb.core.mapping.Document;

@Data
@NoArgsConstructor
@AllArgsConstructor
public class User {
    @Id
    private String name;
    private String password;
    private String email;
    private String phoneNumber;
    private String appointmentId;
}
마지막으로 User Class를 정의해주면 Model에 대한 정의는 끝이 난다.
/model/validation/AppointmentValidation.java
package org.example.whenwillwemeet.data.model.validation;

import org.example.whenwillwemeet.data.model.AppointmentModel;
import org.example.whenwillwemeet.data.model.Schedule;
import org.springframework.stereotype.Component;

import java.time.ZoneId;
import java.util.ArrayList;
import java.util.List;

@Component
public class AppointmentValidation {
    public List<String> validateAppointmentModel(AppointmentModel appointmentModel) {
        List<String> errors = new ArrayList<>();

        // name 검증
        if (isNullOrEmpty(appointmentModel.getName())) {
            errors.add("Name is required");
        }

        // schedules 검증
        if (appointmentModel.getSchedules() == null || appointmentModel.getSchedules().isEmpty()) {
            errors.add("At least one schedule is required");
        } else {
            for (Schedule schedule : appointmentModel.getSchedules()) {
                if (schedule.getDate() == null) {
                    errors.add("Schedule date is required");
                    break;
                }
            }
        }

        // startTime과 endTime 검증
        if (appointmentModel.getStartTime() == null) {
            errors.add("Start time is required");
        }
        if (appointmentModel.getEndTime() == null) {
            errors.add("End time is required");
        }
        if (appointmentModel.getStartTime() != null && appointmentModel.getEndTime() != null
                && appointmentModel.getStartTime().isAfter(appointmentModel.getEndTime())) {
            errors.add("Start time must be before end time");
        }

        // timeZone 검증
        if (isNullOrEmpty(appointmentModel.getTimeZone())) {
            errors.add("Time zone is required");
        } else {
            try {
                ZoneId.of(appointmentModel.getTimeZone());
            } catch (Exception e) {
                errors.add("Invalid time zone");
            }
        }

        return errors;
    }

    private boolean isNullOrEmpty(String str) {
        return str == null || str.trim().isEmpty();
    }
}
우선 일관적인 FE로부터의 body 검증을 위하여 AppointmentValidation Class를 위와 같이 정의해주었다.
/repository/AppointmentRepository.java
package org.example.whenwillwemeet.data.repository;

import org.example.whenwillwemeet.data.model.AppointmentModel;
import org.springframework.data.mongodb.repository.MongoRepository;
import org.springframework.stereotype.Repository;

@Repository
public interface AppointmentRepository extends MongoRepository<AppointmentModel, String> {
	...
}
이후 AppointmentRepository를 생성해주었는데, 현재는 기본 쿼리 메소드로도 로직을 구현할 수 있기에 별도의 쿼리를 추가해주지는 않았다.
/dao/AppointmentDAO.java
@Slf4j
@Component
public class AppointmentDAO {
    private final AppointmentRepository appointmentRepository;

    @Autowired
    public AppointmentDAO(AppointmentRepository appointmentRepository) {
        this.appointmentRepository = appointmentRepository;
    }

    public CommonResponse getAppointmentById(String id) {
        try{
            return new CommonResponse(true, HttpStatus.OK, "Appointment fetched", appointmentRepository.findById(id));
        }catch (Exception e){
            return new CommonResponse(false, HttpStatus.INTERNAL_SERVER_ERROR, "Appointment fetch failed with : [" + e + "]");
        }
    }

    public CommonResponse createAppointment(AppointmentModel appointment) {
        try {
            log.info("[AppointmentDAO]-[createAppointment] Current Appointment Expiration time : {}h", ConstantVariables.APPOINTMENT_EXPIRATION_TIME);
            // APPOINTMENT_EXPIRATION_TIME static 상수를 통해 ExpireAt 설정
            appointment.setExpireAt(LocalDateTime.now(ZoneId.of("Asia/Seoul")).plusHours(ConstantVariables.APPOINTMENT_EXPIRATION_TIME));

            // startTime부터 endTime까지 15분 단위로 TimeSlot 생성
            List<TimeSlot> timeSlots = createTimeSlots(appointment.getStartTime(), appointment.getEndTime());
            log.info("[AppointmentDAO]-[createAppointment] {} time slots created", timeSlots.size());

            // 각 Schedule에 대해 TimeSlot 설정
            if (appointment.getSchedules() != null) {
                for (Schedule schedule : appointment.getSchedules()) {
                    schedule.setId(UUID.randomUUID().toString());
                    schedule.setTimes(new ArrayList<>(timeSlots));
                }
            }

            AppointmentModel savedAppointment = appointmentRepository.save(appointment);
            log.info("[AppointmentDAO]-[createAppointment] Appointment [{}] created", savedAppointment.getId());
            return new CommonResponse(true, HttpStatus.OK, "Appointment created", savedAppointment);
        } catch (Exception e) {
            return new CommonResponse(false, HttpStatus.INTERNAL_SERVER_ERROR, "Appointment creation failed with : [" + e + "]");
        }
    }

    private List<TimeSlot> createTimeSlots(LocalDateTime startTime, LocalDateTime endTime) {
        List<TimeSlot> timeSlots = new ArrayList<>();
        LocalDateTime currentTime = startTime;

        while (currentTime.isBefore(endTime) || currentTime.equals(endTime)) {
            TimeSlot timeSlot = new TimeSlot();
            timeSlot.setTime(currentTime);
            timeSlot.setUsers(new ArrayList<>());
            timeSlots.add(timeSlot);

            currentTime = currentTime.plus(15, ChronoUnit.MINUTES);
        }

        return timeSlots;
    }

    public CommonResponse updateAppointment(AppointmentModel appointment) {
        try {
            if (appointmentRepository.existsById(appointment.getId())) {
                AppointmentModel updatedAppointment = appointmentRepository.save(appointment);
                log.info("[AppointmentDAO]-[createAppointment] Appointment [{}] updated", updatedAppointment.getId());
                return new CommonResponse(true, HttpStatus.OK, "Appointment updated", updatedAppointment);
            } else {
                throw new RuntimeException("Appointment not found with id: " + appointment.getId());
            }
        } catch (Exception e){
            return new CommonResponse(false, HttpStatus.INTERNAL_SERVER_ERROR, "Appointment update failed with : [" + e + "]");
        }
    }
}AppointmentDAO는 MongoDB와 Repository를 통해 직접 작업을 수행하는 Class로 주요 메소드는 아래와 같다.
-
createAppointment: 새로운 Appointment를 생성한다.
이때 APPOINTMENT_EXPIRATION_TIME static 상수를 통해 ExpireAt 설정하고 startTime부터 endTime까지 15분 단위로 TimeSlot 생성한 후 Schedule에 각 TimeSlot을 배치한다. -
updateAppointment: 파라미터를 통해 전달받은 AppointModel로 현재 Model을 업데이트한다.
/service
/AppointmentService.java
@Service
public class AppointmentService {
    @Autowired
    private AppointmentDAO appointmentDAO;

    public CommonResponse getAppointment(String appointmentId){
        return appointmentDAO.getAppointmentById(appointmentId);
    }

    public CommonResponse createAppointment(AppointmentModel appointmentModel){
        return appointmentDAO.createAppointment(appointmentModel);
    }
}
DAO와 Controller 사이에서 중재자 역할을 하는 AppointmentService Class를 정의하였다.
/controller
/AppointmentController.java
@Slf4j
@RestController
@RequestMapping("/api/v1/appointment")
public class AppointmentController {
    @Autowired
    private AppointmentService appointmentService;

    @Autowired
    AppointmentValidation appointmentValidation;

    @GetMapping(value="/getAppointment")
    public ResponseEntity<CommonResponse> getAppointment(@RequestParam("appointmentId") String appointmentId){
        log.info("[AppointmentController]-[getAppointment] API Called");

        if (appointmentId.isEmpty()) {
            log.warn("[AppointmentController]-[getAppointment] AppointmentId needed");
            CommonResponse response = new CommonResponse(false, HttpStatus.BAD_REQUEST, "AppointmentId needed");
        }

        CommonResponse response = appointmentService.getAppointment(appointmentId);
        return ResponseEntity.status(response.getStatus()).body(response);
    }

    @PostMapping(value="/createAppointment")
    public ResponseEntity<CommonResponse> createAppointment(@Valid @RequestBody AppointmentModel appointmentModel){
        log.info("[AppointmentController]-[createAppointment] API Called");

        List<String> validationErrors = appointmentValidation.validateAppointmentModel(appointmentModel);

        if (!validationErrors.isEmpty()) {
            log.warn("[AppointmentController]-[createAppointment] Validation failed: {}", validationErrors);
            CommonResponse response = new CommonResponse(false, HttpStatus.BAD_REQUEST, String.join(", ", validationErrors));
            return ResponseEntity.status(response.getStatus()).body(response);
        }

        CommonResponse response = appointmentService.createAppointment(appointmentModel);
        return ResponseEntity.status(response.getStatus()).body(response);
    }
}
마지막으로 AppointmentController를 위와 같이 정의하여 API 구현을 마쳤다.
/deleteAppointment의 경우 TTL을 통해 Appointment가 자동으로 삭제되기 때문에 구현하지 않았다.
API Validation
/createAppointment
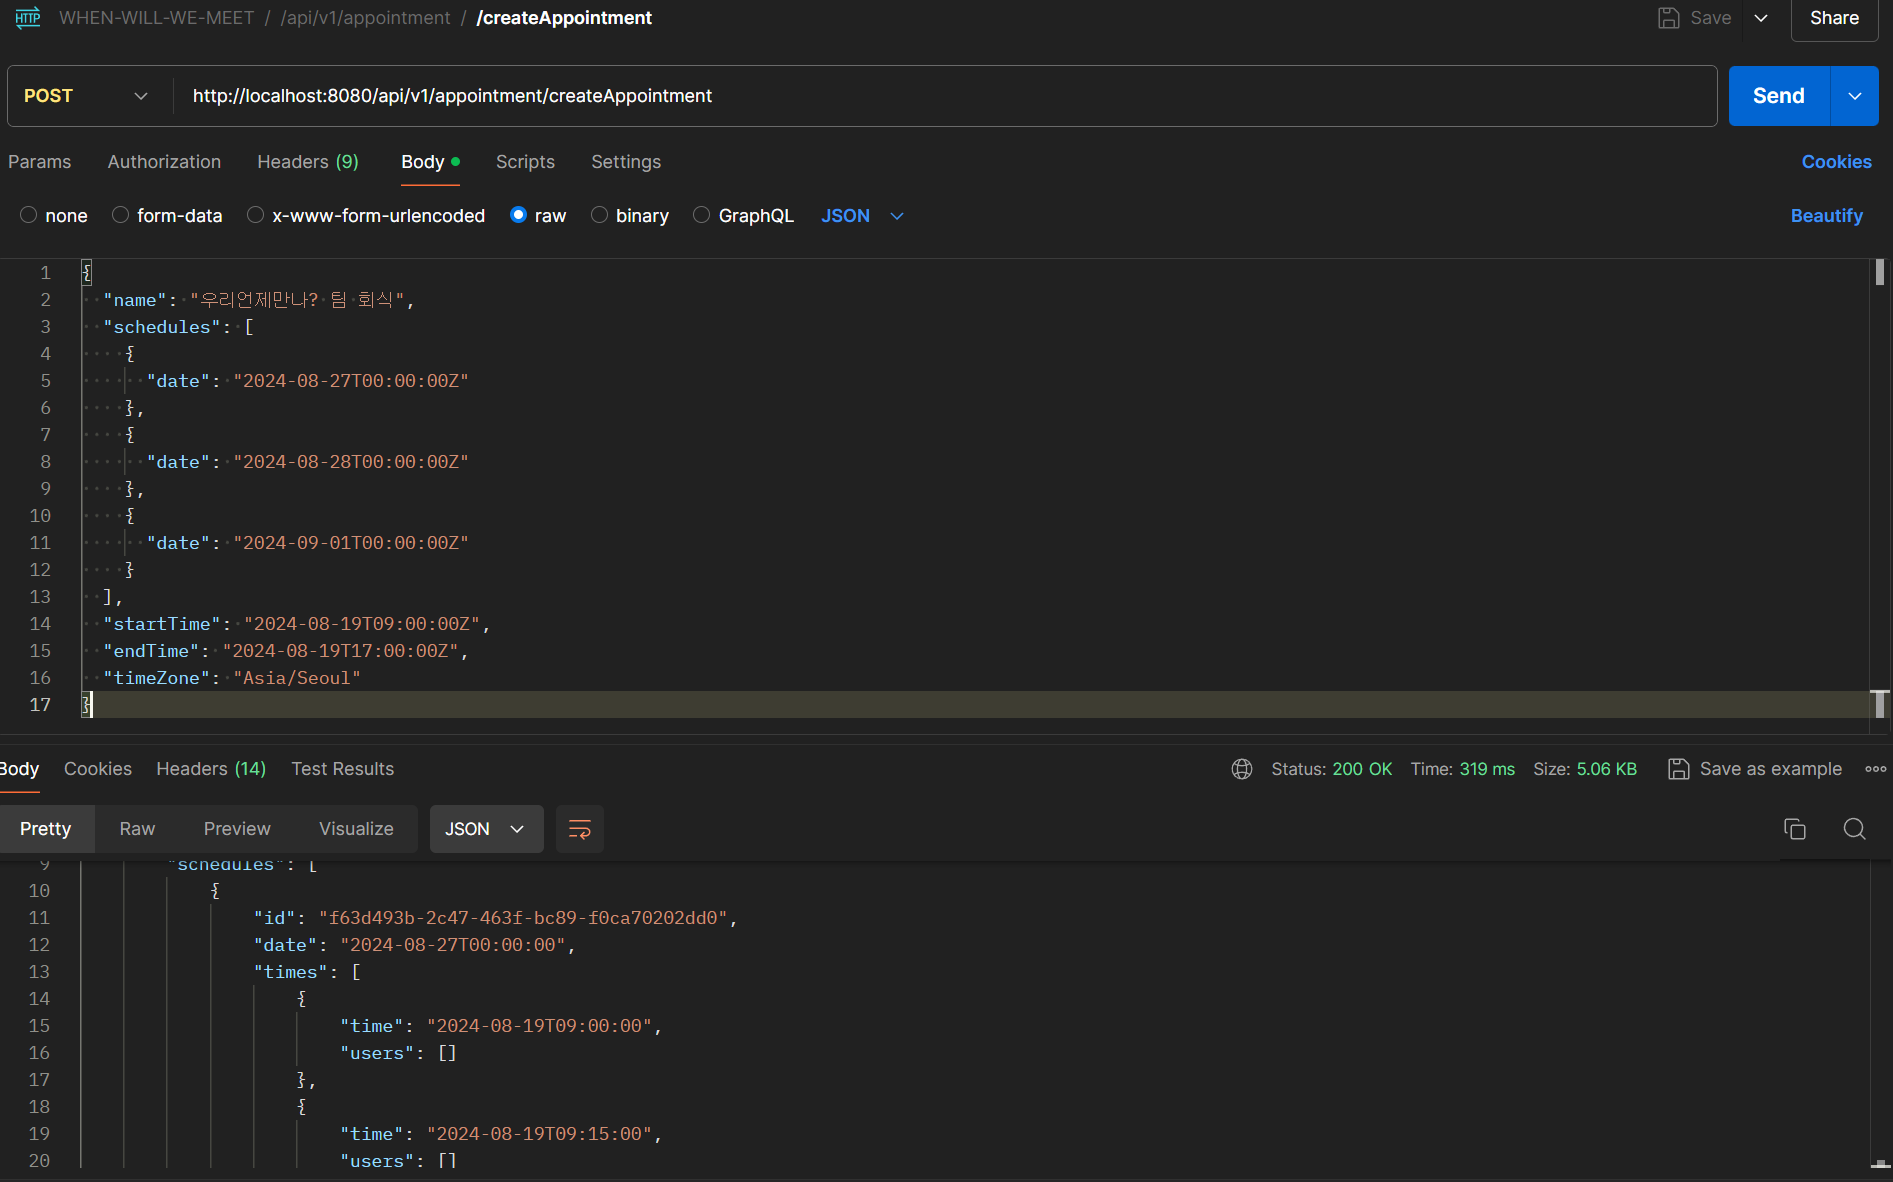
 위와 같이
위와 같이 일정의 이름과 해당 일정 내 조율하고 싶은 날짜, 날짜들의 시간 시작-끝 시간을 입력하고, 마지막으로 TimeZone까지 입력하면 요청이 정상적으로 수행되는 것을 볼 수 있으며
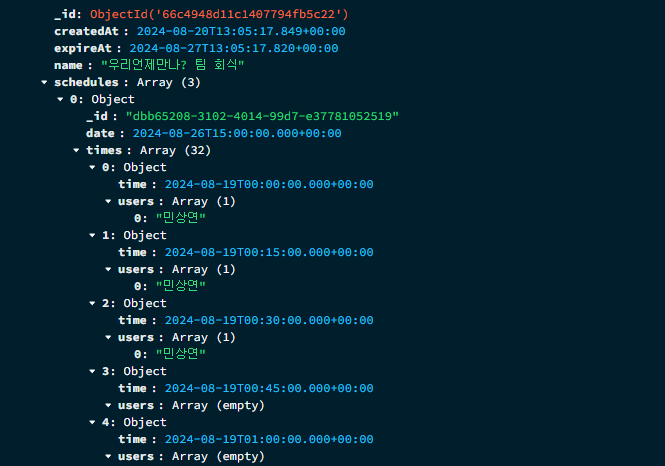
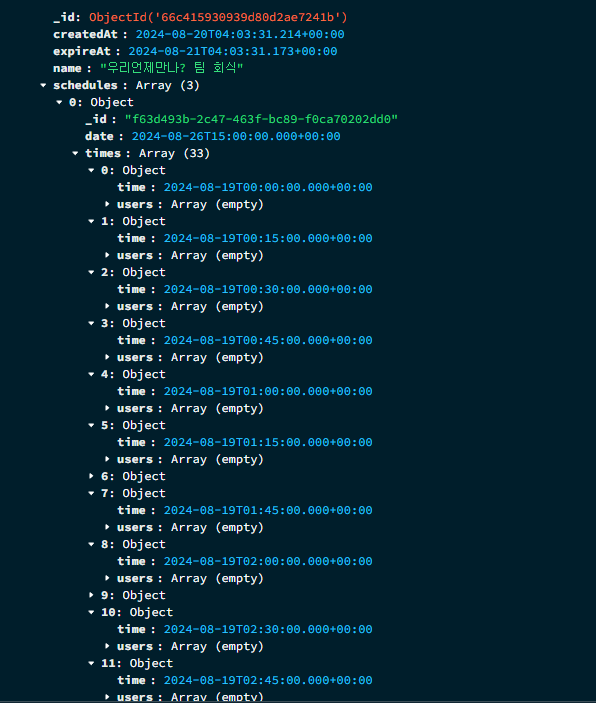 DB에도 모든 Schedule 일자에 대한 times 들이 15분 단위로 생성되는 것을 확인할 수 있다.
TroubleShooting : MongoDB TTL Index
하지만 설정된 expireAt 시간이 지나도 데이터가 자동으로 삭제되지 않아서
 TTL 기능이 정상 작동하는 것을 테스트 하기 위해 위와 같이 임의로 Expiration Date를 1로 정의하고
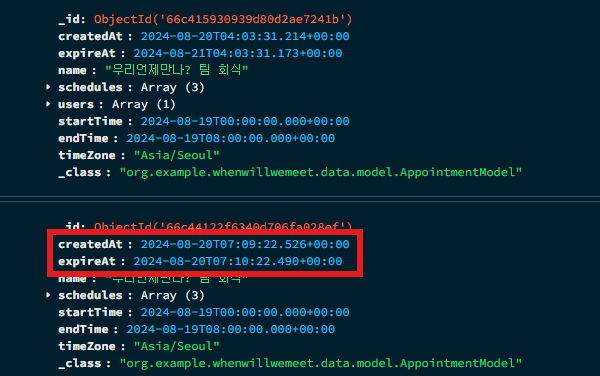 1분 뒤로 들어가는 것을 확인한 후
 정상적으로 데이터가 삭제되는 것을 확인하였다.
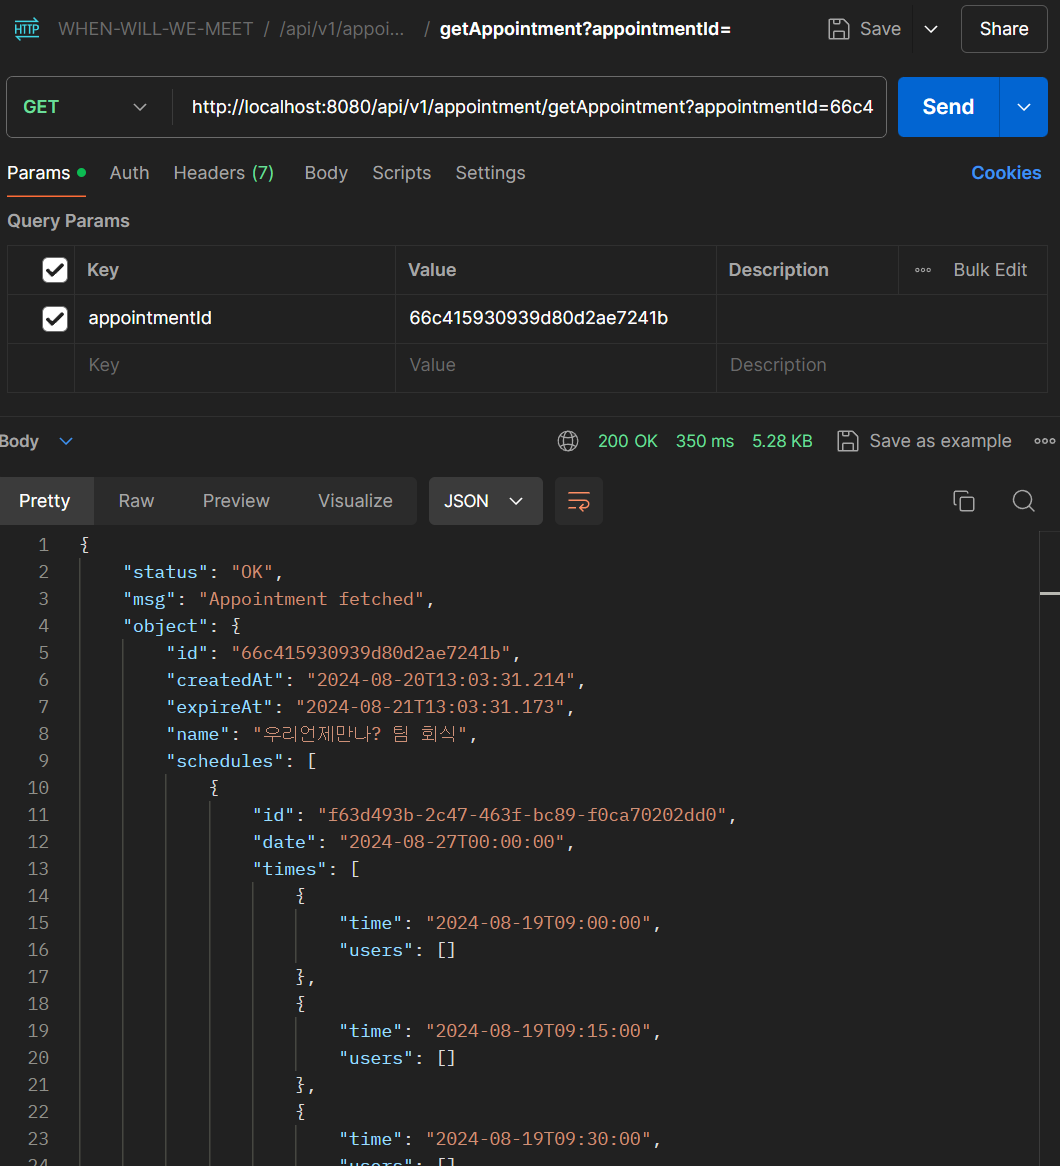
/getAppointment
/user API
/data/model/validation/UserValidation.java
@Component
public class UserValidation {
    public List<String> validateUser(User user) {
        List<String> errors = new ArrayList<>();

        if (isNullOrEmpty(user.getName())) {
            errors.add("Name is required");
        }

        if (isNullOrEmpty(user.getPassword())) {
            errors.add("Password is required");
        }

        if (isNullOrEmpty(user.getAppointmentId())) {
            errors.add("AppointmentId is required");
        }

        return errors;
    }

    private boolean isNullOrEmpty(String str) {
        return str == null || str.trim().isEmpty();
    }
}
UserValidation Class를 위와 같이 정의하여주고
/service/UserService.java
@Slf4j
@Service
public class UserService {
    @Autowired
    private AppointmentDAO appointmentDAO;

    @Autowired
    private PasswordEncoder passwordEncoder;

    public CommonResponse login(User user) {
        Optional<AppointmentModel> appointmentModelOptional = appointmentDAO.getAppointmentModelById(user.getAppointmentId());

        if(appointmentModelOptional.isEmpty()) {
            return new CommonResponse(false, HttpStatus.NOT_FOUND, "Appointment not found");
        }

        AppointmentModel appointmentModel = appointmentModelOptional.get();

        if(appointmentModel.getUsers() == null)
            appointmentModel.setUsers(new ArrayList<>());

        User existingUser = findUserByName(appointmentModel, user.getName());

        if (existingUser != null) {
            // 사용자가 존재하는 경우
            if (passwordEncoder.matches(user.getPassword(), existingUser.getPassword())) {
                // 비밀번호가 일치하는 경우
                existingUser.setPassword(null);
                return new CommonResponse(true, HttpStatus.OK, "Login success", existingUser);
            } else {
                // 비밀번호가 불일치하는 경우
                return new CommonResponse(false, HttpStatus.UNAUTHORIZED, "Login failed: Incorrect password");
            }
        } else {
            // 사용자가 존재하지 않는 경우, 새로운 사용자 생성
            User newUser = new User();
            newUser.setName(user.getName());
            newUser.setPassword(passwordEncoder.encode(user.getPassword()));
            newUser.setEmail(user.getEmail());
            newUser.setPhoneNumber(user.getPhoneNumber());

            appointmentModel.getUsers().add(newUser);
            CommonResponse updateResponse = appointmentDAO.addUserToAppointment(appointmentModel.getId(), newUser);

            if (updateResponse.isSuccess()) {
                newUser.setPassword(null);
                return new CommonResponse(true, HttpStatus.CREATED, "New user registered", newUser);
            } else {
                return new CommonResponse(false, HttpStatus.INTERNAL_SERVER_ERROR, "Failed to register new user");
            }
        }
    }

    public CommonResponse updateUser(User updatedUser) {
        Optional<AppointmentModel> appointmentModelOptional = appointmentDAO.getAppointmentModelById(updatedUser.getAppointmentId());

        if(appointmentModelOptional.isEmpty()) {
            return new CommonResponse(false, HttpStatus.NOT_FOUND, "Appointment not found");
        }

        AppointmentModel appointmentModel = appointmentModelOptional.get();
        User existingUser = findUserByName(appointmentModel, updatedUser.getName());

        // 기존 User 존재 여부 검증 및 비밀번호 검증
        if (existingUser == null) {
            return new CommonResponse(false, HttpStatus.NOT_FOUND, "User not found");
        } else if (!passwordEncoder.matches(updatedUser.getPassword(), existingUser.getPassword())) {
            return new CommonResponse(false, HttpStatus.UNAUTHORIZED, "Incorrect password");
        }

        // 업데이트할 정보 설정
        existingUser.setEmail(updatedUser.getEmail());
        existingUser.setPhoneNumber(updatedUser.getPhoneNumber());

        // AppointmentModel 업데이트
        CommonResponse updateResponse = appointmentDAO.updateAppointment(appointmentModel);

        if (updateResponse.isSuccess()) {
            existingUser.setPassword(null);
            return new CommonResponse(true, HttpStatus.OK, "User information updated successfully", existingUser);
        } else {
            return new CommonResponse(false, HttpStatus.INTERNAL_SERVER_ERROR, "Failed to update user information");
        }
    }

    private User findUserByName(AppointmentModel appointmentModel, String name) {
        return appointmentModel.getUsers().stream()
                .filter(u -> u.getName().equals(name))
                .findFirst()
                .orElse(null);
    }
}UserService를 설계한 로직에 맞추어 아래와 같은 주요 메소드로 구성하였다.
-
login: 자동으로name을 기준으로 자동으로 회원가입, 로그인을 진행한다
회원가입의 경우 atomic한addUserToAppointment메소드를 통해 동시성 문제를 해결하였다. -
updateUser: 추후 서비스 확장시 알림기능, 사용자 기능 등을 위해 User를 업데이트하는 메소드이다.
/controller/UserController.java
@Slf4j
@RestController
@RequestMapping("/api/v1/user")
public class UserController {
    @Autowired
    private UserService userService;

    @Autowired
    UserValidation userValidation;

    @PostMapping(value="/login")
    public ResponseEntity<CommonResponse> login(@Valid @RequestBody User user){
        log.info("[UserController]-[login] API Called");

        List<String> validationErrors = userValidation.validateUser(user);

        if (!validationErrors.isEmpty()) {
            log.warn("[UserController]-[login] Validation failed: {}", validationErrors);
            CommonResponse response = new CommonResponse(false, HttpStatus.BAD_REQUEST, String.join(", ", validationErrors));
            return ResponseEntity.status(response.getStatus()).body(response);
        }

        CommonResponse response = userService.login(user);
        return ResponseEntity.status(response.getStatus()).body(response);
    }

    @PutMapping(value="/updateUser")
    public ResponseEntity<CommonResponse> updateUser(@Valid @RequestBody User user){
        log.info("[UserController]-[updateUser] API Called");

        List<String> validationErrors = userValidation.validateUser(user);

        if (!validationErrors.isEmpty()) {
            log.warn("[UserController]-[updateUser] Validation failed: {}", validationErrors);
            CommonResponse response = new CommonResponse(false, HttpStatus.BAD_REQUEST, String.join(", ", validationErrors));
            return ResponseEntity.status(response.getStatus()).body(response);
        }

        CommonResponse response = userService.updateUser(user);
        return ResponseEntity.status(response.getStatus()).body(response);
    }
}UserController를 정의하여 /user API를 구현하였다.
API Validation
/login
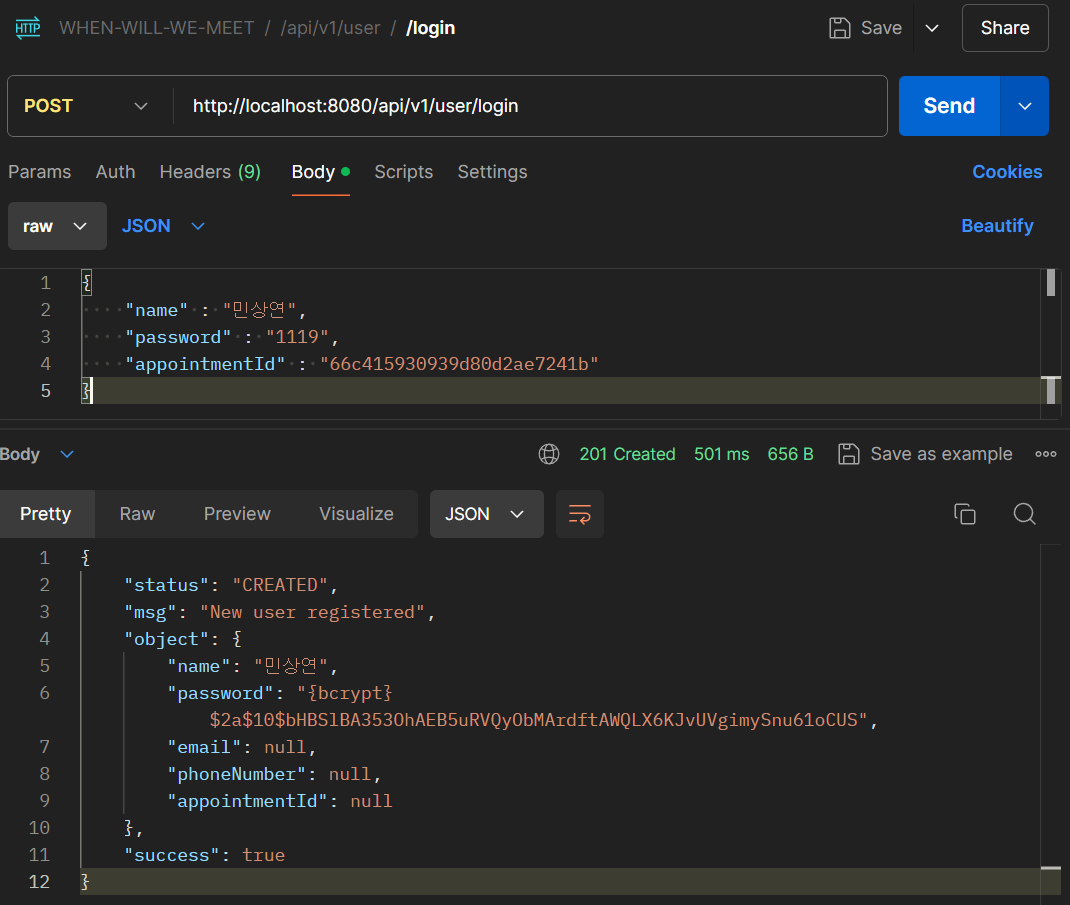 먼저 위와 같이 User가 존재하지 않는 Appointment에 로그인 요청을 보내게 되면
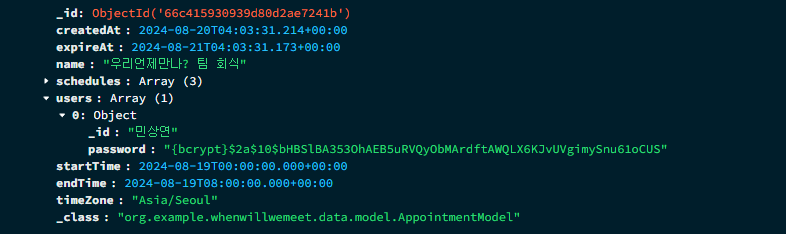 encrypted된 비밀번호로 새로운 User가 생성되는 것을 볼 수 있다.
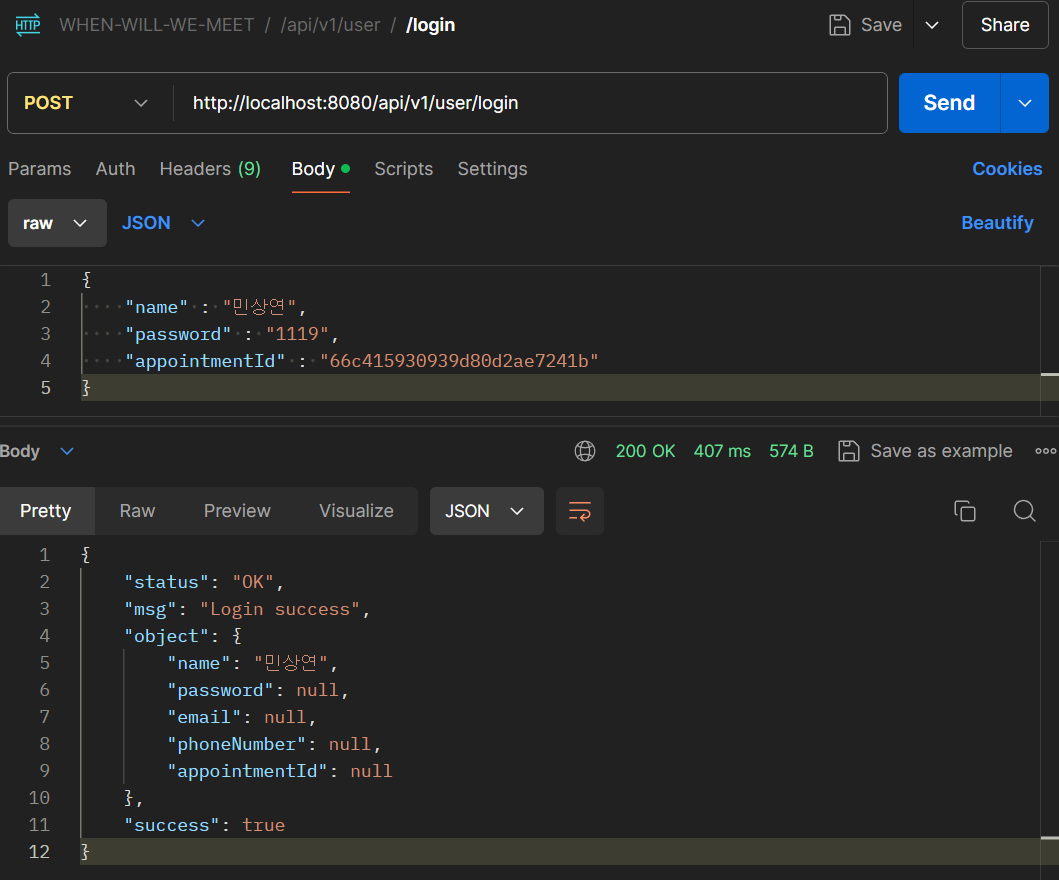 또한 같은 User에 대해 로그인 요청을 다시 보내면 정상적으로 로그인되는 것을 볼 수 있으며
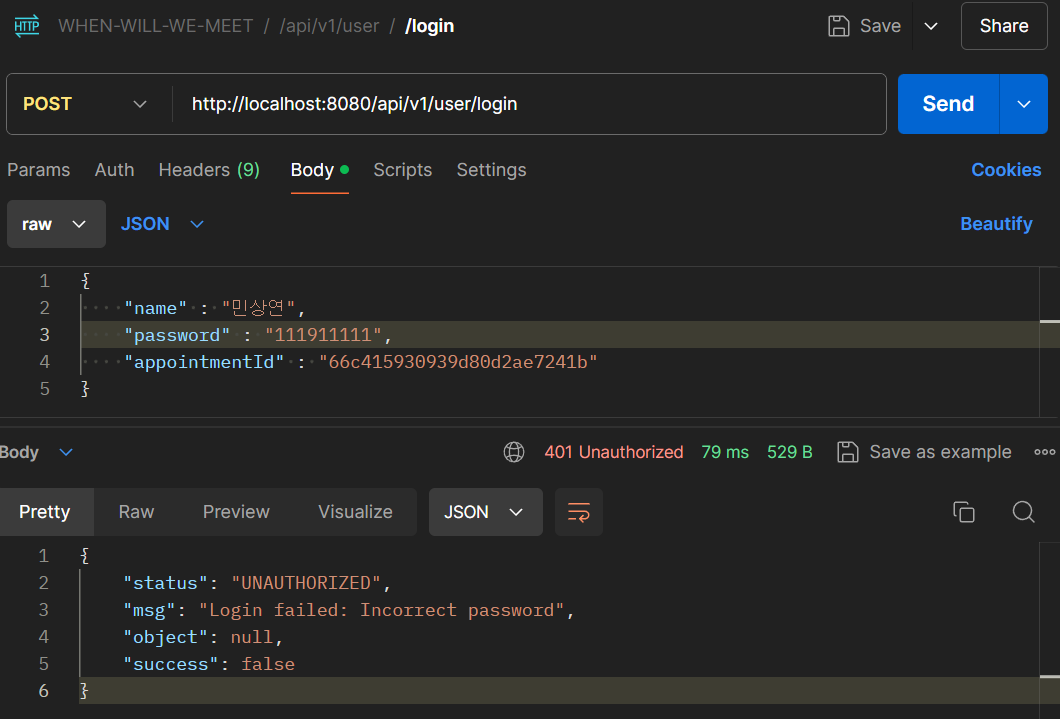 일부러 비밀번호를 틀리게 적으면 로그인이 실패하는 것을 볼 수 있다.
추후 FE 개발 시 response의 success 여부로 사용자 로그인 여부를 판단할 계획이다.
/updateUser
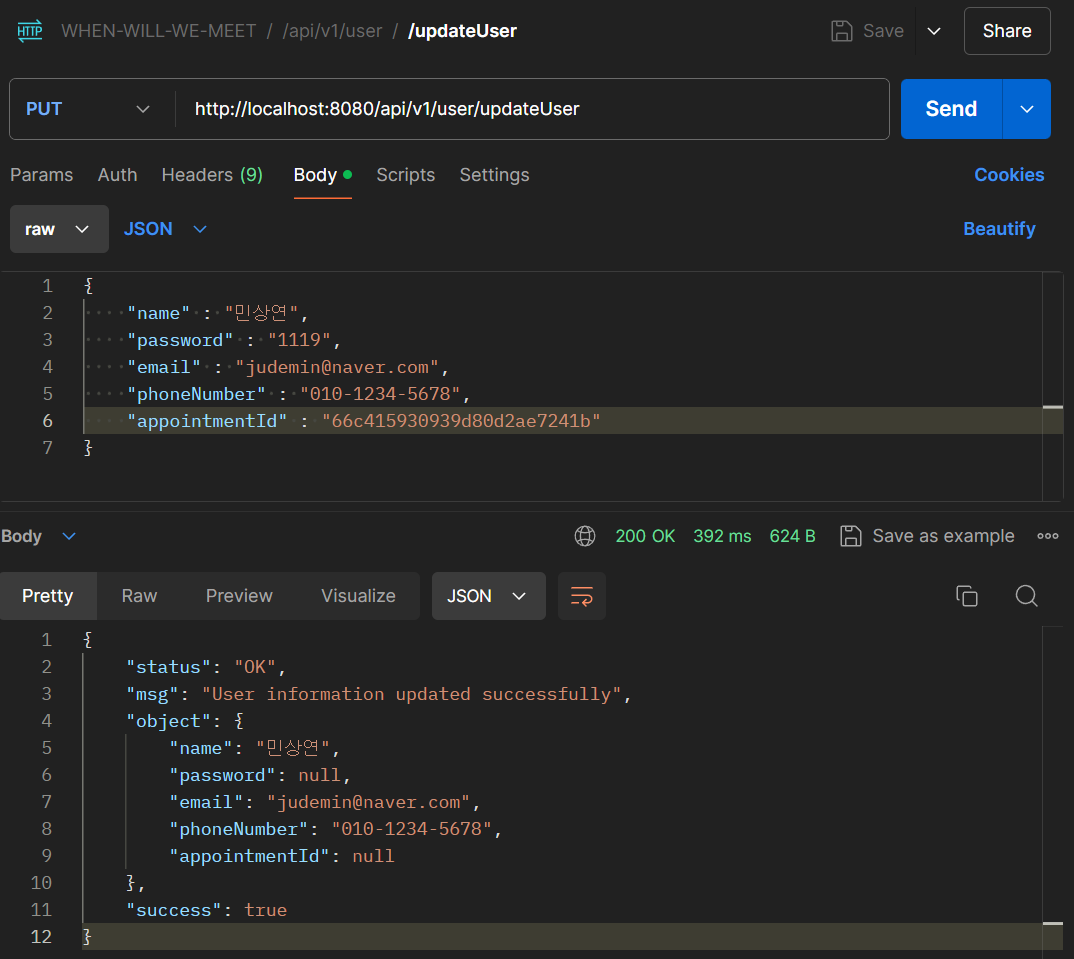 이메일과 핸드폰 번호를 추가하여 update 요청을 보내면 잘 동작하는 것을 볼 수 있고
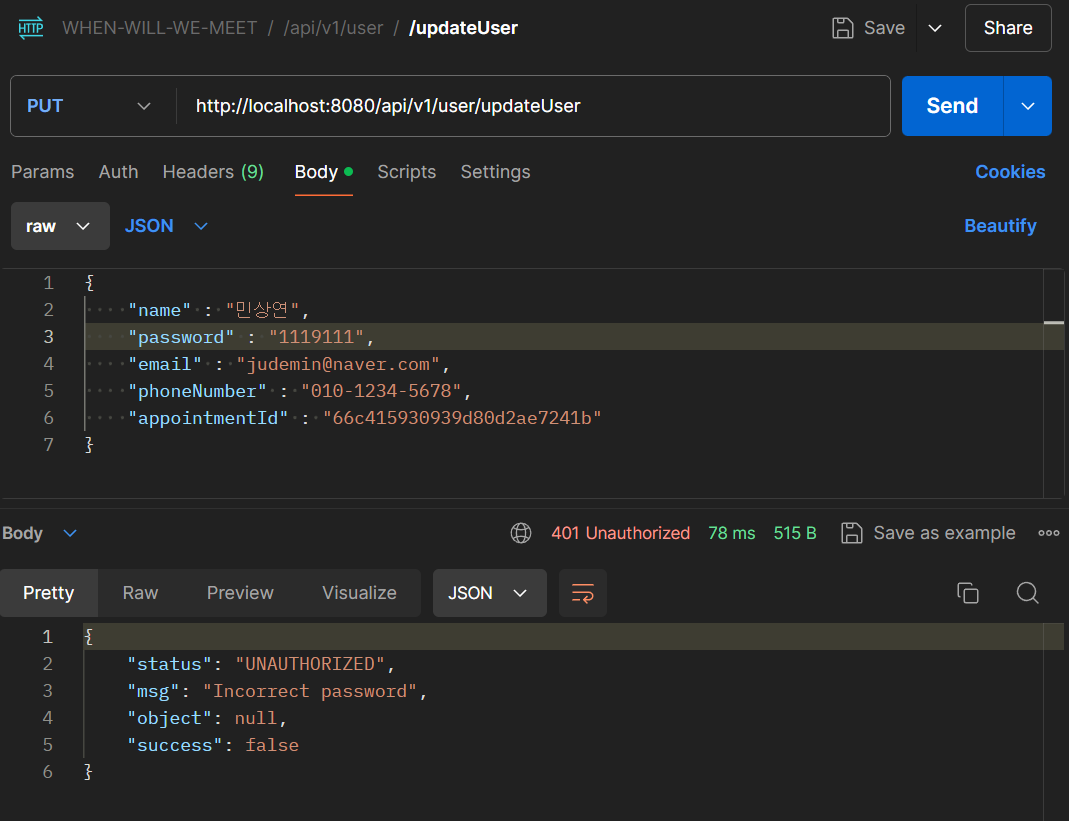 비밀번호가 틀릴경우 실패하는 것을 볼 수 있다.
/schedule API
/data/dao/ScheduleDAO.java
@Slf4j
@Component
public class ScheduleDAO {
    private final MongoTemplate mongoTemplate;

    public ScheduleDAO(MongoTemplate mongoTemplate) {
        this.mongoTemplate = mongoTemplate;
    }

    public void addUserToTimeSlot(String appointmentId, String scheduleId, LocalDateTime time, String userName, String zoneId) {
        Query query = new Query(Criteria.where("_id").is(new ObjectId(appointmentId))
                .and("schedules._id").is(scheduleId)
                .and("schedules.times.time").is(Date.from(time.atZone(ZoneId.of(zoneId)).toInstant())));

        Update update = new Update().addToSet("schedules.$[sched].times.$[slot].users", userName);

        update.filterArray(Criteria.where("sched._id").is(scheduleId));
        update.filterArray(Criteria.where("slot.time").is(Date.from(time.atZone(ZoneId.of(zoneId)).toInstant())));

        mongoTemplate.updateFirst(query, update, "appointments");
    }

    public void removeUserFromTimeSlot(String appointmentId, String scheduleId, LocalDateTime time, String userName, String zoneId) {
        Query query = new Query(Criteria.where("_id").is(new ObjectId(appointmentId))
                .and("schedules._id").is(scheduleId)
                .and("schedules.times.time").is(Date.from(time.atZone(ZoneId.of(zoneId)).toInstant())));

        Update update = new Update().pull("schedules.$[sched].times.$[slot].users", userName);

        update.filterArray(Criteria.where("sched._id").is(scheduleId));
        update.filterArray(Criteria.where("slot.time").is(Date.from(time.atZone(ZoneId.of(zoneId)).toInstant())));

        mongoTemplate.updateFirst(query, update, "appointments");
    }
}
우선 atomic하게 TimeSlot에 대해 어떤 User가 가능한지 여부를 추가하는 쿼리를 작성하기 위해 MongoTemplate를 활용하여 ScheduleDAO를 정의하였다.
또한 MongoDB의 시간의 경우 UTC를 기준으로 자동으로 변환되어 저장되는데, 저장되는 데이터를 직접 바꾸는 것보다 Appointment의 TimeZone을 기준으로 UTC 데이터를 활용할 때 변환하는 것이 더 효율적이며 항상 LocalDateTime을 사용할 때 유의하여야 한다.
/data/model/validation/ScheduleValidation.java
@Component
public class ScheduleValidation {
    public List<String> validateSchedule(Schedule schedule) {
        List<String> errors = new ArrayList<>();

        if (isNullOrEmpty(schedule.getId())) {
            errors.add("ScheduleId is required");
        }

        if (isNullOrEmpty(schedule.getAppointmentId())) {
            errors.add("AppointmentId is required");
        }

        if (isNullOrEmpty(String.valueOf(schedule.getDate()))) {
            errors.add("Date is required");
        }

        if (schedule.getTimes().isEmpty()) {
            errors.add("Time Array is required");
        } else {
            for (int i = 0; i < schedule.getTimes().size(); i++) {
                TimeSlot timeSlot = schedule.getTimes().get(i);
                if (timeSlot.getTime() == null) {
                    errors.add("Time is required for TimeSlot at index " + i);
                    break;
                }
                if (timeSlot.getUsers() == null || timeSlot.getUsers().isEmpty()) {
                    errors.add("At least one user is required for TimeSlot at index " + i);
                    break;
                } else if (isNullOrEmpty(timeSlot.getUsers().getFirst())) {
                    errors.add("First user cannot be empty for TimeSlot at index " + i);
                    break;
                }
            }
        }

        return errors;
    }

    private boolean isNullOrEmpty(String str) {
        return str == null || str.trim().isEmpty();
    }
}
이후 ScheduleValidation Class를 정의하였으며
/service/ScheduleService.java
@Slf4j
@Service
public class ScheduleService {

    @Autowired
    private AppointmentRepository appointmentRepository;

    @Autowired
    private ScheduleDAO scheduleDAO;

    @Autowired
    private AppointmentDAO appointmentDAO;

    public CommonResponse getSchedule(String appointmentId) {
        Optional<AppointmentModel> optionalAppointment = appointmentDAO.getAppointmentModelById(appointmentId);

        return optionalAppointment.map(appointmentModel -> {
            log.info("[ScheduleService]-[getSchedule] Schedule found for appointment ID: {}", appointmentId);
            return new CommonResponse(true, HttpStatus.OK, "Schedule fetched", appointmentModel.getSchedules());
        }).orElse(
                new CommonResponse(false, HttpStatus.NOT_FOUND, "Appointment not found", null)
        );
    }

    // 주어진 Schedule 정보를 기반으로 현재 Appointment 모델과 비교하여 사용자를 TimeSlot에 추가하거나 제거
    // 즉, Frontend에서 발생한 이벤트를 전달해주면 자동으로 현재 DB의 데이터와 비교하여 Toggle
    @Transactional
    public CommonResponse updateSchedule(Schedule inputSchedule, String userName) {
        try {
            String appointmentId = inputSchedule.getAppointmentId();

            // 현재 Appointment 정보를 데이터베이스에서 fetch
            Optional<AppointmentModel> appointmentOpt = appointmentRepository.findById(appointmentId);

            if (!appointmentOpt.isPresent())
                throw new RuntimeException("Appointment not found with id: " + appointmentId);

            AppointmentModel appointment = appointmentOpt.get();

            // 입력 Schedule의 ID와 일치하는 Schedule을 찾기
            Optional<Schedule> existingScheduleOpt = appointment.getSchedules().stream()
                    .filter(s -> s.getId().equals(inputSchedule.getId()))
                    .findFirst();

            if (!existingScheduleOpt.isPresent())
                throw new RuntimeException("Schedule not found in Appointment");

            Schedule existingSchedule = existingScheduleOpt.get();

            // 입력 Schedule의 각 TimeSlot에 대해 Toggle 작업을 수행
            for (TimeSlot inputTimeSlot : inputSchedule.getTimes()) {
                Optional<TimeSlot> existingTimeSlotOpt = findTimeSlotByTime(existingSchedule, inputTimeSlot.getTime());

                if (existingTimeSlotOpt.isPresent()) {
                    TimeSlot existingTimeSlot = existingTimeSlotOpt.get();
                    if (existingTimeSlot.getUsers().contains(userName)) {
                        // 사용자가 이미 존재하면 제거
                        scheduleDAO.removeUserFromTimeSlot(appointmentId, existingSchedule.getId(), inputTimeSlot.getTime(), userName, appointment.getTimeZone());
                    } else {
                        // 사용자가 존재하지 않으면 추가
                        scheduleDAO.addUserToTimeSlot(appointmentId, existingSchedule.getId(), inputTimeSlot.getTime(), userName, appointment.getTimeZone());
                    }
                } else {
                    log.error("Schedule {}, User {} TimeSlot not found : {}", inputSchedule.getDate(), userName, inputTimeSlot.getTime());
                    throw new RuntimeException("TimeSlot not found in existing Schedule");
                }
            }
            log.info("Schedule {} User {} updated", inputSchedule.getDate(), userName);
            return new CommonResponse(true, HttpStatus.OK, "Schedule [" + inputSchedule.getDate() + "], User [" + userName + "] updated");
        } catch(Exception e){
            log.error("Schedule {}, User {} update failed with : {}", inputSchedule.getDate(), userName, e.toString());
            return new CommonResponse(false, HttpStatus.INTERNAL_SERVER_ERROR, "Schedule [" + inputSchedule.getDate() + "], User [" + userName + "] update failed with : [" + e + "]");
        }
    }

    private Optional<TimeSlot> findTimeSlotByTime(Schedule schedule, LocalDateTime time) {
        return schedule.getTimes().stream()
                .filter(ts -> ts.getTime().equals(time))
                .findFirst();
    }
}ScheduleService에서 현재 Appointment 정보를 데이터베이스에서 fetch한 후 입력 Schedule의 ID와 일치하는 Schedule을 찾아 각 TimeSlot에 대해 Toggle 작업을 수행할 수 있도록 updateSchedule 메소드를 정의하였다.
/controller/ScheduleController.java
@Slf4j
@RestController
@RequestMapping("/api/v1/schedule")
public class ScheduleController {
    @Autowired
    private ScheduleService scheduleService;

    @Autowired
    ScheduleValidation scheduleValidation;

    @GetMapping(value="/getSchedule")
    public ResponseEntity<CommonResponse> getSchedule(@RequestParam("appointmentId") String appointmentId){
        log.info("[ScheduleController]-[getSchedule] API Called");

        if (appointmentId.isEmpty()) {
            log.warn("[AppointmentController]-[getAppointment] AppointmentId needed");
            CommonResponse response = new CommonResponse(false, HttpStatus.BAD_REQUEST, "AppointmentId needed");
        }

        CommonResponse response = scheduleService.getSchedule(appointmentId);
        return ResponseEntity.status(response.getStatus()).body(response);
    }

    @PutMapping(value="/updateSchedule")
    public ResponseEntity<CommonResponse> login(@Valid @RequestBody Schedule schedule){
        log.info("[ScheduleController]-[updateSchedule] API Called");

        List<String> validationErrors = scheduleValidation.validateSchedule(schedule);

        if (!validationErrors.isEmpty()) {
            log.warn("[ScheduleController]-[updateSchedule] Validation failed: {}", validationErrors);
            CommonResponse response = new CommonResponse(false, HttpStatus.BAD_REQUEST, String.join(", ", validationErrors));
            return ResponseEntity.status(response.getStatus()).body(response);
        }

        CommonResponse response = scheduleService.updateSchedule(schedule, schedule.getTimes().getFirst().getUsers().getFirst());
        return ResponseEntity.status(response.getStatus()).body(response);
    }
}
마지막으로 ScheduleController를 정의하여 API를 구현하였다.
API Validation
/updateSchedule
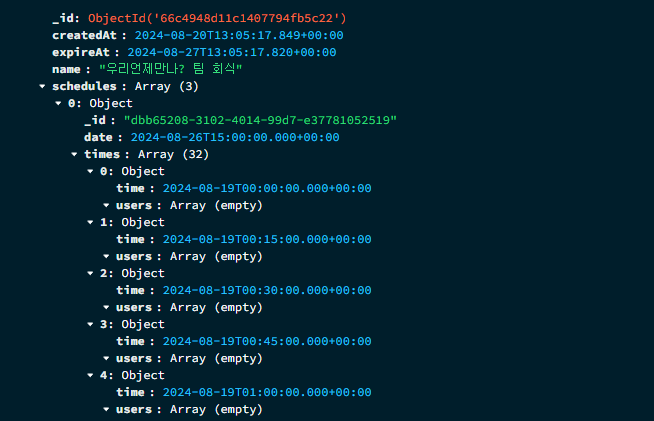 위와 같이 각 TimeSlot에 아무 데이터도 들어가 있지 않은 상태에서
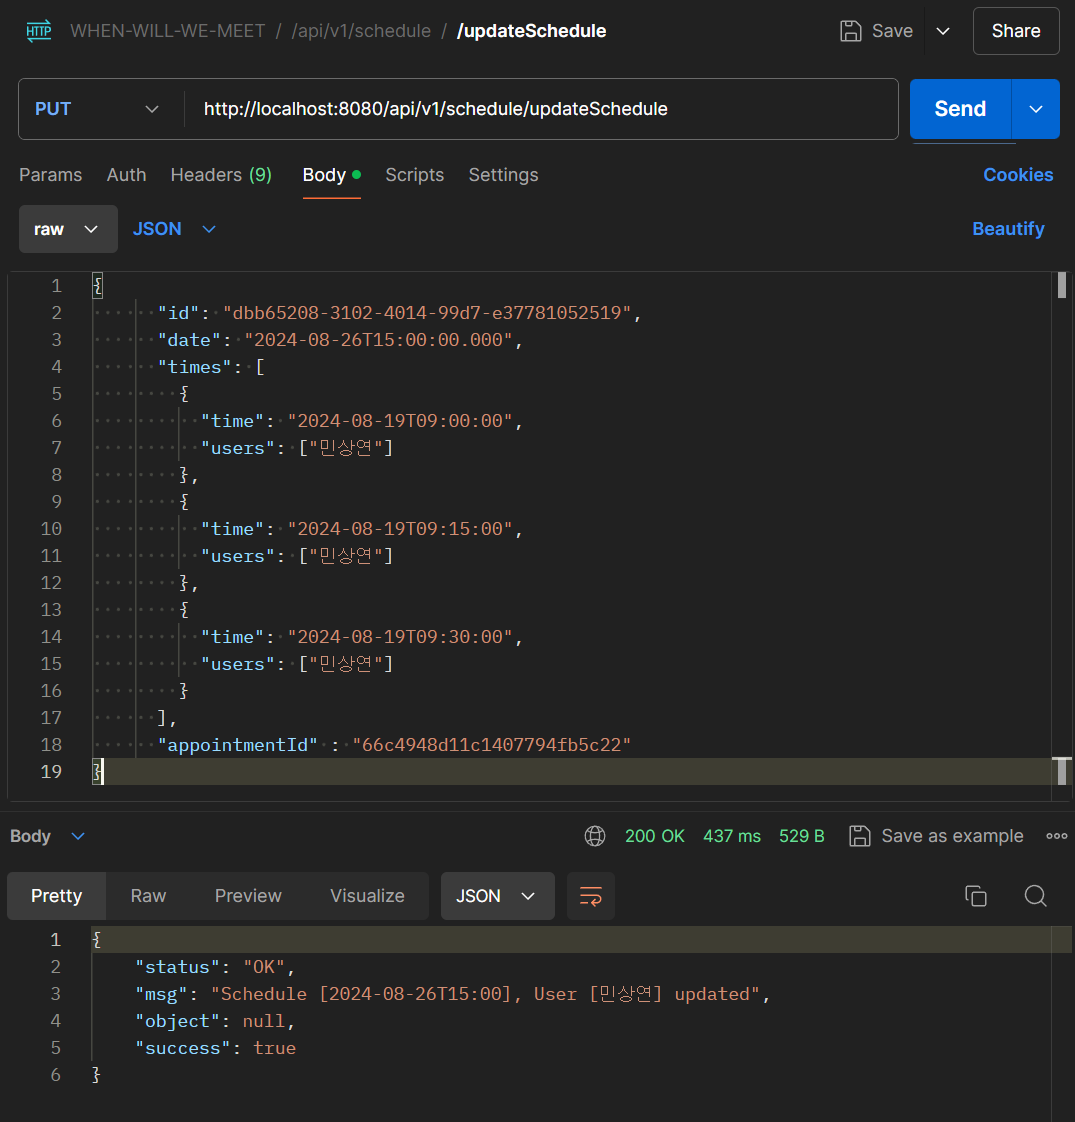
/updateSchedule 요청을 보내게 되면
 선택한 각 TimeSlot에 대해서만 가능한 사용자의 name이 입력되는 것을 볼 수 있다.
/getSchedule
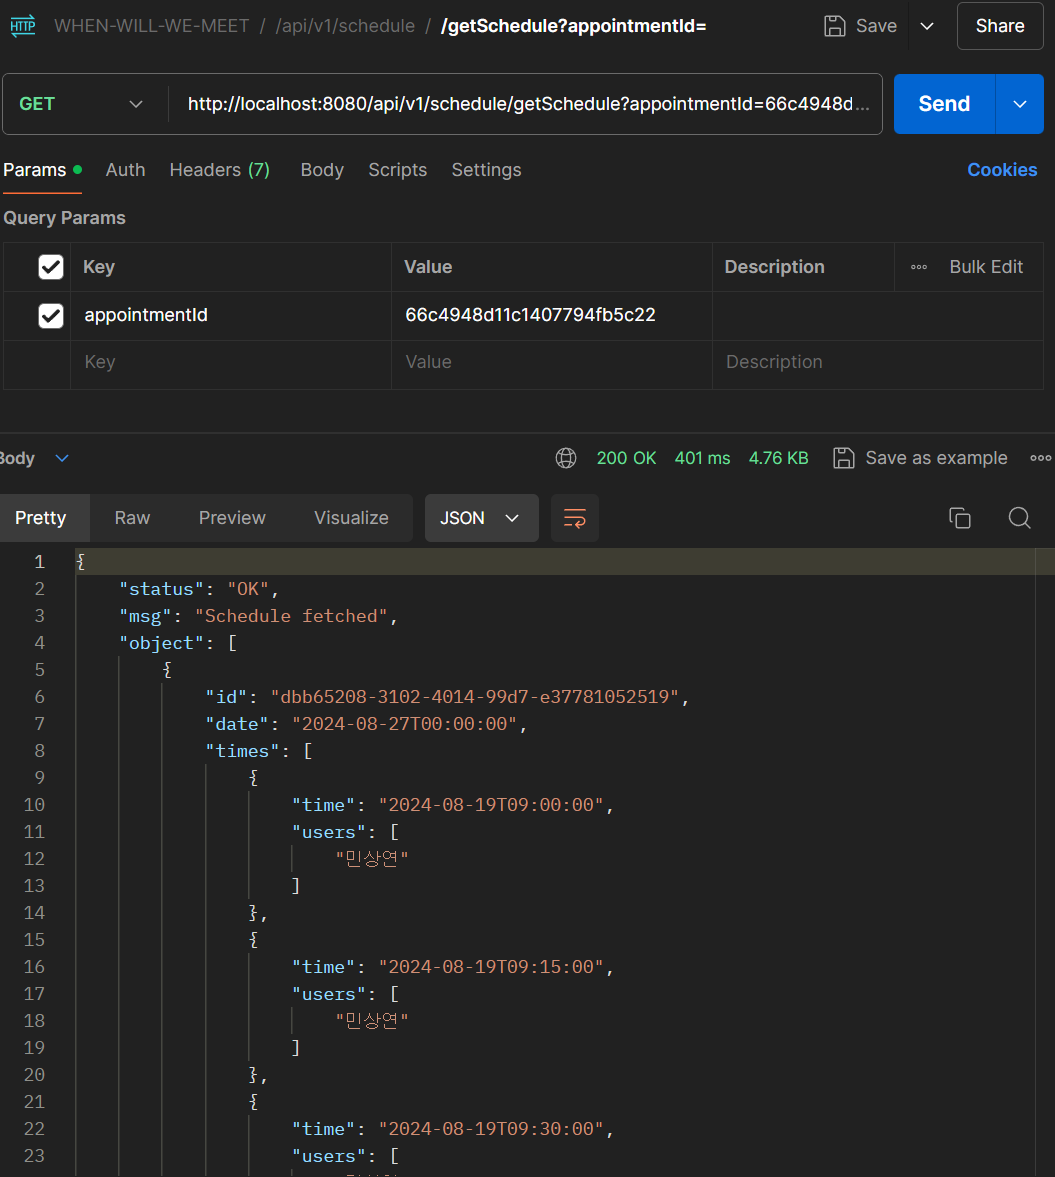 또한 위와 같이 AppointModel의 다른 데이터들 이외에 Schedule만 가져올 수 있는
 /getSchedule도 정상적으로 동작하는 것을 확인하였다.
DevOps
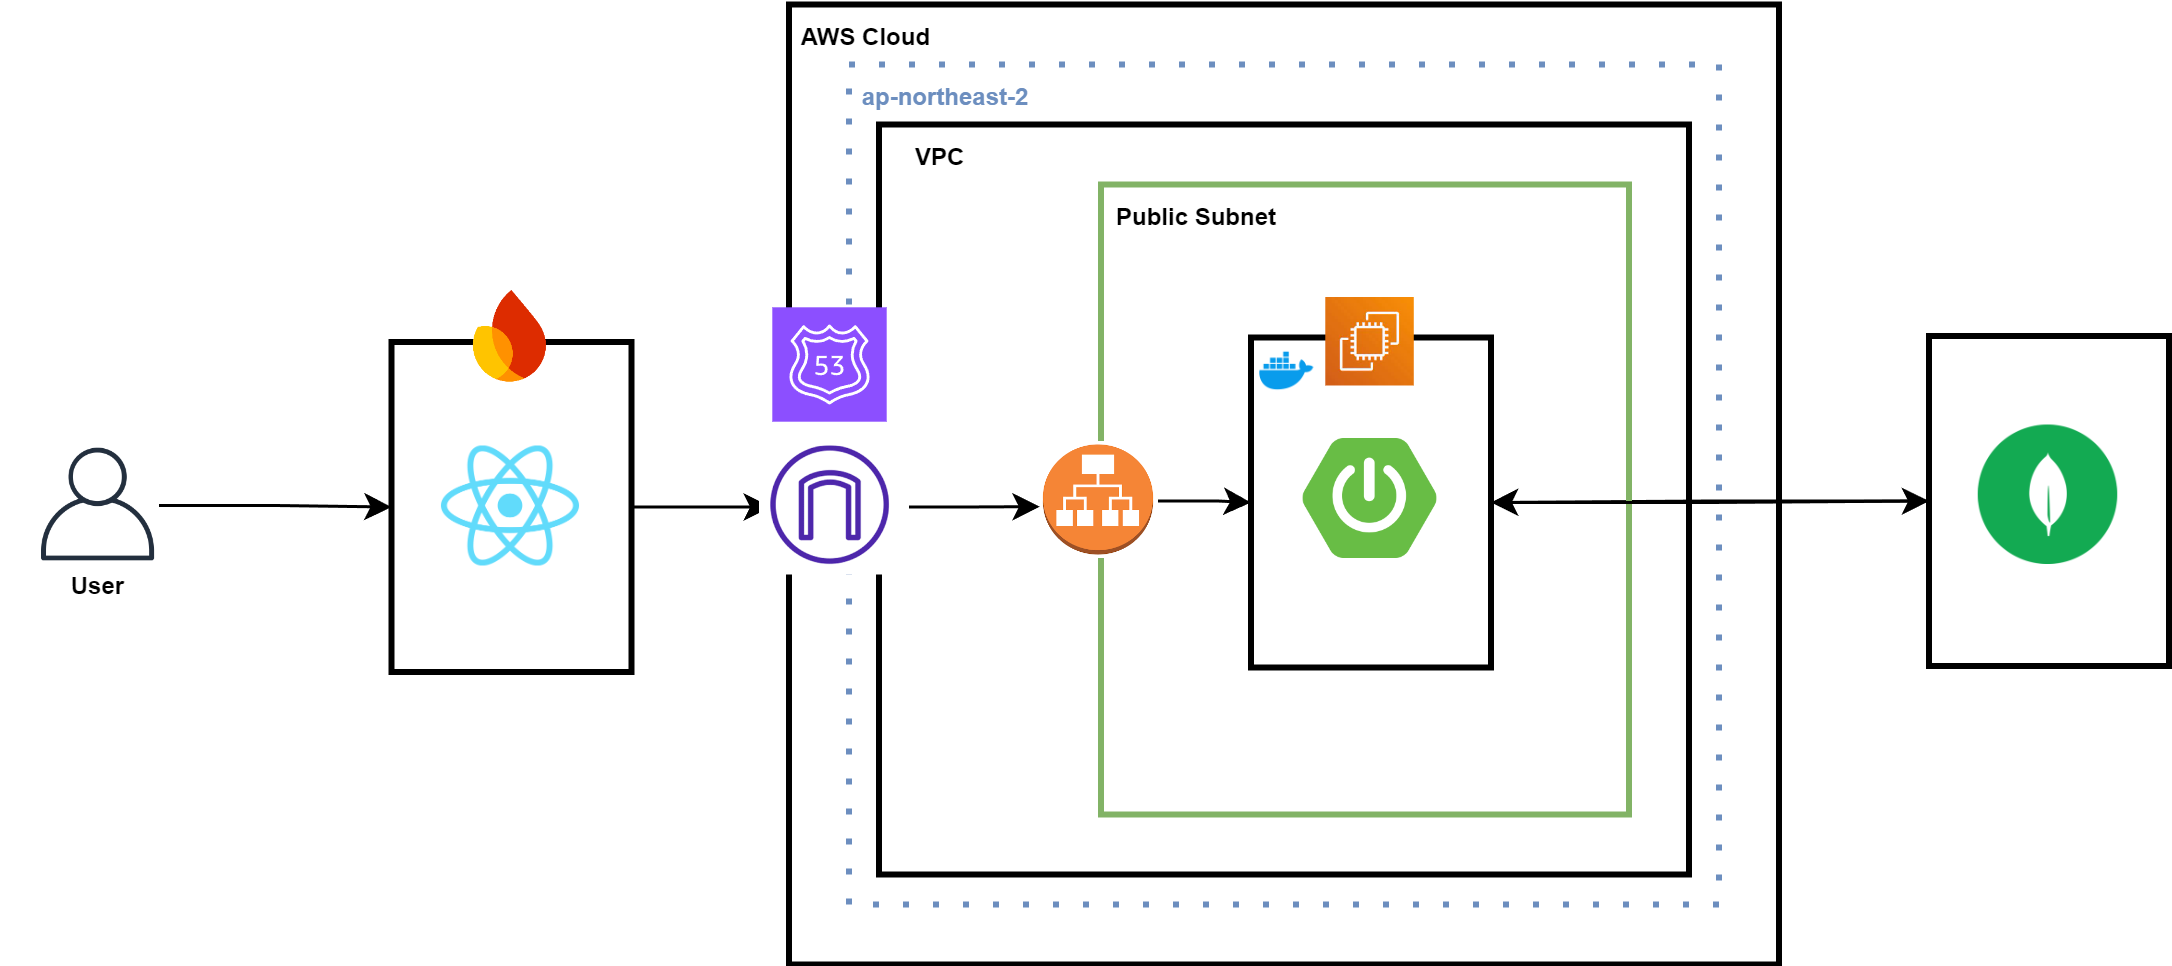
추후 위 아키텍처의 Production 환경 구축을 위해 CI Pipeline을 생성하였다.
Spring CI Pipeline
Dockerfile
FROM openjdk:17-jdk-slim

ARG JAR_FILE=build/libs/*.jar
COPY ${JAR_FILE} app.jar

EXPOSE 8080
ENTRYPOINT ["java", "-jar", "app.jar"]
우선 위와 같이 8080 포트로 서버를 EXPOSE하는 Dockerfile을 작성하고
Github Workflow
name: Spring Boot CI with Gradle

on:
  push:
    branches: [ "main" ]

permissions:
  contents: read

jobs:
  build:
    runs-on: ubuntu-latest
    steps:
      - name: checkout
        uses: actions/checkout@v3

      - name: Set up JDK 17
        uses: actions/setup-java@v3
        with:
          java-version: '17'
          distribution: 'temurin'

      ## create application-private.properties
      - name: make application-private.properties
        run: |
          ## create application-private.properties
          cd ./src/main/resources

          # application-private.properties 파일 생성
          touch ./application-private.properties

          # GitHub-Actions 에서 설정한 값을 application-private.properties 파일에 쓰기
          echo "${{ secrets.SPRING_BE_APPLICATION_PRIVATE }}" >> ./application-private.properties
        shell: bash

      # gradle build
      - name: Build with Gradle
        run: |
          chmod +x ./gradlew
          ./gradlew bootJar
        shell: bash

      - name: Set up Docker Buildx
        uses: docker/setup-buildx-action@v1

      - name: Login to DockerHub
        uses: docker/login-action@v1
        with:
          username: ${{ secrets.ORG_JUDEMIN_DOCKERHUB_USERNAME }}
          password: ${{ secrets.ORG_JUDEMIN_DOCKERHUB_PASSWORD }}

      - name: Docker build and push
        id: docker_build
        uses: docker/build-push-action@v2
        with:
          # Dockerfile이 위치한 디렉토리를 지정
          context: .
          push: true
          tags: judemin/...:latest
          # GitHub Action Cache
          cache-from: type=gha
          cache-to: type=gha,mode=max
Github Workflow 작성을 통해 Github Action에서 Gradle Build를 수행하고 Docker 이미지를 생성한 다음 Push할 수 있도록 하였다.
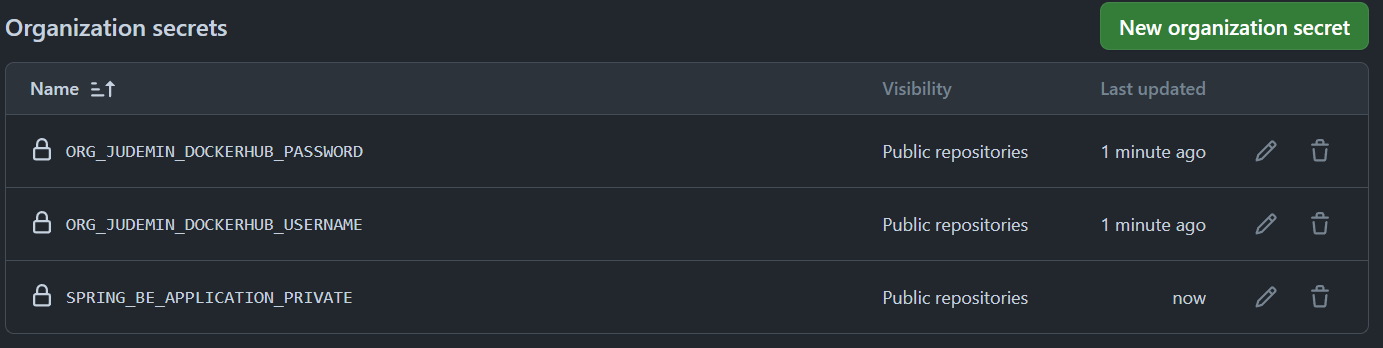 Github Action을 위해 Organization Secret을 위와 같이 정의하였으며
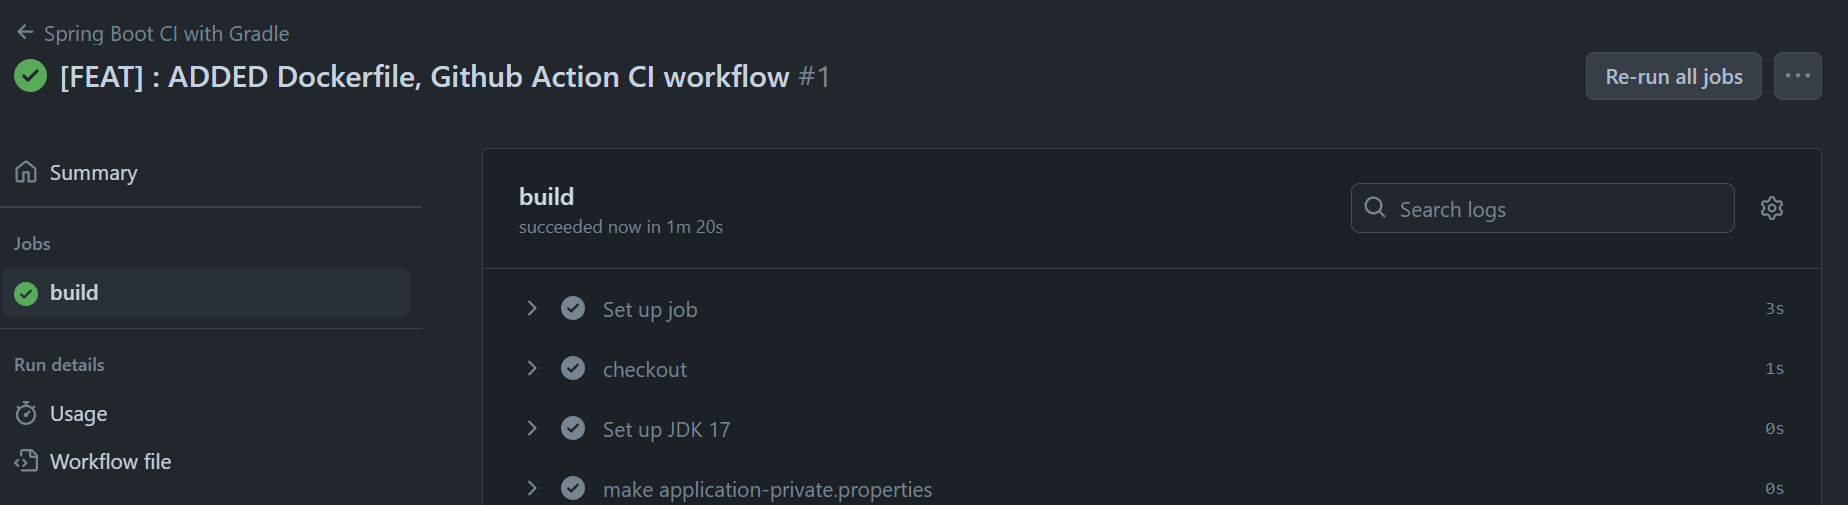 Workflow가 정상적으로 완료된 것을 확인하였다.
Firebase Official Account
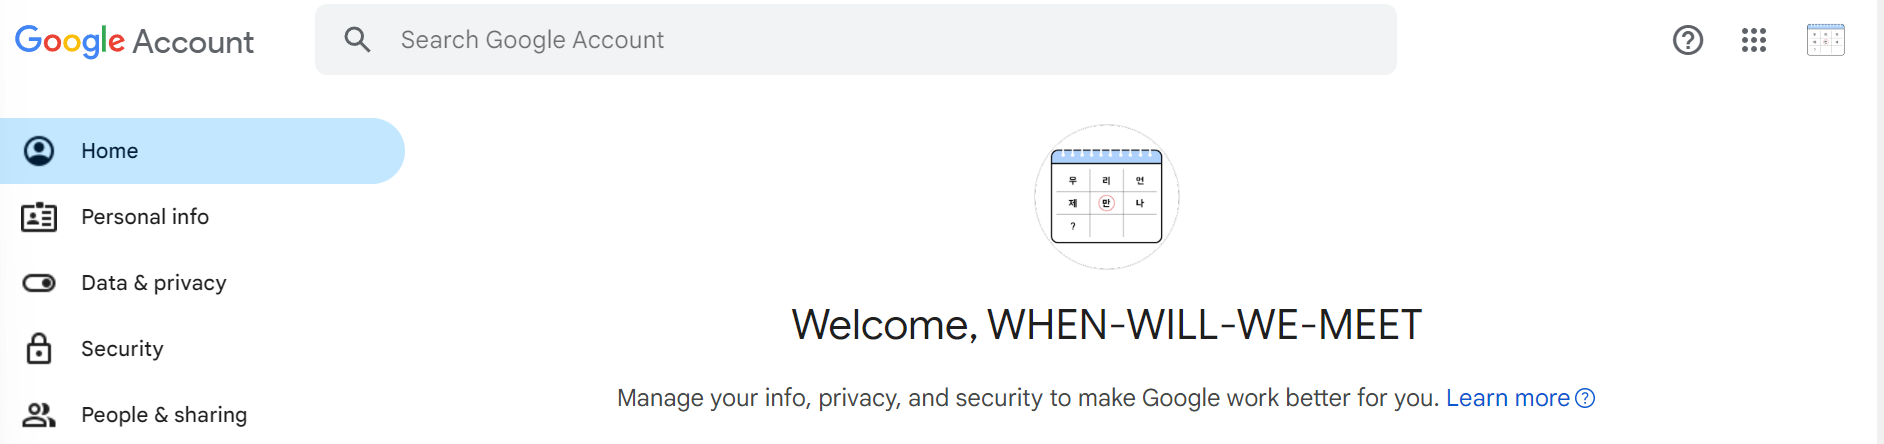
 또한 추후 FE 호스팅 및 서비스 운영을 위해 공식 Google 계정을 생성하였으며 Firebase 프로젝트까지 생성하였다.
이렇게 Spring-BE는 개발이 완료되었고, 추후 디자인 및 FE 개발 진행에 맞추어 함께 기능 개발을 진행할 예정이다.