❤️ 정적 컨텐츠
: 파일 자체를 웹 브라우저에 전달
스프링 부트 정적 컨텐츠 기능
Spring Boot serves static content from a directory called
/static(or/publicor/resourcesor/META-INF/resources) in the classpath or from the root of theServletContext.
공식 문서 참고
- 스프링 부트에서는 정적 컨텐츠 제공 기능을 자동 지원
src/main/resources/static에hello-static.html파일 생성 후 작성<!DOCTYPE HTML> <html> <head> <title>static content</title> <meta http-equiv="Content-Type" content="text/html; charset=UTF-8" /> </head> <body> 정적 컨텐츠 입니다. </body> </html>- 서버를 동작시키고
localhost:8080/hello-static.html을 요청
동작과정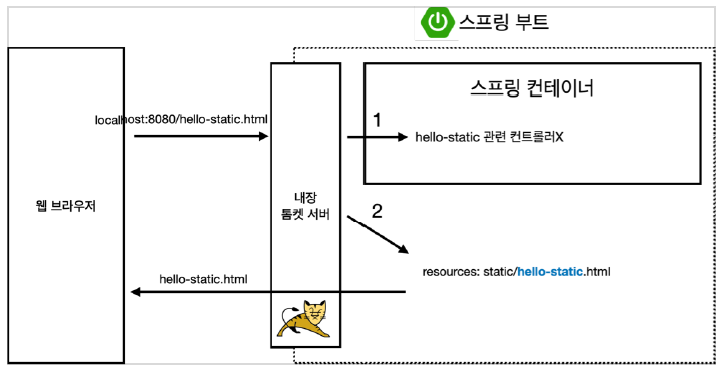
- 웹 브라우저에서
localhost:8080/hello-static.html요청 - 내장 톰캣 서버가 먼저 요청을 받고 스프링 컨테이너의 컨트롤러에서
hello-static이 있는지 확인 - 관련 컨트롤러가 없으므로
resources/static에서hello-static.html을 찾음 hello-static.html을 반환 (화면에 출력)
❤️ MVC와 템플릿 엔진
: 서버에서 html파일을 변환 후 전달
✔️ MVC
: Model, View, Controller
- view : 화면에 보여주기 위한 것
- Model, Controller : 비즈니스 로직, 내부적인 것을 처리
✔️ 템플릿 엔진
: 템플릿 양식과 특정 데이터 모델에 따른 입력 자료를 결합하여 원하는 결과 문서를 출력하는 소프트웨어(또는 컴포넌트)
→ SSR(Server Side Rendering)
- Controller
@Controller public class HelloController { @GetMapping("hello-mvc") public String helloMvc(@RequestParam("name") String name, Model model) { model.addAttribute("name", name); return "hello-template"; } } - View
:resources/templates에hello-template.html을 생성 후 작성<html xmlns:th="http://www.thymeleaf.org"> <body> <p th:text="'hello ' + ${name}">hello! empty</p> </body> </html> http://localhost:8080/hello-mvc?name=spring!!!!을 요청

동작과정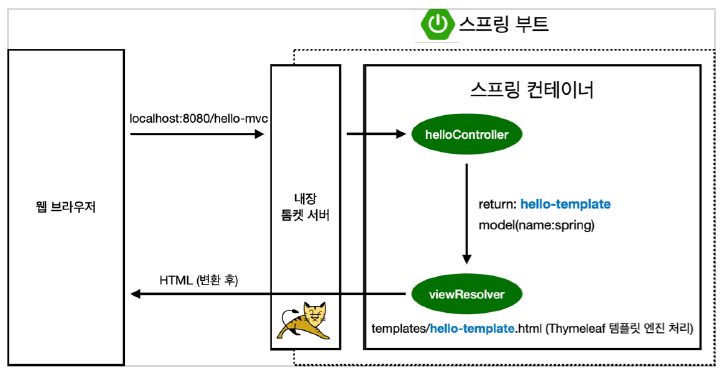
- 웹 브라우저에서
localhost:8080/hello-mvc?name=spring!!!!요청 - 내장 톰캣 서버가 먼저 요청을 받고 스프링 컨테이너의 컨트롤러에서
hello-mvc에 매핑이 되어있는지 확인 - 메서드 호출하고
hello-template으로 리턴 - ViewResolver가
hello-template.html을 찾아 Thymeleaf 템플릿 엔진으로 넘김 - Thymeleaf 템플릿 엔진이 렌더링 후 변환을 거친 html을 반환
❤️ API
: xml이나 JSON(default)으로 client에게 전달, 서버끼리 통신할 때 사용
@ResponseBody 문자 반환
-
Controller 작성
@GetMapping("hello-spring") @ResponseBody public String helloSpring(@RequestParam("name") String name) { return "hello" + name; // http 응답 바디에 문자 그대로 반환 }@ResponseBody를 사용하면 뷰 리졸버( viewResolver )를 사용하지 않음- 대신, HTTP의 BODY에 문자 내용을 직접 반환
-
http://localhost:8080/hello-spring?name=spring!!을 요청 -
viewResolver를 사용하지 않았기 때문에 스크립트를 확인했을 때 해당 문자만 확인할 수 있음

@ResponseBody 객체 반환
-
Controller 작성
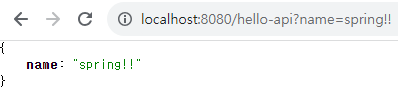
@GetMapping("hello-api") @ResponseBody public Hello helloApi(@RequestParam("name") String name) { Hello hello = new Hello(); hello.setName(name); return hello; } static class Hello { private String name; public String getName() { return name; } public void setName(String name) { this.name = name; } }@ResponseBody를 사용하고, 객체를 반환하면 JSON으로 변환됨
-
http://localhost:8080/hello-api?name=spring!!을 요청하면 json형식으로 화면에 나타남
동작과정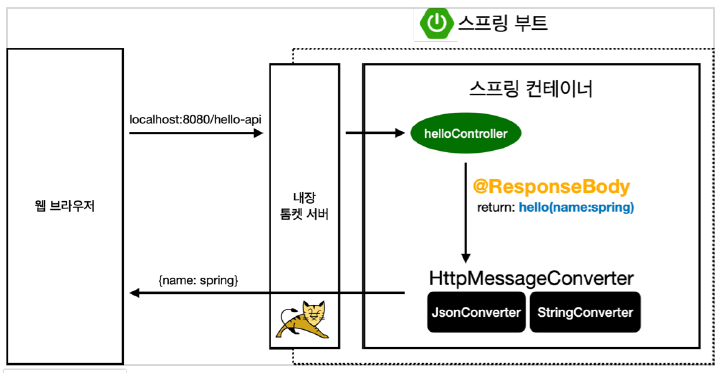
- 웹 브라우저에서
http://localhost:8080/hello-api?name=spring!!요청 - 내장 톰캣 서버가 먼저 요청을 받고 스프링 컨테이너의 컨트롤러에서
hello-api에 매핑이 되어있는지 확인 @ResponseBody애노테이션이 붙어 있을 경우, 문자를 반환하면 HTTP BODY로 문자 그대로 반환@ResponseBody애노테이션이 붙어 있을 경우, 객체를 반환하면 JSON방식으로 데이터를 만들어 반환
@ResponseBody사용
- HTTP의 BODY에 문자 내용을 직접 반환
viewResolver대신에HttpMessageConverter가 동작- 기본 문자처리:
StringHttpMessageConverter- 기본 객체처리:
MappingJackson2HttpMessageConverter- byte 처리 등등 기타 여러
HttpMessageConverter가 기본으로 등록되어 있음
출처 - 인프런 '스프링 입문' 강의

🦋개발 공부 기록🦋