UITableView
- 세로 스크롤(가로 ❌)을 통해 목록을 표시해주는 뷰 (ex: 연락처 목록, 채팅 목록 등)
UITableView: 화면에 보일 셀만 그림dataSource: 실제 셀의 데이터를 알려줌delegate: 사용자 인터랙션(클릭 등)을 처리함- 항상 Delegate + DataSource가 필요
- 셀을 재사용하여 스크롤이 빠르고 메모리 사용이 적음
| 구성요소 | 설명 |
|---|
| Cell | 목록에 보이는 각각의 항목 (UITableViewCell) |
| Section | Cell들을 묶는 구간 (옵션) |
| Header/Footer | 섹션마다 붙는 설명 뷰 (옵션) |
| DataSource | 어떤 Cell을 보여줄지 알려주는 데이터 담당 |
| Delegate | 셀 클릭, 높이 설정 등 동작 담당 |
필수 메서드들
1. UITableViewDataSource (데이터 제공자)
extension MyTableViewController: UITableViewDataSource {
func tableView(_ tableView: UITableView, numberOfRowsInSection section: Int) -> Int {...}
func tableView(_ tableView: UITableView, cellForRowAt indexPath: IndexPath) -> UITableViewCell {...}
}
2. UITableViewDelegate (동작 제어)
extension MyTableViewController: UITableViewDelegate {
func tableView(_ tableView: UITableView, didSelectRowAt indexPath: IndexPath) {...}
}
func tableView(_ tableView: UITableView, heightForRowAt indexPath: IndexPath) -> CGFloat
1. 전체 테이블 상단 헤더
tableView.tableHeaderView: 테이블 맨 위의 전체 헤더 (1개만 가능)
let headerView = UILabel()
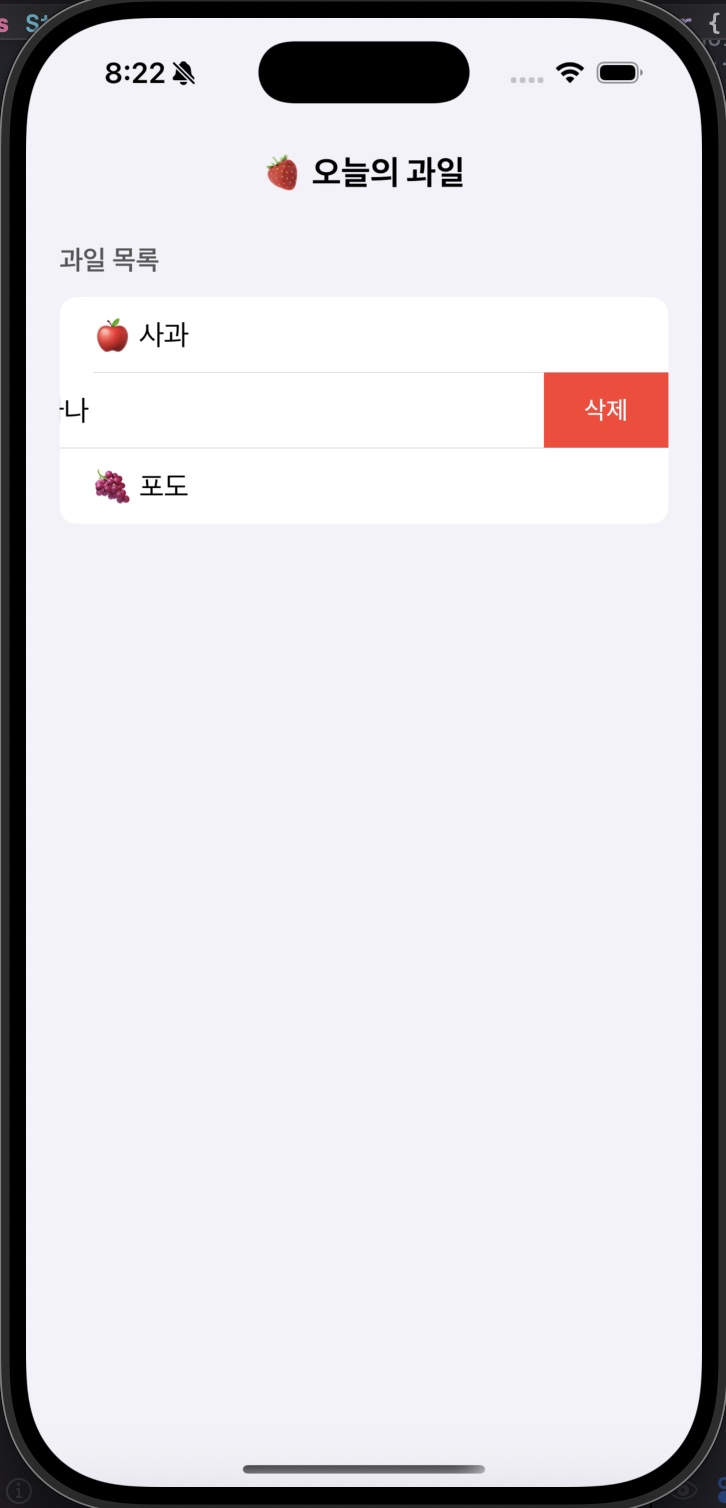
headerView.text = "🍓 오늘의 과일"
headerView.textAlignment = .center
headerView.font = .systemFont(ofSize: 20, weight: .bold)
headerView.frame = CGRect(x: 0, y: 0, width: view.frame.width, height: 60)
tableView.tableHeaderView = headerView
2. 각 섹션별 헤더
기본 텍스트 헤더
UITableViewDataSource의 메서드titleForHeaderInSection: 섹션 텍스트 헤더
func tableView(_ tableView: UITableView, titleForHeaderInSection section: Int) -> String? {
    return "과일 목록"
}
커스텀 뷰 헤더
UITableViewDelegate의 메서드viewForHeaderInSection: 섹션 커스텀 헤더 (UILabel, UIView 등 사용 가능)heightForHeaderInSection: 섹션 헤더 높이 (기본값 0이면 안 보임)
func tableView(_ tableView: UITableView, viewForHeaderInSection section: Int) -> UIView? {
    let label = UILabel()
    label.text = "과일 목록"
    label.backgroundColor = .systemGroupedBackground
    label.font = .boldSystemFont(ofSize: 16)
    label.textColor = .darkGray
    label.textAlignment = .left
    label.frame = CGRect(x: 0, y: 0, width: tableView.frame.width, height: 44)
    return label
}

func tableView(_ tableView: UITableView, heightForHeaderInSection section: Int) -> CGFloat {
    return 44
}
셀 삭제 스와이프 추가
UITableViewDelegate의 메서드canEditRowAt: 셀 편집(삭제, 이동, 삽입 등) 가능 여부를 설정trailingSwipeActionsConfigurationForRowAt: 커스텀 스와이프(오른쪽 → 왼쪽) 버튼을 설정 (iOS 11 이상에서 사용 가능)
func tableView(_ tableView: UITableView, canEditRowAt indexPath: IndexPath) -> Bool {
return true
}
func tableView(_ tableView: UITableView,
trailingSwipeActionsConfigurationForRowAt indexPath: IndexPath)
-> UISwipeActionsConfiguration? {
let delete = UIContextualAction(style: .destructive, title: "삭제") { _, _, completion in
self.fruits.remove(at: indexPath.row)
tableView.deleteRows(at: [indexPath], with: .automatic)
completion(true)
}
return UISwipeActionsConfiguration(actions: [delete])
}
전체 코드
1. UIViewController
import UIKit
class MyTableViewController: UIViewController {
let tableView = UITableView(frame: .zero, style: .insetGrouped)
var fruits = ["🍎 사과", "🍌 바나나", "🍇 포도"]
override func viewDidLoad() {
super.viewDidLoad()
let headerView = UILabel()
headerView.text = "🍓 오늘의 과일"
headerView.textAlignment = .center
headerView.font = .systemFont(ofSize: 20, weight: .bold)
headerView.frame = CGRect(x: 0, y: 0, width: view.frame.width, height: 60)
tableView.tableHeaderView = headerView
view.addSubview(tableView)
tableView.frame = view.bounds
tableView.dataSource = self
tableView.delegate = self
tableView.rowHeight = UITableView.automaticDimension
tableView.estimatedRowHeight = 44
tableView.register(UITableViewCell.self, forCellReuseIdentifier: "cell")
}
}
2. UITableViewDataSource
extension MyTableViewController: UITableViewDataSource {
func tableView(_ tableView: UITableView, numberOfRowsInSection section: Int) -> Int {
return fruits.count
}
func tableView(_ tableView: UITableView, cellForRowAt indexPath: IndexPath) -> UITableViewCell {
let cell = tableView.dequeueReusableCell(withIdentifier: "cell", for: indexPath)
cell.textLabel?.text = fruits[indexPath.row]
return cell
}
}
3. UITableViewDelegate
extension MyTableViewController: UITableViewDelegate {
func tableView(_ tableView: UITableView, viewForHeaderInSection section: Int) -> UIView? {
let label = UILabel()
label.text = "과일 목록"
label.backgroundColor = .systemGroupedBackground
label.font = .boldSystemFont(ofSize: 16)
label.textColor = .darkGray
label.textAlignment = .left
label.frame = CGRect(x: 0, y: 0, width: tableView.frame.width, height: 44)
return label
}
func tableView(_ tableView: UITableView, heightForHeaderInSection section: Int) -> CGFloat {
return 44
}
func tableView(_ tableView: UITableView, didSelectRowAt indexPath: IndexPath) {
print("선택한 과일: \(fruits[indexPath.row])")
tableView.deselectRow(at: indexPath, animated: true)
}
func tableView(_ tableView: UITableView, canEditRowAt indexPath: IndexPath) -> Bool {
return true
}
func tableView(_ tableView: UITableView,
trailingSwipeActionsConfigurationForRowAt indexPath: IndexPath)
-> UISwipeActionsConfiguration? {
let delete = UIContextualAction(style: .destructive, title: "삭제") { _, _, completion in
self.fruits.remove(at: indexPath.row)
tableView.deleteRows(at: [indexPath], with: .automatic)
completion(true)
}
return UISwipeActionsConfiguration(actions: [delete])
}
}
4. 결과 화면