☕ 개요
이번 글에서는 지난 글에 이어서 Spring AOP에 대해서 좀 더 자세히 알아보도록 하겠다.
본격적으로 시작하기에 앞서서 AOP에서 자주 언급될 용어들을 먼저 정리해보도록 하자.
Sping AOP 관련 용어 정리
💡 스프링의 ProxyFactory를 사용할 때, 나오는 개념인 Pointcut이 AOP에서는 Join point, Pointcut으로 역할에 따라서 나뉘어졌다.
- Join point : Advice가 적용될 수 있는 위치를 나타내는 추상적인 개념
- Pointcut : Advice가 적용될 위치를 선별하는 역할
- Target : Advice를 받는 객체. 즉, 프록시가 적용되는 객체
- Advice : 프록시가 갖고 있는 부가 기능
- Aspect : Advice n개 + Pointcut n개의 세트. @Aspect
- Advisor : Advice 1개 + Pointcut 1개의 세트
- Weaving : Pointcut으로 결정한 Target에 Advice를 적용한 것을 의미
💻 예제 코드
1. Repository, Service
먼저, 매우 간단한 기능을 갖고 있는 Service클래스 하나와 Repositor클래스를 하나 만들어주자.
import lombok.extern.slf4j.Slf4j;
import org.springframework.stereotype.Repository;

@Slf4j
@Repository
public class OrderRepository {

    public String save(String itemId) {
        return itemId + "ok";
    }

}
import lombok.RequiredArgsConstructor;
import lombok.extern.slf4j.Slf4j;
import org.springframework.stereotype.Service;
@Slf4j
@Service
@RequiredArgsConstructor
public class OrderService {
private final OrderRepository orderRepository;
public void orderItem(String itemId) {
orderRepository.save(itemId);
}
}실질적인 기능은 없는 껍데기만 있는 클래스들이다.
2. 분리된 포인트 컷
포인트 컷을 Aspect 클래스 안에 메서드로 만들어도 되지만, 이번에는 포인트컷만을 관리하는 클래스를 따로 만들어보도록 하겠다.
import org.aspectj.lang.annotation.Pointcut;

public class Pointcuts {

    @Pointcut("execution(* hello.springaop.aop.order..*(..))")
    public void orderPackage() {} // Pointcut signature

    @Pointcut("execution(* *..*Service.*(..))")
    public void allService(){}

    @Pointcut("allService() && orderPackage()")
    public void orderService(){}

}- orderPackage :
order패키지 하위의 모든 클래스, 메서드를 가리킨다. - allservice :
xxxService와 같은 이름의 클래스를 가리킨다. - orderService : order패키지 하위에 Service클래스들을 가리킨다.
3. Aspect 클래스 만들기
import lombok.extern.slf4j.Slf4j;
import org.aspectj.lang.ProceedingJoinPoint;
import org.aspectj.lang.Signature;
import org.aspectj.lang.annotation.Around;
import org.aspectj.lang.annotation.Aspect;
import org.springframework.stereotype.Component;

@Slf4j
@Aspect
@Component
public class BasicAspect {

    @Around("hello.springaop.aop.order.aop.Pointcuts.orderPackage()")
    public Object doLog(ProceedingJoinPoint joinPoint) throws Throwable {
        Signature signature = joinPoint.getSignature();
        log.info("[Call] {}", signature);
        return joinPoint.proceed();
    }

    @Around("hello.springaop.aop.order.aop.Pointcuts.orderService()")
    public Object doTransaction(ProceedingJoinPoint joinPoint) throws Throwable{
        Signature signature = joinPoint.getSignature();
        try {
            log.info("[Transaction start] {}", signature);
            Object result = joinPoint.proceed();
            log.info("[Transaction end] {}", signature);
            return result;
        } catch (Exception e) {
            log.info("[Transaction rollback] {}", signature);
            throw e;
        }
    }

}
2개의 부가 기능이 명시된 Aspect 클래스이다.
하나는 메서드가 호출될 때, 그 정보를 출력하는 기능(doLog())이고, 또 하나는 트랜잭션의 시작과 끝 그리고 에러가 발생한 경우에 로그를 출력하는 기능(doTransaction)이다.
Pointcut은 이전에 만든 Pointcuts 클래스에서 참조하는 형태로 구성하였다.
그리고 좀 더 부연 설명을 하자면, @Aspect 어노테이션이 붙어 있기 때문에 스프링의 자동 프록시 생성기에 의해서 Advisor로 등록이 되기에 원하는 기능에 프록시를 적용할 수 있는 것이다. 또, 중요한 점은 이 클래스를 반드시 Bean으로 등록해주어야한다는 점이다.
4. 동작 확인하기
import hello.springaop.aop.order.OrderRepository;
import hello.springaop.aop.order.OrderService;
import lombok.extern.slf4j.Slf4j;
import org.junit.jupiter.api.DisplayName;
import org.junit.jupiter.api.Test;
import org.springframework.beans.factory.annotation.Autowired;
import org.springframework.boot.test.context.SpringBootTest;

@Slf4j
@SpringBootTest
public class AopTest {
    @Autowired
    private OrderService orderService;
    @Autowired
    private OrderRepository orderRepository;

    @Test
    @DisplayName("실행")
    public void 실행() throws Exception {

        orderService.orderItem("hello");

    }
}
위와 같이 테스트 코드를 작성해서 실행해보면, 아래와 같이 정상적으로 프록시가 적용된 것을 확인할 수 있다.
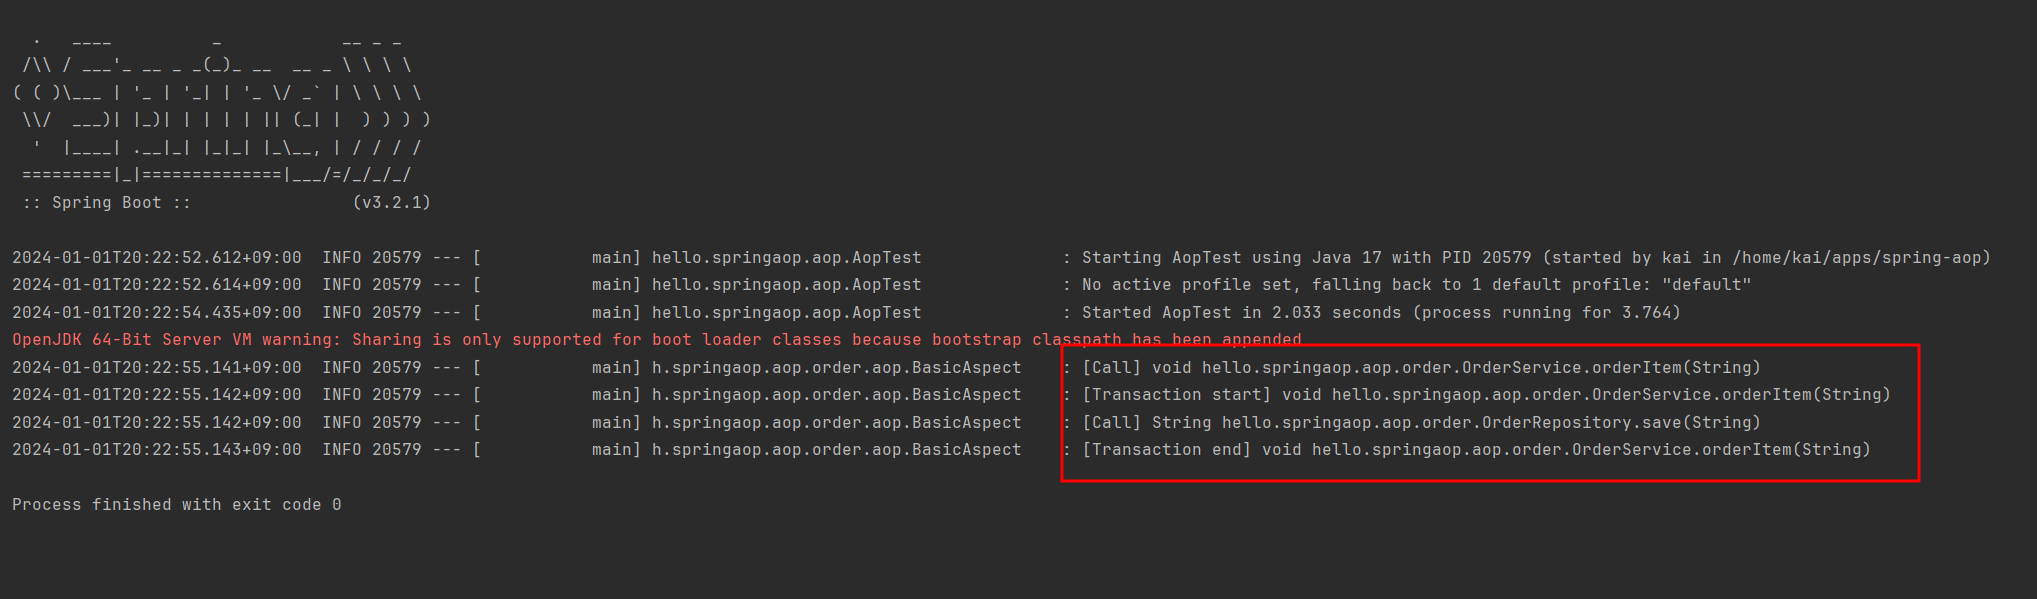
즉, 비지니스 로직을 전혀 건들지 않고 부가 기능을 적용한 것이다.
5. 프록시 적용 순서 정하기
3번의 Aspect클래스에는 2개의 부가 기능에 대해서 순서가 명시되어 있지 않다. 그래서 특정 부가 기능이 반드시 먼저 적용되어야하는 상황이라면, 문제가 생길 수 있다.
그래서 이번에는 순서를 설정할 수 있는 형태로 Aspect 클래스를 변경해보도록 하겠다.
순서는 @Aspect가 붙은 클래스에만 적용할 수 있으므로, 부가 기능마다 클래스를 만들어줘야하는 특징이 있다.
import lombok.extern.slf4j.Slf4j;
import org.aspectj.lang.ProceedingJoinPoint;
import org.aspectj.lang.Signature;
import org.aspectj.lang.annotation.Around;
import org.aspectj.lang.annotation.Aspect;
import org.springframework.core.annotation.Order;
import org.springframework.stereotype.Component;

@Slf4j
public class BasicAspect2 {

    @Aspect
    @Order(2)
    @Component
    public static class LogAspect {
        @Around("hello.springaop.aop.order.aop.Pointcuts.orderPackage()")
        public Object doLog(ProceedingJoinPoint joinPoint) throws Throwable {
            Signature signature = joinPoint.getSignature();
            log.info("[Call] {}", signature);
            return joinPoint.proceed();
        }
    }

    @Aspect
    @Order(1)
    @Component
    public static class TxAspect {
        @Around("hello.springaop.aop.order.aop.Pointcuts.orderService()")
        public Object doTransaction(ProceedingJoinPoint joinPoint) throws Throwable{
            Signature signature = joinPoint.getSignature();
            try {
                log.info("[Transaction start] {}", signature);
                Object result = joinPoint.proceed();
                log.info("[Transaction end] {}", signature);
                return result;
            } catch (Exception e) {
                log.info("[Transaction rollback] {}", signature);
                throw e;
            }
        }
    }

}
트랜잭션 관련 부가 기능이 먼저 적용되고, 로그 관련 부가 기능이 적용되도록 하였다. 물론, 이 두개의 기능을 BasicAcpect2라는 클래스로 묶지 않고 각가의 클래스로 만들어서 관리해도 된다.
6. 동작 확인 2
4번에서 작성한 테스트 코드를 다시 실행해서 프록시의 적용 순서가 보장되었는지 확인해보자.
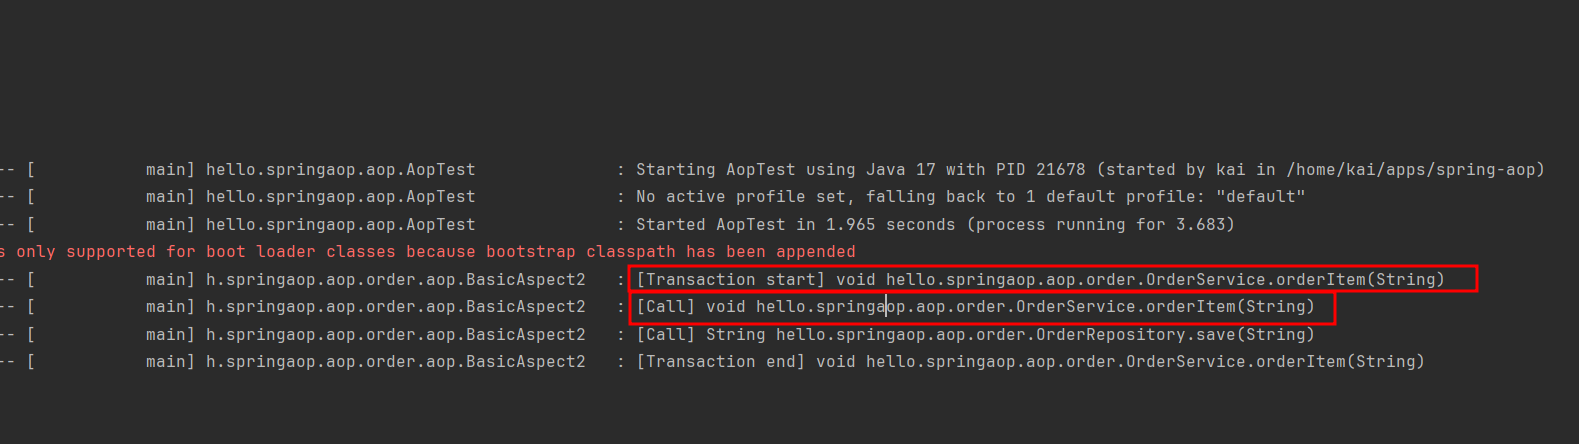
4번의 결과와 달리 트랜잭션 프록시가 먼저 실행되고, 그 후에 로그 프록시가 실행이 되는 것을 확인할 수 있다.
📒 Advice의 종류
위 예제 코드를 통해서 Spring AOP의 동작 방식에 대해서 알아보았다. 그리고 @Around라는 막상한 어노테이션을 통해서 Advice를 구현했는데, 좀 더 세분화된 어노테이션들도 존재한다.
그 어노테이션들에 대해서 한번 알아보자.
@Before
joinPoint.proceed()Advice의 코드에는 반드시 이러한 실행 코드가 들어간다. 이는 타겟이 되는 메서드를 실행하는 것을 의미하는 것이기 때문이다.
여기서 @Before는 joinPoint가 실행되기 전에 들어갈 부가 기능에 대해서 정의할 수 있도록 하는 역할을 한다.
@AfterReturning
joinPoint가 정상적으로 실행된 후, 실행시킬 부가 기능을 정의할 수 있다.
@AfterThrowing
joinPoint가 실행되다가 에러를 던진 경우 실행시킬 부가 기능을 정의할 수 있다.
에러를 로깅하는 것과 같은 기능이 들어갈 수 있을 것이다.
@After
jointPoint의 실행 성공 여부와 무관하게, joinPoint가 실행된 후 실행시킬 부가 기능을 정의할 수 있다.
try-catch-finally문에서 finally와 같은 역할이라고 볼 수 있다.
📒 포인트컷 지시자의 종류
@Pointcut("execution(* *..*Service.*(..))")예제 코드에서는 execution이라는 포인트컷 지시자만을 사용했었는데, 이번에는 execution을 포함해서 좀 더 다양한 유형의 지시자들을 알아보도록 하겠다.
execution
가장 많이 사용되는 지시자이다.
within
@Pointcut("within(hello.springaop.aop.order.OrderService)")표현식에 해당하는 클래스를 JoinPoint로 지정해서, 그 안에 모든 메서드가 프록시 대상이 된다.
args
@Pointcut("args(String, ..)")특정 클래스가 인자로 넘어온 경우를 JoinPoint로 지정할 수 있다.
@target, @within
@Pointcut("@target(hello.springaop.aop.annotation.SomeAnnotation)")@Pointcut("@within(hello.springaop.aop.annotation.SomeAnnotation)")두 지시자 모두, 특정 어노테이션이 붙어 있는 클래스가 JoinPoint로 지정된다.
@target은 대상으로 지정된 모든 메서드가 프록시 대상이 된느 것이고, @within은 어노테이션이 붙은 클래스의 메서드만 프록시의 대상이 된다.
즉, @target은 부모 클래스에게 상속받은 메서드까지 프록시의 대상이 되는 것이다.
@annotation
@Pointcut("@annotation(hello.springaop.aop.annotation.SomeAnnotation)")@annotation은 특정 어노테이션이 붙어 있는 메서드가 JoinPoint로 지정된다.
@args
@Pointcut("@args(hello.springaop.aop.annotation.SomeAnnotation)")어떤 메서드의 인자로 전달 받은 인스턴스의 타입에 어노테이션이 붙어 있는 경우 그 메서드가 JoinPoint로 지정된다.
bean
@Pointcut("bean(orderService) || bean(*Repository)")AsspectJ의 스펙은 아니고, 스프링 전용 지시자이다.
Bean의 이름으로 JoinPoint를 설정할 수 있도록 해주는 지시자이다.
this, target
@Pointcut("this(hello.springaop.order.OrderService)")@Pointcut("target(hello.springaop.order.OrderService)")this와 target 지시자 모두 하나의 클래스만을 JoinPoint의 대상으로 지정할 수 있다.
this는 스프링 Bean으로 등록되어 있는 프록시 객체를 대상으로 지정할 수 있고, target은 프록시가 적용된 실제 객체를 대상으로 지정할 수 있다.
☕ 마무리
이번 글을 통해서 스프링 AOP의 다양한 구현 방식과 다양한 문법들에 대해서 알아보았다.
다음 글에서는 스프링 AOP를 사용하면서 주의해야할 점들을 정리해보록 하겠다.
Shout out to 김영한! 🙏